|
|

PIX Firewall provides firewall and network translation services. This guide describes how to install, upgrade, and configure PIX Firewall.
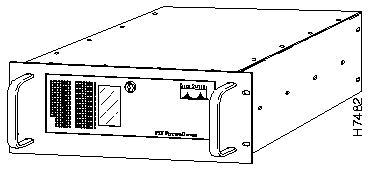
Cisco Systems' PIX (Private Internet Exchange) Firewall provides full firewall protection that completely conceals the architecture of an internal network from the outside world. PIX Firewall allows secure access to the Internet from within existing private networks and the ability to expand and reconfigure TCP/IP networks without being concerned about a shortage of IP addresses. With PIX Firewall, users can take advantage of larger address classes than they may have been assigned by the Internet's Network Information Center (NIC). PIX Firewall provides this access through its Network Address Translation (NAT) facility as described by RFC 1597.
With the firewall feature, you can eliminate the overhead and risks associated with UNIX-based firewall systems and have complete accounting and logging of all transactions, including attempted break-ins.
PIX Firewall has the following features:
The PIX Firewall contains two Ethernet interfaces, one for the inside, secure network and the other for the outside, unprotected network. Both the inside and outside Ethernet interfaces can listen to RIP routing updates and broadcast a RIP default route.
When packets arrive at the inside Ethernet, the PIX Firewall checks to see if previous packets have come from the inside host. If not, the PIX Firewall creates a dynamic translation slot in its state table. The dynamic translation slot includes the inside IP address and the new globally unique IP address, which is drawn from the virtual network of up to 64K host addresses. PIX Firewall then changes the IP address, the checksums, and other aspects of the packet so they agree, and forwards the packet to the outside Ethernet interface on its way to the Internet.
When a packet arrives at the outside interface, it must first pass the PIX Firewall Adaptive Security criteria (refer to the next section for more information). If the packet passes the security tests, PIX Firewall removes the destination IP address, and the internal IP address is inserted in its place. The packet is forwarded to the inside interface.
Dynamic translation slots are useful for desktop machines that do not need constant addresses on the Internet. Inside network hosts with IP addresses not registered with the NIC (Network Information Center) can directly access the Internet with standard TCP/IP software on the desktop. No special client software is needed.
Another class of address translation on the PIX Firewall is static translation. Static translation effectively moves an internal unregistered host into the virtual network in the PIX Firewall. This is useful for internal machines that need to be addressed from the outside Internet gateways; for example, an SMTP server.
The Adaptive Security (AS) feature applies to the dynamic translation slots and can be applied to static translation slots via the secure flag of the static command. The Adaptive Security algorithm is a very stateful approach to security. Every inbound packet is checked exhaustively against the Adaptive Security algorithm and against connection state information in memory. This stateful approach to security is regarded in the industry as being far more secure than a stateless packet screening approach. Adaptive Security follows these rules:
You can protect static translation slots with Adaptive Security, and you can have exceptions (called conduits) to the previously described rules, which you create with the conduit command. Multiple exceptions may be applied to a single static translation slot (via multiple conduit commands). This lets you permit access from an arbitrary machine, network, or any host on the Internet to the inside host defined by the static translation slot. PIX Firewall handles UDP data transfers in a manner similar to TCP. Special handling allows DNS service, archie, and RealAudio to work securely. PIX Firewall creates UDP connection state information when a UDP packet is sent from the inside network. Response packets resulting from this traffic are accepted if they match the connection state information. The connection state information is deleted after a short period of inactivity.
The PIX Firewall shipping carton contains the following:
Follow these guidelines to ensure general safety:
 | Warning Before working on a system that has an on/off switch, turn OFF the power and unplug the power cord. Refer to the Regulatory Compliance and Safety Information for the Cisco PIX Firewall for more information. |
| Warning Do not touch the power supply when the power cord is connected. For systems with a power switch, line voltages are present within the power supply even when the power switch is off and the power cord is connected. For systems without a power switch, line voltages are present within the power supply when the power cord is connected. Refer to the Regulatory Compliance and Safety Information for the Cisco PIX Firewall for more information. |
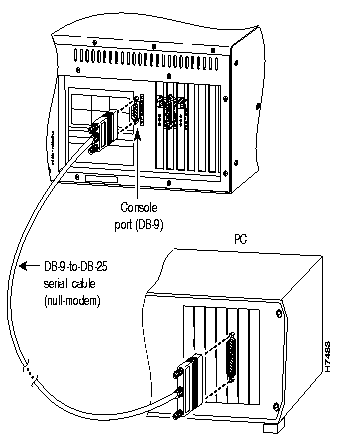
To set up and configure PIX Firewall, you need an ASCII terminal or a computer with serial communications software installed and running. The computer can be a Windows workstation, Macintosh system, or UNIX system.
Install PIX Firewall as follows:

Because PIX Firewall ships with its software already in flash memory, you do not need to insert the system diskette to boot the PIX Firewall.
PIX Bios V2.
Booting Floppy
Loading from Flash
outside Ethernet=3c590 MAC=00:20:af:f8:f3:4b ports=rj,fe
inside  Ethernet=3c590 MAC=00:20:af:f8:f3:3e ports=rj,fe
           P r i v a t e     I n t e r n e t     e X c h a n g e
  -----------------------------------------------------------------------
                      ppppppp     iiiii  xxx    xxx
                      p      p      i     x      x
                      p       p     i      x    x
                      p       p     i       x  x
                      p       p     i        xx
                      p      p      i        xx
                      ppppppp       i       x  x
                      p             i      x    x
                      p             i     x      x
                      p           iiiii  xxx    xxx
  -----------------------------------------------------------------------
                   (c) Cisco Systems, Inc.
Version 2.7.n
Hit return to login
$
The installation is now complete.You are now ready to configure PIX Firewall as described in the section "Configuring the PIX Firewall."
To upgrade from a previous version of PIX Firewall:
You can configure PIX Firewall by entering commands on your console computer or terminal that are similar in context to those you use with Cisco routers.
Use the commands that follow to initially configure your PIX Firewall unit:
$ ifconfig inside ip_address netmask mask link auto up
$ ifconfig outside ip_address netmask mask link auto up
$ route inside router_ip_address
$ route outside router_ip_address
In lines 1 and 2, the ifconfig command specifies the IP address, optional network mask, and the speed of the Ethernet card depending on what your cards support. If your PIX Firewall unit uses the Intel 10/100 Ethernet card, you can use the auto command to automatically set the card to the network speed.
In lines 3 and 4, the route command specifies the IP address of the inside and outside network routers. If you do not have a router on the inside network, specify the IP address as 0.0.0.0; for example, the command would be as follows:
In line 5, the global command specifies the pool of registered IP addresses to which the PIX Firewall maps private network addresses.
In line 6, the save command stores the current configuration in flash memory.
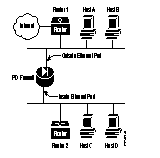
This section relies on the following example network:
Use the steps that follow to confirm that your PIX Firewall is ready for use.
Once your initial configuration is complete and tested, you should tailor the configuration for your site.
The following table lists commands by PIX Firewall features:
| Feature | Command |
|---|---|
Access lists:
|
apply access_list no access_list show access_list show apply |
ARP cache:
|
arp clear arp-cache |
| Configuration, display | save -s
ifconfig (without arguments) show config |
Ethernet interface:
|
ifconfig ifconfig ifstat ifshow |
Flash memory:
|
clear_config restore save |
Floppy diskette:
|
restore -f save -f |
| IP address, set | ifconfig |
Login sessions:
|
kill who |
Private Link:
|
link no link route link_stat |
| Reboot PIX Firewall | reboot |
RIP listening:
|
rip no rip list_rip |
Routing table:
|
route route (without arguments) |
Syslog:
|
ifconfig loghost loghost (without arguments) |
Telnet access:
|
telnet no telnet tcpstat |
| Uptime for PIX Firewall | mem |
Observe the following guidelines during configuration:
Configure PIX Firewall using the commands that follow. You can enter commands from your console computer or terminal.
Inserts a comment in a PIX Firewall configuration file.
: [comment]
| comment | Any text string, terminated by a carriage return. |
The : command is useful for adding remarks to a system configuration file that is stored on a remote system. Comment lines are ignored by PIX Firewall.
Following is a sample configuration file:
: My Simple Configuration
: Here's the outside network
ifconfig outside 10.10.25.1 netmask 255.255.255.0 link bnc up
route outside 10.10.25.2
: Here's the inside network
ifconfig inside 192.168.1.1 netmask 255.255.255.0 link aui up
route inside 192.168.1.2
: And here's the virtual network
global -a 10.10.26.0
: Save this config
save
: End of My Simple Configuration
If you paste the contents of this file into the PIX Firewall console, you get the following configuration (displayed with the save -s command):
$ save -s
: Saved Config
ifconfig outside 10.10.25.1 netmask 255.255.255.0 link bnc up
ifconfig inside 192.168.1.1 netmask 255.255.255.0 link rj up
global -a 10.10.26.1-10.10.26.254
route outside 10.10.25.2
route inside 192.168.1.2
timeout xlate 24:00:00 conn 12:00:00
rip inside default passive
rip outside nopassive
loghost 192.168.1.3
telnet 192.168.1.3
arp -t 600
: version 2.7.n
$
Creates an access list for controlling Internet use. The no access_list command deletes an access list.
access_list num [permit | deny] ipaddr mask [port[-port]] no access_list numWithout arguments, access_list displays the command syntax.
The following command prevents host 192.168.1.49 from accessing the World Wide Web (port 80).
$ access_list 11 deny 192.168.1.49 255.255.255.255 80
$ apply 11 outgoing_src
If your employees are spending too much time examining GIF images on a particular site with two web servers, you can use the following lines to restrict this access:
$ access_list 12 deny 192.168.146.201 255.255.255.255 80
$ access_list 12 deny 192.168.146.202 255.255.255.255 80
$ apply 12 outgoing_dest
apply
show access_list
show apply
Applies an access list to the PIX Firewall.
apply num [outgoing_src | outgoing_dest]| num | An access list number previously created with access_list. |
| outgoing_src | Examines the source address on packets traversing the PIX Firewall for access list enforcement. Limits access for an inside network address. |
| outgoing_dest | Examines the destination address on packets traversing the PIX Firewall for access list enforcement. Limits access to a particular IP address and service on the Internet. |
Without arguments, the apply command displays the command syntax.
The following command prevents network 192.168.1.0 from accessing the World Wide Web (port 80).
$access_list 11 deny 192.168.1.0 255.255.255.255 80$apply 11 outgoing_src
access_list
show apply
Displays and changes ARP (Address Resolution Protocol) cache entries.
To view the ARP cache, use arp without arguments:
arpTo display the ARP cache persistence timer value, use the -l option:
arp [-l]To change the ARP cache persistence timer value, use the -t option:
arp [-t num]| -l | Display the ARP cache persistence timer value. |
| -t num | Change the ARP cache persistence timer. The entries remain in the PIX Firewall ARP cache for num seconds. The minimum timer value is 30 seconds and the maximum is 4,000,000 seconds (just over 46 days). Setting the value to 30 or less, sets the timer to 30 seconds. |
ARP is a low-level TCP/IP protocol that resolves a node's physical address from its IP address through an ARP request asking the node with a particular IP address to send back its physical address.
The following example shows the ARP cache entries for the inside and outside networks:
$ arp
Inside:
192.168.1.2 at 08:00:20:0b:3a:32
192.168.1.3 at 08:00:20:1d:5b:43
Outside:
10.10.25.2 at 08:00:20:09:6f:71
10.10.25.3 at 08:00:20:0a:5e:64
10.10.25.4 at 08:00:20:0b:3c:71
$
The following example shows that the ARP cache persistence timer value is 600 seconds:
$ arp -l
arp -t 600
$
In this example, the ARP cache persistence timer value is changed to 60 seconds:
$ arp -t 60
$ arp -l
arp -t 60
Erases the current configuration stored in flash memory.
clear_configThe clear_config command erases the configuration information stored in flash memory.
Following is an example of using the clear_config command:
$ clear_config
Cleared saved config;  interfaces down
You must now reboot to clear ram config
$
restore
save
Adds and removes conduits to static translations.
conduit global_ip protocol:ip-addr/bits-port no conduit global_ip protocol:ip-addr/bits-portThe conduit command creates an exception to the PIX Firewall Adaptive Security mechanism, which lets you permit connections from outside the PIX Firewall to hosts on the inside network. Conduits exist on the static translation slots and can be added with the conduit command or through the last parameter of the static command. The conduit command is the recommended method. The no conduit command removes the conduit you specify.
If a conduit is specified as, for example: conduit 192.1.1.1 tcp:192.1.2.2/32-0, the host 192.1.2.2 can access the inside host that is mapped to the global address 192.1.1.1 on any TCP port. The same syntax applies for UDP.
The following pair of commands enables only SMTP communication between the UNIX gateway host (10.10.25.10) and an SMTP server on the inside network (192.168.1.49):
$ static -a 10.10.26.147 192.168.1.49 secure
$ conduit 10.10.26.147 tcp:10.10.25.10/32-25
To remove the last conduit, issue the following:
$ no conduit 10.10.26.147 tcp:10.10.25.10/32-25
static
Ends the PIX Firewall session.
exitThe exit command ends a PIX Firewall session. After issuing the exit command on the serial console, a password: prompt appears. No further PIX Firewall commands are accepted until the system password is correctly entered. If the exit command is used on a Telnet session to the PIX Firewall, the Telnet session is closed.
$ exit
password:
passwd
Adds global network addresses.
global [-ar] ip[-ip]| -a | Add IP addresses to the PIX Firewall virtual network. |
| -r | Remove IP addresses from the PIX Firewall virtual network. |
| ip[-ip] | One or more virtual network IP addresses to add or remove. You can enter a range of IP addresses by separating the starting and ending addresses with a hyphen. Specifying a zero in the last octet is the same as specifying an IP address range of n.n.n.1-n.n.n.254 and appears in the save -s output with the range form. |
Configuring the PIX Firewall requires you to specify at least two global IP addresses with the global command. PIX Firewall uses the global addresses to assign a virtual IP address to a connection. When a connection ends, the global address returns to the available pool. If the outside network connects with the Internet, each IP address you specify as a global must be registered with the NIC (Network Information Center). The phrases global network and virtual network are synonymous in this document.
The minimum number of IP addresses you must add to the global pool is 2; for example, 10.10.26.10-10.10.26.11. The maximum is 1 class B network worth of IP addresses. It is not valid to add 1 address; for example, global -a 10.10.26.20.
If you are using the same subnet and want to share it between the outside network and the PIX Firewall virtual network, the PIX Firewall causes a proxy-arp for the global pool on the outside network. If you are using global networks that are disjoint from the outside network address, be certain that the networking equipment and computers have a routing table entry for the global network with a next hop of the outside interface of the PIX Firewall.
$ global -a 10.10.26.0
$
$ global -a 10.10.26.5-10.10.26.254
$
static
Lists available commands.
helpThe help command displays a brief description of each user command.
$ help
|
access_list arp conduit global ifconfig ifstat link list_rip mem reboot rip save static telnet trace who $ | - create access list
- show arp tables - modify static conduits - enter global addresses - configure interface - show interface status - establish private link - show PIX RIP table - PIX memory information - reboot PIX - adjust RIP behavior - save configuration - make static translation - assign telnet host - icmp packet trace - show PIX users | apply
clear_config exit help ifshow kill link_stat loghost passwd restore route show tcpstat timeout version xlate | - apply access list
- erase flash config - logout - this listing - show interface summary - terminate login sessions - show link status - enter addr for loghost - assign password - reload configuration - enter default routes - show <sub-command> - show tcp connections - adjust resource timeout - show software version - show xlate/conn tables |
Configures the interface; specify without arguments to list the current configuration.
ifconfig ifconfig [inside|outside] [ip_address] [netmask mask] [link type] [up|down]ifconfig without arguments displays the current configuration of both network interfaces.
Specify IP addresses and network masks in dotted-decimal notation.
$ ifconfig inside 192.168.1.1 netmask 255.255.255.0 link auto up
$ ifconfig outside 10.10.1.1 netmask 255.255.255.0 link auto up
$ ifconfig
ifconfig outside 10.10.1.1 netmask 255.255.255.0 link auto up
ifconfig inside 192.168.1.1 netmask 255.255.255.0 link auto up
$
$ ifconfig outside down
$ ifconfig
ifconfig outside 10.10.1.1 netmask 255.255.255.0 link auto down
ifconfig inside 192.168.1.1 netmask 255.255.255.0 link auto up
$
View PIX Firewall system information
ifshowThe ifshow command displays cumulative system statistics for the PIX Firewall.
$ ifshow
Outside Ethernet is down, line protocol is down
  Hardware is type Ethernet, address is 00:a0:24:76:c5:99
  MTU 1500 bytes, BW 10000 Kbit
        0 packets input, 0 bytes, 0 no buffer
        Received 0 broadcasts, 0 runts, 0 giants
        0 input errors, 0 CRC, 0 frame, 0 overrun, 0 ignored, 0 abort
        0 packets output, 0 bytes, 0 underruns
Inside Ethernet is down, line protocol is down
  Hardware is type Ethernet, address is 00:a0:24:78:12:31
  MTU 1500 bytes, BW 10000 Kbit
        0 packets input, 0 bytes, 0 no buffer
        Received 0 broadcasts, 0 runts, 0 giants
        0 input errors, 0 CRC, 0 frame, 0 overrun, 0 ignored, 0 abort
        0 packets output, 0 bytes, 0 underruns
$
Displays interface statistics.
ifstatThe ifstat command displays cumulative statistics for the inside and outside Ethernet interfaces of the PIX Firewall.
| $ ifstat
unit outside: inside: $ |
dropped 0 0 |
incomplete 0 0 |
crc 0 0 |
overrun 0 0 |
oversized 0 0 |
runt 0 0 |
framing 0 0 |
Terminates login sessions to the PIX Firewall.
kill tty_id| tty_id | The tty_id is the session number shown in the output of the who command. |
kill terminates PIX Firewall administration sessions that are established via the console and through Telnet.
$ who
1: From 192.168.1.3
0: On console
$ kill 1
$ who
0: On console
$
who
telnet
Establishes an encrypted PIX Firewall Private Link. Use no link to remove a link entry from the local PIX Firewall.
link local_global remote_global key no link local_global remote_global key| local_global | The IP address from the global pool that is associated with the link command. The encrypted packet will be encapsulated in a UDP frame with a source IP of local_global. |
| remote_global | This is the IP address for the remote PIX Firewall and is the global address on that PIX Firewall to send UDP frames to. The encrypted packet will be encapsulated in a UDP frame with a destination IP address of remote_global. |
| key | The 56-bit key to seed the encryption chip. This key must be the same at each end of an encrypted link. The key consists of decimal or hexadecimal numbers. If you specify a hexadecimal key, precede it with 0x; for example, 0xFADEBAC. Select a unique key that is difficult to guess. |
The link command creates an encrypted path between Private Link equipped PIX Firewall units.
The PIX Firewall Private Link consists of an encryption card and software that permits PIX Firewall units to provide encrypted communications across an unsecure network such as the Internet. This optional feature is available to domestic customer sites.
Private Link allows up to 64 PIX Firewall units to communicate in a secure fashion across a public network (usually the Internet). At least two PIX Firewall units are required along with the hardware/software option to use this feature.
Private Link works by checking packets that arrive at the PIX Firewall inside interface. If a route link previously created by the route link command exists that matches the destination network address, the packet is encrypted and encapsulated in a UDP frame. The UDP frame has a destination address of remote_global and a source address of local_global and will have a destination port of 1123. When the packet arrives at the remote PIX Firewall unit, the data in the packet is decrypted and then sent through the inside interface to the original IP address specified. No translation takes place on packets that traverse the PIX Firewall Private Link. The addressing and data remains completely unchanged.
You can manage remote PIX Firewall units through the Private Link interface.
To configure a Private Link, refer to the following example: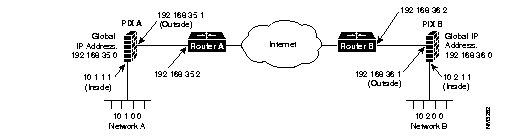
Before configuring Private Link, you would initially configure the systems using the five standard commands. To configure PIX Firewall A, use these commands:
$ ifconfig inside 10.1.1.1 netmask 255.255.255.0 link auto up
$ ifconfig outside 192.168.35.1 netmask 255.255.255.0 link auto up
$ global -a 192.168.35.0
$ route inside 10.1.1.2
$ route outside 192.168.35.2
To initially configure PIX Firewall B, use these commands:
$ ifconfig inside 10.2.1.1 netmask 255.255.255.0 link auto up
$ ifconfig outside 192.168.36.1 netmask 255.255.255.0 link auto up
$ global -a 192.168.36.0
$ route inside 10.2.1.2
$ route outside 192.168.36.2
When you configure a Private Link, follow these steps:
On PIX Firewall A, you would enter these two commands to configure the Private Link:
$ 	link 192.168.35.1 192.168.36.1 0xFADEBAC
$ route link 10.2.0.0 255.255.0.0 192.158.36.1
On PIX Firewall B, you would enter:
$ link 192.168.36.1 192.168.35.1 0xFADEBAC
$ route link 10.1.0.0 255.255.0.0 192.168.35.1
The first argument of each link command specifies the source address for all encrypted packets. The second argument specifies the destination address. The third argument is the encryption key.
The first argument of each route link command specifies the network address served by the remote PIX Firewall. The next argument specifies the network mask, and the last argument specifies the same destination address you specified in the link command.
route link
link_stat
Shows the status of PIX Firewall Private Links.
link_statlink_stat shows the number of frames passed through a PIX Firewall Private Link since the boot time.
$ link_stat
10.1.0.1->10.2.0.1 15043904 out, 7948217 in
link
route
Displays the current RIP table.
list_ripThe RIP table contains the following columns:
interface destination gateway hop_count seconds
The interface is either in or out. The destination and gateway show their respective IP addresses, and the hop count shows the number of local hops before data enters the network.
The last column indicates the number of seconds until the routing information in the RIP table entry expires.
$ list_rip
in 192.168.2.0 192.168.1.2 1 249
in 192.168.3.0 192.168.1.2 1 249
$
rip
Specifies the IP address of the SYSLOG logging system.
loghost [ip_address]| ip_address | The IP address of the logging host machine. |
loghost without arguments displays the current loghost IP address. Disable logging with the loghost 0.0.0.0 command.
PIX Firewall generates SYSLOG messages for system events, such as security alerts and resource depletion. SYSLOG messages may be used to create email alerts and log files, or be displayed on the console of a designated host using UNIX SYSLOG conventions. The loghost machine must be on the internal network.
PIX Firewall sends SYSLOG messages to document the following events:
Logging is enabled by configuring the PIX with the IP address of the loghost. A Windows WinSock version of syslogd can also work, but it logs everything to one file, not separate files like the UNIX model. A public domain version for Windows is available from ftp.translation.com.
To configure a UNIX system to accept SYSLOG messages:
# mkdir /var/log/pix
# touch /var/log/pix/system
# touch /var/log/pix/resource
# touch /var/log/pix/security
# touch /var/log/pix/acct
# A.S. violations
local4.crit      /var/log/pix/security
# resource depletion
local5.err       /var/log/pix/resource
# boot/login messages
local6.notice   /var/log/pix/system
# accounting information
local7.info     /var/log/pix/acct
This configuration directs PIX Firewall SYSLOG message to four separate files, one for each category. Alternatively, if you want the message sent to the loghost console or emailed to a system administrator, refer to the syslog.conf(5) manual page.
Entries in /etc/syslog.conf must obey these rules:
# cat /etc/syslog.pid
92
# kill -HUP 92
The first command lists the SYSLOG process ID. This number may vary by system. The second command sends SYSLOG the HUP signal to cause it to restart.
$ loghost 192.168.1.3
$ loghost
loghost 192.168.1.3
$
Examples of PIX Firewall SYSLOG messages resemble the following:
Oct 15 12:55:03 pix-in PIX out of connections!
Oct 15 12:54:28 pix-in conn end faddr 192.168.42.42 fport 4457 gaddr 10.10.10.1 laddr 10.10.10.2
Oct 15 13:04:02 pix-in deny tcp out 192.168.96.14 in 10.10.10.42 flags SYN ACK
Oct 15 13:37:44 pix-in conns 16384 conns_used 0 xlate 254 xlate_used 1
Oct 15 13:47:21 pix-in PIX logged in from 10.10.42.112
Displays the current PIX Firewall system memory usage.
memThe mem command displays the current PIX Firewall system memory usage, showing the current resources in use, remaining, and those used since reboot.
| Field | Description |
|---|---|
| Memory | RAM utilization of PIX Firewall system |
| Xlate | translation slots utilization - addresses from global pool |
| Conn | connection slots utilization - a count of TCP connections through PIX Firewall |
| Block | system memory blocks utilization |
| Conduit | conduit resource utilization |
| Link | PIX Firewall Private Link utilization |
| Path | count of route link commands in the system |
| Uptime | Hours:Minutes:Seconds of time since PIX Firewall has booted |
$ mem
          in use       remain        most used
Memory  :  3830K        3338K         3830K
Xlate   :     1          253             1
Conn    :             1        255                   256
Block   :     5          324            18
Conduit :     8         4088             8
Link    :     1           63             1
Path    :     1          255             1
Uptime  : 432:29:05
$
Assigns a password to the PIX Firewall system.
passwd [password] [-]| password | Assigns password for all future logins to PIX Firewall. |
| - | Removes password. The PIX Firewall now does not require a password for login. |
passwd assigns or changes the PIX Firewall password for future console sessions. The password can be up to 14 printable characters.
$ passwd xyzzy
$ passwd
passwd xyzzy
$ passwd -
$ passwd
$
exit
Reboots the PIX Firewall.
rebootThe reboot command shuts down the PIX Firewall system and restarts it. If there is a PIX Firewall system diskette in the floppy drive, the system reboots from the diskette. If there is no diskette in the floppy drive, the system reboots from flash memory. The PIX Firewall prompts you to determine if you want to overwrite the flash memory configuration from floppy after loading the floppy image. If you want to upgrade the system software, press y within 15 seconds. The PIX Firewall then upgrades the system software. If you do not type anything, the PIX Firewall reboots from flash memory and operates normally.
$ reboot
Rebooting....
PIX Firewall Bios V2.7.n
Booting Floppy
...................................
Restores the PIX Firewall configuration from flash memory or floppy diskette.
restore [-fs]| -f | Restores the system configuration from the floppy diskette. |
| -s | Displays the system configuration currently stored in the flash memory. |
restore without any arguments restores the system configuration from flash memory.
$ restore -s
: Saved Config
ifconfig outside 10.10.25.1 netmask 255.255.255.0 link bnc up
ifconfig inside 192.168.1.1 netmask 255.255.255.0 link rj up
route outside 10.10.25.2
route inside 192.168.1.2
timeout xlate 24:00:00 conn 12:00:00
rip inside default passive
rip outside nopassive
loghost 192.168.1.3
telnet 192.168.1.3
arp -t 600
: version 2.7.n
$
save
clear_config
Changes or displays RIP settings.
rip [inside|outside] [nodefault|default] [passive|nopassive]rip without arguments displays the current RIP settings.
RIP default broadcast is possible on either the inside or outside interface.
The rip default passive command causes default broadcasts from the outside interface to appear in the routing table if the outside router is broadcasting a default route.
$ rip
rip inside nodefault passive
rip outside nopassive
$ rip inside default
$ rip
rip inside default passive
rip outside nopassive
$
list_rip
Sets the network default route and paths for Private Link. The no form of this command removes the specified route entry.
route inside|outside destination gateway metric no route inside|outside destination route inside|outside ip_address route link dest_net net_mask remote_global no route link dest_net net_mask remote_global| inside|outside | Sets the network default route and path for either the inside or outside interface. |
| ip_address | IP address of the default route for the network attached to that interface. |
| link | This keyword means the following arguments affect packets destined for a PIX Firewall Private Link. |
| dest_net | The destination network on the inside interface of the remote PIX Firewall of a Private Link. |
| net_mask | Specifies a subnet mask to apply to dest_net. |
| remote_global | IP address in the global pool of the remote PIX Firewall in a Private Link environment. |
| destination | Specifies a destination network for a static route. |
| gateway | Specifies the next hop for a static route. Note that the gateway's IP address must be directly attached to the PIX Firewall. |
| metric | Specifies the routing metric for a static route. |
route without arguments displays the IP addresses of the default routes for both inside and outside networks and any paths for link commands.
Refer to the link command description for more information on Private Link.
$ route outside 10.10.25.2
$ route inside 192.168.1.2
$ route link 192.168.100.0 255.255.255.0 10.10.27.1
$ route
route outside 10.10.25.2
route inside 192.168.1.2
route link 192.168.100.0 255.255.255.0 10.10.27.1
$
$ no route link 192.168.100.0 255.255.255.0 10.10.27.1
$ route
route outside 10.10.25.2
route inside 192.168.1.2
link
link_stat
Saves or displays current configuration.
save [-sf]| -f | Saves the current configuration to the floppy diskette. |
| -s | Displays the current configuration to the console screen. |
save without arguments saves the configuration data to the flash memory.
$ save -s
: Saved Config
ifconfig outside 10.10.25.1 netmask 255.255.255.0 link bnc up
ifconfig inside 192.168.1.1 netmask 255.255.255.0 link rj up
global -a 10.10.26.1-10.10.26.254
route outside 10.10.25.2
route inside 192.168.1.2
timeout xlate 24:00:00 conn 12:00:00
rip inside default passive
rip outside nopassive
telnet 192.168.33.4
loghost 192.168.1.3
arp -t 600
: version 2.7.n
$
restore
clear_config
Shows list information.
show list_name| list_name | Displays PIX Firewall system information. |
show without arguments displays the lists that can be shown. show config is the same as the save -s or ifconfig (without arguments) commands.
The following commands show the access lists on the PIX Firewall:
$ show access_list
 11 permit 10.10.204.3 255.255.255.0 23
 12 deny 172.146.201 255.255.255.255 80
 12 deny 172.216.146.202 255.255.255.255 80
$ show access_list 12
 12 deny 10.10.146.201 255.255.255.255 80
 12 deny 10.10.146.202 255.255.255.255 80
The following command shows the apply list:
$ show apply
outgoing_src :  11
outgoing_dest:  12
access_list
apply
Reserves a local-to-global address translation table entry.
static [-ar] global_ip local_ip [secure] [protocol:ip-addr/bits-port]| -a | Adds a static IP address to the system configuration. |
| -r | Removes a static address from the system configuration. |
| global_ip | The registered IP address to be used from the global pool. |
| local_ip | The local IP address from the inside network. |
| secure | Enables Adaptive Security (AS) for this translation entry. |
| protocol:ip-addr/ bits-port | On secure static translations, you may permit incoming connections by creating a conduit as follows:
|
The static command creates a permanent mapping (static translation slot) between a local IP address and a global IP address in the virtual pool. A static address is a permanent mapping from one of the global, registered IP addresses to a local IP address inside the private network. Static addresses are recommended for internal network service hosts, such as an SMTP server. Note that Adaptive Security is not enabled unless the secure flag is explicitly specified.
Although it is possible to add conduits to the static translation on the static command line, it is recommended to add and remove conduits using the conduit command.
The following pair of commands enables TCP SMTP communication between the UNIX gateway host (10.10.25.10) on the outside network and an SMTP gateway on the inside network (192.168.1.49):
$ static -a 10.10.26.147 192.168.1.49 secure
$ conduit 10.10.26.147 tcp:10.10.25.10/32-25
For backward compatibility only, the following static command also works:
$ static -a 10.10.26.147 192.168.1.49 secure tcp:10.10.25.10/32-25
To remove the previous static:
$ static -r 10.10.26.147 192.168.1.49 secure tcp:10.10.25.10/32-25
conduit
global
Displays TCP statistics for Telnet sessions.
tcpstatThe tcpstat command displays the PIX Firewall unit's notion of a TCP state for all Telnet sessions.
$ tcpstat
0:192.168.1.1:23 -> 0.0.0.0:0 listen
        snd(0, 0, 0), rcv(0, 1000),
        Flags:
        rto 6000, rt_timer 0, tw_timer 0, cl_timer 0, per_timer 0
        |in| 0, |out| 0
        cwnd 1024
$
telnet
Authorizes IP addresses to able to access the PIX Firewall over your network with Telnet. The no telnet command removes the specified host from the list of those allowed.
telnet ip_address [mask]| ip_address | The IP address or network of a host that is authorized to access the PIX Firewall Telnet management interface. |
| mask | The netmask for the network specified in this Telnet command. This allows multiple machines on a particular IP subnet access to the PIX Firewall management interface. |
telnet without arguments displays the current list of IP addresses authorized to access the PIX Firewall. Use the who command to list which IP addresses are logged into the PIX Firewall. Up to 16 hosts or networks are allowed access to the PIX Firewall, 4 simultaneously.
With Telnet, you can configure the PIX Firewall from the inside network or over Private Link.
Only access the "inside" interface IP address of the PIX Firewall with Telnet.
$ telnet 192.168.1.3 255.255.255.255
$ telnet 192.168.1.4 255.255.255.255
$ telnet 192.168.2.0 255.255.255.0
$ telnet
telnet 192.168.1.3 255.255.255.255
telnet 192.168.1.4 255.255.255.255
telnet 192.168.2.0 255.255.255.0
$ no telnet 192.168.1.3
$ telnet
telnet 192.168.1.4
telnet 192.168.2.0 255.255.255.0
kill
tcpstat
passwd
Sets the maximum idle time for translation and connection slots.
timeout [xlate hh:mm:ss] [conn hh:mm:ss]| xlate hh:mm:ss | Idle time until a translation slot is cleared (default value is 24 hours). |
| conn hh:mm:ss | Idle time until a connection slot is cleared (default value is 12 hours). |
timeout without arguments displays the current timeout settings. TCP connection slots are freed within 30 seconds after a normal connection close sequence. timeout sets the idle time for connection and translation slots. If the connection or translation slot has not been used for the idle time specified, the resource is returned to the free pool. The minimum idle time for both xlate and conn is 5 minutes.
$ timeout
timeout xlate 24:00:00 conn 12:00:00
$ timeout xlate 5:0:0
$ timeout conn 2:0:0
$ timeout
timeout xlate 5:00:00 conn 2:00:00
$ timeout xlate 0:10:0 conn 0:5:0
$ timeout
timeout xlate 0:10:00 conn 0:05:00
$ timeout xlate 0:0:12345
$ timeout
timeout xlate 3:25:45 conn 0:05:00
$
Traces ICMP packets traversing the PIX Firewall.
trace [on|off]| on | Enables tracing of ICMP packets on the PIX Firewall. |
| off | Disables tracing of ICMP packets on the PIX Firewall. |
The trace command without arguments shows the status of tracing on the PIX Firewall (either on or off).
When trace is on, ICMP packets that traverse the PIX Firewall appear on the terminal in real-time. The first IP address shown in each line of the display is that of the outside world host being communicated with, followed by an arrow indicating the direction of packet flow, then the registered IP address that has been dynamically assigned to the private network host by the PIX Firewall. The final address in parenthesis is the IP address on the private network. Be sure to turn the trace option off during normal operation because it impairs performance if left on.
$ trace on
$
16.1.0.2 <- 10.10.26.5 (192.168.1.49)
16.1.0.2 -> 10.10.26.5 (192.168.1.49)
192.48.96.9 -> 10.10.26.251 (192.168.1.2)
192.48.96.9 <- 10.10.26.251 (192.168.1.2)
$ trace off
$
Displays PIX Firewall system software version.
versionThe version command displays the current version of PIX Firewall software.
$ version
: version 2.7.n
$
Shows active administration sessions on PIX Firewall.
whoThe who command shows the PIX Firewall tty_id and IP address of each Telnet client currently logged into the PIX Firewall.
$ who
2: From 192.168.2.2
1: From 192.168.1.3
0: On console
$
kill
telnet
Displays current translation and connection slot information.
xlate [-x | -l local_ip | -g global_ip | -u]| -x | Shows only the translation slot information. |
| -l local_ip | Shows the translation and connection slot information for a particular [local_ip] address. |
| -g global_ip | Shows the translation and connection slot information for a particular [global_ip] address. |
| -u | Displays the UDP connection state information. |
xlate displays the current translation and connection slot information.
The lines that are flush on the left margin are the translation slots. The translation slot information contains both the global and local addresses (global addresses are from the virtual pool added using the global command. The Local address is the address from the inside LAN). The indented lines display information about connection slots that are associated with the above translation slot. The information includes the outside IP address and port number, the inside IP address and port number, idle time, and number of bytes transferred on a per-TCP-connection basis. The xlate command is a snapshot of system resources when the command is executed.
$ xlate
$ xlate
Global 10.10.26.3 Local 192.168.1.2
  out 16.1.0.2-23 in 192.168.1.2-3538 idle 0:00:21 Bytes 96
Global 10.10.26.254 Local 192.168.1.4
  out 192.100.81.100-23 in 192.168.1.4-1182 idle 0:00:42 Bytes 1032
$ xlate -x
Global 10.10.26.3 Local 192.168.1.2
Global 10.10.26.254 Local 192.168.1.4
$ xlate -l 192.168.1.4
Global 10.10.26.254 Local 192.168.1.4
  out 192.100.81.100-23 in 192.168.1.4-1182 idle 0:00:44 Bytes 1032
$ xlate -g 10.10.26.3
Global 10.10.26.3 Local 192.168.1.2
  out 16.1.0.2-23 in 192.168.1.2-3538 idle 0:00:24 Bytes 96
|
|