|
|

This configuration note contains the following information for installing and configuring the router card (WS-X3011):
The WS-X3011 router card must have software release 11.28 installed to fully support the WS-X3011 card. Cards with software release 11.0(11) can support the WS-X3011 card; however, the card will be identified as a Cisco 2503 unit instead of as a WS-X3011card. For best results, upgrade to release 11.28 if your card is running a previous release. Your switch must be running software release 2.0(1) or higher.
Figure 1 shows the router card (WS-X3011).

The specifications of the router card are listed in Table 1.
| Description | Specification |
|---|---|
| Processor | 20-MHz Motorola 68EC030 |
| Memory | 8-MB (minimum) dynamic random-access memory (DRAM) for main memory and shared memory |
| NVRAM | 32-KB nonvolatile random-access memory (NVRAM) for storing configuration information |
| Flash | 8-MB (minimum) flash memory for running the Cisco IOS software |
| Interfaces | 1 Ethernet (IEEE1 802.3) (Internal)
2 Synchronous serial2 (DB-60) 1 ISDN BRI (RJ-45)3 |
| Safety | UL 1950, CSA 22.2-No. 950, Austel TS001, EN 60950, IEC 950 |
| EMI | FCC Part 15 Class A, VCCI Class II, CISPR 22B, EN 55022 Class B, CE Marking, Canadian ICES-003 Class A |
Follow these guidelines to ensure general safety:
Warning 
This warning symbol means danger. You are in a situation that could cause bodily injury. Before you work on any equipment, be aware of the hazards involved with electrical circuitry and be familiar with standard practices for preventing accidents. Refer to the appendix "Translated Safety Warnings" in the Catalyst 3100 Configuration and Installation Guide for translations of the warnings in this document.
| Warning Ultimate disposal of this product should be handled according to all national laws and regulations. (To see translated versions of this warning, refer to the appendix "Translated Safety Warnings" in the Catalyst 3100 Configuration and Installation Guide.) |
Follow these guidelines when working on equipment powered by electricity.
Warning
Before working on equipment that is connected to power lines, remove jewelry (including rings, necklaces, and watches). Metal objects will heat up when connected to power and ground and can cause serious burns or weld the metal object to the terminals. (To see translated versions of this warning, refer to the appendix "Translated Safety Warnings" in the Catalyst 3100 Configuration and Installation Guide.)
Warning
Before working on a chassis or working near power supplies, unplug the power cord on AC units; disconnect the power at the circuit breaker on DC units. (To see translated versions of this warning, refer to the appendix "Translated Safety Warnings" in the Catalyst 3100 Configuration and Installation Guide.)
Electrostatic discharge (ESD) can damage equipment and impair electrical circuitry. It occurs when electronic components are improperly handled and can result in complete or intermittent failures.
Always follow ESD-prevention procedures when removing and replacing components. Ensure that the chassis is electrically connected to earth ground. Wear an ESD-preventive wrist strap, ensuring that it makes good skin contact. Connect the clip to an unpainted surface of the chassis frame to safely channel unwanted ESD voltages to ground. To properly guard against ESD damage and shocks, the wrist strap and cord must operate effectively. If no wrist strap is available, ground yourself by touching the metal part of the chassis.
 | Caution For safety, periodically check the resistance value of the antistatic strap, which should be between 1 to 10 megohms (Mohms). |
When setting up your switch with a router card, consider distance limitations and potential electromagnetic interference (EMI) as defined by the EIA.
The switch has a DB-9 console port that automatically detects baud rate. The default is 9600 baud; other supported baud rates are 1200, 2400, 4800, 19200, 38400, and 57600. Refer to the Catalyst 3100 Installation and Configuration Guide for detailed pin assignments for the cables you can use on the console port
Table 4 and Table 5 and two figures (Figure 2 and Figure 3) detail pin-assignment information for the cables you can use on the console port of the switch.
For a terminal connection, use a null-modem cable or a straight cable (EIA-232) with a null modem adapter attached. Refer to the Catalyst 3100 Configuration and Installation Guide for the EIA-232 cable description.
For a modem connection, use a standard modem (straight) cable.
Use a BRI cable (not included) to connect the router directly to an ISDN port. (See Table 2.)
Table 2 lists the specifications for ISDN BRI cables. Refer to the section "ISDN BRI Port and Cable Pinouts" for pinouts.
| Specification | High-Capacitance Cable | Low-Capacitance Cable |
|---|---|---|
| Resistance (at 96 kHz) | 160 ohms/km | 160 ohms/km |
| Capacitance (at 1 kHz) | 120 nF1/km | 30 nF/km |
| Impedance (96 kHz) | 75 ohms | 150 ohms |
| Wire diameter | 0.024 in. (0.6 mm) | 0.024 in. (0.6 mm) |
| Distance limitation | 32.8 ft (10 m) | 32.8 ft (10 m) |
Before you connect a device to the synchronous serial port (labeled "SERIAL"), you will need to know the following:
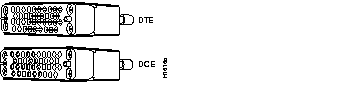
A device that communicates over a synchronous serial interface is either a DTE or DCE device. A DCE device provides a clock signal that paces the communications between the device and the router card. A DTE device does not provide a clock signal. DTE devices usually connect to DCE devices. The documentation that came with the device should indicate whether it is a DTE or DCE device. (Some devices have a jumper to select either mode.) If you cannot find the information in the documentation, refer to Table 3 to help you select the proper device type.
| Device Type | Gender | Typical Devices |
|---|---|---|
| DTE | Male1 | Terminal
PC Router |
| DCE | Female2 | Modem
CSU/DSU3 Multiplexer |
Serial signals can travel a limited distance at any given bit rate; generally, the slower the data rate, the greater the distance. All serial signals are subject to distance limits, beyond which a signal degrades significantly or is completely lost.
Table 4 lists the maximum speeds and distances for EIA/TIA-232 signals. This signaling standard supports unbalanced circuits at signal speeds up to 64 kbps.
| Data Rate (Baud) | Distance (Feet) | Distance (Meters) |
|---|---|---|
| 2400 | 200 | 60 |
| 4800 | 100 | 30 |
| 9600 | 50 | 15 |
| 19200 | 50 | 15 |
| 38400 | 50 | 15 |
| 64000 | 25 | 7.6 |
Balanced drivers allow EIA/TIA-449 signals to travel greater distances than the EIA/TIA-232 signals. Table 5 lists the maximum speeds and distances for EIA/TIA-449, V.35, X.21, and EIA-530 signals.
| Data Rate (Baud) | Distance (Feet) | Distance (Meters) |
|---|---|---|
| 2400 | 4,100 | 1,250 |
| 4800 | 2,050 | 625 |
| 9600 | 1,025 | 312 |
| 19200 | 513 | 156 |
| 38400 | 256 | 78 |
| 56000 | 102 | 31 |
| Caution The EIA/TIA-449 and V.35 interfaces support data rates up to 2.048 Mbps. Exceeding this maximum could result in loss of data and is not recommended. |
The synchronous serial port supports the following signaling standards: EIA/TIA-232, EIA/TIA-449, V.35, X.21, and EIA-530. You can order a DB-60 shielded serial transition cable that has the appropriate connector for the standard you specify. The router end of the shielded serial transition cable has a DB-60 connector, which connects to the serial port on the router card. The other end of the serial transition cable is available with the connector appropriate for the standard you specify. The documentation for the device you want to connect should indicate the standard used for that device. The synchronous serial port can be configured as DTE or DCE (except EIA-530, which is DTE only), depending on the attached cable.
Figure 2 shows the serial transition cables you can connect to the serial port on the router card.
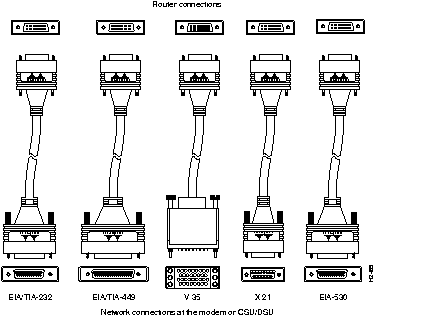
Cisco does not recommend that you attempt to manufacture your own serial cables (because of the small size of the pins on the DB-60 serial connector). To order a cable, refer to the section "Obtaining Service and Support" at the end of this document. To manufacture your own cable, refer to the cable pinouts provided in the section "Cable, Pinout, and Port Specifications."
The EIA/TIA-232 standard supports unbalanced circuits at signal speeds up to 64 kbps. The serial port (labeled "SERIAL") supports synchronous connections. The console and auxiliary ports also use an EIA/TIA-232 connection; however, the console and auxiliary ports support asynchronous connections.
The network end of the EIA/TIA-232 serial transition cable (not included) provides a DB-25 connector, as shown in Figure 3. The end that connects to the serial port on the rear panel of the router has a DB-60 connector. EIA/TIA-232 serial transition cables are available with a DB-25 plug or receptacle in either DTE or DCE mode. To order a cable, refer to the section "Obtaining Service and Support."

The EIA/TIA-449 standard, which supports balanced and unbalanced transmissions, is a faster (up to 2 Mbps faster) version of the EIA/TIA-232 standard and provides more functions and supports transmissions over greater distances.
The network end of the EIA/TIA-449 serial transition cable (not included) provides a DB-37 connector, as shown in Figure 4. The end that connects to the serial port on the router card has a DB-60 connector. EIA/TIA-449 serial transition cables are available with a DB-37 plug or receptacle in either DTE or DCE mode. To order a cable, refer to the section "Obtaining Service and Support" at the end of this document.

The V.35 standard is recommended for speeds up to 48 kbps, although in practice it is used successfully at 4 Mbps.
The network end of the V.35 serial transition cable (not included) provides a standard 34-pin Winchester-type connector, as shown in Figure 5. The end that connects to the serial port on the router card has a DB-60 connector. V.35 cables are available with a standard V.35 plug or receptacle in either DTE or DCE mode. To order a cable, refer to the section "Obtaining Service and Support" at the end of this document.
The X.21 connector uses a 15-pin connector for balanced circuits and is commonly used in the United Kingdom to connect to the public data network. X.21 relocates some of the logic functions to the DTE and DCE interfaces and, as a result, requires fewer circuits and a smaller connector than EIA/TIA-232.
The network end of the X.21 serial transition cable (not included) is a standard DB-15 connector, as shown in Figure 6. The end that connects to the serial port on the router card has a DB-60 connector. X.21 cables are available with a plug or receptacle in either DTE or DCE mode. To order a cable, refer to the section "Obtaining Service and Support" at the end of this document.

The EIA-530 standard, which supports balanced transmission, provides the increased functionality, speed, and distance of EIA/TIA-449 on the smaller, DB-25 connector used for EIA/TIA-232, instead of the 37-pin connector used for EIA/TIA-449. Like EIA/TIA-449, EIA-530 refers to the electrical specifications of EIA/TIA-422 and EIA/TIA-423. Although the specification recommends a maximum speed of 2 Mbps, EIA-530 is used successfully at 4 Mbps or faster speeds over short distances.
The EIA-530 serial transition cable (not included) is available in DTE mode only. The network end of the EIA-530 adapter cable is a standard DB-25 plug commonly used for EIA/TIA-232 connections, as shown in Figure 7. The end that connects to the serial port on the router card has a DB-60 connector. To order a cable, refer to the section "Obtaining Service and Support" at the end of this document.

This section guides you through the installation of the router card and includes the following subsections:
The Cisco configuration guide and command reference publications provide additional software configuration information. These publications are available in the CD ROM package that came with your switch, or you can order printed copies. Refer to the section "Ordering Documentation" at the end of this document.
Installation requires some tools and equipment that are not provided as standard equipment with the router card. Following are the tools and parts required to install the router card:
You must have a console connected to the switch to configure the router card after it is installed. If a console is connected to the switch already, proceed to the next section; otherwise, perform the following steps to connect a console to the switch:
Step 1 Connect the switch to a PC or other DTE (Data Terminal Equipment) device using a straight, 25-pin to 9-pin EIA (RS)-232 cable and a null modem adapter. Refer to the section "Preparing to Connect to a Network" in this document for a description of the cables and adapters.
Step 2 Connect the EIA-232 cable to the DB-9 connector (console) on the switch. The male DB-9 connector on the switch is configured as a DTE device.
Step 3 Use Table 6 to set the configuration parameters on the console for communication with the switch.
| Console | Default |
| Baud rate | 2400, 4800, 9600, 19.2K, 38.4K, 57.6K (default: 9600) |
| Parity | None |
| Data bits | 8 |
| Stop bits | 1 |
| Handshaking | None |
| Terminal emulation | VT100 |
| Duplex | Full |
| Soft flow control (XON/XOFF) | Off (input and output) |
| Hard flow control (RTS/CTS) | Off |
| Autobaud upon break | On |
| Line wrap | On |
| Screen scroll | On |
| CR translation | CR |
| Backspace (BS) translation | Destructive |
| Break length (milliseconds) | 350 |
| Enquiry (ENQ) | Off |
| EGA/VGA true underline | Off |
| Terminal width | 890 |
| ANSI 7 or 8 bit commands | 7 |
| Microsoft Windows', terminal emulation | Disable the "Use Function, Arrow, and Ctrl Keys for Windows" option, located in the Terminal Preference menu |
Step 4 Power on the switch.
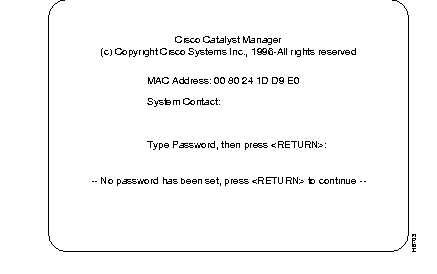
At power on (cold boot), the switch performs a series of self-test diagnostics that verify that hardware components are functioning. The diagnostic self-test for the switch displays two different screens (lists of information), depending on whether you perform a cold boot (power on cycle with full diagnostics), or a warm boot (a reset without full diagnostics). For detailed information about these diagnostics, refer to the Catalyst 3X00 Installation and Configuration Guide.
At the end of the boot messages, you should be prompted to press RETURN. The Greeting screen of the switch Console Manager should appear, as shown in Figure 8.
If the diagnostic list does not appear, or the list is garbled, refer to the "Encountering Communication Problems" section in this document..
Step 5 At the Greeting screen, press RETURN to enter the Main menu. The contents of the Main menu, instructions for setting a Password and all information within the menus and sub-menus are described in the Catalyst 3X00 Installation and Configuration Guide.
Step 6 Access the router card command-line interface by pressing Ctrl-R from the switch Main menu.
To adjust the baud rates between the console and the switch if the diagnostic list does not appear or the list is garbled, use the Autobaud routine within the switch. Press the Reset button on the switch and wait for the internal diagnosis to finish (the Diagnostic LED goes off). Resetting the switch resets the Autobaud routine to its default mode of enabled.
The console command keys that initiate the Autobaud routine depend on the type of console. Four of the command keys are RETURN, the combination keys ALT-B, the BREAK key, or ESCAPE.
After the DIAG LED goes out, at the console press one of the command keys repeatedly. If there is no response, wait several seconds and again press it repeatedly. If there is still no response, perform the same routine using the other command keys.
If none of the command keys work but there is garbled output on the screen, push the SysReq button on the switch. As soon as garbled characters appear, press the console's RETURN key twice in rapid succession. (Again, try the other command keys as necessary.)
If there is still a problem, perform the following steps:
Step 1 Check all of the cable connections.
Step 2 Check the baud rate at the console's setup screen; make sure the baud rate is set to the default, 9600.
Step 3 Set the console baud rate to different values up or down, pressing RETURN after each selection.
Step 4 If you are using a terminal emulation program, try exiting the program and restarting.
Step 5 If you still can not get the connection to work, contact a support person.
This section explains how to connect the router card to your network. The synchronous serial and ISDN ports are used to connect the router to a WAN.
The cables required to connect the router card to a network are not provided with the card. For ordering information, refer to the section "Obtaining Service and Support" in this document. For cable pinouts, refer to the section "Cable, Pinout, and Port Specifications" in this document.
Take the following steps to connect your router card to a network:
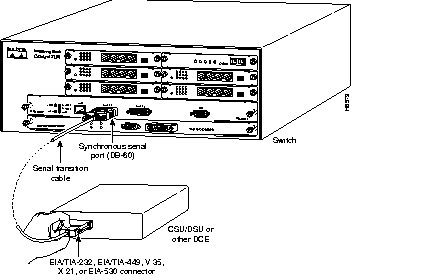
Step 1 If you will be using AutoInstall to configure the router card, connect the synchronous serial port (DB-60) to a CSU/DSU or other DCE device, as shown in Figure 9. If you do not plan to use AutoInstall (or you are not sure what AutoInstall is) do not connect the WAN cable until after you have configured the router card.
If a WAN cable is connected when you power ON the switch with the router card for the first time, it will attempt to run AutoInstall to download a configuration file from a TFTP server. It can take several minutes for the router card to determine that the necessary files are not in place for AutoInstall to begin. For more information about AutoInstall, refer to the Cisco IOS configuration guide, which is available in the CD ROM package that came with your switch.
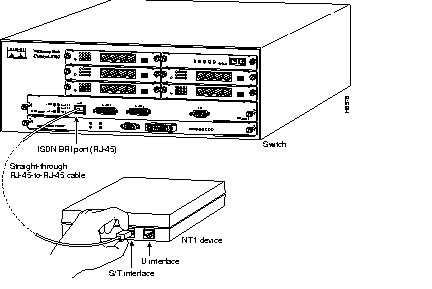
Step 2 Connect the ISDN BRI port (RJ-45) to an NT1 device. (See Figure 10.)
Step 3 After you have installed the router card, connect the power cable to the switch and the power source and then power it ON. (If the switch does not power ON, refer to the appropriate manual for the switch.)
This section describes how to configure the router card and contains the following topics:
This section provides minimum software configuration information. Detailed software configuration information is available in the Cisco IOS configuration guide and command reference publications. These publications are available in the CD ROM package or you can order printed copies. Refer to the section "Ordering Documentation" at the end of this document.
To access the router card commad-line interface (CLI), perform the following steps:
Step 1 Connect a console terminal to the console port on your switch. (For more information, refer to the "Connecting the Console" section in this document.)
Step 2 Power ON the switch. The switch Greeting screen appears (Figure 8).
Step 3 Access the router card CLI by pressing Ctrl-R from the switch Main menu.
After about 30 seconds, messages are displayed, corresponding to the Cisco IOS release and feature set you selected. The screen displays in this section are for reference only and might not exactly reflect the screen displays on your console. Following is an example of the messages displayed:
Each time you power on the switch, the router card performs the following boot sequence:
The first time you boot your switch with the router card, you need to configure the router interfaces and then save the configuration to a file in NVRAM.
You can configure the router card using one of the following procedures. Each procedure is described in detail later in this section:
 | Time Saver Before you begin to configure the router card, obtain the correct network addresses from your system administrator or consult your network plan to determine the correct addresses. |
Use the procedure that best fits the needs of your network configuration and Cisco IOS software experience level. If you will be using configuration mode or AutoInstall to configure the router card, and you would like a quick review of the Cisco IOS software, refer to the section "Cisco IOS Software Basics" later in this chapter. Otherwise, proceed with the next section, "Using the System Configuration Dialog."
If you do not plan to use AutoInstall, make sure all the WAN cables are disconnected from the router card. This will prevent the router card from attempting to run the AutoInstall process. The router card will attempt to run AutoInstall whenever you power it ON, if there is a WAN connection on both ends and the router card does not have a configuration file stored in NVRAM. The router card can take several minutes to determine that AutoInstall is not connected to a remote TCP/IP host.
If your router card does not have a configuration (setup) file and you are not using AutoInstall, the router card will automatically start the setup command facility. An interactive dialog called the System Configuration Dialog appears on the console screen. This dialog helps you navigate through the configuration process, prompting you for the configuration information necessary for the router card to operate.
Many prompts in the System Configuration Dialog include default answers, which are included in square brackets following the displayed question. To accept a default answer, press Return; otherwise, enter your response.
This section gives an example configuration using the System Configuration Dialog. When you are configuring your router card, respond as appropriate for your network.
At any time during the System Configuration Dialog, you can request help by typing a question mark (?) at a prompt.
Before you begin to configure the router card, obtain the correct addresses and the number of bits in the subnet field (if applicable) of the router ports from you system administrator.
Take the following steps to configure the router card using the System Configuration Dialog:
Step 1 When you are prompted to enter the initial dialog, enter yes or press Return to enter the initial dialog mode:
yes
Step 2 When the System Configuration Dialog asks whether you want to view the current interface summary, press Return or enter yes:
Step 3 Configure the global parameters. A typical configuration follows:
Next, you are prompted to enter an enable secret password. There are two types of privileged-level passwords:
The enable password is used when the enable secret password does not exist.
For maximum security, be sure the passwords are different. If you enter the same password for both, the router card will accept your entry, but will display a warning message indicating that you should enter a different password.
Step 4 Enter an enable secret password:
pail
Step 5 Enter the enable and virtual terminal passwords:
shovel
vterm1
Step 6 Press Return to accept Simple Network Management Protocol (SNMP) management, or enter no to refuse it:
no
Step 7 In the following example, the router card is configured for AppleTalk, Internet Protocol (IP), and Internetwork Packet Exchange (IPX). Configure the appropriate protocols for your router card:
yes
yes
15
yes
Step 8 Enter the ISDN BRI switch type. The switch type appropriate for the router depends on the ISDN service provider's equipment. Table 7 lists the ISDN switch types.
basic-5ess
| Country | ISDN Switch Type | Description |
|---|---|---|
| Australia | basic-ts013 | Australian TS013 switches |
| Europe | basic-1tr6 | German 1TR6 ISDN switches |
| basic-nwnet3 | Norwegian NET3 ISDN switches (phase 1) | |
| basic-net3 | NET3 ISDN switches (UK and others) | |
| basic-net5 | NET5 switches (UK and Europe) | |
| vn2 | French VN2 ISDN switches | |
| vn3 | French VN3 ISDN switches | |
| Japan | ntt | Japanese NTT ISDN switches |
| New Zealand | basic-nznet3 | New Zealand NET3 switches |
| North America | basic-5ess | AT&T basic rate switches |
| basic-dms100 | NT DMS-100 basic rate switches | |
| basic-ni1 | National ISDN-1 switches |
The ISDN BRI interface is configured to allow connection to ISDN WANs. Determine which protocols to support on the ISDN BRI interface and enter the appropriate responses. In the following example, the router card is configured for IP, AppleTalk, and IPX:
Configuring interface BRI0: Is this interface in use? [yes] Configure IP on this interface? [yes] IP address for this interface:172.16.71.1Number of bits in subnet field [0]:8Class B network is 172.16.0.0, 8 subnet bits; mask is 255.255.255.0 Configure AppleTalk on this interface? [no]:yesExtended AppleTalk network? [no]:yesAppleTalk starting cable range [0]:1AppleTalk ending cable range [1]:2AppleTalk zone name [myzone]: AppleTalk additional zone name:otherzoneAppleTalk additional zone name: Configure IPX on this interface? [no]:yesIPX network number [1]:B000
After you have completed the entire initial router card interface configuration using the System Configuration Dialog, proceed to the section "Configuring ISDN" later in this document for additional ISDN configuration information.
The Ethernet interface is configured to allow connection to a LAN. To configure the interface parameters, you need to know your Ethernet interface network addresses.
Take the following steps to configure an Ethernet interface to allow communication over a LAN:
Step 1 Press Return or enter yes to configure the LAN interface:
Step 2 Determine which protocols you want to support on the LAN interface and enter the appropriate responses. In the following example, the system is configured for IP, AppleTalk, and IPX:
172.16.72.1
8
yes
yes
3
3
otherzone
yes
B001
The synchronous serial interfaces are configured to allow connection to WANs. After the Ethernet port has been configured, configure the synchronous serial interfaces as follows:
Step 1 Press Return or enter yes to configure serial port 0:
Step 2 Determine which protocols you want on the synchronous serial interface and enter the appropriate responses. In the following example, the system is configured for IP, AppleTalk, and IPX:
172.16.73.1
yes
4
4
ZZ Serial
yes
B002
Step 3 Configure the second synchronous serial interface, for example, as follows:
172.16.74.2
yes
5
5
ZZ Serial
yes
B003
Step 4 The configuration you entered is now displayed and you are asked if you want to use the displayed configuration. If you enter no, you will lose the configuration information you just entered and you can begin the configuration again. If you enter yes, the configuration will be entered and saved in the startup configuration:
yes
Proceed to the section "Cisco IOS Software Basics" for more information about the Cisco IOS software.
You can configure the router card manually if you do not want to use AutoInstall or the prompt-driven System Configuration Dialog. Perform the following steps to configure the router card manually:
Step 1 When you are prompted to enter the initial dialog, enter no to enter the normal operating mode of the router card:
no
Step 2 After a few seconds you will see the user EXEC prompt (Router>). Enter the enable command to enter privileged EXEC mode. You can only make configuration changes in privileged EXEC mode:
enable
The prompt changes to the privileged EXEC prompt:
Step 3 Enter the configure terminal command at the privileged EXEC prompt to enter configuration mode:
configure terminal
You can now enter any changes you want to the configuration. You will probably want to perform the following tasks:
(a) Assign a host name for the router using the hostname command.
(b) Enter an enable secret password using the enable password command.
(c) Assign addresses to the interfaces using the protocol address command.
(d) Specify which protocols to support on the interfaces.
Refer to the Cisco IOS configuration guide and command reference publications for more information about the commands you can use to configure the router card. These manuals are available on CD ROM and in printed form. Refer to the section "Ordering Documentation" at the end of this document for information about how to obtain these documents.
Step 4 When you are finished configuring the router card, enter the exit command until you return to the privileged EXEC prompt (Router#).
Step 5 To save the configuration changes to NVRAM, enter the copy running-config startup-config command at the privileged EXEC prompt.
copy running-config startup-config
The router card will now boot with the configuration you entered.
The AutoInstall process is designed to configure the router card automatically after connection to your WAN. In order for AutoInstall to work properly, a Transmission Control Protocol/Internet Protocol (TCP/IP) host on your network must be preconfigured to provide the required configuration files. The TCP/IP host may exist anywhere on the network as long as the following two conditions are maintained:
This functionality is coordinated by your system administrator at the site where the TCP/IP host is located. You should not attempt to use AutoInstall unless the required files have been provided on the TCP/IP host. For more information, refer to the Cisco IOS configuration guide and command reference publications. These manuals are available on CD ROM and in printed form. Refer to the section "Ordering Documentation" at the end of this document for information about how to obtain these documents.
After powering on the switch, the router interface loads the operating system image from Flash memory. If the remote end of the WAN connection is connected and properly configured, the AutoInstall process begins automatically.
After AutoInstall completes successfully, enter the copy running-config startup-config command in privileged EXEC mode to write the configuration data to the router card's NVRAM:
Router# copy running-config startup-config
The configuration settings created by the AutoInstall process are saved in the router card's NVRAM. If you do not save the configuration to NVRAM, the configuration will be lost the next time you reload the router card.
Some parameters are configurable from the switch Main Menu. These parameters govern the bootup process, router reset, and router flow control and provide access to the router command line interface. To configure these parameters follow these steps:
Step 1 From the switch Main Menu, select Configuration>Router Configuration. The Router Configuration menu appears, as shown in Figure 11.
Step 2 At the Enter a port in box, port format (e.g. 2,15) prompt, enter the number of the Catalyst box containing the router card and the number of the port.
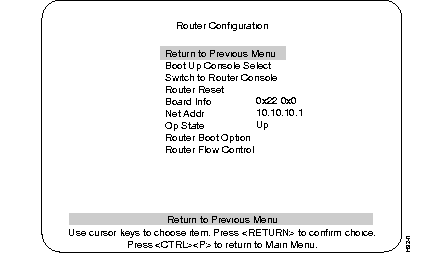
The options on the menu are as follows:
This section provides you with some basic information about the Cisco IOS software, and includes the following topics:
The Cisco IOS software provides access to several different command modes. Each command mode provides a different group of related commands.
For security purposes, the Cisco IOS software provides two levels of access to commands: user and privileged. The unprivileged user mode is called user EXEC mode. The privileged mode is called privileged EXEC mode and requires a password. The commands available in user EXEC mode are a subset of the commands available in privileged EXEC mode.
Table 8 describes some of the most commonly used modes, how to enter the modes, and the resulting prompts. Each prompt helps you identify which mode you are in and, therefore, which commands are available to you.
| Mode of Operation | Usage | How to Enter the Mode | Prompt |
|---|---|---|---|
| User EXEC | User EXEC commands allow you to connect to remote devices, change terminal settings on a temporary basis, perform basic tests, and list system information. The EXEC commands available at the user level are a subset of those available at the privileged level. | Log in. | Router> |
| Privileged EXEC | Privileged EXEC commands set operating parameters. The privileged commands include those contained in user EXEC mode, and also the configure command through which you can access the remaining command modes. Privileged EXEC mode also includes high-level testing commands, such as debug. | From user EXEC mode, enter the enable EXEC command.
| Router# |
| Global configuration | Global configuration commands apply to features that affect the system as a whole. | From global configuration mode, enter the configure privileged EXEC command. | Router(config)# |
| Interface configuration
| Interface configuration commands modify the operation of an interface such as an Ethernet or serial port. Many features are enabled on a per-interface basis. Interface configuration commands always follow an interface global configuration command, which defines the interface type. | From global configuration mode, enter the interface type number command. For example, enter the interface serial 0 command to configure the serial 0 interface.
| Router(config-if)#
|
| ROM monitor
| ROM monitor commands are used to perform low-level diagnostics. You can also use the ROM monitor commands to recover from a system failure and stop the boot process in a specific operating environment.1
| From privileged EXEC mode, enter the reload EXEC command. Press Break during the first 60 seconds while the system is booting.
| >
|
Almost every configuration command also has a no form. In general, use the no form to disable a feature or function. Use the command without the keyword no to reenable a disabled feature or to enable a feature that is disabled by default. For example, IP routing is enabled by default. To disable IP routing, enter the no ip routing command. Enter ip routing to reenable it. The Cisco IOS software command reference publication provides the complete syntax for the configuration commands and describes what the no form of a command does. This manual is available on CD ROM and in printed form. Refer to the section "Ordering Documentation" at the end of this document for information about how to obtain these documents.
In any command mode, you can get a list of available commands by entering a question mark (?).
Router> ?
To obtain a list of commands that begin with a particular character sequence, type in those characters followed immediately by the question mark (?). Do not include a space. This form of help is called word help, because it completes a word for you.
Router# co?
configure  connect  copy
To list keywords or arguments, enter a question mark in place of a keyword or argument. Include a space before the question mark. This form of help is called command syntax help because it reminds you which keywords or arguments are applicable based on the command, keywords, and arguments you have already entered.
Router# configure ?
  memory    Configure from NV memory
  network   Configure from a TFTP network host
  terminal  Configure from the terminal
  <cr>
You can also abbreviate commands and keywords by entering just enough characters to make the command unique from other commands. For example, you can abbreviate the show command to sh.
Any time you make changes to the router configuration, you must save the changes to memory. If you do not, they will be lost in the event of a system reload or power outage. There are two types of configuration files: the running (current operating) configuration and the startup configuration. The running configuration is stored in RAM; the startup configuration is stored in NVRAM.
To display the current running configuration, enter the show running-config command. Enter the copy running-config startup-config command to save the current running configuration to the startup configuration file in NVRAM.
Router>enableRouter#copy running-config startup-config
To display the startup configuration, enter the show startup-config command. Enter the copy startup-config running-config command to write the startup configuration to the running configuration:
Router>enableRouter#copy startup-config running-config
To erase both configuration files (and start over), enter the write erase and reload commands:
Router>enableRouter#write eraseRouter#reload
| Caution This command sequence will erase the entire router configuration in RAM and NVRAM and reload the router. |
This section describes a typical ISDN configuration for one or two B channels. In the examples that follow, the BRI port is configured for IP routing, Challenge Handshake Authentication Protocol (CHAP), and Point-to-Point Protocol (PPP) encapsulation.
For your reference, an example configuration follows in the next section, "Example ISDN Configuration." You may want to refer to it during this procedure.
Take the following steps to configure the router for a basic ISDN PPP connection on a single B channel or two B channels, substituting the correct addresses and host names as appropriate for your network:
Step 1 Enter privileged EXEC mode:
enable
enablepassword
Step 2 Enter the configure terminal command to enter global configuration mode. Then enter the host name of the current router, the user name of the target router (the router to which packets will be sent), and the password that the routers will use for CHAP caller identification. The user name and password are case sensitive and must match the host name and password of the target router (even if it is not a Cisco router):
configure terminal
hostname currentrouter
username targetrouter password abc
Step 3 Enter the isdn switch-type command to configure the ISDN switch type (such as basic-5ess, basic-dms100, or basic-ni1). Refer to Table 7, earlier in this chapter, for a list of ISDN switch types supported.
isdn switch-type switch-type
Step 4 Configure the IP address and subnet mask for the LAN interface:
interface type port_number
ip address ipaddress subnetmask
Step 5 Configure the IP address and subnet mask for the BRI interface:
interface bri port_number
ip address ipaddress subnetmask
Step 6 If you are using an ISDN switch type (such as Basic NI1 or DMS-100) that requires a service profile identifier (SPID), enter the SPID and optional local directory number (LDN). The SPID and LDN are assigned by the ISDN service provider.
The SPID is a number that identifies the service to which you have subscribed. A SPID is not required for AT&T 5ESS service configured for a point-to-point connection.
The LDN is an optional seven-digit phone number for the channel.
isdn spid1 SPID_no [LDN]
isdn spid2 SPID_no [LDN]
Step 7 Configure the router for PPP encapsulation and CHAP authentication:
encapsulation ppp
ppp authentication chap
Step 8 Enter the load-threshold or ppp multilink command to set up a second B channel.
For bandwidth on demand, enter the load-threshold command to set the ISDN load threshold. The load threshold determines the percentage of network load at which the second ISDN B channel is activated. The value ranges from 1 to 255 (100 percent). In the following example, the value of 128 means that when the first B channel reaches 50 percent of its bandwidth capacity (128 equals 50 percent of 255), the second B channel will activate to assist with the bandwidth load:
dialer load-threshold 128
Alternatively, you can use Multilink PPP to activate a second ISDN line. For Multilink PPP to work, the router must be running Cisco IOS Release 11.0(3) or a later release, and both the current router and target router must support Multilink PPP:
ppp multilink
Step 9 Enter the dialer map command to provide the information necessary to successfully route packets to the target router. Do not use periods or hyphens when entering the number to dial:
dialer map protocol targetBRIport_ipaddress name targetrouter_number
Step 10 Enter the dialer-group command to specify the number of the group permitted to access the router:
dialer-group groupnumber
Step 11 Enter the exit command to exit interface configuration mode.
Step 12 Enter the dialer list command to specify the groups and protocols permitted to access the router:
dialer-list groupnumber protocol protocol_type permit
Step 13 Configure a static route to allow connection to the target router's LAN. Enter the IP address and subnet mask of the target router's LAN interface, and the IP address of the target router's BRI port:
ip route targetrouter_ipnetwork subnetmask targetBRIport_ipaddress
Step 14 Enter the exit command to exit global configuration mode.
Step 15 Enter the copy running-config startup-config command to save the configuration to NVRAM.
For your reference, Table 9 shows an example configuration for a Catalyst 3100 switch with a router card installed, and a Cisco router using IP over ISDN. In the example, the router card (branch1) is at a remote site and the target router (main1) is at a central site.
| Configuration for the Current Router | Configuration for the Target Router |
|---|---|
Router> enable
password: pail1
Router# config term
Router (config)# hostname branch1
branch1 (config)# username main1 password secret1
branch1 (config)# isdn switch-type basic-dms100
branch1 (config)# interface Ethernet 0
branch1 (config)# ip address 172.16.80.170 255.255.255.0
branch1 (config-if)# interface bri 0
branch1 (config-if)# ip address 172.16.71.1 255.255.255.0
branch1 (config-if)# isdn spid1 415988488501 9884885
branch1 (config-if)# isdn spid2 415988488602 9884886
branch1 (config-if)# dialer load-threshold 128
branch1 (config-if)# ppp multilink
branch1 (config-if)# encapsulation ppp
branch1 (config-if)# ppp authentication chap
branch1 (config-if)# dialer map ip 172.16.71.2 name main1 9884883
branch1 (config-if)# dialer group 1
branch1 (config-if)# exit
branch1 (config)# dialer-list 1 protocol ip permit
branch1 (config-if)# ip route 172.16.0.0 255.255.0.0 172.16.71.2
branch1 (config-if)# ip route 0.0.0.0 172.16.71.2
branch1 (config)# exit
branch1# copy running-config startup-config
branch1#
| Router> enable
password: pail2
Router# config term
Router (config)# hostname main1
main1 (config)# username branch1 password secret1
main1 (config)# isdn switch-type basic-dms100
main1 (config)# interface Ethernet 0
main1 (config)# ip address 172.16.64.190 255.255.255.0
main1 (config-if)# interface bri 0
main1 (config-if)# ip address 172.16.71.2 255.255.255.0
main1 (config-if)# isdn spid1 415988488201 9884882
main1 (config-if)# isdn spid2 415988488302 9884883
main1 (config-if)# dialer load-threshold 128
main1 (config-if)# ppp multilink
main1 (config-if)# encapsulation ppp
main1 (config-if)# ppp authentication chap
main1 (config-if)# dialer map ip 172.16.71.1 name branch1 9884885
main1 (config-if)# dialer group 1
main1 (config-if)# exit
main1 (config)# dialer-list 1 protocol ip permit
main1 (config-if)# ip route 172.16.80.0 255.255.0.0 172.16.71.1
main1 (config)# exit
main1# copy running-config startup-config
main1#
|
After you have installed and configured the router, you can use the following commands in user EXEC mode to verify network connectivity:
If there is a problem with network connectivity, refer to the section "Reading the LEDs" later in this document. If there is still a problem, check the switch configuration. Refer to the Catalyst 3X00 Installation and Configuration Guide.
For more information about router software configuration, refer to the Cisco IOS configuration guide and command reference publications. These publications are available in the CD ROM that accompanied your switch, or you can order printed copies. Refer to the section "Ordering Documentation" at the end of this document.
The LEDs indicate the current operating condition of the router card. You can observe the LEDs, note any fault condition that the router card is encountering, and then contact your system administrator or customer service, if necessary. For information about how to contact customer service, refer to the section "Obtaining Service and Support."
Figure 12 shows the location of the LEDs on the router card. The LEDs are labeled and indicate activity on a port by flickering. When there is heavy activity on a port, the LED might be ON constantly. If an LED is not ON when the port is active and the cable is connected correctly, there might be a problem with the port.
This section contains the following information:
The illustrations and tables in this section provide assembly drawings and pinouts for the EIA-530 DCE, EIA/TIA-232, EIA/TIA-449, V.35, and X.21 DTE and DCE cables, which are used with the synchronous serial WAN port (labeled "SERIAL").
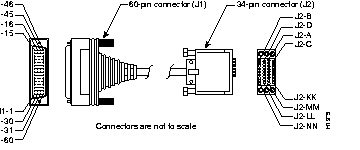
Figure 13 shows the EIA-530 serial cable assembly, and Table 10 lists the pinouts. Arrows indicate signal direction: --> indicates DTE to DCE, and <-- indicates DCE to DTE.
| 60 Pin | Signal | 25 Pin | Signal | Direction DTE DCE1 |
|---|---|---|---|---|
| J1-11
J1-12 | TxD/RxD+
TxD/RxD- | J2-2
J2-14 | BA(A), TxD+
BA(B), TxD- | -->
--> |
| J1-28
J1-27 | RxD/TxD+
RxD/TxD- | J2-3
J2-16 | BB(A), RxD+
BB(B), RxD- | <--
<-- |
| J1-9
J1-10 | RTS/CTS+
RTS/CTS- | J2-4
J2-19 | CA(A), RTS+
CA(B), RTS- | -->
--> |
| J1-1
J1-2 | CTS/RTS+
CTS/RTS- | J2-5
J2-13 | CB(A), CTS+
CB(B), CTS- | <--
<-- |
| J1-3
J1-4 | DSR/DTR+
DSR/DTR- | J2-6
J2-22 | CC(A), DSR+
CC(B), DSR- | <--
<-- |
| J1-46
J1-47 | Shield_GND
MODE_2 | J2-1
- | Shield
- | Shorted |
| J1-48
J1-49 | GND
MODE_1 | -
- | -
- | Shorted |
| J1-5
J1-6 | DCD/DCD+
DCD/DCD- | J2-8
J2-10 | CF(A), DCD+
CF(B), DCD- | <--
<-- |
| J1-24
J1-23 | TxC/RxC+
TxC/RxC- | J2-15
J2-12 | DB(A), TxC+
DB(B), TxC- | <--
<-- |
| J1-26
J1-25 | RxC/TxCE+
RxC/TxCE- | J2-17
J2-9 | DD(A), RxC+
DD(B), RxC- | <--
<-- |
| J1-44
J1-45 | LL/DCD
Circuit_GND | J2-18
J2-7 | LL
Circuit_ GND | -->
- |
| J1-7
J1-8 | DTR/DSR+
DTR/DSR- | J2-20
J2-23 | CD(A), DTR+
CD(B), DTR- | -->
--> |
| J1-13
J1-14 | TxCE/TxC+
TxCE/TxC- | J2-24
J2-11 | DA(A), TxCE+
DA(B), TxCE- | -->
--> |
| J1-51
J1-52 | GND
MODE_DCE | --
-- | --
-- | Shorted |
Figure 14 shows the EIA/TIA-232 cable assembly. Table 11 lists the DTE pinouts. Table 12 lists the DCE pinouts. Arrows indicate signal direction: --> indicates DTE to DCE, and <-- indicates DCE to DTE.
| 60 Pin | Signal | Description | Direction | 25 Pin | Signal |
|---|---|---|---|---|---|
| J1-50
J1-51 J1-52 | MODE_0
GND MODE_DCE | Shorting group | - | - | - |
| J1-46 | Shield GND | Single | - | J2-1 | Shield GND |
| J1-41
Shield | TxD/RxD
- | Twisted pair no. 5 | -->
- | J2-2
Shield | TxD
- |
| J1-36
Shield | RxD/TxD
- | Twisted pair no. 9 | <--
- | J2-3
Shield | RxD
- |
| J1-42
Shield | RTS/CTS
- | Twisted pair no. 4 | -->
- | J2-4
Shield | RTS
- |
| J1-35
Shield | CTS/RTS
- | Twisted pair no. 10 | <--
- | J2-5
Shield | CTS
- |
| J1-34
Shield | DSR/DTR
- | Twisted pair no. 11 | <--
- | J2-6
Shield | DSR
- |
| J1-45
Shield | Circuit GND
- | Twisted pair no. 1 | -
- | J2-7
Shield | Circuit GND
- |
| J1-33
Shield | DCD/LL
- | Twisted pair no. 12 | <--
- | J2-8
Shield | DCD
- |
| J1-37
Shield | TxC/NIL
- | Twisted pair no. 8 | <--
- | J2-15
Shield | TxC
- |
| J1-38
Shield | RxC/TxCE
- | Twisted pair no. 7 | <--
- | J2-17
Shield | RxC
- |
| J1-44
Shield | LL/DCD
- | Twisted pair no. 2 | -->
- | J2-18
Shield | LTST
- |
| J1-43
Shield | DTR/DSR
- | Twisted pair no. 3 | -->
- | J2-20
Shield | DTR
- |
| J1-39
Shield | TxCE/TxC
- | Twisted pair no. 6 | -->
- | J2-24
Shield | TxCE
- |
| 60 Pin | Signal | Description | Direction | 25 Pin | Signal |
|---|---|---|---|---|---|
| J1-50
J1-51 | MODE_0
GND | Shorting group | -
| -
| -
|
| J1-46 | Shield GND | Single | - | J2-1 | Shield GND |
| J1-36
Shield | RxD/TxD
- | Twisted pair no. 9 | <--
- | J2-2
Shield | TxD
- |
| J1-41
Shield | TxD/RxD
- | Twisted pair no. 5 | -->
- | J2-3
Shield | RxD
- |
| J1-35
Shield | CTS/RTS
- | Twisted pair no. 10 | <--
- | J2-4
Shield | RTS
- |
| J1-42
Shield | RTS/CTS
- | Twisted pair no. 4 | -->
- | J2-5
Shield | CTS
- |
| J1-43
Shield | DTR/DSR
- | Twisted pair no. 3 | -->
- | J2-6
Shield | DSR
- |
| J1-45
Shield | Circuit GND
- | Twisted pair no. 1 | -
- | J2-7
Shield | Circuit GND |
| J1-44
Shield | LL/DCD
- | Twisted pair no. 2 | -->
- | J2-8
Shield | DCD
- |
| J1-39
Shield | TxCE/TxC
- | Twisted pair no. 7 | -->
- | J2-15
Shield | TxC
- |
| J1-40
Shield | NIL/RxC
- | Twisted pair no. 6 | -->
- | J2-17
Shield | RxC
- |
| J1-33
Shield | DCD/LL
- | Twisted pair no. 12 | <--
- | J2-18
Shield | LTST
- |
| J1-34
Shield | DSR/DTR
- | Twisted pair no. 11 | <--
- | J2-20
Shield | DTR
- |
| J1-38
Shield | RxC/TxCE
- | Twisted pair no. 8 | <--
- | J2-24
Shield | TxCE
- |
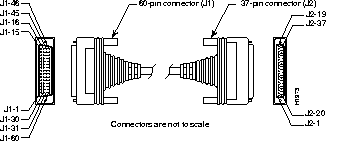
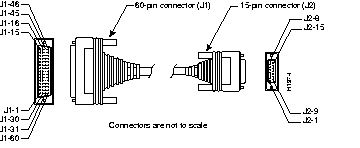
Figure 15 shows the EIA/TIA-449 cable assembly. Table 13 lists the DTE pinouts. Table 14 lists the DCE pinouts. Arrows indicate signal direction: --> indicates DTE to DCE, and <-- indicates DCE to DTE.
| 60 Pin | Signal | Description | Direction | 37 Pin | Signal |
|---|---|---|---|---|---|
| J1-49
J1-48 | MODE_1
GND | Shorting group | - | - | - |
| J1-51
J1-52 | GND
MODE_DCE | Shorting group | - | - | - |
| J1-46 | Shield_GND | Single | _ | J2-1 | Shield GND |
| J1-11
J1-12 | TxD/RxD+
TxD/RxD- | Twisted pair no. 6 | -->
--> | J2-4
J2-22 | SD+
SD- |
| J1-24
J1-23 | TxC/RxC+
TxC/RxC- | Twisted pair no. 9 | <--
<-- | J2-5
J2-23 | ST+
ST- |
| J1-28
J1-27 | RxD/TxD+
RxD/TxD- | Twisted pair no. 11 | <--
<-- | J2-6
J2-24 | RD+
RD- |
| J1-9
J1-10 | RTS/CTS+
RTS/CTS- | Twisted pair no. 5 | -->
--> | J2-7
J2-25 | RS+
RS- |
| J1-26
J1-25 | RxC/TxCE+
RxC/TxCE- | Twisted pair no. 10 | <--
<-- | J2-8
J2-26 | RT+
RT- |
| J1-1
J1-2 | CTS/RTS+
CTS/RTS- | Twisted pair no. 1 | <--
<-- | J2-9
J2-27 | CS+
CS- |
| J1-44
J1-45 | LL/DCD
Circuit_GND | Twisted pair no. 12 | -->
_ | J2-10
J2-37 | LL
SC |
| J1-3
J1-4 | DSR/DTR+
DSR/DTR- | Twisted pair no. 2 | <--
<-- | J2-11
J2-29 | DM+
DM- |
| J1-7
J1-8 | DTR/DSR+
DTR/DSR- | Twisted pair no. 4 | -->
--> | J2-12
J2-30 | TR+
TR- |
| J1-5
J1-6 | DCD/DCD+
DCD/DCD- | Twisted pair no. 3 | <--
<-- | J2-13
J2-31 | RR+
RR- |
| J1-13
J1-14 | TxCE/TxC+
TxCE/TxC- | Twisted pair no. 7 | -->
--> | J2-17
J2-35 | TT+
TT- |
| J1-15
J1-16 | Circuit_GND
Circuit_GND | Twisted pair no. 9 | -
- | J2-19
J2-20 | SG
RC |
| 60 Pin | Signal | Description | Direction | 37 Pin | Signal |
|---|---|---|---|---|---|
| J1-49
J1-48 | MODE_1
GND | Shorting group | - | - | - |
| J1-46 | Shield_GND | Single | - | J2-1 | Shield GND |
| J1-28
J1-27 | RxD/TxD+
RxD/TxD- | Twisted pair no. 11 | <--
<-- | J2-4
J2-22 | SD+
SD- |
| J1-13
J1-14 | TxCE/TxC+
TxCE/TxC- | Twisted pair no. 7 | -->
--> | J2-5
J2-23 | ST+
ST- |
| J1-11
J1-12 | TxD/RxD+
TxD/RxD- | Twisted pair no. 6 | -->
--> | J2-6
J2-24 | RD+
RD- |
| J1-1
J1-2 | CTS/RTS+
CTS/RTS- | Twisted pair no. 1 | <--
<-- | J2-7
J2-25 | RS+
RS- |
| J1-24
J1-23 | TxC/RxC+
TxC/RxC- | Twisted pair no. 9 | -->
--> | J2-8
J2-26 | RT+
RT- |
| J1-9
J1-10 | RTS/CTS+
RTS/CTS- | Twisted pair no. 5 | -->
--> | J2-9
J2-27 | CS+
CS- |
| J1-29
J1-30 | NIL/LL
Circuit_GND | Twisted pair no. 12 | -->
- | J2-10
J2-37 | LL
SC |
| J1-7
J1-8 | DTR/DSR+
DTR/DSR- | Twisted pair no. 4 | -->
--> | J2-11
J2-29 | DM+
DM- |
| J1-3
J1-4 | DSR/DTR+
DSR/DTR- | Twisted pair no. 2 | <--
<-- | J2-12
J2-30 | TR+
TR- |
| J1-5
J1-6 | DCD/DCD+
DCD/DCD- | Twisted pair no. 3 | -->
--> | J2-13
J2-31 | RR+
RR- |
| J1-26
J1-25 | RxC/TxCE+
RxC/TxCE- | Twisted pair no. 10 | <--
<-- | J2-17
J2-35 | TT+
TT- |
| J1-15
J1-16 | Circuit_GND
Circuit_GND | Twisted pair no. 8 | _
_ | J2-19
J2-20 | SG
RC |
Figure 16 shows the V.35 cable assembly. Table 15 lists the DTE pinouts. Table 16 lists the DCE pinouts. Arrows indicate signal direction: --> indicates DTE to DCE, and <-- indicates DCE to DTE.
| 60 Pin | Signal | Description | Direction | 34 Pin | Signal |
|---|---|---|---|---|---|
| J1-49
J1-48 | MODE_1
GND | Shorting group | - | - | - |
| J1-50
J1-51 J1-52 | MODE_0
GND MODE_DCE | Shorting group | - | - | - |
| J1-53
J1-54 J1-55 J1-56 | TxC/NIL
RxC_TxCE RxD/TxD GND | Shorting group | - | - | - |
| J1-46 | Shield_GND | Single | - | J2-A | Frame GND |
| J1-45
Shield | Circuit_GND
- | Twisted pair no. 12 | -
- | J2-B
Shield | Circuit GND
- |
| J1-42
Shield | RTS/CTS
- | Twisted pair no. 9 | -->
- | J2-C
Shield | RTS
- |
| J1-35
Shield | CTS/RTS
- | Twisted pair no. 8 | <--
- | J2-D
Shield | CTS
- |
| J1-34
Shield | DSR/DTR
- | Twisted pair no. 7 | <--
- | J2-E
Shield | DSR
- |
| J1-33
Shield | DCD/LL
- | Twisted pair no. 6 | <--
- | J2-F
Shield | RLSD
- |
| J1-43
Shield | DTR/DSR
- | Twisted pair no. 10 | -->
- | J2-H
Shield | DTR
- |
| J1-44
Shield | LL/DCD
- | Twisted pair no. 11 | -->
- | J2-K
Shield | LT
- |
| J1-18
J1-17 | TxD/RxD+
TxD/RxD- | Twisted pair no. 1 | -->
--> | J2-P
J2-S | SD+
SD- |
| J1-28
J1-27 | RxD/TxD+
RxD/TxD- | Twisted pair no. 5 | <--
<-- | J2-R
J2-T | RD+
RD- |
| J1-20
J1-19 | TxCE/TxC+
TxCE/TxC- | Twisted pair no. 2 | -->
--> | J2-U
J2-W | SCTE+
SCTE- |
| J1-26
J1-25 | RxC/TxCE+
RxC/TxCE- | Twisted pair no. 4 | <--
<-- | J2-V
J2-X | SCR+
SCR- |
| J1-24
J1-23 | TxC/RxC+
TxC/RxC- | Twisted pair no. 3 | <--
<-- | J2-Y
J2-AA | SCT+
SCT- |
| 60 Pin | Signal | Description | Direction | 34 Pin | Signal |
|---|---|---|---|---|---|
| J1-49
J1-48 | MODE_1
GND | Shorting group | - | - | - |
| J1-50
J1-51 | MODE_0
GND | Shorting group | - | - | - |
| J1-53
J1-54 J1-55 J1-56 | TxC/NIL
RxC_TxCE RxD/TxD GND | Shorting group | - | - | - |
| J1-46 | Shield_GND | Single | - | J2-A | Frame GND |
| J1-45
Shield | Circuit_GND
- | Twisted pair no. 12 | -
- | J2-B
Shield | Circuit GND
- |
| J1-35
Shield | CTS/RTS
- | Twisted pair no. 8 | <--
- | J2-C
Shield | RTS
- |
| J1-42
Shield | RTS/CTS
- | Twisted pair no. 9 | -->
- | J2-D
Shield | CTS
- |
| J1-43
Shield | DTR/DSR
- | Twisted pair no. 10 | -->
- | J2-E
Shield | DSR
- |
| J1-44
Shield | LL/DCD
- | Twisted pair no. 11 | -->
- | J2-F
Shield | RLSD
- |
| J1-34
Shield | DSR/DTR
- | Twisted pair no. 7 | <--
- | J2-H
Shield | DTR
- |
| J1-33
Shield | DCD/LL
- | Twisted pair no. 6 | <--
- | J2-K
Shield | LT
- |
| J1-28
J1-27 | RxD/TxD+
RxD/TxD- | Twisted pair no. 5 | <--
<-- | J2-P
J2-S | SD+
SD- |
| J1-18
J1-17 | TxD/RxD+
TxD/RxD- | Twisted pair no. 1 | -->
--> | J2-R
J2-T | RD+
RD- |
| J1-26
J1-25 | RxC/TxCE+
RxC/TxCE- | Twisted pair no. 4 | <--
<-- | J2-U
J2-W | SCTE+
SCTE- |
| J1-22
J1-21 | NIL/RxC+
NIL/RxC- | Twisted pair no. 3 | -->
--> | J2-V
J2-X | SCR+
SCR- |
| J1-20
J1-19 | TxCE/TxC+
TxCE/TxC- | Twisted pair no. 2 | -->
--> | J2-Y
J2-AA | SCT+
SCT- |
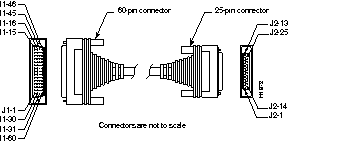
Figure 17 shows the X.21 cable assembly. Table 17 lists the DTE pinouts. Table 18 lists the DCE pinouts. Arrows indicate signal direction: --> indicates DTE to DCE, and <-- indicates DCE to DTE.
| 60 Pin | Signal | Description | Direction | 15 Pin | Signal |
|---|---|---|---|---|---|
| J1-48
J1-47 | GND
MODE_2 | Shorting group | - | - | - |
| J1-51
J1-52 | GND
MODE_DCE | Shorting group | - | - | - |
| J1-46 | Shield_GND | Single | - | J2-1 | Shield GND |
| J1-11
J1-12 | TxD/RxD+
TxD/RxD- | Twisted pair no. 3 | -->
--> | J2-2
J2-9 | Transmit+
Transmit- |
| J1-9
J1-10 | RTS/CTS+
RTS/CTS- | Twisted pair no. 2 | -->
--> | J2-3
J2-10 | Control+
Control- |
| J1-28
J1-27 | RxD/TxD+
RxD/TxD- | Twisted pair no. 6 | <--
<-- | J2-4
J2-11 | Receive+
Receive- |
| J1-1
J1-2 | CTS/RTS+
CTS/RTS- | Twisted pair no. 1 | <--
<-- | J2-5
J2-12 | Indication+
Indication- |
| J1-26
J1-25 | RxC/TxCE+
RxC/TxCE- | Twisted pair no. 5 | <--
<-- | J2-6
J2-13 | Timing+
Timing- |
| J1-15
Shield | Control_GND
- | Twisted pair no. 4 | -
- | J2-8
Shield | Control GND
- |
| 60 Pin | Signal | Description | Direction | 15 Pin | Signal |
|---|---|---|---|---|---|
| J1-48
J1-47 | GND
MODE_2 | Shorting group | - | - | - |
| J1-46 | Shield_GND | Single | - | J2-1 | Shield GND |
| J1-28
J1-27 | RxD/TxD+
RxD/TxD- | Twisted pair no. 6 | <--
<-- | J2-2
J2-9 | Transmit+
Transmit- |
| J1-1
J1-2 | CTS/RTS+
CTS/RTS- | Twisted pair no. 1 | <--
<-- | J2-3
J2-10 | Control+
Control- |
| J1-11
J1-12 | TxD/RxD+
TxD/RxD- | Twisted pair no. 3 | -->
--> | J2-4
J2-11 | Receive+
Receive- |
| J1-9
J1-10 | RTS/CTS+
RTS/CTS- | Twisted pair no. 2 | -->
--> | J2-5
J2-12 | Indication+
Indication- |
| J1-24
J1-23 | TxC/RxC+
TxC/RxC- | Twisted pair no. 4 | -->
--> | J2-6
J2-13 | Timing+
Timing- |
| J1-15
Shield | Control_GND
- | Twisted pair no. 5 | -
- | J2-8
Shield | Control GND
- |
Table 19 lists the ISDN BRI port pinouts. The straight-through RJ-45-to-RJ-45 cable, used to connect to the ISDN BRI port, is not included.
| RJ-45 8 Pin1 | TE2 | NT3 | Polarity |
|---|---|---|---|
| 3 | Transmit | Receive | + |
| 4 | Receive | Transmit | + |
| 5 | Receive | Transmit | - |
| 6 | Transmit | Receive | - |
For service and support for a product purchased from a reseller, contact the reseller. Resellers offer a wide variety of Cisco service and support programs, which are described in the information packet that shipped with your chassis.
For service and support for a product purchased directly from Cisco, use CCO.
CCO is Cisco Systems' primary, real-time support channel. SMARTnet customers and partners can self-register on CCO to obtain additional content and services.
Available 24 hours a day, 7 days a week, CCO provides a wealth of standard and value-added services to Cisco's customers and business partners. CCO services include product information, software updates, release notes, technical tips, the Bug Navigator, configuration notes, brochures, descriptions of service offerings, and download access to public and authorized files.
CCO serves a wide variety of users through two interfaces that are updated and enhanced simultaneously--a character-based version and a multimedia version that resides on the World Wide Web (WWW). The character-based CCO supports Zmodem, Kermit, Xmodem, FTP, and Internet e-mail, and is excellent for quick access to information over lower bandwidths. The WWW version of CCO provides richly formatted documents with photographs, figures, graphics, and video, as well as hyperlinks to related information.
You can access CCO in the following ways:
For a copy of CCO's Frequently Asked Questions (FAQ), contact cco-help@cisco.com. For additional information, contact cco-team@cisco.com.
Please use CCO to obtain general information about Cisco Systems, Cisco products, or upgrades. If CCO is not accessible, contact 800 553-6387, 408 526-7208, or cs-rep@cisco.com.
Documentation for Cisco products is available in three forms: in a CD-ROM package, printed books, and on the World Wide Web. You have the option of subscribing to the CD ROM package through an update service. Or you can order printed documentation at an additional cost. Refer to the information packet included with the router for detailed ordering information. You can also access Cisco documentation on the World Wide Web URL http://www.cisco.com.
The Cisco WS-X3011 router card complies with Part 68 of the FCC rules. On the bottom of this equipment is a label that contains, among other information, the FCC registration number. If requested, this information must be provided to the telephone company.
An FCC compliant cord and modular plug must be used with this equipment, designed to be connected to the telephone network or premises wiring suing a compatible modular jack which is Part 68 compliant.
This equipment cannot be used on telephone company-provided coin service. Connection to Party Line Service is subject to State Tariffs.
If this equipment causes harm to the telephone network, the telephone company will notify you in advance that temporary discontinuance of service may be required. If advance notice isn't practical, the telephone company will notify the customer as soon as possible. Also, you will be advised of your right to file a complaint with the FCC if you believe it is necessary.
The telephone company may make changes in its facilities, equipment, operations, or procedures that could affect the operation of the equipment. If this happens, the telephone company will provide advance notice in order for you to make the necessary modifications in order to maintain uninterrupted service.
If trouble is experienced with this equipment, please contact us for repair and warranty information. If the trouble is causing harm to the telephone network, the telephone company may request you remove the equipment from the network until the problem is resolved.
It is recommended that the customer install an AC surge arrestor in the AC outlet to which this device is connected. This is to avoid damaging the equipment caused by local lightening strikes and other electrical surges.
This equipment uses USOC jacks as follows;
| Model Name | Facility Interface Code | Service Order Code | Jack Type |
|---|---|---|---|
| WS-X3011 | 02IS5 | 6.0N | RJ-48S |
.
|
|