|
|

This chapter describes how to install and configure CiscoWorks software on AIX systems.
Before installing CiscoWorks, you must complete the prerequisite steps described in the "Preparing to Install CiscoWorks" chapter. To install and configure CiscoWorks, you need to perform the following general tasks:
To perform the tasks associated with installing and configuring CiscoWorks, you must log in to your system as the superuser (root). Superusers can perform functions that normal users cannot.
To become the superuser, you must know the root password. In the following examples, the root password is rootpassword.
If you are not logged in, enter the following commands to log in as the superuser:
login:rootPassword:rootpassword
Make sure that you start an X Window Manager session.
The UNIX prompt is a pound sign (#), indicating that you are logged in as the superuser.
If you are already logged in, but not as root, enter the following commands to change your login:
%suPassword:rootpassword
The C shell prompt changes from a percent sign (%) to a pound sign (#), indicating that you are logged in as the superuser.
If you are not upgrading, skip this section and go to "Upgrading or Installing CiscoWorks".
Before you upgrade, you must perform the following tasks:
Since CiscoWorks uses the Sybase database, you must close all database files and shut down your database before starting the backup process.
To shut down the database, perform the following steps:
Step 1 Log in to your system as the superuser.
For information on how to become the superuser, refer to the section "Becoming the Superuser," earlier in this chapter.
Step 2 To ensure that your Sybase environment variable is set, enter the following:
setenv SYBASE $NMSROOT/sybase10
Step 3 Execute the isql binary by entering the following:
$SYBASE/bin/isql -Usa -P sa_password
Enter the password, if you created one, for the Sybase SA account at your site. If you do not supply a password, the script assumes the value for password is null.
After starting isql, the prompt 1> appears.
Step 4 Enter the shutdown command as follows:
shutdown
go
The database shuts down, and the root prompt reappears.
Back up your entire CiscoWorks system, including the $NMSROOT directory, current database(s) and map files, as well as any additional Sybase data files. For information on backing up UNIX files, refer to the UNIX manual pages on tar(1) or cpio(1).
 | Caution To prevent possible data loss, back up your system and database before installing CiscoWorks. |
After you shut down the Sybase database and back up your existing CiscoWorks software, verify that you are running the supported operating systems and network management software versions.
To verify your current operating system, enter uname -a.
To verify your current network management platform versions, start NetView and then select Help>About Open View to view the version number.
If you are not running the supported versions, follow the instructions to upgrade your operating system and the network management platform software. If you are using AIX, follow the instructions in the IBM documentation to upgrade your version of AIX to the appropriate version. After you install your operating system, follow the instructions in your NMS documentation to install NetView, if it is not already installed.
Before you install CiscoWorks from a CD-ROM drive attached to your system or a remote system, connect a CD-ROM drive either to your workstation or to the remote workstation. Then you must use SMIT to mount the local or remote device on the local AIX system.
Retain the device number used by the CD-ROM drive for later use in installing CiscoWorks.After you log in as the superuser, the installation script prompts you to supply the device name of the local or the remote CD-ROM drive, or the name of the remote system and the device name of the remote drive.
The installation and configuration process takes a minimum of 20 to 30 minutes. Depending on your system performance and installation method, installation from a remote CD-ROM drive may take longer than 30 minutes.
| Caution Avoid exposing the CiscoWorks CD-ROM to direct sunlight because it might harm the contents. |
To mount the CD-ROM on the filesystem from a local CD-ROM drive, use SMIT to perform the following steps:
Step 1 Insert the CD-ROM in the drive.
Step 2 Log in as the superuser by entering su and the root password.
Step 3 Start SMIT by entering the following at the command prompt:
smit
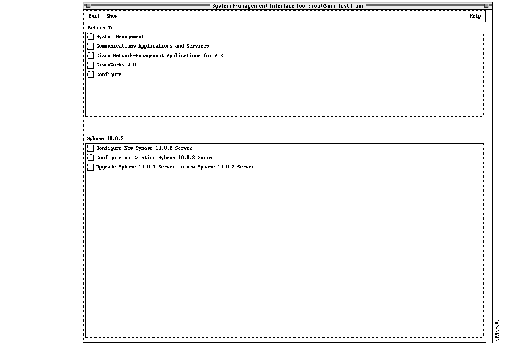
The main SMIT menu, shown in Figure 2-1, appears.
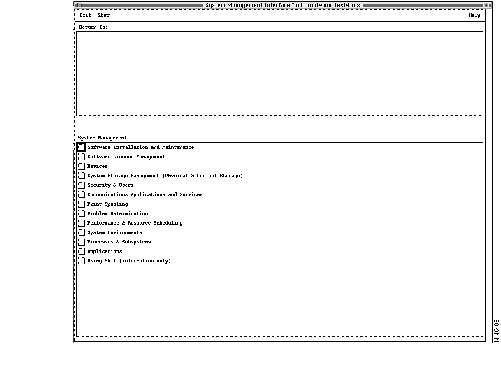
Step 4 From the System Management menu, select System Storage Management (Physical & Logical Storage).
Step 5 Select File Systems.
Step 6 Select Add/Change/Show/Delete File Systems.
Step 7 Select CDROM File Systems.
Step 8 Select Add a CDROM File System.
Step 9 Select the DEVICE name List button and select the device name (such as /dev/cd0).
Step 10 Enter the name of a mount point directory (such as /cdrom) in the Mount point field.
Step 11 Click OK and read the output.
If you have already performed this procedure, or if another device is already mounted on the mount point, the process will fail.
Step 12 Click Done and Cancel.
Step 13 Terminate SMIT by pressing F12 or by clicking Exit SMIT on the Exit menu.
Step 14 Enter the following at the command prompt:
smit mountfs
Step 15 Click the FILE SYSTEM name List button and select a device name (such as /dev/cd0).
Step 16 In the DIRECTORY over which to mount field, enter the name of a mount point directory (such as /cdrom).
Step 17 Click the TYPE of file system List button and select cdrfs as the file system type.
Step 18 Set the Mount as Read-Only System field to yes.
Step 19 Click OK and read the output.
Step 20 Click Done and Cancel.
If you use a CD-ROM drive attached to a remote system, CiscoWorks does not consume disk space on the remote system because the software is copied across the network to the local workstation.
The root .rhosts file on the remote system must contain the host name of your local system and an entry for the user root. Otherwise, you cannot access the remote system to download software from its CD-ROM drive. For more information, refer to the rhosts UNIX manual page.
To install CiscoWorks from a remote host, acquire the appropriate login account to mount the CD-ROM remotely.
To mount the CD-ROM on the local file system from a remote CD-ROM drive, perform the following steps on the remote system:
Step 1 Insert it into the CD-ROM drive.
Step 2 Log in as the superuser.
For details, see "Becoming the Superuser" earlier in this chapter.
Step 3 Start SMIT by entering the following at the command prompt:
smit
The main SMIT menu, shown in Figure 2-1, appears.
Step 4 On the System Management menu, select System Storage Management (Physical & Logical Storage).
Step 5 Select File Systems.
Step 6 Select Add/Change/Show/Delete File Systems.
Step 7 Select CDROM File Systems.
Step 8 Select Add a CDROM File System.
Step 9 Select the DEVICE name List button and select the device name (such as /dev/cd0).
Step 10 Enter the name of a mount point directory (such as/cdrom) in the Mount point field.
Step 11 Click OK and read the output.
If you have already performed this procedure, or if another device is already mounted on the mount point, the process will fail.
Step 12 Click Done and Cancel.
Step 13 Terminate SMIT by pressing F12 or by clicking Exit SMIT on the Exit menu.
Step 14 Enter the following at the command prompt:
smit mountfs
Step 15 Click the FILE SYSTEM name List button and select a device name (such as /dev/cd0).
Step 16 In the DIRECTORY over which to mount field, enter the name of a mount point directory (such as /cdrom).
Step 17 Select the TYPE of file system List button and select cdrfs as the file system type.
Step 18 Set the Mount as Read-Only System field to yes.
Step 19 Click OK and read the output.
Step 20 Click Done and Cancel.
Step 21 Enter smit mknfsexp at the command prompt.
Step 22 Enter the PATHNAME of directory to export (such as /cdrom).
Step 23 Use the arrow keys to change the Mode to Export Directory field to read-only.
Step 24 Enter the appropriate information, if necessary, into any of the other fields.
Step 25 Click OK and read the output.
Step 26 Click Done and Cancel.
Step 27 Terminate SMIT by pressing F12 or by clicking Exit SMIT on the Exit menu.
Perform the following steps on the local system:
Step 1 Log in as the superuser.
For details, see "Becoming the Superuser" earlier in this chapter.
Step 2 Enter the following at the command prompt:
mount remote_hostname:remote_exported_filesystem_name local_mount_point
For example, to mount a remote filesystem named zen, enter the following at the prompt:
mount zen:/cdrom /cdrom
The CD-ROM is ready for installation of software.
You may need to install CWSI 1.1 and CiscoWorks on the same system.
The system on which you are installing or upgrading CiscoWorks may already have CWSI 1.1 installed. To install CiscoWorks 4.0 with CWSI already installed, follow the procedures as described in the next section,"Upgrading or Installing CiscoWorks".
The system from which you are removing CWSI 1.1 may have CiscoWorks installed. Use the following steps to remove CWSI:
Step 1 Uninstall CWSI using the procedures described in the CWSI 1.1 CWSI Installation Guide for AIX.
Step 2 Remove any links left in the /usr/OV/bitmaps/C directory by entering the following command:
find /usr/OV/bitmaps/C -type link -exec rm {} \;
Step 3 Copy the files under the directory /usr/nms/hpov/icons to the directory /usr/OV/bitmaps/C using the following command:
cp /usr/nms/hpov/icons/* /usr/OV/bitmaps/C
Step 4 Remove the file /usr/OV/registration/C/ciscoview.reg by entering the following command:
rm /usr/OV/registration/C/ciscoview.reg
Before installing CiscoWorks 4.0, you do not need to de-install CiscoWorks 3.0.3. When upgrading, however, you typically want to preserve the Sybase data from CiscoWorks 3.0.3 rather than enter it again into CiscoWorks 4.0.
To install or upgrade the CiscoWorks files on the AIX platform, perform the following steps:
Step 1 Insert the CD-ROM into the local or remote drive.
Step 2 Log in as the superuser.
Step 3 If NetView is running, exit by selecting File>Exit.
Step 4 Shut down the Netview daemons by entering the following command:
# ovstop
Step 5 Start SMIT by entering the following at the command prompt:
smit
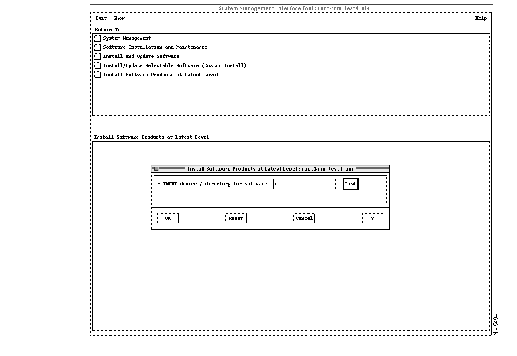
Step 6 On the System Management menu, select Software Installation and Maintenance.
Step 7 On the next menu, select Install and Update Software.
Step 8 On the next menu,
For AIX 4.1.5, go to step Step 10.
For AIX 4.2, select Install and Update from Latest Available Software.
Step 9 In the Install and Update from Latest Available Software dialog, enter the source of CiscoWorks 4.0 software, then go to step Step 14.
Step 10 Select Install/Update Selectable Software (Custom Install).
Step 11 On the next menu, select Install Software Products at Latest Level.
Step 12 On the next menu, select Install New Software at Latest Level.
Step 13 In the Install Software Products at Latest Level dialog box (shown in Figure 2-2), enter the source of the CiscoWorks 4.0 software.
Step 14 Click the List button, then click the name of the CD-ROM device on which you loaded the CD-ROM.
Step 15 Select the appropriate CD-ROM.
Step 16 Click OK.
The Install Software Products at Latest Available Level dialog box (as shown in Figure 2-3) displays additional fields.
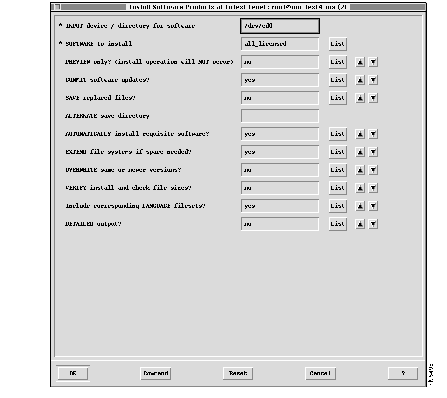
Step 17 Click the List button next to the SOFTWARE to install field. After a brief delay, the Multi-Select List dialog box (as shown in Figure 2-4) appears.
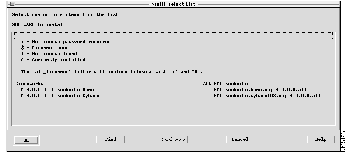
Step 18 Click all CiscoWorks modules in the list so that all are simultaneously highlighted:
 | Time Saver Clicking on the CiscoWorks All line accomplishes the same task as Step 18. |
Step 19 Click OK twice.
Step 20 In response to the ARE YOU SURE? prompt, click OK when you are sure you want to install the modules you just highlighted.
While the animated man is running, SMIT installs the selected modules in the /usr/nms directory, and CiscoWorks modifies SMIT to allow subsequent configuration and de-installation of CiscoWorks.
If the man raises his hands and SMIT displays OK, the process has succeeded.
If the man falls on his face, installation has failed. If the reason is not apparent, read the installation log file $HOME/smit.log and supply it to a Cisco TAC representative.
Step 21 Click Done.
Step 22 If Step 20 indicated success, click the System Management in the Main SMIT menu and go to the following section, "Configuring CiscoWorks."
In the event of failure, terminate SMIT by pressing F12 or by clicking Exit SMIT on the Exit menu.
Step 23 To unmount and eject the CD-ROM from your local or remote machine, enter:
cd /
umount /cdrom
Step 24 Remove the CD-ROM from the drive and store it in a safe place.
Configuring CiscoWorks 4.0 for AIX is a three-part process:
To configure the Sybase database management system for use with CiscoWorks, perform the following steps:
Step 1 Start SMIT if you have not already done so:
smit
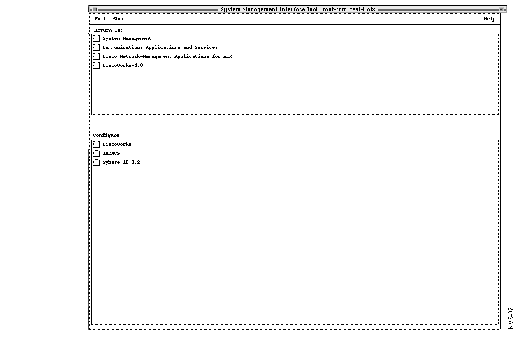
Step 2 On the main SMIT menu, click Communications Applications and Services.
Step 3 On the next menu, click Cisco Network-Management Applications for AIX.
Step 4 On the next menu, click CiscoWorks-4.0.
Step 5 On the CiscoWorks 4.0 menu, click Configure.
Step 6 On the Configure menu, click Sybase10.0.2.
The Sybase10.0.2 menu (as shown in Figure 2-5) appears.
Step 7 Select the configuration method appropriate for your situation.The available methods are as follows:
Configure New Sybase10.0.2 Server. Click this button if this is a first-time installation and configuration process (not an upgrade from CiscoWorks 3.0.3) and if you have not configured Sybase 10.0.2 for the first time.
Configure an Existing Sybase10.0.2 Server. Click this button if this installation of CiscoWorks will utilize an existing Sybase 10.0.2 server and you did not install Sybase 10.0.2 from the distribution medium.
Upgrade Sybase-10.0.1 Server to new Sybase-10.0.2 Server. Click this button if this is an upgrade from CiscoWorks 3.0.3 to CiscoWorks 4.0 and you have chosen to preserve Sybase 10.0.1 data for use with the new Sybase 10.0.2 software. During a CiscoWorks upgrade, this is the typical selection.
Step 8 Accept the defaults or enter new values into the fields of the dialog box that appears. Following are the dialog boxes and their fields:
Configure New Sybase10.0.2 Server fields:
mv /usr/nms/sybase102 <new dst dir>
Configure an Existing Sybase10.0.2 Server fields:
Update Sybase 10.0.1 Server to Sybase 10.0.2 Server fields:
Step 9 After selecting and completing the fields of one category above, click OK and read the output.
Step 10 Click Done.
To configure the CiscoWorks product, perform the following steps:
Step 1 Start SMIT if you have not already done so:
smit
Step 2 On the main SMIT menu, select Communications Applications and Services.
Step 3 On the next menu, select Cisco Network-Management Applications for AIX.
Step 4 On the next menu, select CiscoWorks-4.0.
Step 5 On the CiscoWorks 4.0 menu, select Configure.
The Configure menu (as shown in Figure 2-6) appears.
Step 6 Select CiscoWorks.
The Configure CiscoWorks Product dialog box (as shown in Figure 2-7) appears.
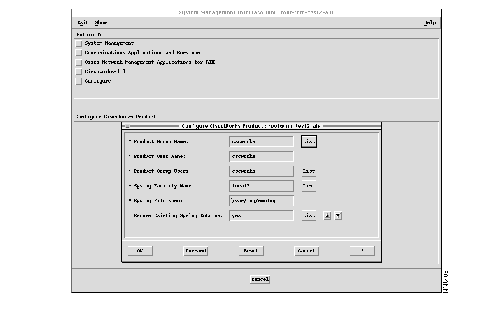
Step 7 Accept the defaults, or type values into each of the following fields:
Step 8 Click OK, wait for the process to complete, and read the output.
Step 9 Click Done, and then Cancel.
If TACACS is enabled on the devices to be managed by CiscoWorks, or if this AIX host will serve as a TACACS server, configure the TACACS server now.
Step 1 Start SMIT if you have not already done so:
smit
Step 2 On the main SMIT menu, click Communications Applications and Services.
Step 3 On the next menu, click Cisco Network-Management Applications for AIX.
Step 4 On the next menu, click CiscoWorks-4.0.
Step 5 On the Configure menu, click TACACS.
Step 6 The Configure TACACS Server dialog box (as shown in Figure 2-8) appears.
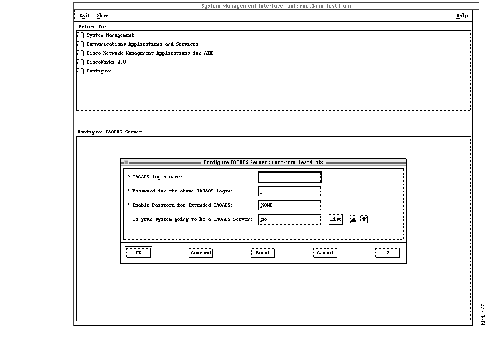
Step 7 Accept the defaults, or type values into each of the following fields:
Step 8 Click OK and read the output.
Step 9 Click Done, and then Cancel.
To ensure CiscoWorks runs successfully, you may need to perform several post-installation tasks. The following sections contain instructions for these tasks:
If you are using the NIS, the NIS-related information obtained during the configuration is saved to the following files after SMIT terminates:
After completing the CiscoWorks configuration, refer your NIS administrator to the information in these files to update your NIS server. Your NIS administrator can add these files to the NIS database and transfer this information to the NIS server as an update.
If this installation has been an upgrade from CiscoWorks 3.0.2 to CiscoWorks 4.0, you can optionally remove the Sybase10.0.1 database management system from the system because Sybase 10.0.2 is installed for use by CiscoWorks 4.0. To de-install Sybase 10.0.1, perform the following steps:
| Caution Do not perform this task until you are sure the CiscoWorks 4.0 installation has been successful. |
Step 1 Log in as the root user.
For details, see "Becoming the Superuser" in this chapter.
Step 2 Run the de-installation script by entering the following at the command prompt:
NMSROOT/install/bin/sybase?.deinstal
Unless an error message appears, Sybase 10.0.1 is de-installed.
During installation and configuration, log files are created to track the installation process and provide diagnostic information if a problem arises. When you are satisfied that CiscoWorks is properly installed and operating, you can remove these files. To remove these files from your system, log in as the root user and enter the following commands:
hostname#rm/tmp/cwinstall.loghostname#rm /usr/nms/install/log/cwconfig.loghostname#rm /usr/nms/install/log/cw_configsyb.loghostname#rm /usr/nms/install/log/cw_sybconfig.log
Unless an error message appears, the log files are removed.The log files are described in Table 2-1.
rm *.log to remove the CiscoWorks log files because other applications can put log files in these directories, and you may need to keep those application's log files.
| Log Filename | Contents |
|---|---|
| /usr/nms/etc/cwconfigure.defs | Your responses to the prompts during the configuration. (This file is not removed because you may want to use the same answers if you need to reinstall CiscoWorks. The software will use these answers as the defaults when you next install CiscoWorks.)
This file is in directory $NMSROOT/etc. |
| /usr/nms/install/log/config.log | Configuration log messages. |
After installing and configuring CiscoWorks, proceed to the chapter "Validating CiscoWorks Installation."
You can customize certain features of your CiscoWorks and NMS environments by modifying the X Windows resource files. X resources are listed in each user's .Xdefaults file or in the system X resource files located in the /usr/lib/X11/app-defaults directory. For example, you can change the window display colors, fonts, or sizes, or specify certain ways for CiscoWorks to run in your X Windows environment.
This section provides information on the following topics:
You can customize any X resource that CiscoWorks applications use, including colors, fonts, and sizes in CiscoWorks windows. To use your own colors, fonts, and sizes for CiscoWorks, perform one of the following procedures:
When working with CiscoWorks applications, you may notice that the window sizes vary from application to application. The layout of the window and the size of its text and graphics is preset to be large enough to contain all the elements that define the window. However, you can resize the window without obscuring the text.
To save the default CiscoWorks window size, perform the following steps:
Step 1 Use a text editor, such as vi, to open the $HOME/XCiscoWorks file.
Step 2 Add the following line to your $HOME/XCiscoWorks file:
XCiscoWorks*geometry:500x400+0+0
Step 3 Save the $HOME/XCiscoWorks file and quit the text editor.
Step 4 Enter the following command at the UNIX prompt:
xrdb -merge ~/XCiscoWorks
CiscoWorks features an expanded Help system with hyperlinks (jumps to other help windows) to help you learn more about your CiscoWorks applications.
By default, hyperlinks display link text in forest green. To change the color, you can modify the X resource HyperHelp*LinkColor.
The current default help settings are modeled after Microsoft Help's color scheme. To change the default setting for windows, fonts, and other options, modify lines in your X resource HyperHelp file.
To modify the X resources for your Help windows, perform the following steps:
Step 1 Change to the directory where the HyperHelp X resource file is located by entering the following command:
cd /usr/lib/X11/app-defaults
You may have put the HyperHelp file in a different directory; if so, change to the appropriate directory path.
Step 2 Use a text editor such as vi to alter any of the following X resources in the HyperHelp file:
Hyperhelp*fontList: 9x15bold
HyperHelp*ScrolledWindow*background: grey
HyperHelp*NonScrollableWindow.background: gray80
HyperHelp*LinkColor: pink
Step 3 Save the HyperHelp file and exit.
Step 4 Restart the online help system to allow the new HyperHelp system changes to take effect.
To define the look of your text editor window, perform the following steps, substituting the appropriate options:
Step 1 Confirm that X Windows is running.
To start an X window session, enter x11start or xinit at the UNIX command line.
Step 2 Use a text editor such as vi to open the .Xdefaults file.
Step 3 Add a line with the following format to the .Xdefaults file:
EditorFormat:command_string %s
Where command_string is the value or name of the X resource. For example, to specify the vi editor located in /usr/local/bin, add the following line to the .Xdefaults file:
EditorFormat:/usr/local/bin/vi %s
For example, to specify the vuepad editor located in /usr/vue/bin, add the following line to the .Xdefaults file:
EditorFormat:/usr/vue/bin/vuepad %s
Step 4 Save the .Xdefaults file and quit the text editor.
To enable boot file generation, edit the .Xdefaults file to specify the on state by performing the following steps:
Step 1 Confirm that X Windows is running.
To start an X window enter x11start or xinit at the UNIX command line.
Step 2 Use a text editor such as vi to open the .Xdefaults file.
Step 3 Add the following line to the .Xdefaults file:
Bootfile:on
Step 4 Save the .Xdefaults file and quit the text editor.
After you install CiscoWorks for the first time, you may need to reinstall it. For example, some files on your workstation might become damaged or corrupted. Reinstalling means that you delete all of the existing CiscoWorks files and reinstall them from the same version of CiscoWorks. When you reinstall CiscoWorks, you can do a new or upgrade install, as appropriate.
|
|