|
|

This chapter describes how to install your router, how to install module s and WAN interface cards, and how to connect the router to networks and external devices. It contains the following sections:
You can set the chassis on a desktop, or install it in a rack. Use the procedure that best meets the needs of your installation.
For desktop or shelf mounting, use the rubber "feet" shipped on a black adhesive strip with the chassis. They protect the chassis and provide a nonskid surface.
Take the following steps to attach the rubber feet:
Step 1 Locate the rubber feet that shipped with the chassis.
Step 2 Place the router upside-down on a smooth, flat surface.
Step 3 Peel the rubber feet off the black adhesive strip and place them adhesive-side down at each corner of the underside of the chassis.
Step 4 Place the router right-side up on a flat, smooth, secure surface.
 | Caution Do not place anything on top of the router that weighs more than 10 pounds (4.5 kg). Excessive weight on top could damage the chassis. |
If you are planning to rack-mount the router, do so before making network and power connections. If you need to install module s or WAN interface cards, you can do so either before or after rack-mounting the router. Ideally, you would install module s or WAN interface cards when you have the best access to the router's rear panel.
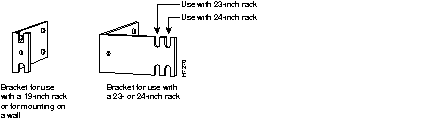
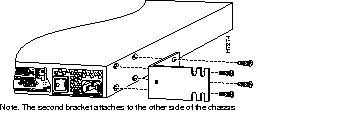
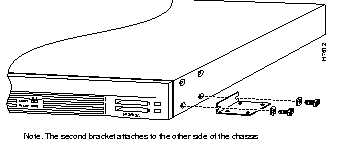
The router is shipped with one set of brackets. Brackets for 19-inch racks are shipped unless the 23-inch or 24-inch brackets are specified at the time of your order. The brackets are shown in Figure 3-1.
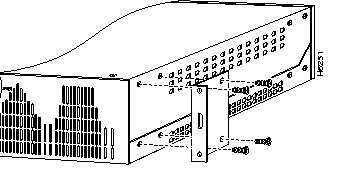
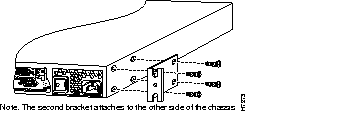
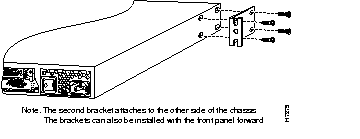
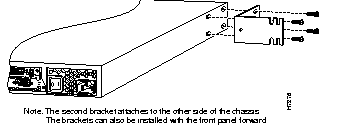
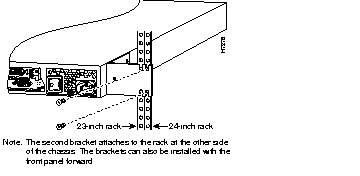
To install the chassis in a rack with the front panel forward, attach the brackets on each side of the chassis as shown in Figure 3-2 or Figure 3-3.
To install the chassis in a rack with the rear panel forward, attach the brackets on each side of the chassis as shown in Figure 3-4 or Figure 3-5.
To install the chassis in a center-mount telco rack, attach the brackets on each side of the chassis as shown in Figure 3-6 or Figure 3-7.
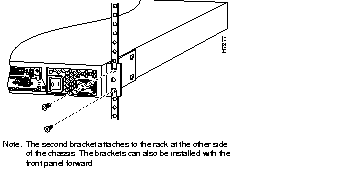
When the brackets have been fastened to the chassis, you can rack-mount the chassis. Using your own screws, attach the chassis to the rack as shown in Figure 3-8 or Figure 3-9.
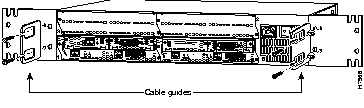
Attach the cable guides to the rack-mounting brackets on each side of the chassis as shown in Figure 3-10 or Figure 3-11.
This section explains how to mount the router on a wall. If you have questions or need help with the wall-mounting procedure, refer to the chapter "Troubleshooting."
If you are planning to wall-mount your router, do so before making network and power connections. If you need to install network modules or WAN interface cards, you can do so either before or after mounting the router, whenever you have better access to the rear of the router.
You need the following tools and equipment to install a Cisco 3600 series router on a wall:
Cisco Systems does not provide the board or screws.
Each router is shipped with one set of brackets. The router uses 19-inch rack brackets to mount on a wall. 23-inch or 24-inch brackets may be used for wall mounting if desired. Brackets for 19-inch racks are shipped unless you specify 23-inch or 24-inch brackets at the time of your order. Figure 3-12 shows brackets for the router.
This section explains how to wall-mount the Cisco 3620 router.
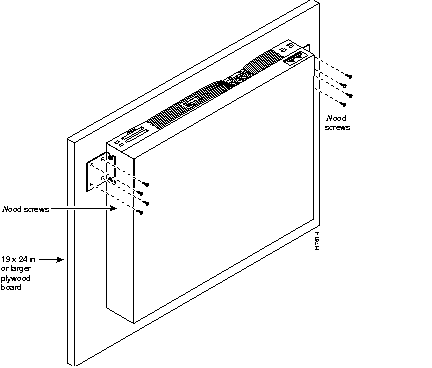
To install the router on a wall, first attach the brackets on each side of the chassis as shown in Figure 3-13, using the special plastic washers and slotted hex-head screws. Place the washers so that the narrow shoulder faces the router chassis.
After fastening the brackets to the chassis, follow this procedure to mount it on the wall (refer to Figure 3-14):
Step 1 Using the brackets as a pattern, mark and drill holes on the board where you will fasten the router. Do not attach the router to the board yet.
Step 2 Locate the wall studs where you plan to attach the router.
| Caution The router must be fastened securely to two studs. |
Step 3 Drill wall-mount screw locations through the plywood board and studs.
Step 4 Mount the plywood board to the wall, using your own 3/16 x 2 1/2-inch or larger wood screws.
Step 5 Using your own screws, approximately #6 x 1/2-inch (depending on the thickness of the board), fasten the router to the board by the mounting brackets.
When the router has been installed, proceed to one of the following sections: "Installing a WAN Interface Card in a Module Slot," "Installing Modules in a Chassis Slot," or "Network Connections" later in this chapter.
The following instructions apply only to installing a WAN interface card in a module that has slots for WAN cards (called a base module). To install a module in a chassis slot, see the section "Installing Modules in a Chassis Slot" later in this chapter.
 | Warning Only trained and qualified personnel should be allowed to install or replace this equipment. (To see translated versions of this warning, refer to the Regulatory Compliance and Safety Information document that accompanied the router.) |
| Warning Do not insert a WAN interface card into a base module slot while power is ON or network cables are connected. (To see translated versions of this warning, refer to the Regulatory Compliance and Safety Information document that accompanied the router |
| Warning Before opening the chassis, disconnect the telephone-network cables to avoid contact with telephone-network voltages. |
| Warning Do not work on the system or connect or disconnect cables during periods of lightning activity. |
| Warning To avoid electric shock, do not insert a WAN interface card into a 2-slot module while power is ON or network cables are connected. (To see translated versions of this warning, refer to the Regulatory Compliance and Safety Information document that accompanied the router.) |
A WAN interface card can be installed in a module that is already installed in a router. Before inserting a WAN interface card into a base module that is already installed in the router chassis, you must turn off electrical power.
You need either a number 1 Phillips screwdriver or a flat-blade screwdriver. Take the following steps to install a WAN interface card:
Step 1 If you are installing the card directly into a base module in the router, turn OFF power to the router. However, to channel ESD voltages to ground, do not unplug the power cable. Remove all network interface cables, including telephone cables, from the rear panel.
| Warning Before performing any of the following procedures, ensure that power is removed from the DC circuit. To ensure that all power is OFF, locate the circuit breaker on the panel board that services the DC circuit, switch the circuit breaker to the OFF position, and tape the switch handle of the circuit breaker in the OFF position. (To see translated versions of this warning, refer to the Regulatory Compliance and Safety Information document that accompanied the router.) |
If you are installing the card into the base module outside the router, attach an ESD-preventive wrist strap and ensure that it makes good contact with your skin. Connect the equipment end of the wrist strap to an electrical ground.
Step 2 Using a Phillips or flat-blade screwdriver, remove the slot filler panel from the two-slot module where you plan to install the card. Save the slot filler panel for possible future use.
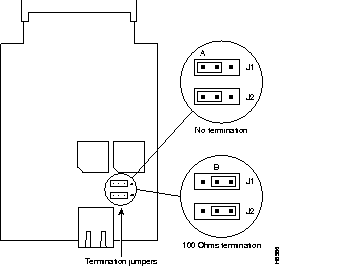
Step 3 If you are installing an older BRI S/T WAN interface card (product number WIC36-1B-S/T, WIC36-1B-U, CPAWIC36-1B-S/T, or CPAWIC36-1B-U), make sure that the termination jumpers, labeled J1 and J2, are set correctly for your installation. (See Figure 3-15.)
For the older card, the jumpers are factory-configured in the B position (100 ohms termination). Keep the jumpers in this position to use the BRI S/T WAN interface card in a point-to-point connection or as the last device on the line of a passive-bus connection. Set the termination jumpers to the A position to use the BRI S/T WAN interface card in a passive-bus connection where it is not the last device on the line.
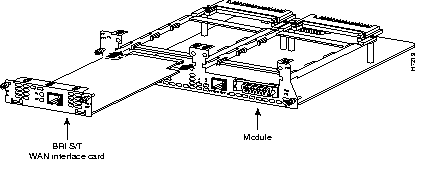
Step 4 Align the card with the guides in the module slot and slide it gently in. (See Figure 3-16.)
Step 5 Push the card into place until you feel its edge connector mate securely with the connector on the module. It may be difficult to tell if the WAN interface card connector has mated with a module unless you can actually see the connectors.
Step 6 Fasten the card's captive mounting screws into the holes in the module faceplate, using a Phillips or flat-blade screwdriver.
Step 7 If the router was previously running, reinstall network interface cables and turn ON power to the router.
| Warning After wiring the DC power supply, remove the tape from the circuit breaker switch handle and reinstate power by moving the handle of the circuit breaker to the ON position. (To see translated versions of this warning, refer to the Regulatory Compliance and Safety Information document that accompanied the router.) |
If the base module is configured with only one, WAN interface card, secure a slot filler panel into the open base module slot to ensure proper airflow. Filler panels must also be installed if no WAN interface cards are installed in the module. See Figure 3-17.

After installing any WAN interface cards you have, proceed to the next section, "Installing Modules in a Chassis Slot," to install the modules into the router.
The following instructions apply only to installing module s in a chassis slot. To install a WAN interface card in a module that has WAN card slots, see the section "Installing a WAN Interface Card in a Module Slot" earlier in this chapter or see the configuration note that shipped with the WAN interface card.
| Warning Only trained and qualified personnel should be allowed to install or replace this equipment. (To see translated versions of this warning, refer to the Regulatory Compliance and Safety Information document that accompanied the router.) |
You can install module s in the chassis either before or after installing the router. If you have a choice, install the module s with the router in the position that provides the best access to the rear panel. You can install any module into any available slot in the chassis.
| Warning Do not insert a module into a slot when power is on or network cables are connected. |
You need either a number 1 Phillips screwdriver or a flat-blade screwdriver. Take the following steps to install a module:
Step 1 Turn OFF electrical power to the router. However, to channel ESD voltages to ground, do not unplug the power cable. Remove all network interface cables, including telephone cables, from the rear panel.
| Warning Before performing any of the following procedures, ensure that power is removed from the DC circuit. To ensure that all power is OFF, locate the circuit breaker on the panel board that services the DC circuit, switch the circuit breaker to the OFF position, and tape the switch handle of the circuit breaker in the OFF position. (To see translated versions of this warning, refer to the Regulatory Compliance and Safety Information document that accompanied the router.) |
Step 2 Using a Phillips or flat-blade screwdriver, remove the filler panel from the slot where you plan to install the module. Save the slot filler panel for possible future use.
Step 3 Align the module with the guides in the chassis and slide it gently into the slot. (See Figure 3-18.)
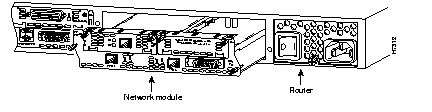
Step 4 Push the module into place until you feel its edge connector mate securely with the connector on the motherboard. Ensure that each of the module's captive screws line up with their hole in the chassis.
Step 5 Fasten the module's captive mounting screws into the holes in the chassis using a Phillips or flat-blade screwdriver.
Step 6 Refer to the section "Network Connections" later in this chapter for network connection instructions for the module.
If the router is configured with fewer than two module s, slot filler panels must fill the open slots to ensure proper airflow. (See Figure 3-19.)

After installing module s into the router, proceed to the section "Network Connections" later in this chapter.
This section explains how to connect the router to your network. The Ethernet and Token Ring interfaces are used to connect the router to a LAN. The synchronous serial and ISDN BRI interfaces are used to connect the router to a WAN.
The cables required to connect the router to a network are not provided with the router. However, cables and transceivers can be ordered from us. For ordering information, contact customer service. For cable pinouts, refer to the appendix "Cable Specifications."
| Warning Do not work on the system or connect or disconnect cables during periods of lightning activity. (To see translated versions of this warning, refer to the Regulatory Compliance and Safety Information document that accompanied the router.) |
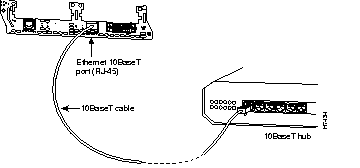
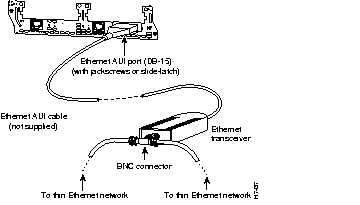
Use an Ethernet AUI cable to connect the Ethernet AUI port (DB-15) to an Ethernet transceiver. Use an Ethernet 10BaseT cable to connect to an Ethernet 10BaseT port (RJ-45). (See Figure 3-20 and Figure 3-21.) Only one connector can be used per Ethernet interface. The Ethernet modules will automatically detect which connector is used.
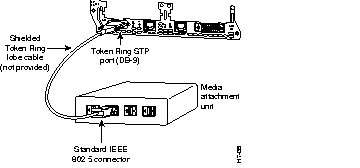
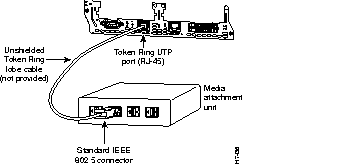
Use a shielded Token Ring lobe cable to connect the Token Ring STP port (DB-9) to a MAU. Use an unshielded Token Ring lobe cable to connect the Token Ring UTP port (RJ-45) to a MAU. (See Figure 3-22 and Figure 3-23.) Only one of the Token Ring connectors can be used. The module will automatically detect which connector is in use.
This section describes how to connect the router to the following WAN interfaces:
| Caution To avoid damage to the router, verify the orientation of the connector when connecting the DB-60 cable to its port. It is possible to insert the cable upside down causing damage. |
Take the following steps to connect the router to a WAN:
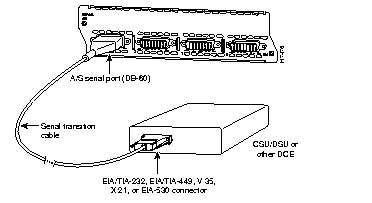
Step 1 If you have a serial WAN interface card or an A/S serial module, use a serial transition cable to connect a serial port (DB-60) to a modem or to a CSU/DSU. (See Figure 3-24 and Figure 3-25.)

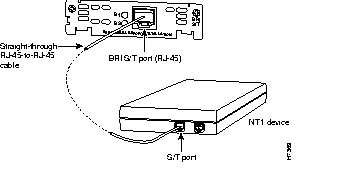
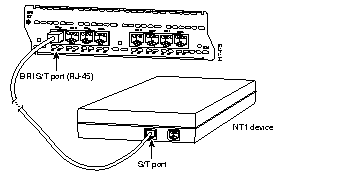
Step 2 If you have a BRI-S/T WAN interface card or a BRI-S/T module installed in your router, use a straight-through RJ-45-to-RJ-45 cable to connect the ISDN BRI port to an NT1. (See Figure 3-26 and Figure 3-27.)
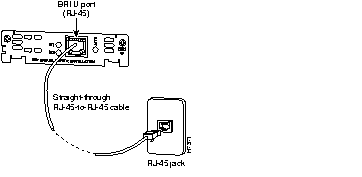
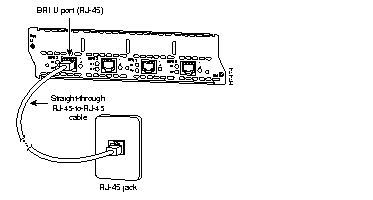
Step 3 If you have a BRI-U WAN interface card or a BRI-U module installed in your router, use a straight-through RJ-45-to-RJ-45 cable to connect the ISDN BRI port to an RJ-45 jack. (See Figure 3-28 and Figure 3-29.)
Step 4 If you have a CT1/PRI module installed in your router, use a DB-15-to-DB-15 T1 serial cable to connect the CT1/PRI port to a T1 CSU. (See Figure 3-30.)

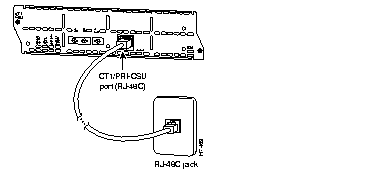
Step 5 If you have a CT1/PRI-CSU module installed in your router, use a straight-through RJ-48C-to-RJ-48C cable to connect the RJ-48C port to an RJ-48C jack. (See Figure 3-31.)
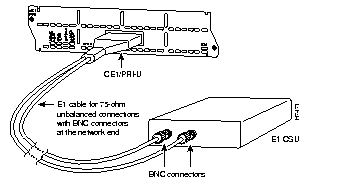
Step 6 If you have a 75-ohm CE1/PRI-U module installed in your router, use the appropriate cable to connect the CE1/PRI port to an E1 CSU. (See Figure 3-32.)
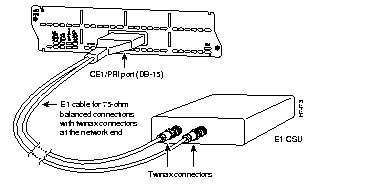
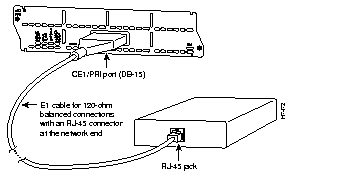
Step 7 If you have a 120-ohm CE1/PRI-B module installed in your router, use the appropriate cable to connect the CE1/PRI-B port to an E1 CSU. (See Figure 3-33, Figure 3-34, and Figure 3-35.)

When you have connected the router to your network, proceed to the next section "Electrical Connections."
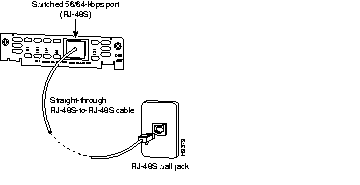
To connect a switched 56 WAN interface card to a network, use a straight-through RJ-48S-to-RJ-48S cable to connect the four-wire RJ-48S port to an RJ-48S jack. (See Figure 3-36.)
This section describes how to connect a console terminal and a modem to the router. You can connect only a terminal to the console port. Use the auxiliary port with a terminal or a modem for remote access to the router.
Take the following steps to connect a terminal or a PC running terminal emulation software to the console port on the router:
Step 1 Connect the terminal using an RJ-45 rollover cable and an RJ-45-to-DB-25 or RJ-45-to-DB-9 adapter. (See Figure 3-37.) The provided adapter is labeled Terminal. For information about cable pinouts, see the appendix "Cable Specifications."
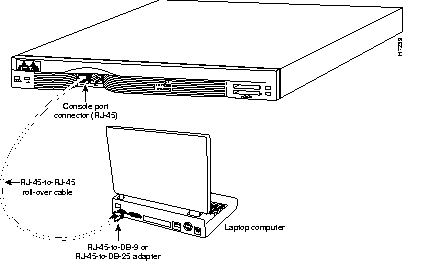
Step 2 Configure your terminal or terminal emulation software for 9600 baud, 8 data bits, no parity, and 2 stop bits.
Take the following steps to connect a modem to the auxiliary port on the router:
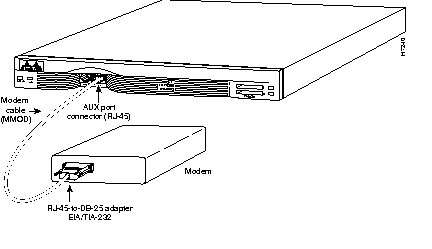
Step 1 Connect a modem to the auxiliary port using an RJ-45 rollover cable with an RJ-45-to-DB-25 adapter. (See Figure 3-38.) The provided adapter is labeled Modem. For information about cable pinouts, see the appendix "Cable Specifications."
Step 2 Make sure that your modem and the router auxiliary port are configured for the same transmission speed (up to 115200 bps is supported) and hardware flow control with Data Carrier Detect (DCD) and Data Terminal Ready (DTR) operations.
This section explains how to connect AC or DC power to a router, and how to power up both AC and DC routers. If you have a DC-powered router, go to the next section, "Connecting Routers with a DC-Input Power Supply." If you have an AC-powered router, go to the section "Powering On the Router" later in this chapter.
| Warning This unit is intended for installation in restricted access areas. A restricted access area is where access can only be gained by service personnel through the use of a special tool, lock and key, or other means of security, and is controlled by the authority responsible for the location. (To see translated versions of this warning, refer to the Regulatory Compliance and Safety Information document that accompanied the router.) |
| Warning Before performing any of the following procedures, ensure that power is removed from the DC circuit. To ensure that all power is OFF, locate the circuit breaker on the panel board that services the DC circuit, switch the circuit breaker to the OFF position, and tape the switch handle of the circuit breaker in the OFF position. (To see translated versions of this warning, refer to the Regulatory Compliance and Safety Information document that accompanied the router.) |
If you ordered the router with a DC-input power supply, follow the directions in this section for proper wiring. A router with a DC-input power supply has a terminal block cover in place of a three-pronged connector for an AC power cord.
Figure 3-39 shows the router DC-input power supply terminal block.
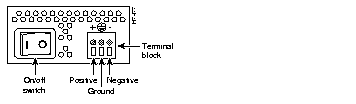
Take the following steps to wire the terminal block:
Step 1 Use 14-AWG copper wires to connect DC-input power to the power supply.
Step 2 Attach the appropriate lugs at the wire end of the power supply cord.
| Warning When stranded wiring is required, use approved wiring terminations, such as closed-loop or spade-type with upturned lugs. These terminations should be the appropriate size for the wires and should clamp both the insulation and conductor. (To see translated versions of this warning, refer to the Regulatory Compliance and Safety Information document that accompanied the router.) |
Step 3 Wire the DC-input power supply to the terminal block as shown in Figure 3-39.
| Warning The illustration shows the DC power supply terminal block. Wire the DC power supply using the appropriate lugs at the wiring end, as illustrated. The proper wiring sequence is ground to ground, positive to positive (line to L), and negative to negative (neutral to N). Note that the ground wire should always be connected first and disconnected last. (To see translated versions of this warning, refer to the Regulatory Compliance and Safety Information document that accompanied the router.) |
| Caution Do not overtorque the terminal block captive thumbscrew or terminal block contact screws. The recommended torque is 8.2 ± 0.4 inch-lb. |
| Warning After wiring the DC power supply, remove the tape from the circuit breaker switch handle and reinstate power by moving the handle of the circuit breaker to the ON position. (To see translated versions of this warning, refer to the Regulatory Compliance and Safety Information document that accompanied the router.) |
| Warning The plug-socket combination must be accessible at all times because it serves as the main disconnecting device. (To see translated versions of this warning, refer to the Regulatory Compliance and Safety Information document that accompanied the router.) |
| Caution Never operate the router unless the unit is completely closed to ensure adequate cooling. |
Take the following steps to power on the router:
Step 1 For routers with AC input, plug the router's power cord into a 3-terminal, single-phase power source that provides power within the acceptable range (140W, 10 to 240 VAC, 50 to 60 Hz).
| Warning This product relies on the building's installation for short-circuit (overcurrent) protection. Ensure that a fuse or circuit breaker no larger than 120 VAC, 15A U.S. (240 VAC, 10A international) is used on the phase conductors (all current-carrying conductors). (To see translated versions of this warning, refer to the Regulatory Compliance and Safety Information document that accompanied the router.) |
Step 2 Power ON the router. The LED labeled SYSTEM on the front panel should go on.
If you encounter problems when you power up the router, see the appendix "Troubleshooting."
When you have installed the router hardware, continue with the chapter "Configuring the Software."
|
|