|
|

Most system cards and appliques have light-emitting diode (LED) indicators that show, for example, the state of a port on an interface card or the mode (DTE or DCE) of a serial applique. These LEDs also can be used to troubleshoot and isolate a problem with the chassis and its components.
Typically, you will know a problem exists before you examine the LEDs, but should a problem require more investigation, the LEDs can help identify the problem.
The following card LEDs are included in this appendix:
The following applique LEDs are included in this appendix:
The following sections discuss reading and interpreting the LED indicators on processor and interface cards.
Along the front edge of the CSC-1R (and CSC-2R) card are ten status LEDs: nine red and one green. The order of the LEDs is left to right when looking at the front edge of the card. (See Figure B-1.) Although only the CSC-1R is shown, both the CSC-1R and CSC-2R have the same LED configuration. The CPT cannot use Token Ring interfaces. The CGS can use only the CSC-2R.
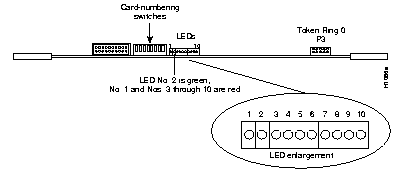
The red LED on the far left end of the bank of LEDs is the Power-On LED (No. 1). The next LED is the green Processor LED (No. 2). The remaining eight LEDs (3 through 10) are all red. At system boot, these eight LEDs will change state to indicate that the card is being initialized. The seven initialization states of LEDs 3 through 10 are shown in Table B-1.
In the first initialization state, all eight status LEDs (3 through 10) are on. During the next four states, LEDs 7 through 10 will be on, while LEDs 6 through 3 consecutively will turn on then off. States 6 and 7 will indicate a successful initialization.
The first seven LED states display consecutively at system boot. If a problem occurs during this initialization, the state that the LEDs were in when the problem occurred will flash on and off.
When the port inserts into the ring, LEDs 3 through 10 will flash a series of patterns too fast to see. Following this, LEDs 3 through 10 will strobe back and forth to indicate correct operation. The speed of this strobing is in inverse proportion to the volume of data traffic; the heavier the traffic, the slower the strobing, and so forth. Either way, the strobing of these LEDs is the key indicator for the proper operation of the CSC-1R and CSC-2R Token Ring cards.
| LEDs1 | ||||||||
|---|---|---|---|---|---|---|---|---|
| State | 3 | 4 | 5 | 6 | 7 | 8 | 9 | 10 |
| 1 | O | O | O | O | O | O | O | O |
| 2 | · | · | · | O | O | O | O | O |
| 3 | · | · | O | · | O | O | O | O |
| 4 | · | O | · | · | O | O | O | O |
| 5 | O | · | · | · | O | O | O | O |
| 6 | · | O | O | · | · | O | O | · |
| 7 | O | · | · | · | · | O | · | O |
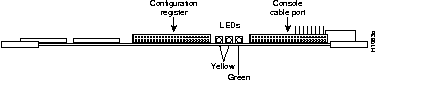
To the right of the configuration register, on the front edge of the processor card, are three LEDs. On the CSC/3, the left and center LEDs are red (see Figure B-2), while on the CSC/4, they are yellow (see Figure B-3). The third LED (far right) on each card is green. The LED on the left is a software-programmable status light; it lights (momentarily) during initialization, flashes to indicate an error, and remains off under normal operation. The middle LED is the processor halt light; it lights when the processor halts for any reason. This LED can flash at power-up, but should not remain lit; a problem is indicated when it does. The green LED on the right is a software-programmable run light that lights when the system is running properly.

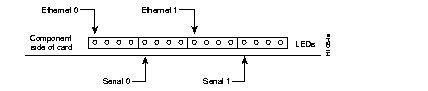
The CSC-MCI and CSC-SCI cards contain a bank of 16 LEDs. (Four are currently used.) Table B-2 lists the LEDs that are used and the serial and Ethernet port each LED represents. LED 0 is at the left end of each block of four LEDs (as you view the front edge of the card in the system card cage--shown in Figure B-4 and Figure B-5). At startup, all LEDs flash and then only those LEDs that indicate active interfaces will stay lit. A problem is indicated if all LEDs remain lit after the system boots, or if the LED of a specific interface does not stay lit after the system boots.
| LED | MCI Port | SCI Port |
|---|---|---|
| 0 | Ethernet 0 | Serial 0 |
| 4 | Serial 0 | Serial 1 |
| 8 | Ethernet 1 | Serial 2 |
| 12 | Serial 1 | Serial 3 |
When the indicated LED is lit, Carrier Detect (CD) is present on that serial interface, and the interface is enabled. In Ethernet systems, this means that the interface is attached to the Multibus correctly, but is not an indication of complete functionality.

The CSC-MC+ has two LEDs on the front edge of the card. (See Figure B-6 and note the chassis front orientation of the illustration.) When viewed with the card installed in the card cage, the green LED is on the left. The green LED is the power indicator and should be lit when power is on. The yellow LED is lit during Flash copy operations and will be off at all other times. When the write-protect jumper is removed, Flash memory cannot be overwritten or erased.

The CSC-MT card has one green and three red LEDs (from left to right, when viewing the front edge of the card). (See Figure B-7.) The red LEDs each indicate battery status. If one of the three onboard batteries fails, its corresponding red LED lights up. The green LED on the left indicates that power is on to the card and is normally on when the system is powered up.

The CSC-R16M Token Ring card, which can be used in the MGS chassis only, has 14 LED indicators located on the front edge of the card. (See Figure B-8.) During normal operation, after the card has initialized and the port is connected to the ring, LEDs F through M will strobe back and forth to indicate proper operation. The descriptions of the CSC-R16M LED functions are listed in Table B-3.

| LED | Function |
|---|---|
| A | Processor halted (normally off) |
| B | -12V fused |
| C | +12V fused |
| D | + 5V fused |
| E | + 5V (power) |
| F-M | Activity lights1 |
| N | Run light (green) |
Checking applique LEDs requires access to the chassis rear panel, which may require removing the system from a rack or closet. In the following serial applique LED tables, the symbols <-- and --> indicate signal direction with respect to DCE and DTE devices. For example, "DCE <-- DTE" means signal direction is from DTE to DCE.
The following LED indicators are included in this section:
The Ethernet 10BaseT applique has the following green LED indicators. (See Figure B-9.)
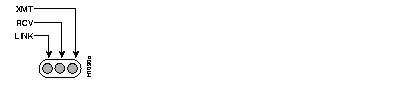
At power up, the LINK LED lights up and remains lit if it is connected to a 10BaseT link that is powered up. This LED indicates that a good link has been established. If it does not light, check the opposite end of the link to ensure that it is powered up and that the cable is securely installed. If the LED still does not light, switch the transmit and receive pair at one end of the link and restart the system. When a good link is established, the RCV LED will flash or remain lit to indicate packet traffic on the link. The XMT LED will light when the unit transmits data over the link.
If the opposite end of the link is connected to a hub, the hub will perform a crossover function, which means that the transmitter from the unit goes to the receiver of the hub, and the transmitter from the hub goes to the receiver of the unit. This configuration is correct; however, if the unit connects to an external media attachment unit (MAU), then the crossover function must be performed in the attaching wires. Otherwise, the two transmit wires are connected to each other, as are the two receive wires.
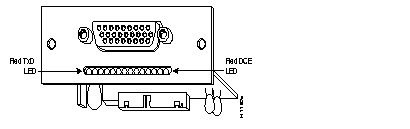
Table B-4 lists the 14 LEDs that indicate the status of the HD V.35 synchronous serial applique. LEDs are listed as viewed from left to right on the applique. (See Figure B-10.) Use the green LEDs toward the end of the row for orientation. The LEDs on the HD V.35 applique are located beneath the connector.
| LED Number | Color | Mnemonic DTE (DCE) | Function | Direction DCE DTE |
|---|---|---|---|---|
| 1 | Red | TxD (RxD) | Transmit Data (Receive Clock) | <-- (-->) |
| 2 | Red | SCTE (SCR) | Serial Clock Transmit External (Serial Clock Receive) | <-- (-->) |
| 3 | Red | RxD(TxD) | - | --> (<--) |
| 4 | Red | SCR (SCTE) | - | --> (<--) |
| 5 | Red | DTR | Data Terminal Ready | --> |
| 6 | Red | RTS | Clear To Send | --> |
| 7 | Red | RTS | Request To Send | <-- |
| 8 | Red | DCD | Data Carrier Detect | <-- |
| 9 | Red | LT | Software Loopback | <-- |
| 10 | Green | +5V | +5V present | On if OK |
| 11 | Green | +12V | +12V present | On if OK |
| 12 | Green | -12V | -12V present | On if OK |
| 13 | Green | OK | Applique test OK | On if OK |
| 14 | Red | DCE | Mode selection | On for DCE |
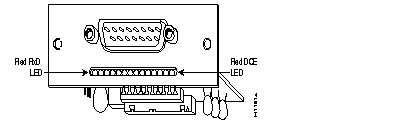
On the RS-232, RS-232 Synchronous Data Link Control (SDLC), and RS-449 appliques, the LEDs are located beneath the connectors. These synchronous serial appliques have the lamp pattern shown in Table B-5, except the RS-232 SDLC applique which has two additional LEDs. Use the green LEDs toward the end of the row for orientation. LEDs in Table B-5 are listed as viewed left to right on the applique. The signal mnemonics and directions are listed in Table B-6.
| LED Number | Color | RS-232 SDLC--DTE (DCE) | RS-232 DTE | RS-232 DCE | RS-449 DTE | RS-449 DCE |
|---|---|---|---|---|---|---|
| 1 | Red | TxD (RxD) | RxD | RxD | RxD | RxD |
| 2 | Red | RxC | RxC | RxC | RxC | SCT/SCR |
| 3 | Red | RxD | TxD | RxD | TxD | RxD |
| 4 | Red | TxC | TxC | TxC | TxC | RxC |
| 5 | Red | DCD | DTR | DCD | DTR | DCD |
| 6 | Red | CTS | RTS | CTS | RTS | CTS |
| 7 | Red | RTS (CTS) | CTS | CTS | CTS | CTS |
| 8 | Red | DTR (DCD) | DCD | DCD | DCD | RLSD |
| 9 | Red | LT | LT | LT | LTST | LT |
| 10 | Green | +5V OK | +5V OK | +5V OK | +5V OK | +5V OK |
| 11 | Green | +12V OK | +12V OK | +12V OK | +12V OK | +12V OK |
| 12 | Green | -12V OK | -12V OK | -12V OK | -12V OK | -12V OK |
| 13 | Green | Applique OK | Applique OK | Applique OK | Applique OK | Applique OK |
| 14 | Red | NRZI/NRZ (on for NRZI) | - | - | - | - |
| 151 | Red | DCE/DTE (on for DTE) | - | - | - | - |
| Mnemonic | Description | Direction |
|---|---|---|
| CTS | Clear To Send | DCE to DTE |
| DCD | Data Carrier Detect | DCE to DTE |
| DTR | Data Terminal Ready | DTE to DCE |
| LT (LTST) | Loopback Test | DTE to DCE |
| RTS | Request To Send | DTE to DCE |
| RxC | Receive Clock | DCE to DTE |
| RxD | Receive Data | DCE to DTE |
| SCT/SCR | Source Clock Transmit/Source Clock Receive | DCE to DTE |
| TxC | Transmit Clock | DCE to DTE |
| TxD | Transmit Data | DTE to DCE |
On the X.21 serial applique, the 14 LED indicators, which are positioned as shown in Figure B-11, indicate the status of the interface. Use the green LEDs toward the end of the row for orientation. The LEDs are located beneath the connector. The LEDs are listed in Table B-7 as viewed from left to right when facing the front of the applique.
| LED Number | Color | Mnemonic DTE | Mnemonic DCE | Function | Direction DCE DTE |
|---|---|---|---|---|---|
| 1 | Red | RxD | TxD | Receive Data | --> |
| 2 | Red | RxC | - | Receive Clock | --> |
| 3 | Red | TxD | RxD | Transmit Data | <-- |
| 4 | Red | DCE CLK | DCE CLK | Internal Clock | --> |
| 5 | Red | BDSR | BDSR | Data Set Ready B | --> |
| 6 | Red | RTS/CONTROL | CTS/INDICATE | Request To Send | <-- |
| 7 | Red | CTS/INDICATE | RTS/CONTROL | Clear To Send | --> |
| 8 | Red | BDCD/BCTS | BDCD/BCTS | Data Carrier Detect /Clear To Send | --> |
| 9 | Red | - | LOOP1 | Loopback | <-- |
| 10 | Green | +5V | +5V | +5V present | On if OK |
| 11 | Green | +12V | +12V | +12V present | On if OK |
| 12 | Green | -12V | -12V | -12V present | On if OK |
| 13 | Green | OK | OK | Applique test OK | On if OK |
| 14 | Red | DCE | DCE | DCE Mode | On for DCE |
|
|