|
|

This chapter provides information on using token servers and one-time password authentication with the CiscoSecure Access Control Server (ACS) and includes the following sections:
Token servers, used in conjunction with the appropriate token cards (also known as one-time password cards), add a new layer of security. Each token card, about the size of a credit card, is programmed to a specific user and each user has a unique personal identification number (PIN) that can generate a password keyed strictly to the corresponding card.
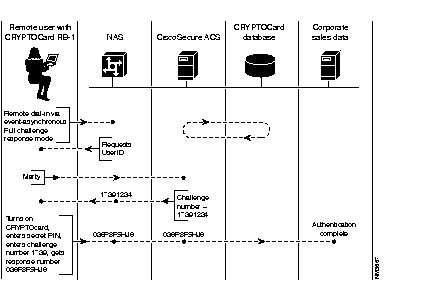
One-time password authentication takes place between the specified token server and the user. Figure 9-1 shows how a remote user can authenticate to the CiscoSecure ACS by means of a token card.
The token card database is usually considered part of the CiscoSecure ACS, although the two can be separate from each other depending on your preferences.
CiscoSecure ACS software supports authentication from the following three authentication servers:
For each token server you plan to support, make sure you have properly installed the corresponding software before installing the CiscoSecure ACS. For example, if you plan to support the SecurID ACE/Server, confirm that you have installed ACE/Server software before installing the CiscoSecure ACS. Or, if you plan to support SafeWord from Secure Computing, confirm that you have installed SafeWord Access Server software before installing the CiscoSecure ACS.
To provide better understanding of using token servers with CiscoSecure ACS software, the following example shows the procedure for a user, Hank, who authenticates as an asynchronous user to the network's CiscoSecure ACS:
User Access Verification
Username: Hank
User Access Verification
Username: Hank
Challenge: 5128
Enter Response:
User Access Verification
Username: Hank
Challenge: 51289999
Enter Response:From the token card
This challenge-response password represents the final verification needed to authenticate Hank to the CiscoSecure ACS.
Based on the previous scenario, before the user Hank can attempt a remote connection, the administrator must first confirm that SafeWord Server software or Secure ID ACE/Server is loaded.
Next, confirm that Hank's account is configured through the CiscoSecure ACS GUI so that he is required to use the DES Gold Card. In this case, the AA database would be modified to display something like the following:
user = Hank {
        password = Enigma
}
In this case, Hank would be required to give a different DES Gold Card password every time he logs in.
If you configured the profile to use a token passcode (a secure user name) and to use the Point-to-Point Protocol (PPP) with the Password Authentication Protocol (PAP) or Challenge Handshake Authentication Protocol (CHAP) for remote-node login, the user of that profile must supply the passcode in the username field in the format:
username* passcode
For example, consider a user profile called Joe. If you configure Joe's profile for Service-PPP, Password-PAP, and Password-crypto, Joe needs to enter the passcode in the username field in the following format:

Enter the PAP password in the Password field.

Finally, consider that you configured Joe's profile to authenticate by means of a one-time password card in combination with Service-PPP and Password-CHAP. In this case, Joe needs to enter the passcode in the username field and enter the CHAP password in the password field. Depending on what you specified for the CHAP password, Joe's login screen would look similar to the one shown in Figure 9-2.
This section provides the instructions you need to use the CRYPTOCard token server with your CiscoSecure ACS.
Support for CRYPTOCard is built into CiscoSecure ACS. However, before remote users can successfully dial in with CRYPTOCard, you need to perform three essential steps:
To obtain your CRYPTOCard RB-1 token cards, send your request directly to the following location:
CRYPTOCard, Inc. at 1649 Barclay Blvd., Buffalo Grove, IL 60089
Telephone: 847-459-6500 or toll free 1-800-307-7042
Fax: 847-459-6599
e-mail: token@cryptocard.com.
http://www.cryptocard.com/
After receiving your request, a CRYPTOCard representative will quickly refer you to the proper distributor or reseller in your area. CRYPTOCard is free from export controls.
While you are waiting to receive the physical CRYPTOCard RB-1 token cards, you can create a CRYPTOCard directory so that you can establish users within the CiscoSecure ACS database, as described in the next section.
In order to use the CRYPTOCards, you must establish a unique directory within your CiscoSecure ACS database. This directory will store the names of CRYPTOCard users.
To create a CRYPTOCard directory that can be accessed by the CiscoSecure ACS database:
Step 1 In the /etc directory, create a directory called CC.
Step 2 In the directory called /etc/CC, create a file (by using vi or similar text editor), called /ccsecret as shown in the following example:
vi ccsecret
Step 3 Enter the string 123456 in the text editor and save it as ccsecret.
Step 4 Change directories to move to the directory where you have the CiscoSecure ACS daemon located. For example:
cd /$base/CSU
This is the directory where all CiscoSecure ACS files are stored. This directory contains two essential files that support CRYPTOCard: initcard and initfile.
Step 5 Enter ./initfile to initialize the token card, as follows:
./initfile
You are prompted to enter a username. This will be the name of the CiscoSecure ACS user who will authenticate to the CiscoSecure ACS by means of CRYPTOCard.
Step 6 Enter a username of at least eight alphanumeric characters, for example:
Frank12
You are next prompted to enter a value for option field 1, option field 2, and option field 3. After you enter a value for an option field, you are immediately prompted to enter a value for the next option value field.
For each option field, you will select three digits from the corresponding range of values shown in parentheses. Use commas to separate values.
Step 7 For the server, enter values for option field 1, option field 2, and option field 3, as shown in the following example (you should record the option values for later reference):
1,1,0
1,3,5
1,0,1
You are now asked to enter values that will be used later when you initialize the physical token cards. The user key entered in the database and the user key loaded in the token must be identical. The whole key is 64 bits long, and it is entered as eight fields of 3 octal digits each, with each field representing one byte. Just as you were prompted previously to enter digits from a given range, you will once again enter values. This time, however, you will be prompted for key bytes rather than option fields, as shown in the following example:
111
111
111
111
111
111
111
111
After entering key byte 8, you are prompted to enter the user ID, as follows:
Enter userid: Frank12
Step 8 Enter PIN: 8888
Step 9 Enter the serial number of the CRYPTOCard, as prompted (the serial number is found on the reverse side of the CRYPTOCard):
310104001
At this point, you have completed the process of enabling the CRYPTOCard token card for the user Frank.
The following will display:
If you enter Y, you return to Step 6 where you can specify another CRYPTOCard user. If you enter N, you return to the UNIX prompt.
Step 10 Enter Y to repeat this process for each user who needs to authenticate to the CiscoSecure ACS by means of CRYPTOCard.
Step 11 Execute the initcard file by entering the following command:
$BASE/CSU/initcard -u Frank12
You need to issue a physical CRYPTOCard to each user that you specified in the CRYPTOCard directory from the previous section. Furthermore, you need to initialize each CRYPTOCard, as follows:
Step 1 Press the ON button of the CRYPTOCard.
You see the word "locked" to indicate that the card is ready to be initialized. The cards display this prompt when they are new or when someone has entered a number of incorrect PINs that exceeds the limit.
Step 2 Press the ENT button.
You are prompted for options regarding your preferences for certain operating parameters including PIN Entry Feedback, challenge-response mode, invalid PIN entry limit, minimum PIN length, automatic switch-off timeout and prompt language. The options for operating parameters are shown in Table 9-1, Table 9-2, and Table 9-3.
| Option Field 1 | Digit Value | Meaning |
|---|---|---|
First Digit (MSB) -PIN entry feedback options | 0 | No PIN entry feedback, PIN is fixed at time of issue |
| 1 | PIN entry feedback, PIN can be changed | |
| 2 | Not valid | |
| 3 | PIN entry feedback, PIN is fixed at time of issue | |
| Second Digit1 | 1 | Must be set to 1 for CiscoSecure ACS |
| Third Digit (LSB) | 0 | Must be set to 0 for CiscoSecure ACS |
| Option Field 2 | Digit Value | Meaning |
|---|---|---|
First Digit (MSB)2 -Authentication Mode and User ID Options | 0 | Full challenge mode, no user ID required |
| 1 | Full challenge mode, user ID required | |
| 2 | Event synchronous mode, no user ID required | |
| 3 | Event synchronous mode, user ID required | |
Second Digit -Number of PIN Entry Attempts | 0 | Unlimited number of attempts allowed |
| 1-7 | Indicates number of failed attempts allowed before token reverts to 'Locked' state | |
Third Digit (LSB) -Minimum PIN Length | 0 | 8-digit PIN required |
| 1 | Not allowed | |
| 2 | Not allowed | |
| 3-7 | Indicates minimum number of digits in PIN |
| Option Field 3 | Digit Value | Meaning |
|---|---|---|
First Digit (MSB) | 0 | Turn off token after 30 seconds of inactivity |
| 1 | Turn off token after 60 seconds of inactivity | |
Second Digit - Prompt Language | 0 | English 1 |
| 1 | English 2 | |
| 2 | French | |
| 3 | German | |
| 4 | Italian | |
| 5 | Portuguese | |
| 6 | Swedish | |
| 7 | Spanish | |
| Third Digit | 1 | Must be set to 1 for the CiscoSecure ACS |
Step 3 Enter the 3-digit option fields by pressing numeric keys on the CRYPTOCard keypad followed by the arrow key. The option field values are the same as those entered into the CRYPTOCard database for each particular user. Refer to the following example:
1,1,0 '1,3,5 '1,0,1 'After the arrow key is pressed for each option field, a prompt appears indicating the number of the next option field.
Step 4 When the number 4 appears, press ENT.
The prompt Key1 appears.
Step 5 Enter the same eight 3-digit octal values that you entered in the database; press the arrow key after each entry. Refer to the following example:
111 '
111 '
111 '
111 '
111 '
111 '
111 '
111 '
The display on the token card should go blank.
Step 6 Press Ent.
The prompt UserID appears.
Step 7 Enter the user ID in the same way as the user key.
In other words, enter the user ID as a series of eight, 3-digit octal values each terminated by the arrow key. Each 3-digit value represents a standard ASCII-designated character and the valid octal values range from 040 to 177.
This includes the uppercase and lowercase alphabet as well as numbers, punctuation marks, and special characters. Leading zeros must be entered explicitly. Refer to the following example:
106 '
162 '
141 '
156 '
153 '
071 '
067 '
040 '
The display on the token card should go blank.
Step 8 Press ENT.
The User ID just entered should appear.
Step 9 Press ENT.
The prompt New PIN? should appear on the token display.
Step 10 Enter the PIN that was specified earlier in Step 8 of the section "../../../../../../../home/home.htm."
Step 11 Press ENT.
The prompt Card OK appears.
Step 12 Turn off the card by pressing the On/Off key.
The initialization is complete.
For security reasons, the card and the PIN should be sent to the end user separately.
For the purpose of example, a remote user, Hank will go through the following logon sequence when dialing in to CiscoSecure ACS by means of a CRYPTOCard:
The user ID or username appears on the card.
Hank sets up a connection to his primary office using remote access software and enters his username as follows:
User Access Verification
Username: Hank
The challenge is a string of 5 to 8 digits displayed on Hank's computer, as follows:
User Access Verification
Username: Hank
Challenge: 12345678
Enter Response
User Access Verification Username:HankChallenge: 12345678 Enter Response:34567890
This challenge-response password represents the final verification needed to authenticate Hank to the CiscoSecure ACS.
The S/Key one-time password system from Bellcore provides secure authentication over networks that are subject to eavesdropping. S/Key prevents the user's secret password from ever crossing the network during authentication.
In Figure 9-4, S/Key is used as the authentication method for attempts to enable services at level 4.
For TACACS+, the privilege keyword specifies the password that users must provide in order to use services of a specified security level, as follows:
privilege = des "sefjKaLm7zybE" 3
The quoted string specifies the password that allows this user to enable and use any service that requires a level 3 authorization. The password specified by the privilege keyword means that users must enter this password when they use the enable command to enable a service. In some cases, you might want to specify a logon password that is different from the privilege or enable password. Using different passwords for different security levels is an additional security measure to prevent unauthorized access to mission-critical information.
You can also use inheritance to restrict access to the privilege-level password by making it an attribute of a group and restrict the number of users who can use the privilege password, even if it is widely known.
The following example shows the procedure for a user, identified as Sue who authenticates to the CiscoSecure ACS NAS.
User Access Verification
Username: sue
s/key 97 fr09072
Password:
The CiscoSecure ACS observes that Sue needs to supply an S/Key password.
Based on the verification display, the CiscoSecure ACS instructed the NAS to display the sequence number, 97, and a seed, fr09072, which will be used by a separate program to initiate the encryption process leading to an S/Key password.
Sue notes the sequence number and seed, then pauses from her interaction with the NAS in order to generate a password. She will generate the password by entering the sequence number and seed, along with her secret password, into an S/Key calculator program.
%key 97 fr09072Enter secret password:secret_password
The secret password is any string of at least 10 alphanumeric characters generated by Sue, for Sue, and known only by Sue.
CRAG BAKE MOLT JEAN JIBE OFT
The one-time S/Key password is always expressed as a sequence of six short English words. Note how the one-time password is generated without any secret information crossing the network.
This second password will be used to authenticate Sue to the CiscoSecure ACS. Sue now returns to her interaction with the NAS. She enters the S/Key password and is authenticated, as follows:
Password: CRAG BAKE MOLT JEAN JIBE OFT
Sue's account could also be configured so that she is required to use S/Key when she enables on the router. In this case, CiscoSecure ACS would be modified to display information similar to that shown in Figure 9-5.
In this case, Sue would be required to give a different S/Key password every time she logs in and every time she enables at level 15.
For more on S/Key authentication, refer to the section "S/Key Authentication" in the chapter "Applying TACACS+ and RADIUS Attributes."
To use CiscoSecure ACS with the SecurID ACE/Server, you must purchase and install SecurID ACE/ Server software and obtain SecurID one-time-password tokens. This section summarizes setup information for a SecurID server and client to function with CiscoSecure ACS. However, always refer to the documentation that came with your SecurID ACE/Server software for details or questionable procedures.
During the installation of your ACE/Server software, if you elect not to use the Secure Dynamics, Inc. (SDI) default directory name recommended by the SDI installation documentation, then you must set up the /etc/sdace.txt directory as described in the following procedure.
During the installation of the SDI ACE/Server software, you will have configured a way to resolve host names and services. If, during installation of the ACE/Server software, you answered "no" to the prompt "Do you want to resolve hosts and services by name," the client, server, and administrator will not use the /etc/hosts file, /etc/services file, or name server to resolve the names of servers and services. If you answered "yes," the names are resolved at run time through the /etc/hosts file, /etc/services file, or information service.
Depending on how you elected to resolve hostnames and services, follow these steps:
Step 1 Make sure that the /etc/hosts file has the name of the SDI ACE/Server and that the SDI ACE/Server /etc/hosts file has the name of the CiscoSecure ACS (the CiscoSecure ACS acts as the client to the ACE/Server).
Step 2 Make sure that the definition "securid 5500/udp" found in the /etc/services file of the ACE/Server, is the same as the /etc/services file of the CiscoSecure ACS.
Step 3 Copy the sdconf.rec file from the ACE/Server to the CiscoSecure ACS.
This file might be in the default directory /sdi/ace/data, or a directory that is established while installing the SDI ACE/Server software. In either case, make sure that the file is copied to the same path used during the ACE/Server software installation. You can specify the location of the sdconf file to the CiscoSecure ACS (the libsdi.so library) in one of two ways:
(a) Set up the environmental variable VAR_ACE to access the directory that libsdi.so can access to find the sdconf.rec file.
(b) Include this same VAR_ACE record in a file named /etc/sdace.txt (a fixed name for libsdi.so to search for in case the environmental variable is not found). In this way, the SDI library software in CiscoSecure ACS will search for the environmental variable VAR_ACE first; if not found, it will next search in the /etc/sdace.txt file for the VAR_ACE definition. If found, the SDI library software in CiscoSecure ACS will then set up an environmental variable. (Otherwise, if the environmental variable cannot be found, the library cannot continue and will fail with an error in syslog.)
This section summarizes the CiscoSecure ACS configuration for ACE/Server setup.
Step 1 Run sdadmin.
Step 2 Use the Add Client option to add the CiscoSecure ACS to the client list.
Step 3 Select the User Activation check box.
When the first authentication takes place from the CiscoSecure ACS to the ACE/Server, the ACE/Server sends the node secret file to its client, the CiscoSecure ACS. The application programming interface of the CiscoSecure ACS stores this node secret file in the same directory as the sdconf.rec file. The name of this node secret file corresponds to the name used in the /etc/services file to associate a name, port number, protocol, and alias name to a service.
For example, if you set up a service name of "eatabug 5566/udp," then the name of the secret node file on the client (the CiscoSecure ACS) will be "eatabug." This name is in the sdconf.rec file so the SDI API can function.
When you run the sdadmin program, use the Add Client option to add the CiscoSecure ACS to the client list. Also, enable the User Activation option to ensure that all users configured on the ACE/Server are granted access to the CiscoSecure ACS.
The sdconf.rec file is encrypted and this is why the CiscoSecure ACS installation does not attempt to recreate this record based on queries and answers from the user during installation. To ensure that the client is working properly with the sdconf.rec file of the SDI ACE/Server, you must copy sdconf.rec to the specified directory of the CiscoSecure ACS during installation.
If you need to set up CiscoSecure on a ACE/Server for NT, go to the next section.
To configure CiscoSecure for UNIX with ACE/Server for NT, first make sure these conditions are met:
Then do this:
Step 1 Install the ACE/Server client on the CiscoSecure ACS from the ACE/Server CD-ROM making sure to do these things:
(a) From the aceclnt/sol/ directory on the CD-ROM, copy sol_clnt.tar to a temporary directory on your hard disk.
(b) From the temporary directory, type:
tar -xvf col_clnt.tar
(c) Type: ./sdsetup -client
(d) Follow the prompts to install the client software. Choose / as the directory to install.
Step 2 Copy the sdconf.rec file from the ACE/Server located in /ace/data to the CiscoSecure machine /ace/data. This is the same directory structure created on the CiscoSecure machine during the client installation.
Step 3 From /ace/prog type: ./sdinfo to see what the client name is and what IP address is selected. For example:
Step 4 On the client (the CiscoSecure ACS), add the ACE/Server to the host's file.
Step 5 Create the client on the ACE/Server:
(a) Run the ACE/Server Database Administration software.
(b) Click Client.
(c) Click Add Client.
(d) Client OK. You should see the IP address, which should match the one shown in sdinfo.
Step 6 If the client is multi-home, do this:
(a) Click Secondary Nodes.
(b) Type the hostname for the other interface (found in the host's file on the client). For example:
TheRock# more hosts(c) Click OK. The IP address should be displayed.
Step 7 Add users as you normally would on the ACE/Server Database Administration GUI.
To use the CiscoSecure ACS with the Secure Computing (formerly called Enigma Logic) SafeWord, you must purchase and install SafeWord Server software and obtain Secure Computing one-time-password cards. During the CiscoSecure ACS installation, if you specified Secure Computing Token Card as one of the token cards you plan to use, no additional configuration steps should be required.
This section summarizes how to set up a Secure Computing client on a CiscoSecure ACS. However, always refer to the documentation that came with your SafeWord authentication software for details or questions about procedures.
The installation of the SafeWord authorization files is best accomplished using your Solaris CD-ROM drive. Follow these steps:
Step 1 Make sure you have enough room on your hard drive. The server installation will require up to 25 megabytes of disk space. The client installation will use approximately 1 megabyte of disk space.
Step 2 Run the installation as root. From within the install directory on the CD-ROM, start the ./install.sh Bourne shell script. You will be prompted for the necessary installation information. The installation is divided into two parts: servers and clients.
Step 3 Install the server software.
Step 4 Start ./install.sh, and then read the license section under Option 1.
Step 5 Select Option 2, Install SafeWord Authentication Servers.
The script will then ask you to agree to honor the license before installing the server or clients.
There are three installation options to accommodate different customer needs:
In the third case, the clients will be installed after the server, on the same host machine and/or other machine(s).
After starting the ./install.sh script and designating the host platform, the script needs to identify where to install the SafeWord servers and related files. The default is /usr/safeword, but you can install the files to almost any location where there is enough disk space. (You cannot install to the directory the installation scripts are in, because this process would overwrite the installation scripts.)
 | Caution Any directory you specify will be created or overwritten. If the directory exists prior to the installation, you will be warned; but, if you select overwrite, the contents of the directory will be overwritten. Be careful as the script is running as root and it is possible to delete important files or directories. |
The computer will spend up to several minutes uncompressing and untarring the archived files. When the files have been decompressed and copied to your computer, the script will prompt you, then add the SafeWord clients as legal shells. The utilities Sid and ident need to be able to execute as shells.
The script will then prompt you for a "SafeWord AS Server Key" (SafeWord authentication server key).
Step 6 Enter a SafeWord authentication server key.
This key is used to secure Extended Authentication and Single Sign-on Protocol (EASSP) connections between the SafeWord authentication server, sasd, and the SafeWord mirroring application, mirrord.
Step 7 For the first host installation, press Enter to accept the default random number.
The database is synchronized by "Mirroring."
Step 8 If you are planning to use the mirroring feature, select yes when prompted. The script will ask you which machines will be mirroring with the current host.
You will then be asked whether you want to install the RADIUS and TACACS servers.
After the appropriate servers have been selected, the install executable binary program will process the license file and initialize the user database. At this point, the trial license is in effect. It will allow three users and will expire within a year. If you have purchased a license or have an extended trial expiration date, enter the information into the IDUTIL program in the directory containing the servers.
Step 9 Start IDUTIL and enter super, which initially does not require a password.
Step 10 Select Configure, then Options, and enter the license information.
Your installation of the SafeWord servers is complete. You can now exit from the installation script, or install the SafeWord client as described in the next section.
The SafeWord client, sid, can be installed on the host server or on another UNIX host.
The client will make authentication requests of the SafeWord authentication server, sasd, via the proprietary EASSP protocol over a TCP/IP network. UNIX login authentication from the host machine can be accomplished from ident, a utility program that does not require TCP/IP.
UNIX login authentication from a remote machine requires the sid client to be installed on the remote machine. Take the following steps:
Step 1 If it isn't running already, start the installation script ./install.sh from the SafeWord CD-ROM.
Step 2 Select option 2, Install Clients, then select the correct hardware platform.
Step 3 Enter the name of the directory for your client.
After the files have been copied to the directory, you will be prompted for the name of the sasd host.
The client installation is complete. Sid has now been installed on your system.
In order for sid to authenticate users, set it up to execute when the users log in to the system.
Take the following steps:
Step 1 Find the login shell in the /etc/passwd file.
Step 2 Change the login shell for users who will be authenticated from sh or csh (etc.) to ident or sid.
Sid is used for authentication via TCP/IP and for remote machines.
Ident does not require TCP/IP, so it can only be used on the machine hosting the authentication server.
The users to be authenticated also need to be registered in the SafeWord database. This is accomplished through the idutil program.
Step 3 Start idutil from within the main directory, select Edit User Database, and enter the user's information.
See the SafeWord Supervisor Manual for more information. This manual is shipped with the SafeWord CD. Additional documentation can be found under the main install directory for Safeword in the DOCS directory. Instructions on the configuration and use of the Secure Computing Token Card can also be found at that location.
Under most circumstances, the CiscoSecure ACS should support use of RADIUS with token card. However, if you experience problems with the password--for example, if the program prompts you for the password two or more times--then you should try creating a new attribute to handle the problem, following this procedure:
Step 1 Create a new RADIUS dictionary by copying the Cisco RADIUS dictionary to a new file and giving it a new name.
Step 2 Create a new attribute, Cisco-Token-Immediate, in the new RADIUS dictionary. This attribute should have the same format as the Ascend-Token-Immediate attribute in the Ascend dictionary:
Step 3 Change the NAS profile(s) so that they are directed to use this new dictionary instead of the default Cisco dictionary.
Step 4 In the user profile(s), add a Cisco-Token-Immediate attribute to the check items with an enum value of Tok-Imm-Yes.
|
|