|
|

You can use the Timbuktu Pro application to control other networked personal computers also equipped with Timbuktu Pro. With Timbuktu Pro installed on your network's computers, you can perform the following functions:
Using Timbuktu Pro you can access other Timbuktu Pro equipped computers over your network, from a remote location via the phone lines, and over the Internet. Just as you can access other computers using Timbuktu Pro, other users can also access your computer at the same time. For example, another Timbuktu Pro user can send files to you while you are exchanging files with a third computer. To ensure privacy on your computer, you can also define different levels of user access to your information.
Take the following steps to start up Timbuktu Pro:
Step 1 Use Net Launcher to log in to your remote network as you normally do.
Step 2 Double-click on the Timbuktu Pro icon in the CiscoRemote Plus program group.
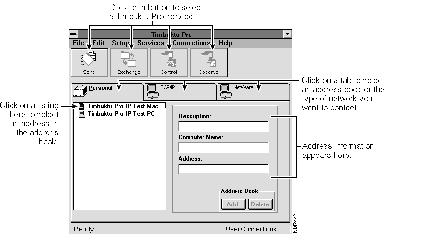
The Timbuktu Pro window opens. (See Figure 4-1.)
Take the following steps to set up user access:
Step 1 Select User Access Privileges from the Setup menu.
Step 2 Select the network protocol options (NetWare and/or TCP/IP) you want to use with Timbuktu Pro.
Step 3 Click OK.
Timbuktu Pro users can access your computer as guests or registered users. Guests can access your computer without entering a password. Registered users must enter a username and password to connect to your computer. You can define the access privileges granted to both guests and registered users.
Take the following steps to define access privileges:
Step 1 Select Define Users from the Setup menu.
The Define Users window opens. (See Figure 4-2.)
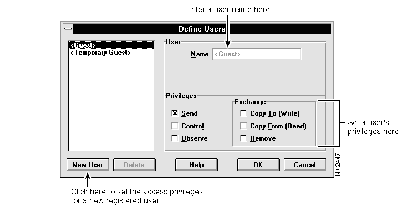
Step 2 Select <Guest> and select the privileges you want to grant (Send, Control, or Observe).
These privileges will be given to all Timbuktu Pro users who access your PC. To add a new registered user, click on New User, enter a name and password (repeating the password in the Confirm field), and assign privileges to that user.
Step 3 Repeat Step 3 for each registered user you want to add.
Step 4 Click OK.
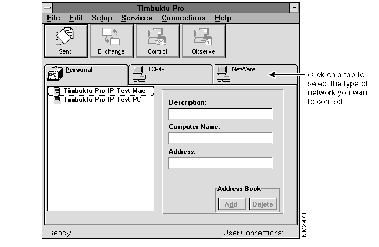
When you want to access another PC, you first select the type of network protocol that is required, either NetWare or TCP/IP, and then specify the name or address of the computer. (See Figure 4-3.)
Take the following steps to connect to a Novell NetWare network:
Step 1 Click on the NetWare connection tab. (See Figure 4-3.)
Step 2 Click on Search to generate a list of all the available Novell/IPX addresses.
To find an address that begins with a specific combination of characters, enter the characters in the field below the Search button and click on Search.
Take the following steps to connect to a TCP/IP network:
Step 1 Click on the TCP/IP connection tab.
Step 2 Enter the IP name or IP address in the IP Address field and press Enter.
You can record the addresses of computers you frequently access in two Timbuktu Pro address books. One is a personal address book that you can maintain with your own address information. The other is a shared address book that makes addresses available to all users on the network.
Take the following steps to select an address from an address book:
Step 1 Click on the Personal or Shared tab for the address book you want to open.
Step 2 Click on an address book entry.
The name and address of the chosen computer appears.
Once you have the address of a computer that you can access, you can quickly add it to your personal address book.
Take the following steps to add an address to your personal address book:
Step 1 Select the Shared, TCP/IP, or NetWare tab.
Step 2 Select or enter the address you want to add to your address book.
Step 3 Click on the Add button.
An address confirmation window opens.
Step 4 Click OK.
The address is added to the personal address book.
You can use Timbuktu Pro to send short e-mail messages (called FlashNotes) and files to other Timbuktu Pro users.
Take the following steps to send FlashNotes and files to remote computers:
Step 1 Select the Personal, Shared, TCP/IP, or NetWare tab.
Step 2 Select or enter an address.
Step 3 Click on the Send button.
A FlashNote window opens. The address you selected appears to the right of the To button.
You can attach files to be transferred with the FlashNote:
Step 4 Enter your FlashNote message in the message window.
Step 5 Click on the Send button to send the FlashNote.
Take the following steps to exchange files with another PC or user:
Step 1 Select the Personal, Shared, TCP/IP, or NetWare tab.
Step 2 Select or enter an address.
Step 3 Click on the Exchange button. (See Figure 4-4.)

The Exchange window opens. A list of files on your PC appears at the top of the window. A list of files on the remote PC appears below it.
Step 4 Drag the files you want to copy from one list to the other.
you can use the Control button to watch and control a remote computer and use the Observe button to watch--but not control--the activities on a remote computer.
Take the following steps to control or observe other computers:
Step 1 Select the Personal, Shared, TCP/IP, or NetWare tab.
Step 2 Select an address.
Step 3 Click on the Control or Observe button. (See Figure 4-5.)
The Control or Observe window appears.

To stop controlling or observing the remote computer, close the window.
You can give temporary access privileges to a remote user by designating that user as a temporary guest. The remote user must use Timbuktu Pro to access your computer.
Take the following steps to add a temporary guest:
Step 1 Select Admit Temporary Guest from the Connections menu.
Step 2 Have the remote user connect to your computer using Timbuktu Pro.
The name of the service being requested and the guest's computer name appear in the Admit Temporary Guests field.
Step 3 Click OK to allow access by the temporary guest.
To close Timbuktu Pro, select Exit from the File menu.
If there are active connections, Timbuktu Pro alerts you before terminating them.
To display Timbuktu Pro's online help, press F1 or select Contents from the Help menu.
For more information about the features of Timbuktu Pro refer to the document, CiscoRemote Plus Administrator Guide, which is available on the CiscoRemote Plus CD.
|
|