|
|

This chapter provides information on configuring CiscoSecure GRS using the graphical user interface (GUI) as well as on enabling and using the CiscoSecure GRS features.
You can configure CiscoSecure GRS by the following methods:
The default directory for the GUI startup script, grs_gui, is /opt/CSCOgrs/bin. If you did not select the default directory during installation, modify your entries accordingly.
To start the CiscoSecure GRS GUI, start CiscoSecure GRS as described in the section "Starting CiscoSecure GRS" in the chapter "Installing and Starting CiscoSecure GRS," then follow these steps:
Step 1 Log in as root and enter:
cd $GRSHOME/bin
Step 2 Enter:
./grs_gui
If this is not the first time you are starting the CiscoSecure GRS GUI and you have not changed data stores (from flatfile to Oracle or vice versa), skip to the section "Additional Configuration for CiscoSecure GRS Using the GUI."
If this is the first time you are starting the CiscoSecure GRS GUI or if you have changed data stores, the Express Setup Wizard guides you through the steps necessary for basic CiscoSecure GRS configuration. The CiscoSecure GRS Express Setup Welcome Window opens. See Figure 3-1.

The Local Domain Setup window opens automatically. See Figure 3-2.
Enter the information for your system. Refer to the section "Preparing to Install CiscoSecure GRS" in the chapter "Installing and Starting CiscoSecure GRS."
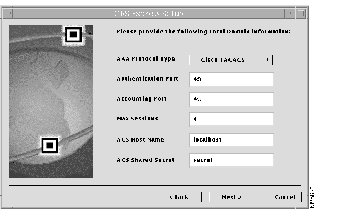
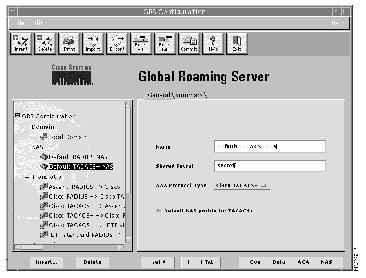
After you have entered the required information in the Local Domain Setup window, the Default NAS Setup window opens automatically. See Figure 3-3.
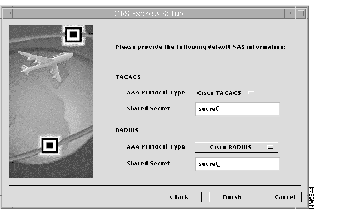
Enter some or all of the following information for the NAS, depending on which AAA protocols you are using on the NAS:
Select one of the following AAA Protocol Types, depending on the dictionary you are using:

This section provides additional instructions for configuring CiscoSecure GRS using the GUI. For information on configuring CiscoSecure GRS using the command-line interface, see the section "Minimum Configuration for CiscoSecure GRS Using the Command-Line Interface" in the chapter "Using the CiscoSecure GRS Command-Line Options and Utilities."
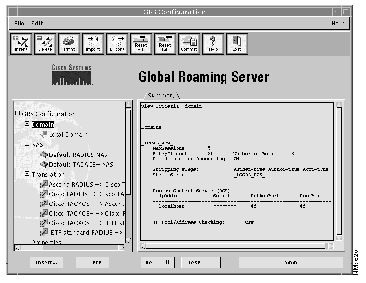
The GRS Configuration window features a navigation tree on the left and a workspace with tabs on the right. See Figure 3-5.
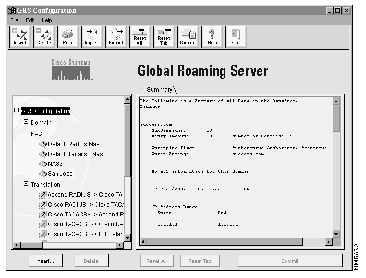
The icons and tabs change according to what is selected in the navigation tree.
The GRS Configuration Summary tab opens in the workspace and displays a summary of the data in the data store:
No ACS information for this domain
The row of buttons at the top of the window is called a toolbar. See Figure 3-6.

Use the toolbar to perform the following tasks:
All of the drop-down menu selections are the same as the buttons in the toolbar, with one addition. From the File menu, you can click Save Summary to File to save a summary of the information on the active tab to an ASCII file.
This section contains information on adding and configuring domains using the GUI.
To add a domain, follow these steps:
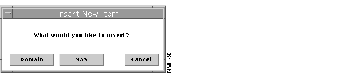
Step 1 From the GRS Configuration window, click Insert. You are asked whether to add a domain or NAS. See Figure 3-7.
Step 2 Click Domain. The New Domain window opens.
Step 3 Click the General tab and enter the name of the new domain.
Step 4 Click the ACS tab and enter the following information:
Step 5 Click Commit.
To delete a domain, follow these steps:
Step 1 In the navigation tree, select the name of the domain to delete.
Step 2 Click Delete. You are prompted to confirm the deletion.
Step 3 Click Yes to confirm or No to cancel the deletion.
In the navigation tree, click the name of the domain to configure. The following tabs display in the workspace:
To view a summary of the domain information, click the Domain Summary tab. The Domain Summary tab opens in the workspace. See Figure 3-8.
To view or change the domain general information, click the Domain General tab. The Domain General tab opens in the workspace. See Figure 3-9.

You can view or change the information for the domain. See the section "GRS Configuration Window" for an explanation of each field.
To insert the domain name into the information listed in accounting packets, check the Insert domain AV pair into Local Domain accounting packets check box. This adds the domain name to the end of accounting packets going to the Local Domain in the format domain=domainname. This item is not available if your Local Domain is RADIUS. The other effect is to remove the domain name from the user name in the accounting packet. For example, mary@isp1.com becomes mary, and domain=isp1.com is added to the end of the packet. See the section "Accounting for the ISP" in the "Introduction to the CiscoSecure Global Roaming Server" for more information.
When you have finished making changes, click Commit.
To restrict IP addresses and IP pools from the ACS, follow these steps:
Step 1 In the GRS Configuration window, select the domain of the ACS.
Step 2 Check the Restrict IP Address and Pools from ACS check box. A darker shade of gray in the box indicates that this feature is enabled. When this feature is enabled, the NAS or ACS always controls the IP pools and addresses. CiscoSecure GRS limits the allowed IP addresses and pools returned by the ACS to those configured for the domain. See the sections "Domain IP Address Range Tab" and "Domain IP Pools Tab" for more information.
Step 3 When you have finished making changes, click Commit.
To view or change the Domain ACS information, click the Domain ACS tab. The Domain ACS tab opens in the workspace. See Figure 3-10.
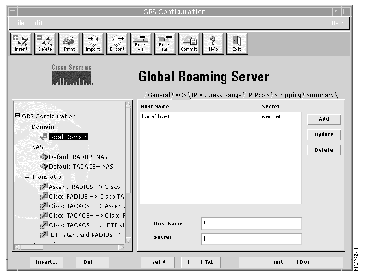
Enter the host name and shared secret for each ACS you want to add. You can enter as many ACSes as you want. If CiscoSecure GRS fails to connect to the first ACS on the list, it will try to connect to the next ACS, and so on down the list. The amount of time CiscoSecure GRS waits before moving to the next ACS on the list depends on the values for the Number of retries and Seconds between retries parameters set on the Domain General tab. See the section "Domain General Tab" for more information. Additionally, the NAS timeout must be set to an interval smaller than the Seconds between retries setting so that the NAS does not time out before CiscoSecure GRS can retry. If you want to change the order of the ACSes on the list, you must delete and re-enter the applicable ACS.
To add an ACS, enter the information in the Host Name (name or IP address) and Secret (shared secret) dialog boxes, then click Add.
To update information for an existing ACS, select the ACS whose information you want to change, enter the new information, then click Update.
When you have finished making changes, click Commit.
To view or change the IP Address Range information, click the Domain IP Address Range tab. The IP Address Range tab opens in the workspace. See Figure 3-11.
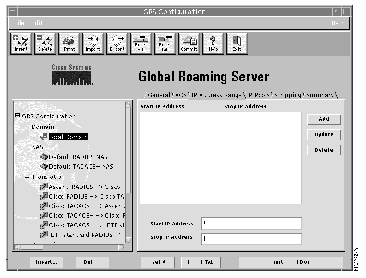
To add a domain IP address range, enter the information in the Start IP address and Stop IP address dialog boxes, then click Add.
To update information for an existing domain IP address range, select the address range whose information you want to change, enter the new information, and click Update.
To delete an existing range, click the range, then click Delete.
You can enter multiple address ranges. CiscoSecure GRS will check all of the ranges to determine if the address returned by the ACS for the dial-in user is valid for the domain. When you have finished making changes, click Commit.
To view or change the IP Pools information, click the Domain IP Pools tab. The Domain IP Pools tab opens in the workspace. See Figure 3-12.
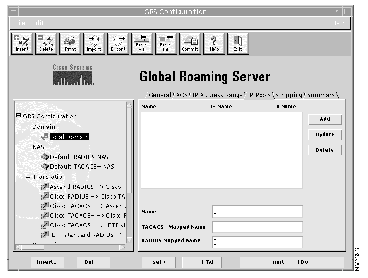
This tab serves as a translation table and as a range-checking table if the range-checking box is highlighted on the General tab.
If you are doing translation, you must enter the information on this tab, even if you have not highlighted the range-checking box.
To add a domain IP pool, enter the following information:
ippool1.
ippool2.
1.
For example, if a TACACS+ ACS returns an IP Pool Name of ippool1, the IP pool name that is returned to the TACACS+ NAS is ippool2. The RADIUS IP pool name is returned to the NAS as 1. This allows you to perform the following actions:
Note that the RADIUS Mapped Name must be a number from 1 through 9.
When you have finished entering information, click Add.
To update information for an existing domain IP pool, select the pool name whose information you want to change, enter the new information, then click Update.
To delete an existing domain IP pool, select the name of the pool, then click Delete.
When you have finished making changes, click Commit.
To view or change the domain stripping information, click the Domain Stripping tab. The Domain Stripping tab opens in the workspace. See Figure 3-13.
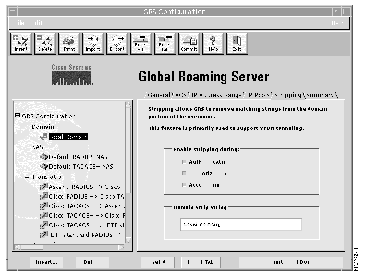
To enable stripping, follow these steps:
Step 1 Check one or more boxes to select the packet types for which you want to enable stripping. Choices are the following:
Step 2 In the Domain Strip String box, enter the matching domain information to strip. You can use any alphanumeric character, but special characters such as pound (#), dollar ($), percent (%), and ampersand (&) cannot be used.
Step 3 Click Commit.
Partial domain matching enables you to allow CiscoSecure GRS to accept partial domains to strip. For example, if the entire domain is mary@eng.dept.cisco, you can configure CiscoSecure GRS to strip dept.cisco so the user is passed as mary@eng. You can use this feature, for example, to pass packets off to other company's users and still use your own ACS.
Follow these steps to enable partial domain matching:
Step 1 Enable stripping as described in the section "Enabling Stripping."
Step 2 Check Allow Partial Domain Matches.
Step 3 Enter the name of the subdomain for which to enable partial domain stripping. You can use any special character, such as percent (%), asterisk (*), pound (#), etc., to indicate a prefix, suffix, or subdomain delimiter. (Note that GRS translates subdomain delimiters to dots (.) internally.) If you try to use the same character to indicate more than one type of delimiter, CiscoSecure GRS will return an error message.
Step 4 When you have finished making changes, click Commit.
Alternatively, you can set this feature in the grs.ini file.
This section contains information on adding and configuring NASes using the GUI.
To see a list of the NASes configured for use with your CiscoSecure GRS, in the navigation tree, click NAS. The NAS Summary tab opens in the workspace. See Figure 3-14.
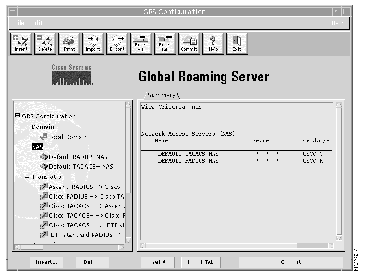
The NAS Summary window displays the following information:
To add a NAS, follow these steps:
Step 1 From the GRS Configuration window, click Insert. The Insert New Item dialog box opens. See Figure 3-15.
Step 2 Click NAS. The New NAS window opens in the workspace. See Figure 3-16.
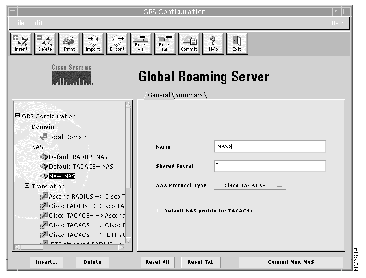
Step 3 Enter the name of the new NAS.
Step 4 Enter the shared secret (password) to be used.
Step 5 From the AAA Protocol Type drop-down box, select one of the following AAA protocol types:
Step 6 (Optional) To make the selected NAS the default NAS for the TACACS+ or RADIUS protocol, check the Set As Default check box. A darker shade of gray indicates that this option is enabled.
Step 7 Click Commit.
Step 8 Click Yes to confirm changes or No to cancel changes.
To delete a NAS, follow these steps:
Step 1 In the navigation tree, select the name of the NAS to delete.
Step 2 Click Delete. You are prompted to confirm the deletion.
Step 3 Click Yes to confirm or No to cancel the deletion.
In the navigation tree, click the name of the NAS to configure.
The NAS Summary tab opens in the workspace. See Figure 3-17.
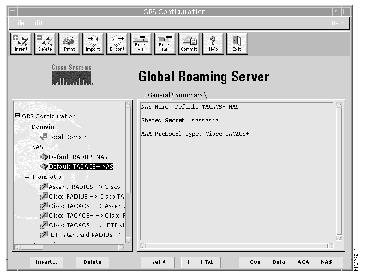
The following information displays:
To view or change the general information for the selected NAS, click the NAS General tab. The NAS General tab opens in the workspace. See Figure 3-18.
Information you can change on this tab includes the following:
When you have finished making changes, click Commit.
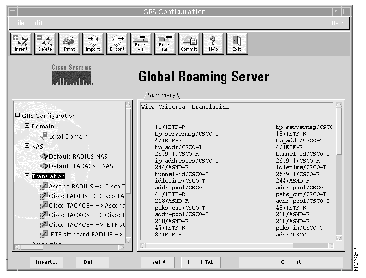
To see a list of AV pairs that will be translated between the listed AAA protocols, in the navigation tree, click Translation. The Translation Summary tab opens in the workspace. See Figure 3-19.
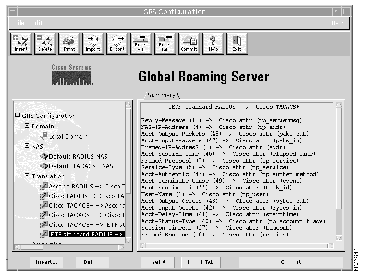
To see a list of the AV pairs that are translated for each listed translation (for example, IETF standard RADIUS-to-Cisco TACACS+), in the navigation tree, click the type of translation you want to view. The Summary tab for the selected translation opens in the workspace. See Figure 3-20.

To configure CiscoSecure GRS properties, click Properties in the navigation tree. The Properties Summary tab opens in the workspace. See Figure 3-21.
The Properties Summary tab lets you view the following information. See the applicable section for each tab for more information.
To configure general attributes, click the Properties General tab. The Properties General tab opens in the workspace. See Figure 3-22.
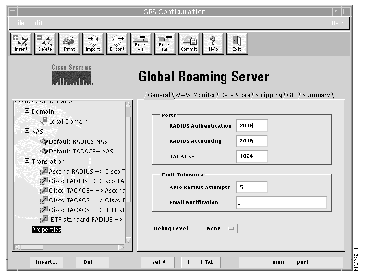
Use the Properties General tab to configure the following parameters:
When you have finished making changes, click Commit Properties.
To configure the type of web browser to use to view statistics and the machine on which to use the browser, follow these steps:
Step 1 Click the Properties WWW Monitor tab. The Properties WWW Monitor tab opens in the workspace. See Figure 3-23.
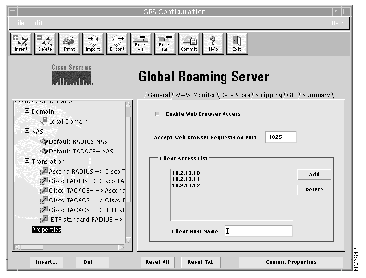
Step 2 To enable or disable the ability to view statistics using a web browser, click the Enable Web Browser Access check box. A darker gray color in this box indicates that browser access is enabled.
Step 3 To change the port on which to run the web browser, check the Accept Web Browser Requests on Port check box and enter the new port number.
Step 4 To add a workstation to the list of those allowed to monitor CiscoSecure GRS using a web browser, enter the name or IP address in the Client Host Name box and click Add. The name or IP address appears in the Client Access List box.
Step 5 To delete a workstation from the list of those allowed to monitor CiscoSecure GRS using a web browser, in the Client Access List box, click the name or IP address of the workstation to delete and click Delete.
Step 6 When you have finished making changes, click Commit Properties.
See the section "Viewing CiscoSecure GRS Status and Current Users" for more information.
To change data stores from flatfile to Oracle and vice versa, click the Properties Data Store tab. The Properties Data Store tab opens in the workspace. See Figure 3-24.
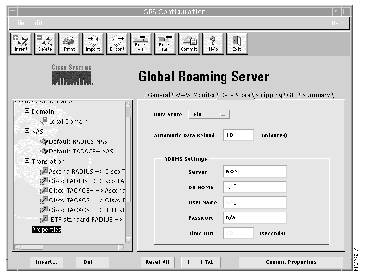
You can change the following information:
When you have finished making changes, click Commit.
To configure stripping of domains, follow these steps:
Step 1 Click the Properties Stripping tab. The Properties Stripping tab opens in the workspace. See Figure 3-25.
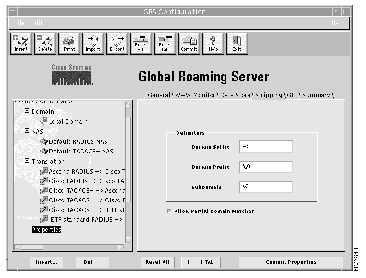
Step 2 Enter the matching domain information to strip. You can use any alphanumeric character, but it is best to use special characters such as pound (#), dollar ($), percent (%), and ampersand (&) so that they do not conflict with user and domain names.
Step 3 When you have finished making changes, click Commit.
The CiscoSecure GRS Online Help is in HyperText Markup Language (HTML) format, so CiscoSecure GRS must have a web browser configured to view the Online Help file. Follow these steps:
Step 1 Click the Properties GUI tab. The Properties GUI tab opens in the workspace. See Figure 3-26.
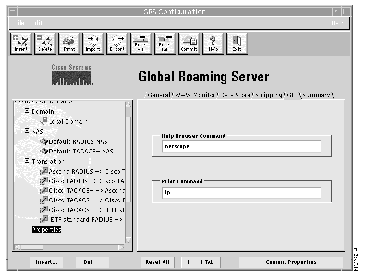
Step 2 To change the browser you use to view the CiscoSecure GRS Online Help, highlight the current information and enter the exact command to start the browser you want to use. The default is netscape. See your browser documentation for more information.
Step 3 To change the print command, highlight the current information and enter the exact command for your printer. The default is lp (line printer). See your printer documentation for more information.
Step 4 When you have finished making changes, click Commit Properties.
To save a summary of your CiscoSecure GRS configuration, follow these steps:
Step 1 From the File menu, select Save Summary. The Save Summary window opens. See Figure 3-27.

Step 2 Change to the path or folder you want, and enter a name for the file, then click OK to create a new file or Update to over-write an existing file.
To exit the GUI, follow these steps:
Step 1 Click Exit. You are prompted to confirm that you want to exit.
Step 2 Click Yes.
To view domain session information for CiscoSecure GRS, you must use a web browser such as Netscape Navigator or Microsoft Internet Explorer. During installation, you should have specified a machine on which to run the web browser. See the chapter "Installing and Starting CiscoSecure GRS." If you did not select a browser during installation, see the section "WWW Monitor" for the instructions to configure this option.
Step 1 Run CiscoSecure GRS.
Step 2 Open your web browser. See your browser documentation for more information.
Step 3 Open the URL for the CiscoSecure GRS monitor. This URL is the name of the server on which CiscoSecure GRS is running, followed by a colon (:) and the number of the port you have configured for monitoring CiscoSecure GRS via the web. For example, if your CiscoSecure GRS is running on a server named server1 and is configured to run the web browser on port 1025, the URL would be:
To find the port number:
(a) From the GRS Configuration window of the GUI, click Properties.
(b) Click the WWW Browser tab. The port number is listed in the Accept Web Browser Requests on Port section.
Alternatively, you can view or set the port number in the grs.ini file.
The CiscoSecure Global Roaming Server Status window opens.
See Figure 3-28.
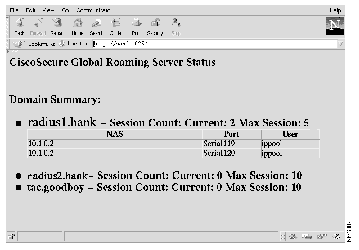
The CiscoSecure Global Roaming Server Status window shows the following information:
10.1.1.1
PRI:0
mary
Step 4 To refresh the information, click Reload in Netscape or Refresh in Internet Explorer. See your web browser documentation for more information.
Step 5 To exit the monitor, exit your web browser. See your web browser documentation for more information.
|
|