|
|

Audience ² Organization ² Related Documentation ² Notation
The LightStream 2020 Operations Guide is a task-oriented guide that describes how to operate a network of LightStream 2020 enterprise ATM switches. The guide presents an overview of network operation tasks, describes the command line interface (CLI), and provides procedures for monitoring switches and collecting statistics.
Your network should be fully installed and configured before you attempt to operate it. Refer to the LightStream 2020 Installation and Troubleshooting Manual for installation instructions and to the LightStream 2020 Configuration Guide for information on configuration.
The LightStream 2020 Operations Guide is intended for anyone who operates a LightStream network. This guide provides detailed procedures to help you operate the LightStream network after the network has been installed and configured.
Users of the LightStream document set are expected to have a general understanding of basic data communications concepts, some knowledge of UNIX, and a familiarity with the interfaces used by the devices connecting to their LightStream network.
It is recommended that you have a working knowledge of TCP/IP networks. For more information about TCP/IP networks, refer to Internetworking with TCP/IP, Volume 1, Principals, Protocols, and Architecture by Douglas E. Comer, 1991, Prentice-Hall, Inc. (ISBN 0-13-468505-9).
This guide is organized as follows:
The following is a list of LightStream manuals and other material relevant to LightStream users.
Before attempting to install, configure, operate, or troubleshoot a network of LightStream switches, read the LightStream 2020 System Overview. This overview provides important background information about the LightStream product and the ATM technology on which the product is based. After reading the LightStream 2020 System Overview, refer to Table 1-1 to determine which manuals you should read next.
| If you want to: | Read the following manuals in the order listed below: |
|---|---|
| Install LightStream switches | LightStream 2020 Release Notes1
LightStream 2020 Site Planning and Cabling Guide LightStream 2020 Installation and Troubleshooting Manual |
| Configure LightStream switches | LightStream 2020 Release Notes1
LightStream 2020 Configuration Guide LightStream 2020 Online Help Screens |
| Set up or expand a LightStream network | LightStream 2020 Release Notes1
LightStream 2020 Administration Guide LightStream 2020 Online Help Screens |
| Operate a LightStream network | LightStream 2020 Release Notes1
LightStream 2020 Operations Guide LightStream 2020 Command and Attribute Reference Guide LightStream 2020 Command Line Interface (CLI) Reference Card LightStream 2020 Traps Reference Manual LightStream 2020 Online Help Screens |
| Manage or troubleshoot a LightStream network | LightStream 2020 Release Notes1
LightStream 2020 Operations Guide LightStream 2020 Administration Guide LightStream 2020 Command and Attribute Reference Guide LightStream 2020 Command Line Interface (CLI) Reference Card LightStream 2020 Traps Reference Manual LightStream 2020 Online Help Screens |
| Troubleshoot LightStream hardware | LightStream 2020 Release Notes1
LightStream 2020 Installation and Troubleshooting Manual LightStream 2020 Site Planning and Cabling Guide |
| |
In this document, several conventions distinguish different types of graphics and text.
| Convention | Purpose | Example |
|---|---|---|
Bold screen literal type
| Represents user input. | $date
|
| Screen literal type | Represents system output. | Wed May 6 17:01:03 EDT 1994 |
| Boldface type | Denotes names of commands, command arguments, and switches. Command names are case sensitive; enter them exactly as they appear in the text. | Issue the clear command. |
| Italic type | Used for titles of documents and for emphasis. | LightStream 2020 Configuration Guide. File names are case sensitive. |
| Angle brackets < > | Indicate user-specified parameters or classes of user responses. When you see this notation in a syntax statement, make the substitution but do not type the angle brackets. | If you see:
you might type: |
| Square brackets [ ] | Indicate keys on the keyboard, or optional arguments or parameters for commands. You can omit optional arguments and parameters in any command. | Press [Return].
cli> |
| Caret symbol ^ | When the caret symbol precedes a character, it refers to the control key. | ^X is the same as [Control]X |
| Curly braces { } | Indicate a choice of arguments or parameters for commands. Arguments or parameters are separated by a vertical line {|}, and you must select one. | cli> set cli traplevel
|
Where to Begin ² Network Operations Tasks ² Tools for Network Operation
This chapter provides a list of activities you should complete before you attempt to operate your network of LightStream 2020 enterprise ATM switches. It then describes operations activities that you can perform on a LightStream network.
This chapter also explains some of the different ways you can operate your LightStream network, depending on your hardware and software. Once you determine how you will operate your network, you can use that information to determine whether you need to start the command line interface (CLI) or a third-party network management system (NMS). The LightStream CLI is described in detail in this guide. For information on a third-party NMS, refer to the documentation that came with the NMS.
Before you attempt to operate your network, each LightStream switch should be fully installed, powered on, and configured. The following checklist describes the tasks that should be complete before you begin operating your network. For information on these tasks, refer to the LightStream 2020 Installation and Troubleshooting Manual and the LightStream 2020 Configuration Guide, or check with your network administrator.
You can perform a wide variety of tasks on your LightStream network. You will perform some tasks every day and others only occasionally. This section lists the different types of tasks that you can perform.
This guide covers general monitoring and control and statistics and data collection. General monitoring and control refers to all the day-to-day activities you perform on the LightStream network, except for monitoring traps. Trap monitoring is discussed in the LightStream 2020 Administration Guide.
A LightStream network can be operated and managed in two different ways:
This section describes these two methods of network operation.
The LightStream switch comes with a configuration program called the configurator. The configurator is a user-friendly graphical interface that, in many cases, reduces configuration tasks to the simple click of a mouse button. A network administrator uses the configurator (for the most part) to manage a network of LightStream 2020 enterprise ATM switches. See the LightStream 2020 Configuration Guide for further details.
LightStream technology provides graphical displays of individual LightStream switches, cards, and ports via the LightStream monitor. In most instances, you will want to monitor the network with the LightStream monitoring tool. (See Chapter 5 of this guide.) However, if the monitor is unavailable to you, you can use the CLI commands in this document to perform many monitoring tasks.
Every LightStream switch includes a software program called the CLI. The CLI is a simple, line-based interface that runs on a LightStream switch or a Sun SPARCstation. You can access the CLI by connecting a terminal to a LightStream switch, by telnetting to the NP, or by running the CLI on a Sun SPARCstation.
In many instances you will want to perform operational procedures with the LightStream monitor or configurator. However, if the LightStream monitor or configurator is unavailable to you, you can use the CLI to perform many procedures. You should be aware, however, if you make changes to any configuration attributes, those changes you make may cause the local configuration database to be out of synchronization with the global database.
You can use any industry-standard, SNMP-compatible NMS to manage a LightStream network. The following three systems can be used with the LightStream switch:
You cannot configure a LightStream network using a third-party NMS. The LightStream configurator that runs on a Sun 4 workstation running SunOS 4.1.x/Solaris 1.1.x is used to configure LightStream switches and networks. For information on the LightStream configurator, refer to the LightStream 2020 Configuration Guide.
The LightStream documentation set does not provide instructions on how to use a third-party NMS. Use the product documentation for your third-party NMS to get specific instructions.
You can perform operations tasks in a number of different ways, depending on your hardware and software and whether or not traps are interleaved with, or separated from, your general monitoring and control functions. (See Table 2-1.) In most cases, you will perform all monitoring and control functions from a central site. Before operating your LightStream network, you need to know what method of operation you will use. Refer to the "Before You Begin" chapter of the LightStream 2020 Administration Guide or see your network administrator to find the appropriate method for your network. The following table describes possible network operation scenarios.
| No. | Hardware | Software | Interleave Traps? | Reference |
|---|---|---|---|---|
| 1 | Sun SPARC-station | Configure, monitor, and control the network on a Sun SPARCstation using LightStream management software. The configurator, the monitor, and the CLI, run and display on the SPARCstation running SunOS 4.1.x. HP OpenView is optional. If you cannot access the SPARCstation, you can use CLI to perform management tasks. (Optionally, other third-party SNMP-compatible network management software can be used.) | Yes | Manage Network from a Sun SPARC- station Using the Light-Stream configurator, LightStream monitor, and the CLI. |
| 2 | VT100- compatible terminal | After configuring the network using the LightStream configurator on a Sun SPARCstation, monitor and control the network from the VT100 terminal. However, if you must add or move hardware or add ports or VCs, you must access the Sun SPARCstation to run the configurator. The CLI runs on a LightStream network processor (NP) and displays on the VT100. | Yes | Manage Network from VT 100 Terminal Using CLI. |
| 3 | Sun SPARC-station | After configuring the network using the LightStream configurator, monitor and control the network from the Sun SPARCstation using the CLI and the third-party NMS. The configurator, the CLI, and the third-party NMS trap monitoring tool run and display on the SPARCstation. | No | Manage Network from a Sun SPARC- station Using CLI and a Third-party Trap Monitoring Tool. |
| 4 | Non-Sun workstation | After configuring the network using the LightStream configurator on a Sun SPARCstation, monitor and control the network from the non-Sun workstation using the CLI. However, if you must add or move hardware or add ports or VCs, you must access the Sun SPARCstation to run the configurator to complete these tasks. The CLI runs on a LightStream NP and displays on the workstation. | No | Manage Network from a Non-Sun Workstation Using CLI Only. |
| 5 | Non-Sun workstation | After configuring the network using the LightStream configurator on a Sun SPARCstation, monitor and control the network from the non-Sun workstation. However, if you must add or move hardware or add ports or VCs, you must access the Sun SPARCstation to run the configurator to complete these tasks. The CLI runs on a LightStream NP and displays on the workstation. The third-party NMS trap monitoring tool runs and displays on the workstation. | No | Manage Network from a Non-Sun Workstation Using CLI and a Third-party Trap Monitoring Tool. |
Introduction to the CLI ² User Accounts ² Commands Available in the CLI ² CLI Command Syntax ² Port Number Formats ² Normal and Protected Mode ² Command Completion Feature ² Line Editing Keys
This chapter is an introduction to the command line interface (CLI) that is used to operate and manage LightStream 2020 enterprise ATM switches. It contains a list of CLI commands and describes their syntax and port number formats. It also discusses normal and protected modes, the command completion feature, line editing keys, and the user accounts that are provided with your LightStream switch.
The CLI is a simple line-oriented interface that you use to perform network operations from any node in the network. The CLI can also be loaded and run on a Sun SPARCstation. The CLI allows you to operate your LightStream network with or without a third-party network management system (NMS).
The CLI allows you to issue commands to only one node at a time. This means that you cannot view the status of several LightStream chassis by entering a single command. You must issue a separate command to each chassis.
You can access the CLI in three different ways:
Refer to Chapter 4 for detailed instructions on how to access the CLI using each of the methods described above. From the CLI, you can access any LightStream node in the network and perform network operations on that node
To issue a CLI command, type the command, then press [Return]. Output is displayed on the screen. Error messages or traps may be displayed on a separate terminal or window, or they may be interleaved with the CLI commands and their output. Figure 3-1 shows a sample CLI session with traps interleaved with the commands and output.
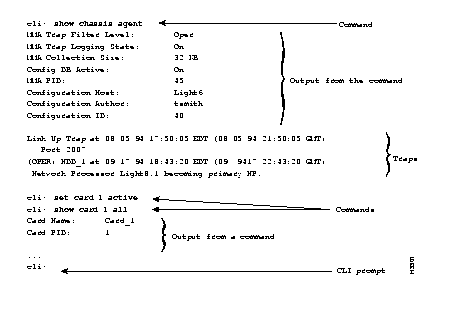
If you are running the CLI on an NP, any command you issue is executed on the LightStream switch you are logged in to. However, you have the option of executing any of the commands listed in Table 3-1 on another LightStream switch. To do this, you must first specify the name of the other switch. This is called setting the target switch. Once you set the target switch, you can issue any of the commands in Table 3-1 to that switch.
| Command Type | Command Name | Command Arguments |
|---|---|---|
| MIB | browse | MIBaddress |
| set | card, chassis, cli, collection, pid, port, stb | |
| show | bflt, card, chassis, cli, collection, gid, nd, pid, port stb | |
| SNMP | getsnmp | MIBaddress |
| getnextsnmp | MIBaddress | |
| setsnmp | MIBaddress | |
| walksnmp | MIBaddress | |
| VLI | define | bflt |
| delete | bflt | |
| Monitor and Control | clear | none |
| exit | none | |
| help | none | |
| protected | none |
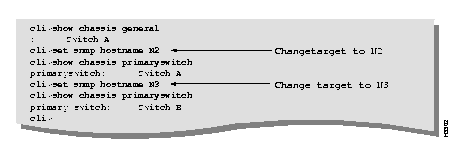
Figure 3-2 shows a CLI session displaying the primaryswitch attribute for two switches. Before viewing the primaryswitch attribute on the second switch, the target switch is reset to the appropriate switch. (Callouts in the figure indicate when the target is reset.)
When you install your LightStream switch, the system automatically creates the four accounts shown in Table 3-2. None of these accounts has default passwords. Passwords for the accounts are usually set when the LightStream switch is installed. If you do not know the password for these accounts, see your network administrator.
| Account Name | Purpose | Default Prompt |
|---|---|---|
| Operator (oper) | Used to access the CLI in the normal mode | cli> |
| NP Administration (npadmin) | Used primarily for protected mode. Can also be used to access the CLI in the normal mode. | *cli> |
| Field Support (fldsup) | Used primarily by field support personnel to perform advanced troubleshooting and maintenance using the LynxOS bash shell. | bash$ |
| root | Used for installation and for certain administration tasks using the LynxOS bash shell. | bash# |
When you access either the operator or the NP administration accounts, the LightStream switch automatically runs the CLI so you can start operations immediately. If you access either of the other accounts, the LightStream switch runs the bash shell or command interpreter and displays the bash (UNIX) prompt.
All users can access shared accounts to operate and manage the network from the CLI. If you prefer, additional accounts can be created so that each user has his or her own account. For more information, see your network administrator.
The CLI supports the following types of commands:
Table 3-3 lists the commands by type and gives a brief description of what each command does. For a detailed description of each command, refer to the LightStream 2020 Command and Attribute Reference Guide or to the LightStream 2020 Command Line Interface (CLI) Reference Card.
| Type | Name | Function |
|---|---|---|
| CLI control commands | browse | Allows you to move through the MIB tree and follow any branch down to its endpoint. |
| clear | Clears the screen. | |
| define | Defines bridge filters. | |
| delete | Deletes bridge filters. | |
| exit | Exits either the CLI program or the protected mode of the CLI program. | |
| help | Provides online help for CLI commands. | |
| password | Allows you to change the password for the protected mode of CLI. | |
| ping | Sends ICMP echo packets to any IP address and reports on any returned packets. | |
| protected | Allows access to protected mode commands. | |
| quit | Exits protected mode or the CLI program. | |
| shell | Executes a shell command to allow you access to the LynxOS shell. | |
| source | Executes a CLI script file stored on a disk. | |
| test1 | Runs diagnostics on a specified card to determine whether it should be replaced. | |
| Object-oriented commands | set | Changes the state of the object specified. |
| show | Displays the value of the object specified. | |
| SNMP protocol emulation commands | getsnmp | Displays the value of the specified MIB object. |
| getnextsnmp | Displays the value of the object in the MIB tree that follows the object specified in this command. | |
| setsnmp | Changes the state of the specified MIB object. | |
| walksnmp | Displays the values of all MIB objects in the MIB subtree starting with the object that you specified. | |
| TCS commands | connect | Logically attaches the console/modem I/O ports to a given slot within a LightStream switch. |
| loadcard | Loads the specified file into the card located in the specified slot, starts the card, and establishes a console connection between CLI and the TCS slave on the card. This command is usually used for diagnostics. | |
| ||
This section shows you some sample CLI commands and describes their syntax. All CLI commands start with the command name. Some commands require no further information; others require arguments such as file names, component names, or values. For a full description of the CLI command syntax, refer to the LightStream 2020 Command and Attribute Reference Guide or to the LightStream 2020 Command Line Interface (CLI) Reference Card.
Table 3-4 shows sample CLI syntax and command examples. In the syntax examples, optional arguments are surrounded by square brackets ([ ]); placeholders that you must replace with meaningful arguments are surrounded by angle brackets (<>).
| Syntax | Command Examples |
|---|---|
| exit | exit |
| protected | protected |
| help [<topic>] | help
help setsnmp |
| show <object type> [<component name>] <parameter> | show card 1 all
show chassis all |
| set <object type> [<component name>] <parameter> [<value>] | set chassis traplevel debug
set port 3.4 loop internal |
| getsnmp <MIB-address> [<MIB-address>] | getsnmp cardName.4 pidName.23 |
Several CLI commands require port numbers. The port number must be entered in the card.port format. The card number is between 1 - 10 for line cards. The port number is between 0 - 7 for a low-speed line card(LSC) and a packet line card (PLC) and 0 - 1 for a medium-speed line card (MSC) and a cell line card (CLC). For example, to issue a show all command to port 4 on card 3 in card.port format, you would enter the following command:
show port 3.4 all
The CLI has two modes: normal and protected.
The protected commands are shown in Table 3-5.
It is not always necessary to enter the full name of a CLI command or its argument. If you have typed enough letters to make the command or argument unambiguous, the CLI will accept the abbreviated name. Once you type enough letters of a command name or command argument to make it unambiguous, you can use the [Tab] key to complete the name. (See the examples in Table 3-6.)
| If you type: | CLI completes the command and displays: |
|---|---|
| br[TAB] | browse |
| sh[TAB] | show |
| walk[TAB] | walksnmp |
If you type,
cli> show por 4.2 statistics
The CLI cannot interpret the command because the component name (port) is not fully spelled out.
However, any of the following commands would work:
cli>show port 4.2 statisticscli>sho port 4.2 staticli>sho[TAB] por[TAB] 4.2 stati[TAB]
cli>show port 4.2 staticli>sho[TAB] por[TAB] 4.2 stati
The CLI uses a set of line editing keys that is a subset of those found in the Emacs editor. In general you can use these line editing keys for any terminal type except a hard copy terminal.
Table 3-7 shows the line editing keys that are available from the CLI.
| Key Sequence | Result |
|---|---|
| ^A | Moves cursor to beginning of line. |
| ^B | Moves cursor back one space. |
| ^C | Interrupts command being executed. |
| ^D | Deletes character at cursor position. |
| ^E | Moves cursor to end of line. |
| ^F | Moves cursor forward one character. |
| ^K | Deletes all characters from cursor position to end of line. |
| ^L | Redisplays current line. |
| ^N | Scrolls forward through all commands that have been entered. (You must scroll backwards using ^P before this command provides any results.) |
| ^O | Toggles between overwrite mode and insert mode. |
| ^P | Scrolls backwards through all commands, beginning with the most recent command. |
| ^R | Searches backwards through all commands for a particular word that you specify at the question mark prompt. |
| ^S | Searches forward through all commands for a particular word that you specify at the question mark prompt. (You must scroll backwards using ^P before this command provides any results.) |
| ^T | Transposes the character at the cursor position with the previous character. |
| ^U | Deletes all characters on line, regardless of cursor position. |
| [Backspace] | Deletes character to left of cursor. |
| [Rubout] | Deletes character to left of cursor. |
| [Return] | Executes command. |
| [Line feed] | Executes command. |
| [Tab] | Completes command entry. |
Procedures to Start CLI ² Basic CLI Functions
This chapter describes how to log in to the command line interface (CLI) and perform basic CLI functions.
This section describes how to start CLI and begin operating your network using the CLI.
The method you'll use to log in will vary depending on the network management option you select. Refer to Network Scenarios in Table 3-1 for a description of different network operation and management possibilities. If you choose an option that requires you to run CLI on a Sun SPARCstation, refer to the LightStream 2020 Installation and Troubleshooting Manual for installation instructions. To start a workstation (Sun or non-Sun) or load and start a third-party network management system (NMS), refer to the documentation for the workstation and NMS.
This section tells you how to log in to CLI. Step-by-step instructions are given for the following access methods:
If you will be using telnet to reach the NP, check with your network administrator to be sure a basic configuration to define the IP address of that NP was entered during installation. If you will be accessing the CLI from either a terminal or modem port, it is not necessary to have the IP addresses defined for the NP.
Step 1 Determine the name and password for the user account you will be using. (See your network administrator if you need assistance.)
Step 2 Enter the following at the prompt on the system from which you are telnetting:
telnet <IP address of the NP>
or
telnet <host name>
The system displays the following information while it makes the connection:
Step 3 Enter the user name when you see the following prompt:
You usually log in to the oper account. However, you can also log in to npadmin, root, fldsup, or any other user account that your network administrator has defined. If you do not know the user name, see your network administrator.
Step 4 Enter the password when you see the following prompt:
If you do not know the password, see your network administrator.
If you log in correctly to either the oper or npadmin account, the CLI opens automatically. If you log in to the fldsup or root accounts, you are placed at the bash$ prompt.
Step 5 To start CLI from the bash$ prompt, enter the following:
cli
Step 1 From the terminal attached to the console (or modem) port on the console/modem assembly, enter the following at the TCS prompt:
connect <slot #>
where <slot #>
Step 2 Enter the user name when you see the following prompt:
If you do not know the user name, see your network administrator.
Step 3 Enter the password when you see the following prompt:
If you do not know the password, see your network administrator.
If you log in correctly to either the oper or npadmin account, CLI opens automatically. If you log in to the fldsup or root accounts, the bash$ prompt is displayed.
Step 4 To start CLI from the bash$ prompt, enter the following at the prompt:
cli
Step 1 If CLI has been installed on your SPARCstation, log in to your SPARCstation. If you have trouble starting CLI, ensure that the directory containing CLI is included in your Lynx search path. (Refer to the LightStream 2020 Installation and Troubleshooting Manual for further information.)
Step 2 Open CLI on the SPARCstation by entering the following command at the prompt:
cli [<flags>]
where[<flags>] = any of the following options:
help Prints this help message.
community=<community> Defines the default community name
prompt=<string> Defines the line prompt
logfile=<filename> Turns on logging of all CLI activities. The entry <filename> specifies the name of the log file.
nomore Turns off more-like scrolling
notraps Disables reception of traps
trapmon Acts only as a trap monitor (no user input is allowed)
Step 3 Set the target switch by entering the following at the cli> prompt:
set snmp hostname <hostname>
where <host name>
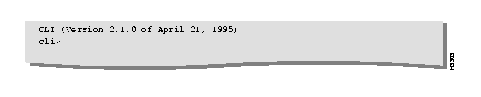
When you have successfully logged in to CLI, the following text appears on the screen:
If you are unable to start the CLI, you might see messages that indicate the shell cannot find a program, permission was denied because CLI is not an executable file, or this user is not allowed to access CLI. (See your network administrator if you need assistance.)
This section describes the following CLI functions:
This section explains how to access online help.
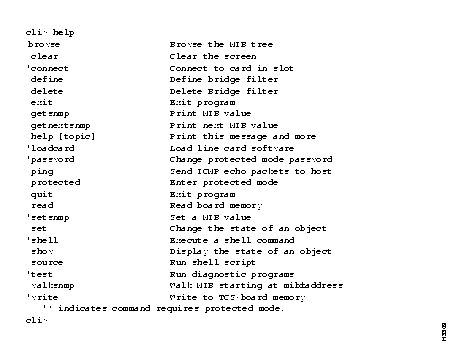
Step 1 Enter the following at the cli> prompt:
help
or
?
A list of all the commands available from CLI is displayed as shown in Figure 4-1. Commands preceded by an asterisk (*) can be used only in protected mode. All other commands are available in normal mode and protected mode.
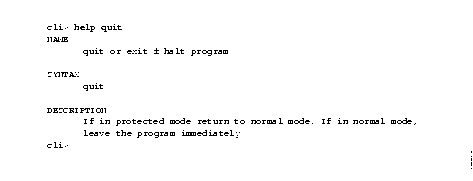
Step 1 Enter the following at the cli> prompt:
help [<topic>]
where [<topic>]
Whenever you use the help command with an argument, the display includes the command name, a syntax statement, and a description, as shown in Figure 4-2.
Step 1 Enter a question mark [?] in a command to display a list of the options. For example, if you are using the show card 5 command and you do not know what type of objects you can display, enter:
show card 5 ?
CLI displays a list of the objects that you can show for card 5. This command also redisplays the command that you typed, so that you do not have to retype it; just enter the name of the object you want to show. (See Figure 4-3.)
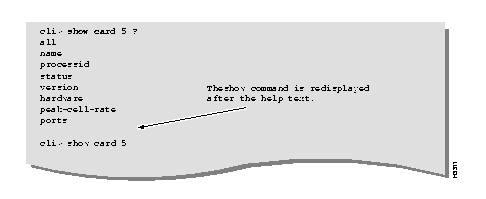
You can continue to use the question mark to complete your show command as shown in Figure 4-4.
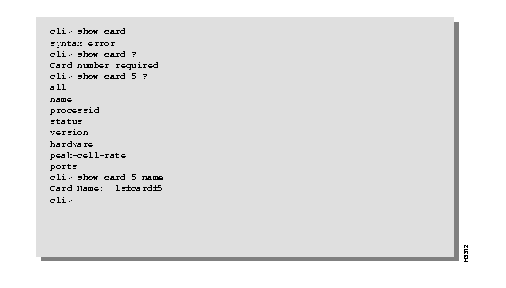
CLI indicates that you must enter the card number. If you enter show card 5 ? at this point, CLI displays a list of the options you can enter for card 5. CLI automatically redisplays show card 5. Then, you enter the option you want to view (name, for example).
This section describes how to clear your screen of the current display.
Step 1 Enter the following at the cli> prompt:
clear
The screen clears and the cli> prompt reappears at the top of the screen.
This section explains how to set a number of CLI attributes. These attributes determine how CLI operates. The attributes that you can set are:
This attribute specifies whether or not the commands in a script file are displayed as they are executed by the source command. If echosource is set to yes, the commands are displayed. If echosource is set to no, the commands are not displayed.
Step 1 To set the CLI echosource attribute, enter the following at the cli> prompt:
where <value>
Step 2 To verify that the command has been executed, enter the following at the cli> prompt:
show cli echosource
*cli> show cli echosource
Echo source: on
*cli>
Set lineedit to on to use the emacs-like editing commands on the command line. Set lineedit to off if you use a hard copy terminal.
Step 1 To set the CLI line edit attribute, enter the following at the cli> prompt:
set cli lineedit <value>
where <value>
Step 2 To verify that the command has been executed, enter:
show cli lineedit

This attribute specifies whether the LightStream switch logs all input to and output from CLI. To keep a log of CLI activity, enter a log file name as the value shown in Step 1. Otherwise, set the value to off.
Step 1 To set the CLI logging attribute, enter the following at the cli> prompt:
set cli log <value>
where <value>
Step 2 To verify that the command has been executed, enter the following at the cli> prompt:
show cli log
*cli> show cli log
Logging: off
*cli>
This attribute specifies the type of terminal you are using. Valid terminal types include VT100 and xterm. A complete list of valid terminal types can be found in the /etc/termcap file on your LightStream switch.
Step 1 To set the CLI terminal type, enter the following at the cli> prompt:
set cli term <terminal type>
where <terminal type>
Step 2 To verify that the command has been executed, enter the following at the cli> prompt:
show cli term
*cli> show cli term
Terminal type: sun
*cli>
This attribute resets the CLI timer, which indicates the elapsed time since CLI was restarted or since this timer was reset.
Step 1 To reset the CLI timer, enter the following at the cli> prompt:
set cli timer
Step 2 To verify that the command has been executed, enter the following at the cli> prompt:
show cli timer
*cli> show cli timer
Timer: 30 Minute(s) 1 Seconds
*cli>
This attribute specifies the severity level of traps to be displayed by CLI or sets the trap level so that no traps are displayed. (Refer to the LightStream 2020 Administration Guide for information on trap severity levels.)
Step 1 To set the CLI traplevel attribute, enter the following at the cli> prompt:
set cli traplevel <value>
where <value>
Step 2 If you are setting the CLI traplevel attribute to off, enter the following additional command at the cli> prompt:
set chassis consoletraplevel off
Step 3 To verify that the command has been executed, enter the following at the cli> prompt:
A screen similar to the following is displayed:
*cli> show cli traplevel
Traplevel: Debug
*cli>
This attribute turns on the debugging mode. This feature is available in protected mode only and is used for development and testing purposes.
Step 1 To set the CLI debug attribute, enter the following at the cli> prompt:
set cli debug <value>
where <value>
Step 2 To verify that the command has been executed, enter the following at the cli> prompt:
A screen similar to the following is displayed:
*cli> show cli debug
Debug: off
*cli>
This procedure shows you how to access protected mode. Your network administrator can provide you with the protected mode password, if you need access.
Step 1 To enter protected mode, type the following at the cli> prompt:
protected
Step 2 Enter the protected mode password when you see the following prompt:
If you enter the password correctly, you enter protected mode. The cli> prompt changes to *cli>. You can now execute protected mode commands in addition to normal mode commands.
If you enter an invalid password, the following message appears:
If you enter a command that requires protected mode while you are in normal mode, the following message appears:
Once you enter protected mode, you remain in that mode until you take explicit action to return to normal mode. (Refer to Procedure 2, below.) To prevent unauthorized access, always return to normal mode when you are finished or before you leave your terminal. It is also good practice to log out whenever you leave your terminal to prevent unauthorized access.
Step 1 To exit from protected mode, enter the following at the *cli> prompt:
exit
or
quit
When you exit protected mode, the *cli> prompt reverts to cli>.
In a LightStream switch with two switch cards (SA and SB), one card is the active switch card and the other card is the backup switch card (a hot spare). In case of a problem with the active switch card, the backup switch card automatically becomes the active switch card, assuming the IP address associated with the active switch card.
In addition, you can force either of the switch cards to become the active (or backup) switch card. This is called a planned cutover. You would do this, for example, if you planned to swap out the active switch card. When you force the backup switch card to become the (new) active switch card, the process forces the (original) active switch card to become the (new) backup switch card. The procedure below shows how to do this.
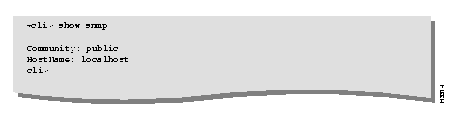
Step 1 Verify that the target switch is correct by entering the following at the cli> prompt:
show snmp
A screen similar to the following is displayed:
Step 2 To determine which switch card is the active, enter the following at the cli> prompt:
show chassis primaryswitch
A screen similar to the following is displayed:

Step 3 At the cli> prompt, enter:
set chassis primaryswitch <slot #>
where <slot #>
The switch card you designate is set to be the active switch card. It takes approximately four seconds to switch the active and backup switch cards.
If you are running CLI on an NP, CLI commands are executed on the LightStream switch you are logged in to. You can issue some CLI commands to a different LightStream switch. Table 3-1 lists those commands. However, to execute any of those commands on another switch, you must first specify the name of the other LightStream switch. This is referred to as setting the target switch. You set the target switch by issuing the set snmp hostname command.
This procedure tells you how to display a list of all LightStream switches in the network and then describes how to set the target switch.
Step 1 Enter the following at the cli> prompt:
protected
Step 2 Enter the protected mode password when you see the following prompt:
Step 3 To display a list of all LightStream switches in your network and their IP addresses, enter the following at the *cli> prompt:
shell "more /etc/hosts"
The following is a sample of the output from that command:
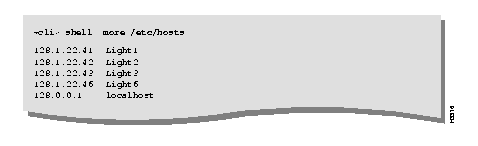
Step 4 Find the name or IP address of the switch you want from this list.
Step 5 To change the target switch, enter the following at the *cli> prompt:
set snmp hostname <host name>
where <host name>
Step 6 To reset the target switch to the local switch, enter the following at the *cli> prompt:
set snmp hostname {localhost|127.0.0.1}
Step 7 To verify the name of the current target switch, enter the following at the *cli> prompt:
show snmp
When you issue commands that affect the operation of a particular switch, be sure to check that the target is set to the correct switch.
The log files include the trap log file, the configurator log file, and the collection files. You can use the LynxOS cbufpr command to display these files. Both commands begin the display with the oldest entry and end with the most current entry.
Fixed-size, circular files are used to limit the amount of space required to store data. When a log file becomes full, the oldest data is overwritten by new data.
Step 1 To display a circular file from the LynxOS shell, enter the following at the bash$ prompt:
cbufpr [-h] [-v] [-all] [-tail] -<number> [-f] [-trap] <file> |more
To display a circular file from CLI, enter the following at the *cli> prompt:
shell "cbufpr [-h] [-v] [-all] [-tail] -<number> [-f] [-level] <file> |more"
where
h Displays this help message.
v Displays cbufpr version information.
all Allows you to read files of all formats, including files that are not circular.
tail Reads the last 20 lines of the trap log file.
<number> Specifies the number of lines to display. This switch can be used with the tail switch to specify the number of lines from the bottom of the file to display.
f Continues reading from end of file rather than exiting. The switch allows you to display traps that accumulate during the time you are viewing other parts of a circular file.
level Defines the level of traps to be displayed (SNMP, oper, info, trace, or debug).
<file> Name of the log file to be printed, for example: usr/tmp/mma/mma.traplog
Step 2 To exit from the log file display, press q.
Depending on the switches and file you select, the results displayed using cbufpr will vary. A screen similar to the following is displayed if you enter shell "cbufpr -tail /usr/tmp/mma/mma.traplog" at the *cli> prompt.

This section explains how to execute a CLI script file. (Refer to the LightStream 2020 Administration Guide for instructions on how to create your own CLI script files.)
Step 1 Enter the following at the cli> prompt:
source "<file name>"
where <file name>
The results of the source command depend upon the contents of the CLI script file that it runs and the value of the CLI attribute called echosource. If you have turned on the echosource attribute in CLI (the default), the command being executed by the CLI script file is echoed to the screen preceded by a plus sign (+).
Introduction to Monitoring ² Monitoring Hardware Components from CLI ² Using the LightStream Monitor ² Monitoring Software Components from CLI ² Monitoring the Test and Control System ² Accessing the MIB Tree
This chapter tells you how to determine the status of LightStream 2020 enterprise ATM switches and their components. It shows command examples and explains how you can obtain additional information.
The LightStream monitor is described in this chapter. The monitor displays a graphical representation of a LightStream switch, its cards and ports.
This chapter discusses the browse command, which allows you to view the value of any object in the LightStream management information base (MIB). Information about every object in a LightStream switch is stored in the MIB. You can issue CLI (command line interface) commands to retrieve and display the MIB information so you can determine how a switch is configured and how it is operating. This chapter also discusses the show command. When you issue a show command, the switch retrieves the requested information from the MIB. You may see a collection of MIB attributes displayed or you may see only a single attribute.
Two tools are available for monitoring: the LightStream monitor program and the CLI. In the CLI, you use the show command to monitor a switch or its components. In the monitor program, you click on components to display information about them. You can monitor the following LightStream components and subsystems:
CLI procedures to monitor all of these components and subsystems, except traps, are described next. Monitoring traps is described in the LightStream 2020 Administration Guide. Use of the LightStream graphical monitor to view switches, cards, and ports begins in the section entitled "Using the LightStream Monitor."
This section provides the procedures for monitoring the hardware components of a LightStream switch:
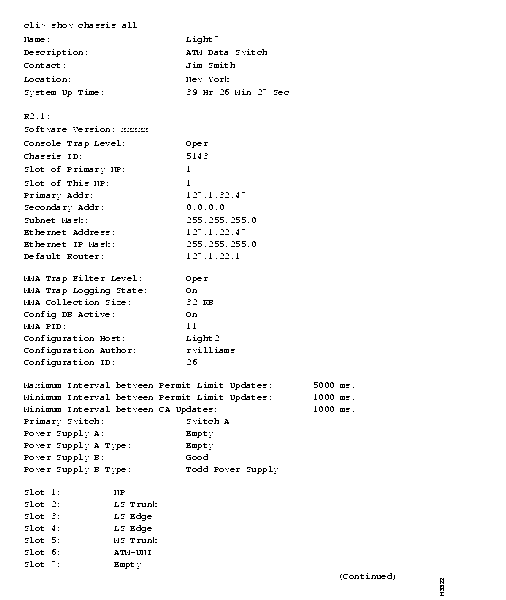
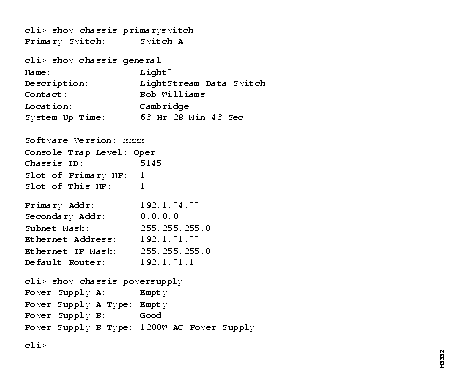
This procedure allows you to monitor the chassis. The information displayed by this procedure applies to the LightStream switch.
Step 1 Verify that the target switch is correct by entering the following at the cli> prompt:
show snmp
If you need instructions on changing the target switch, refer to the subsection entitled "Forcing a Switch Card to Become Active or Backup."
Step 2 Enter the following at the cli> prompt:
show chassis <parameter>
where <parameter>
When you enter show chassis all, information similar to the following is displayed:
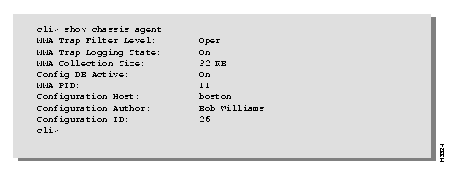
If you enter any parameter except all, a subset of the screen shown above is displayed. For example, if you enter the command show chassis agent, information similar to the following is displayed:
This procedure allows you to monitor the cards in the LightStream switch. You can monitor network processor (NP) cards, edge cards, trunk cards, and switch cards. You select the card you want to monitor by specifying its card number (slot number). When you specify a card, you also get information on its associated access card.
Step 1 Verify that the target switch is correct by entering the following at the cli> prompt:
show snmp
If you need instructions on changing the target switch, refer to the subsection entitled "Forcing a Switch Card to Become Active or Backup."
Step 2 Enter the following at the cli> prompt:
show card <card #> <parameter>
where
The results of this command will very, depending on the type of card in the slot. If you enter any parameter except the all parameter, a subset of the attributes is displayed.
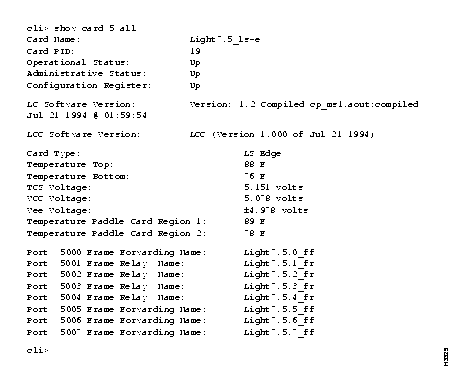
When you enter show card 5 all, information similar to the following (for a low speed edge card) is displayed:
The csumon tool, available from the bash shell, lets you monitor the DSU/CSU for the following:
In addition, you can use csumon to issue commands to an external DSU/CSU attached to a low-speed interface.
You can obtain CSU statistics by connecting to an external data service unit/channel service unit (DSU/CSU) from a LightStream switch through a serial line. This provides a terminal to the DSU/CSU. You use its own interface to set up and monitor the DSU/CSU. (Refer to the documentation for the DSU/CSU for details.)
Step 1 Connect the LightStream switch to the external DSU/CSU by connecting an RS-232 serial cable from the control port on the fantail to the CSU craft (or console) port.
Step 2 To access the bash prompt, log in as root or fldsup on the LightStream switch to which the DSU/CSU you want to monitor is attached.
Step 3 Test the connection by using the following command:
csumon <.card.port#>
where <.card.port#>
Figure 5-5 shows a screen displaying the kind of information you might see in a DSU/CSU status display. The display you see will probably look different, depending on the DSU/CSU you are using.
While the statistics are displayed, you can enter the input shown below to refresh the screen or alter the counter display.
| Input | Action |
|---|---|
| ? | Refresh screen |
| + | Display the next interval counters |
| - | Display the previous interval counters |
Step 5 Terminate the display by pressing ^C. This returns you to the bash$ prompt.
Step 6 To learn about commands you can issue to the DSU/CSU, consult its documentation. To obtain help on csumon, enter the following command at the bash$ prompt:
csumon
The medium-speed line card has a built-in DSU/CSU. Use the procedure below to monitor and display the DS3 MIB statistics for MSC ports. MSC CSU statistics are available using the standard DS3 MIB variables.
Step 1 To access the bash prompt, log in as root or fldsup to the LightStream switch.
Step 2 Enter the following at the bash prompt:
csumon <.card.port#>
where <.card.port#>
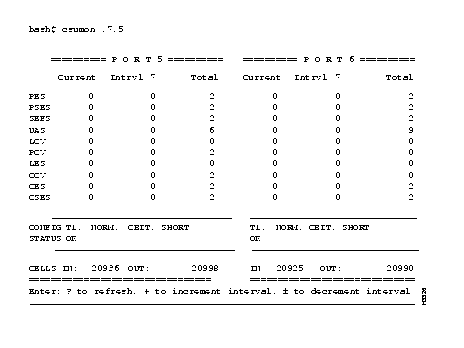
A screen similar to Figure 5-6 will be displayed. Although you enter only one port number, information for both ports on the MSC is displayed.
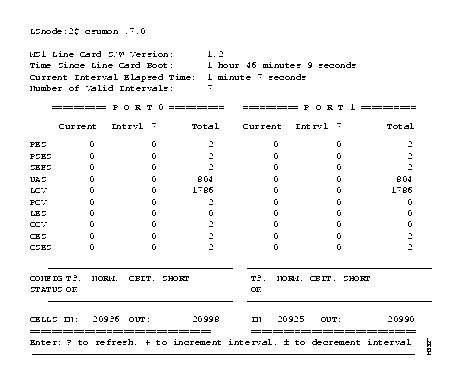
The DS3 MIB maintains these counters over a 24-hour period in 15-minute intervals. The Total column in the display includes up to 96 complete intervals. The Current column includes all counts that will make up the next complete interval. The Intrvl column shows the selected complete interval (from 1 to 96), depending on the actual number of complete intervals. The values that change are updated once per second.
Table 5-1 explains the counters displayed in Figure 5-6.
| Counter* | Definition |
|---|---|
| PES | P-bit Errored Seconds |
| PSES | P-bit Severely Errored Seconds |
| SEFS | Severely Errored Framing Seconds |
| UAS | UnAvailable Seconds |
| LCV | Line Coding Violations |
| PCV | P-bit Coding Violations |
| LES | Line Error Seconds |
| CCV | C-bit Coding Violations |
| CES | C-bit Errored Seconds |
| CSES | C1-bit Severely Errored Seconds |
| Status Term | Definition |
| OK | No alarms present |
| RED | Loss of Framing |
| YELLOW | Far End Receive Failure |
| BLUE | Receiving an Alarm Indication Signal |
| |
While the statistics are displayed, you can enter the input shown below to refresh the screen or alter the counter display.
| Input | Action |
|---|---|
| ? | Refresh screen |
| + | Display the next interval counters |
| - | Display the previous interval counters |
Step 4 Terminate the display by pressing ^C. This returns you to the bash$ prompt.
Step 5 To obtain help on csumon, enter the following command at the bash$ prompt:
csumon
This procedure allows you to monitor the ports on a particular card. You can look at information for a single port, a collection of ports, or a range of ports.
Step 1 Verify that the target switch is correct by entering the following at the cli> prompt:
show snmp
If you need instructions on changing the target switch, refer to the subsection entitled "Forcing a Switch Card to Become Active or Backup."
Step 2 Enter the following at the cli> prompt:
show port <port#> <parameter1> <parameter2>
where
<parameter> all (default)
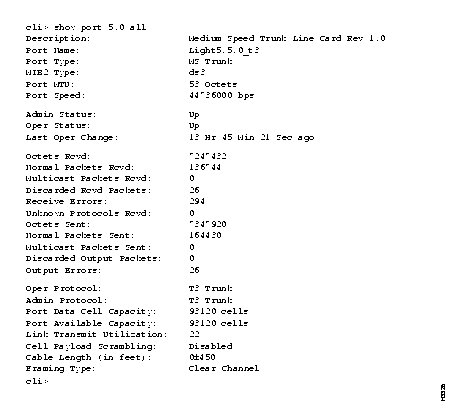
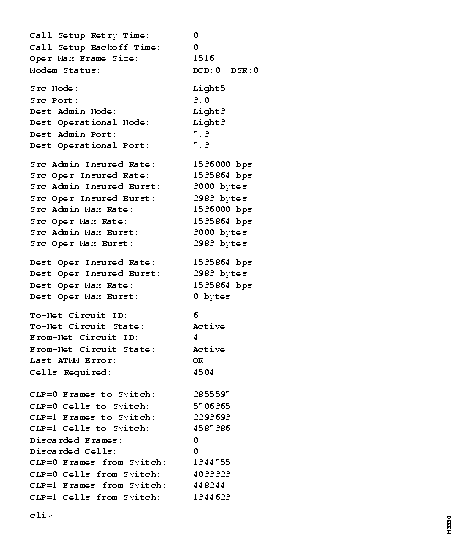
An example for some of the port types is shown in this section. When you enter show port 5.0 all for an MS trunk port, information similar to the following is displayed:
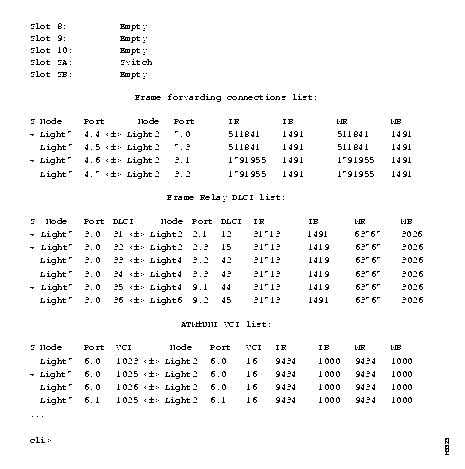
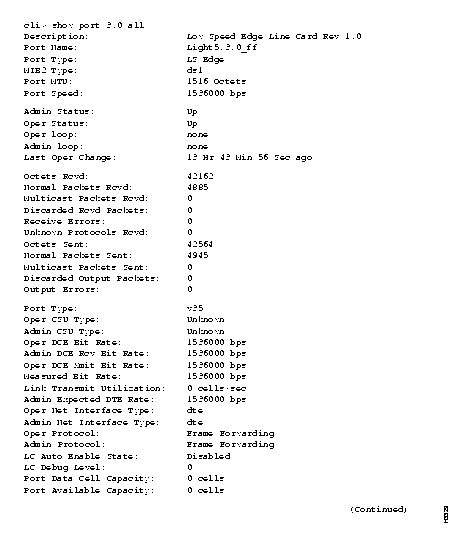
When you enter show port 3.0 all for a frame forwarding port, information similar to the following is displayed:
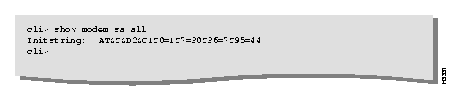
This procedure allows you to monitor the modem port on the switch card's console/modem assembly. If you have a redundant switch card, you can monitor the modem port on either the active or backup switch card. (This command is not used for monitoring modems connected to line card ports.)
Step 1 Verify that the target switch is correct by entering the following at the cli> prompt:
show snmp
If you need instructions on changing the target switch, refer to the subsection entitled "Forcing a Switch Card to Become Active or Backup."
Step 2 Enter the following at the prompt:
show modem <slot #> <parameter>
where
When you enter show modem sa all, information similar to the following is displayed:
This procedure tells you how to monitor the status of your redundant components (switch cards, NP, and power supplies).
Step 1 Verify that the target switch is correct by entering the following at the cli> prompt:
show snmp
If you need instructions on changing the target switch, refer to the subsection entitled "Forcing a Switch Card to Become Active or Backup."
Step 2 To look at the status of switch cards, enter the following at the cli> prompt:
show chassis primaryswitch
This command indicates which switch card is the active switch card. If you have a second switch card, you can assume it is the backup switch card.
Step 3 To look at the slot associated with each of the NPs, enter the following at the cli> prompt:
show chassis general
This command displays a number of details including the slot for the active NP, the slot of this NP, and the system up time. The system up time indicates how long this NP has been up.
Step 4 To look at the status of power supplies, enter the following at the cli> prompt:
show chassis powersupply
This command displays the status and type of the two power supplies, A and B.
The following shows the output for the three commands described in the procedure above:
The LightStream monitor provides a graphical display of individual LightStream switches, cards, and ports. When the monitor is opened, it displays the front of a LightStream switch with bulkheads for the cards as they appear in the actual switch. Information pertinent to the switch is displayed above the bulkheads. This section shows you how to access the monitor to display switches, cards, and ports. You must have a color monitor to use the monitor software.
Step 1 Log into the NMS workstation.
Step 2 Invoke the LightStream monitor by selecting it from the HP OpenView menu or by entering the following command at the system prompt:
monitor <chassisname>
where
is the name of the node you want to view
A display appears showing the front view of the LightStream switch, its components, and their status. The area above the bulkhead in the display contains general indicators and summary information about the switch. For a description of the LEDs displayed on each card in the monitor, refer to the "Hardware Description" chapter of the LightStream 2020 Installation and Troubleshooting Manual.
Step 3 To select an object in the display, point the mouse at the object and click on it with the left mouse button. The object will appear highlighted.
Step 4 To display the access card for a particular line card, click on the screw above it.
Step 5 To display more information for a particular object in the display, point the mouse at the object and double click with the left mouse button. If more information is available for the object, a screen will appear with the relevant information.
Step 6 Select Show All Access Cards from the Slot menu to obtain a rear view of the switch.
Step 7 To select a menu option from the menus at the top left of your display:
The possible options are shown in Table 5-2. All menu options may not be available at all times. Availability depends on the display in the window. Available options are highlighted.
| Menu Name | Options |
|---|---|
| File | Open |
| New Chassis | |
| Exit | |
| Edit | No Options Available |
| Slot | Open Selected Object |
| Show Access Card for Slot | |
| Show Line Card for Slot | |
| Show All Access Cards | |
| Show All Line Cards | |
| General | snmp CLI |
Step 8 You can also display the additional information for an object (discussed in Step 5) by selecting the object with a single click of the left mouse button and then choosing the Open Selected Object option from the Slot menu.
The color of the objects displayed by the monitor provide you with valuable information, as shown in Table 5-3. As you view an object with the monitor, note its color and refer to the table for an explanation. LEDs on the rear view of the switch are unreadable and appear in white.
| Object | Color | Meaning/Cause |
|---|---|---|
| LED | Amber | LED is amber in color. LED is lit. |
| LED | Black | Shut off the machine. Bad connection. |
| LED | Green | LED is green in color. LED is lit. |
| LED | Red | Shut off the machine. Over voltage condition exists. Serious power supply problem. |
| LED | White | LED state is unknown. |
| Screw | Black | No information available for card. |
| Screw | Gray | Card is missing. |
| Screw | Red | Card is not operational. (The card has failed or it has been powered off.) |
| Screw | White | Normal card. |
| Any Icon | Red | Abnormal condition. The orange rectangle around a red icon emphasizes the abnormal condition. |
| Any Icon | Yellow | Abnormal condition. The orange rectangle around a yellow icon emphasizes the abnormal condition. |
| Power Supply | Red | Power supply is not operational. |
| Thermometer | Blue | Temperature is within normal range. |
| Thermometer | Red | Temperature is over normal range. Cause unknown. |
| Thermometer | Orange | Temperature is in the warning range. Cause unknown. |
| Thermometer | Yellow | Temperature is in the warning range. Cause unknown. |
Step 9 To iconify a monitor display, click in the Close box in the bar at the top of the window.
Step 10 To exit the monitor, select Exit from the File menu.
This section provides procedures to monitor the software components (ATM UNI, frame relay, frame forwarding, Ethernet, FDDI, and OC3 connections; CLI; collector; GID; ND; processes; and SNMP) of a LightStream switch.
This procedure allows you to monitor the ATM UNI virtual channel identifiers (VCIs) configured on a particular ATM UNI port. It provides you with information on the individual connections configured on each port. This information is available for ATM UNI ports only.
Step 1 Verify that the target switch is correct by entering the following at the cli> prompt:
show snmp
If you need instructions on changing the target switch, refer to the subsection entitled "Forcing a Switch Card to Become Active or Backup."
Step 2 To get a list of all VCIs configured on a particular ATM UNI port, enter the following at the cli> prompt:
show port <port#> listvci
where <port#>
Step 3 Once you have a list of all ATM-UNI VCIs, you can look at a particular VCI by entering the following at the cli> prompt:
show port <port#> vci <vci#>
where <vci#>
When you enter show port 6.0 vci 16, information similar to the following is displayed:

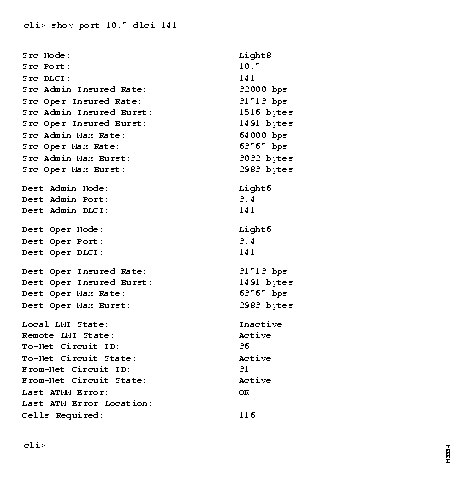
This procedure allows you to monitor individual data link connections configured on frame relay ports. These connections are recognized by their data link connection identifiers (DLCIs).
Step 1 Verify that the target switch is correct by entering the following at the cli> prompt:
show snmp
If you need instructions on changing the target switch, refer to the subsection entitled "Setting the Target Switch for CLI Commands."
Step 2 To get a list of all data link connections configured on a particular frame relay port, enter the following at the cli> prompt:
show port <port#> listdlci
where <port#>
Step 3 Once you have a list of DLCIs, you can look at a particular circuit, by entering the following at the cli> prompt:
show port <port#> dlci <dlci#>
where <dlci#>
When you enter show port 10.7 dlci 141, information similar to the following is displayed:
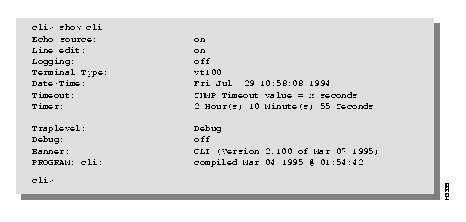
This procedure allows you to monitor the attribute settings for the CLI program.
Step 1 Enter the following at the cli> prompt:
show cli <parameter>
where <parameter>
When you enter show cli, information similar to the following is displayed:
The collector allows you to run up to 25 collections at one time. You can set up the collections to save user-defined data at a user-defined time interval and you can use this data for future analysis. This procedure describes how to monitor the status of a particular collection. For further information on creating collections, see Chapter 6.
Step 1 Verify that the target switch is correct by entering the following at the cli> prompt:
show snmp
If you need instructions on changing the target switch, refer to the subsection entitled "Forcing a Switch Card to Become Active or Backup."
Step 2 If you do not know what collections have been defined, enter the following at the cli> prompt:
walk collectIndex
This command lists the number of all the collections defined on the LightStream switch. You may see a display similar to the following:
walk collectIndex
This display tells you that collection numbers 2, 3, 5, and 6 have been defined.
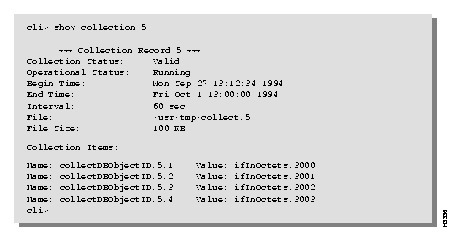
Step 3 To look at the status of a particular collection, enter the following at the cli> prompt:
show collection [<collection #>]
where [<collection #>]
When you enter show collection 5, information similar to the following is displayed:
This procedure allows you to monitor the status of the global information distribution (GID) software.
Step 1 Verify that the target switch is correct by entering the following at the cli> prompt:
show snmp
If you need instructions on changing the target switch, refer to the subsection entitled "Forcing a Switch Card to Become Active or Backup."
Step 2 Enter the following at the cli> prompt:
show gid <parameter>
where <parameter>
When you enter show gid all, information similar to the following is displayed:

If you enter any parameter except all, a subset of the attributes is displayed.
This procedure allows you to monitor the status of the neighborhood discovery (ND) software. This information can tell you what hardware configuration the running software is using or the neighbors of the switch.
Step 1 Verify that the target switch is correct by entering the following at the cli> prompt:
show snmp
If you need instructions on changing the target switch, refer to the subsection entitled "Forcing a Switch Card to Become Active or Backup."
Step 2 Enter the following at the cli> prompt:
show nd <parameter>
where <parameter>
When you enter show nd all, information similar to the following is displayed:
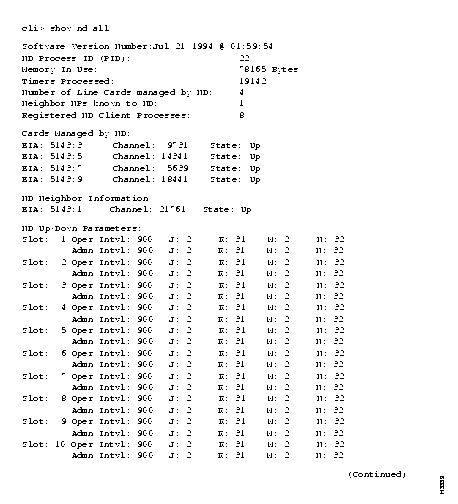

If you enter any parameter except all, a subset of the attributes shown above is displayed.
This procedure allows you to monitor the status of a particular process. You select the process you want to monitor by entering either its number or name.
Step 1 Verify that the target switch is correct by entering the following at the cli> prompt:
show snmp
If you need instructions on changing the target switch, refer to the subsection entitled "Forcing a Switch Card to Become Active or Backup."
Step 2 If you do not know which processes are running, enter the following at the cli> prompt:
walksnmp lwmaTrapCliAlias
This command lists the process identification (pid) numbers and alias names of all the processes running on this LightStream switch. The pid numbers follow the term "Name: lwmaTrapCliAlias." and the alias names follow the term "Value:". For example, you may see
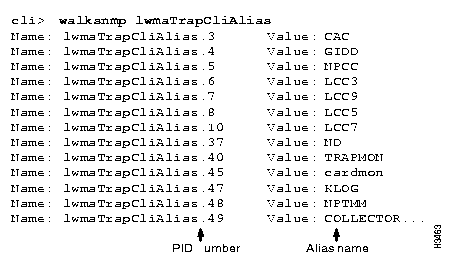
Step 3 Choose the processes that you want to monitor from this list.
Step 4 To display the status of a particular process, enter the following at the cli> prompt:
show pid {<#>|<alias>} [<parameter>]
where
{<#>|<alias>}
[<parameter>]
When you enter show pid 9 all, information similar to the following is displayed:
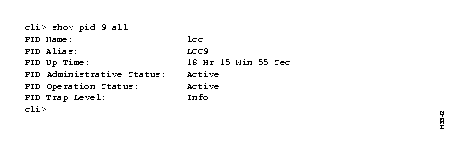
The same information is displayed when you enter show pid lcc9 (The lcc9 entry is the alias name for process 9).
If you enter any parameter except all, a subset of these attributes is displayed.
This procedure allows you to monitor the way in which SNMP operates. SNMP operation is controlled by a number of parameters that are set to default values when the system is started. These parameters can be changed using the set snmp command. (See the subsection entitled "Creating a Collection" for a discussion of this command.)
Step 1 Enter the following at the cli> prompt:
show snmp
Information similar to the following is displayed:
This section gives you procedures to monitor the Test and Control System (TCS).
The procedure allows you to monitor the values collected by the TCS on a particular card in the chassis. The cards you can monitor are in slots 1 - 10, SA, and SB.
Step 1 Verify that the target switch is correct by entering the following at the cli> prompt:
show snmp
If you need instructions on changing the target switch, refer to the subsection entitled "Forcing a Switch Card to Become Active or Backup."
Step 2 Enter the following at the cli> prompt:
show tcs <card #> [<parameter1>] [<parameter2>]
where <card #>
Table 5-4 describes <parameter1> and <parameter2>.
| <parameter1> = | <parameter2>a = |
|---|---|
| all (default) | N/A |
| state | N/A |
| config | all
assembly postcode serialnum slavecode type |
| daughter | all
assembly serialnum |
| paddle | all
assembly serialnum |
| oem | all
assembly serialnum |
| midplane | all
assembly serialnum nodeaddress |
| temperature | N/A |
| voltage | N/A |
| power | |
| |
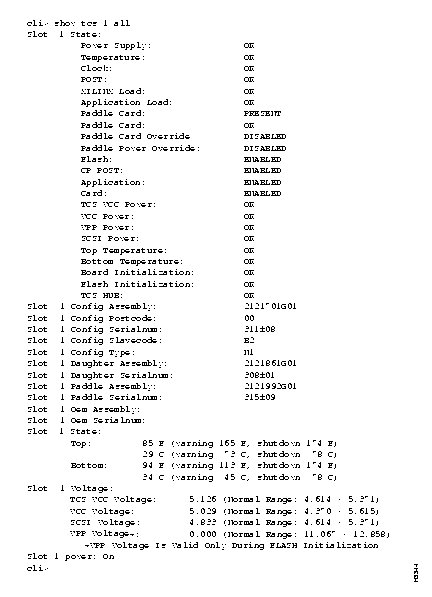
When you enter show tcs 1 all, a display similar to Figure 5-18 is displayed. If you use any value except all for the argument, a subset of this information is displayed.
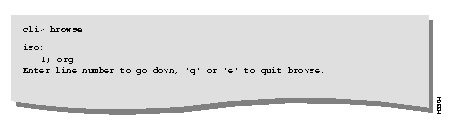
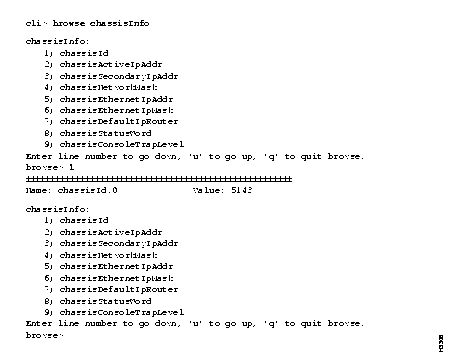
This section explains how to use the browse command. The CLI browse command lets you travel through the MIB from the top down and display the value of any MIB object. The browse command is easy to use and allows you to move through the MIB even if you are not familiar with its structure. When the MIB tree branches, you can go in any direction. At any time you can return to the branch and go in a different direction. Refer to the LightStream 2020 Command and Attribute Reference Guide for an illustration of the MIB tree.
This procedure allows you to travel down through the MIB tree and obtain the value of any MIB object you see.
Step 1 Verify that the target switch is correct by entering the following at the cli> prompt:
show snmp
If you need instructions on changing the target switch, refer to the subsection entitled "Forcing a Switch Card to Become Active or Backup."
Step 2 Enter the following at the cli> prompt:
browse [<mib-address>]
where [<mib-address>]
Step 3 Continue down the "org" subtree by entering the following at the browse> prompt.
1
Step 4 Exit by entering the exit or quit command at the browse> prompt:
exit
or
quit
The following example shows the information that is displayed when you enter the browse command.
The highest level object of the MIB tree is the iso object and the only subtree below it is the org subtree.
Figure 5-19 shows an example of how you can use the browser to travel through the MIB and look at the values of the chassisId and chassisActiveIpAddr objects. (User input is shown in bold.)
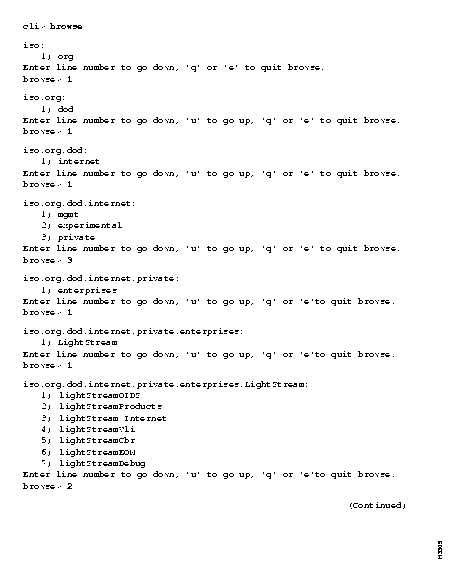
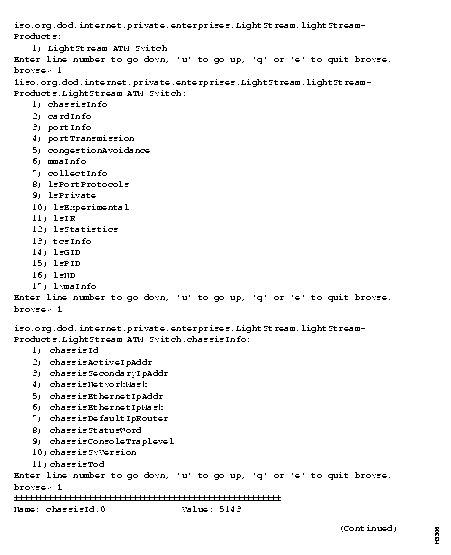
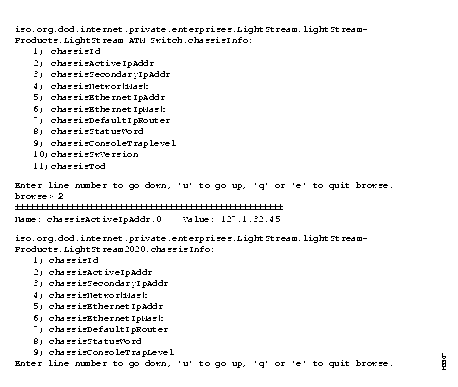
The next screen shows how you can access information quickly by entering the name of the subtree you want to look at. For example, instead of going through all of the steps to get to the chassisId as shown in Figure 5-19, you can enter the command browse chassisInfo as shown in Figure 5-22 and immediately access the chassisId object.
Using LightStream Statistics ² Using Data Collection
Statistics are counters collected by a LightStream 2020 enterprise ATM switch. This chapter tells you how to monitor and evaluate the state and performance of your LightStream switch by reviewing and sometimes processing the statistics.
LightStream statistics are stored in MIB objects. Examples of statistics include the following MIB objects:
Many statistics of interest for the LightStream switch are defined in the Frame Relay DCE MIB, FDDI MIB, Ethernet MIB, OC3 MIB, and MIB-2. For a complete list of MIB objects, refer to the LightStream 2020 Command and Attribute Reference Guide.
All statistics in a LightStream switch are initialized at system startup. When they reach their maximum value (or if you do another startup), they are reset to 0. You can use the collector to collect statistics at regular intervals. Refer to the subsection entitled "Using Data Collection" for more information.
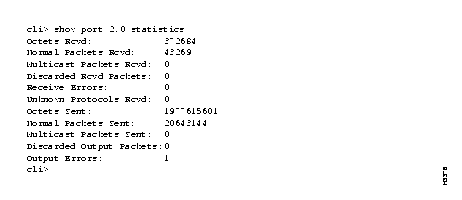
This procedure shows you how to view port statistics with the show command. All of the information displayed for port interfaces is generic and applies to all interfaces, regardless of the interface type.
Step 1 Verify that the target switch is set correctly by entering the following at the cli> prompt:
show snmp
If you need instructions on changing the target switch, refer to the subsection entitled "Forcing a Switch Card to Become Active or Backup."
Step 2 Enter the following at the cli> prompt:
show port <port#> statistics
where <port#>
When you enter show port 2.0 statistics, information similar to the following is displayed:
where
Octets Rcvd = Total octets received from the media
Normal Packets Rcvd = Number of unicast packets delivered (a portion of the total)
Multicast Packets Rcvd = Number of broadcast/multicast packets delivered (a portion of the total)
Discarded Rcvd Packets = Packets discarded due to resource limitation
Receive Errors = Packets discarded due to format error
Unknown Protocols Rcvd = Packets destined for unknown protocols
Octets Sent = Total octets sent on the media
Normal Packets Sent = Number of unicast packets sent (a portion of the total)
Multicast Packets Sent = Number of broadcast/multicast packets sent (a portion of the total)
Discarded Output Packets = Packets discarded due to resource limitation
Output Errors = Packets discarded due to error
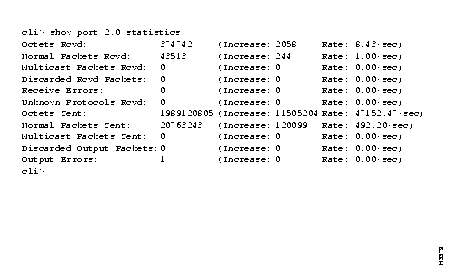
The first time you request statistics for a particular port, you see a display like the one shown in Figure 6-1. However, if you again show statistics on that port, the current value of each statistic is displayed with additional information. The additional information shows the amount that each statistic increased since your last request and the rate at which the statistic is changing. The following figure shows the statistics display when you enter show port 2.0 statistics anytime after the first time.
In addition to displaying statistics, the LightStream switch provides a data collection facility called the collector. The collector allows you to define a set of MIB objects, collect their values at regular intervals, and save the information in a file. The set of MIB objects and their collected values is a collection.
The collector maintains a table called collectTable in the private section of the LightStream MIB. It uses the information in this table to control the operations of its collections. A sample collection table is shown in Table 6-1. Each row defines a collection.
| Collection Number | Collection Status | Operational Status | Begin Time | End Time | Interval | File Name | File Size |
|---|---|---|---|---|---|---|---|
| 1 | valid | Running | 10:00:00 Tues 5/4/94 | 11:00:00 Tues 5/4/94 | 60 | collect.1 | 100 |
| 2 | under Creation | Waiting | 12:30:15 Fri 5/14/94 | 12:00 Fri 5/28/94 | 360 | collect.2 | 100 |
| 75 | valid | Running | 00:01:00 Mon 8/2/94 | 00:01:00 Tues 8/3/94 | 3600 | collect.75 | 50 |
You can use the begintime and endtime arguments to control the collection duration and the filesize argument to control the collection size. If you do not specify the begintime and endtime arguments, the collection runs continually.
The collector can run up to 25 collections simultaneously on a particular LightStream switch. If you attempt to start more than 25 collections, any additional collections will have an operational status of waiting. When the number of running collections falls below 25, the next waiting collection will begin running.
You can collect any set of MIB objects you want at any time interval you want. For example, you can define a collection of ifInErrors and ifOutErrors objects for a particular set of ports to be collected once an hour or once a day. Once the collection is started, the specified information is collected at the correct interval and appended to the collection file.
The collector automatically generates the file and file name for every collection that you create. The file name is of the form collect.<collection number>. All collection files are placed in the /usr/tmp/collector directory. Sample names are /usr/tmp/collector/collect.6 and /usr/tmp/collector/collect.128.
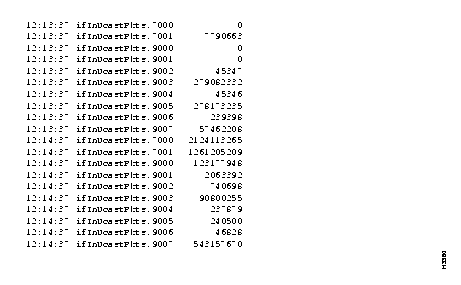
Collection files are circular ASCII files containing the time each object was collected, the object name, and the object value. Figure 6-3 shows a sample collection file. When the circular file is full, the oldest data is overwritten by newer data. Files are displayed in chronological order from the oldest entries to the newest.
You can view and use the collection files as they are or you can process the data. (You may want to sort the data or make calculations to determine when changes in performance or state occur.)
To begin a new collection, follow the procedures described in this chapter in the order listed below.
You may also want to perform the following functions on your collections.
Each of these procedures is explained in the sections that follow.
This procedure tells you how to create a collection. It sets up a row in the collectTable object for a collection with the number you specify.
Step 1 Set the SNMP community to a read/write community by entering the following at the cli> prompt:
set snmp community <community name>
where <community name>
Step 2 Enter the following at the cli> prompt:
set collection <collection number> create
where <collection number>
Step 3 To verify that the collection has been created, enter the following at the cli> prompt:
walk collectIndex
This lists the collection numbers that have been created for this switch.
If you enter the number of a collection that already exists, a message is displayed telling you that you cannot create that collection.
If you enter the walk collectIndex command, you will see a display similar to the following:
cli> walk collectIndex
Name: collectIndex.2 Value: 2
Name: collectIndex.3 Value: 3
Name: collectIndex.5 Value: 5
Name: collectIndex.6 Value: 6
cli>
The numbers that appear after Value: are the numbers of the collections that have been created. The display above indicates that collection numbers 2, 3, 5, and 6 have been defined.
This procedure shows you how to set the time interval for collecting data for a particular collection.
Step 1 Set the SNMP community to a read/write community by entering the following at the cli> prompt:
set snmp community <community name>
where <community name>
Step 2 Enter the following at the cli> prompt:
set collection <collection number> frequency <interval>
where
<collection number>
<interval>
| Typical Time Interval | Number of Seconds in Interval |
|---|---|
| 1 second | 1 seconds |
| 10 seconds | 10 seconds |
| 30 seconds | 30 seconds |
| 1 minute | 60 seconds |
| 5 minutes | 300 seconds |
| 10 minutes | 600 seconds |
| 15 minutes | 900 seconds |
| 30 minutes | 1800 seconds |
| 1 hour | 3600 seconds |
| 2 hours | 7200 seconds |
| 12 hours | 43200 seconds |
| 24 hours | 86400 seconds |
| 1 week | 604800 seconds |
Step 3 To verify the collection interval for a particular collection, enter the following at the cli> prompt:
show collection <collection number>
Check the information in the Collection Interval field.
This procedure explains how to specify a MIB object and add or delete it from a collection. Each MIB object is added or deleted individually.
Step 1 Set the SNMP community to a read/write community by entering the following at the cli> prompt:
set snmp community <community name>
where <community name>
Step 2 If you do not know which MIB objects are available for collection, use the browse command or the walksnmp command to list the objects that are available.
Step 3 To add MIB objects to a collection, enter the following at the cli> prompt:
set collection <collection number> addvar <MIB address>
where
<collection number>
<MIB address>
For example, to collect the ifInOctets MIB object for ports 1 and 2 on card 3, enter the following at the cli> prompt:
set collection 10 addvar ifInOctets.3.1
set collection 10 addvar ifInOctets.3.2
Step 4 To verify that the object(s) you specified in Step 3 will be collected, enter the following from the cli> prompt:
show collection <collection number>
Check the information in the Collection Items field. You should see the MIB object(s) listed that you added to the collection.
Step 1 Set the SNMP community to a read/write community by entering the following at the cli> prompt:
set snmp community <community name>
where <community name>
Step 2 To delete objects from a collection, enter the following from the cli> prompt:
set collection <collection number> delvar <MIB address>
where
<collection number>
<MIB address>
Step 3 To display the current objects to be collected for the collection, enter the following from the cli> prompt:
show collection <collection number>
Check the information in the Collection Items field. The MIB object you specified should not appear in the display.
This procedure tells you how to specify the size of a collection file.
Step 1 Set the SNMP community to a read/write community by entering the following at the cli> prompt:
set snmp community <community name>
where <community name>
Step 2 Enter the following at the cli> prompt:
set collection <collection number> filesize <size>
where
<collection number>
<size>
Step 3 To display the size of the collection, enter the following from the cli> prompt:
show collection <collection number>
Check the information in the Collection File Size.
This procedure tells you how to start the collector. Starting the collector causes the LightStream switch to collect the specified MIB objects (at the defined times) and store the data in the collection file.
Step 1 Set the SNMP community to a read/write community by entering the following at the cli> prompt:
set snmp community <community name>
where <community name>
Step 2 Enter the following at the cli> prompt:
set collection <collection number> start
where <collection number>
Step 3 To confirm that the collection has been started, enter the following from the cli> prompt:
show collection <collection number>
Look at the Collection Status field.
If the Collection Status field status is Valid, the collection has been started and is running. If the status is Waiting, you have more than 25 collections running on this switch, or the collection is scheduled to start at a future time.
This optional procedure tells you how to specify a start and end time for a collection.
Step 1 Set the SNMP community to a read/write community by entering the following at the cli> prompt:
set snmp community <community name>
where <community name>
Step 2 To specify the start time, enter the following from the cli> prompt:
set collection <collection number> begintime <time>
where
Step 3 To determine collection start time, enter the following from the cli> prompt:
show collection <collection number>
Look at the Start Time field.
Step 1 Set the SNMP community to a read/write community by entering the following at the cli> prompt:
set snmp community <community name>
where <community name>
Step 2 To specify the stop time, enter the following from the cli> prompt:
set collection <collection number> endtime <time>
where
You can view the collection file from the command line interface (CLI) or you can copy it to a third-party network management system (NMS) or workstation where you can view it or process it.
Two procedures can be used to view the collection from CLI. The first is used if you are running CLI on the network processor (NP) of the LightStream switch on which the collection is being run and the second is used if you are running CLI on a remote NP or Sun SPARCstation.
Step 1 Enter the following at the *cli> prompt:
shell "cbufpr /usr/tmp/collector/collect.<collection#>"
For more information on the circular buffer print (cbufpr) command, see the subsection entitled "Displaying Log Files."
Step 1 Enter the following at the cli> prompt:
protected
Step 2 Enter the protected mode password when you see the following prompt:
Step 3 Enter the following at the *cli> prompt:
shell "ftp <name or address of workstation or host to which you want to move the collection file>"
The LightStream switch responds with a message similar to the following:
Step 4 When you see the following prompt, enter the user name for the account on the workstation or host to which you are moving the collection file:
Step 5 Enter the password for the account when you see the following prompt:
If you enter the user name and password correctly, the workstation or host displays information similar to the following:
Step 6 Enter the following at the ftp> prompt:
put /usr/tmp/mma/collectIndex.8 [<new name>]
where <new name>
Step 7 To exit the file transfer program and return to CLI, enter the following at the ftp> prompt:
bye
or
quit
The put command sends the log file to the specified workstation or host. The system tells you when the transfer is complete.
You can use a standard UNIX command such as more or cat to view the collection file on the workstation or host. You can also use the text file with any text processing tool you have available.
Figure 6-3 shows a sample of a collection file that you may see if you perform either procedure 1 or 2 above.
This procedure tells you how to get a list of all defined collections. It also explains how to determine the status and contents of any defined collection.
Step 1 Enter the following at the cli> prompt:
walksnmp collectIndex
The walksnmp command displays a list of all collections that have been defined, as follows:
walk collectIndex
The numbers following the term Value: are the collection numbers that have been defined.
Step 2 Once you know the numbers of the collections that have been defined, you can determine the contents and status of each collection by typing the following from the cli> prompt:
show collection <collection number>
If you don't enter a collection number, all collections are displayed.
The following is an example of the output that is displayed when you enter show collection 10:
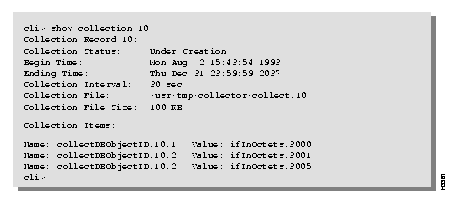
This procedure explains how to temporarily stop a collection. Use this procedure if you may want to resume this collection at a later time. If you restart this collection at a later time, new data is appended to the existing collection file.
Step 1 Set the SNMP community to a read/write community by entering the following at the cli> prompt:
set snmp community <community name>
where <community name>
Step 2 Enter the following at the cli> prompt:
set collection <collection number> halt
where <collection number>
Step 3 To determine if a collection has been stopped, enter the following from the cli> prompt:
show collection <collection number>
The show collection <collection number> command displays the Collection Status field. If the status is Under Creation, the collection has been stopped.
If a collection has been restarted, the Collection Status changes from Under Creation to Valid.
If you have 25 collections running and you stop one or more of them, collections with a Collection Status of Waiting may be started as a result. (In this case, you may not be able to restart the collection you just stopped, unless you halt another collection.)
This procedure tells you how to delete the definition of a collection. It deletes the definition of the collection from the collecTable, but it does not delete the collection file itself. Once a collection is deleted, you can no longer restart it because its definition no longer exists.
Step 1 Set the SNMP community to a read/write community by entering the following at the cli> prompt:
set snmp community <community name>
where <community name>
Step 2 Enter the following at the cli> prompt:
set collection <collection number> delete
where <collection number>
Step 3 To list the collection numbers that have been defined for this switch, enter the following from the cli> prompt:
walksnmp collectIndex
The walksnmp collectIndex command displays the collection numbers that have been defined for this switch. The number that you deleted should not appear on this list.
The following shows a list of commands used to create, define, and then start a collection. This sample collection is defined to collect the ifInErrors MIB object for two ports on card 1 and two ports on card 3 of the target LightStream switch. It is placed in /usr/tmp/collector/collect.2. The data is collected every hour starting when you issue the set collection start command and continuing until you stop it. (No end time has been defined.)
set collection 2 create
set collection 2 frequency 3600
set collection 2 addvar ifInErrors.1000
set collection 2 addvar ifInErrors.1001
set collection 2 addvar ifInErrors.3000
set collection 2 addvar ifInErrors.3001
set collection 2 start
You can view the collection file by following the instructions in the subsection entitled "Viewing a Collection." The following is a sample display of the collection file:
This appendix contains an alphabetical list and description of all fields that may appear in a screen display as the result of a command line interface (CLI) command.
| Field Name | Definition |
|---|---|
| Active LMI System | The local management interface (LMI) for a frame relay port. |
| Address Length | The length of the address. |
| Admin CSU Type | The channel service unit (CSU) type for the specified port. |
| Admin DCE Bit Rate | The speed per second set for the DCE. |
| Admin DSE Bit Rate | The speed per second set for the DSE. |
| Admin Expected DTE Rate | The expected rate of the data terminal equipment (DTE) for the specified port. |
| Admin Net Interface Type | The administrative net interface type for the specified port. |
| Admin Protocol | The administrative protocol for the specified port. |
| Admin Status | The administrative status (up or down) of the named port. |
| Administrative Status | The administrative status (up or down) of the named card. |
| Application | This indicates the current condition of the application as collected by the test and control system (TCS) for a particular card in the chassis. The possible values are enabled (activated) or disabled (not activated). |
| Application Load | This indicates the current condition of the Application Load as collected by the test and control system (TCS) for a particular card in the chassis. |
| ATM Data Switch Contact | The name of the person to contact for issues relating to this switch. The information should include how to contact this person. |
| ATM-UNI VCI list | This displays the list of ATM-UNI VCI connections. If a connection is down, an asterisk (*) appears in the state (S) column for that connection. |
| Banner | The program name, version number, and date display. |
| Begin Time | This indicates the begin time of the specified collection. (A collection runs from its begin time to its ending time. If the begin and ending times are not specified, the collection runs continuously.) |
| Board Initialization | This indicates the condition of the board initialization as collected by the test and control system (TCS) for a particular card in the chassis. |
| Bottom Temperature | The temperature indicated by the bottom sensor of the named card. |
| Broadcast Support | The type of broadcast supported for the specified port. |
| Cable Length (in feet) | The length of the cable connected to this trunk port. |
| Call Setup Backoff Time | The number that determines the successively longer periods of time that the system will wait before retrying call set-ups. |
| Call Setup Retry Time | The waiting period between the first two attempts to establish a connection on this port. If the second attempt fails, Call Setup Backoff Time is invoked. |
| Card | Depending on the CLI command you entered, this indicates the name of the card in the named slot or the current condition of the specified card as collected by the test and control system (TCS). |
| Card Name | The name of an NP, switch, or line card. |
| Card PID | The process identification number (PID) of the specified card. |
| Card Type | This indicates the type of card in the named slot. |
| Cards Managed by Gid | The cards (listed by chassis name and slot number) managed by the global information distribution (GID) process. |
| Cards Managed by ND | The cards managed by the neighborhood discovery (ND) process. |
| Chassis ID | This identifies the chassis by number. |
| Client Announcements Received | The number of client announcements received. |
| Client Announcements Transmitted | The number of client announcements transmitted. |
| Clients Managed by Gid | The clients (listed by process identification number) managed by the global information distribution (GID) process. |
| Clock | This indicates the current condition of the clock as collected by the test and control system (TCS) for a particular card in the chassis. |
| Collection Interval | This indicates the frequency (in seconds) that information is collected in the named collection. (The default is 60 seconds.) |
| Collection Items | This indicates the MIB objects being collected in the named collection. |
| Collection Status | This indicates the status of the named collection. Values are Under Creation (stopped), Waiting (not running), or Valid (running). |
| Community | The name of the SNMP community. |
| Config DB Active | The active configuration data base. |
| Configuration Author | The creator of the current configuration. |
| Configuration Host | The name of the host where the configuration was created. |
| Configuration ID | The identifying number of the current configuration. |
| Console Trap Level | The level set for the console traps. Values are SNMP, Oper, Info, Trace, Debug, or off. |
| Contact | The name of the person to contact for issues relating to this switch. |
| CP POST | The state of power of self test (POST) commands on the card, either enabled or disabled. |
| Date/Time | The current date and time. |
| Debug | The level of the CLI debug attribute. Values are on (debugging enabled) or off (debugging disabled, the default). |
| Default Router | The address of the default router, if one exists. |
| Description | This identifies the type of device. The information should include the full name and version identification of the device. |
| Dest Admin DLCI | The data link connection identifier at the destination port. |
| Dest Admin Node | The data link connection identifier at the destination port. |
| Dest Oper DLCI | The data link connection identifier (DLCI) of the LightStream port at the other end of the frame relay virtual circuit. |
| Dest Oper Insured Burst | The maximum amount of data (in bytes or cells) that the LightStream network will transfer under normal conditions during the measurement interval from the destination port to the source port. |
| Dest Oper Insured Rate | The data throughput specification (in bps or cps) that the LightStream network is committed to support under normal network conditions. |
| Dest Oper Max Burst | The maximum amount (insured plus uninsured) data (in bytes or cells) that the LightStream network will attempt to deliver under normal conditions from destination to source during the measurement interval. |
| Dest Oper Max Rate | The maximum amount (insured plus uninsured) data (in bps or cps) that the LightStream network will attempt to deliver under normal conditions from destination to source. |
| Dest Oper Port | The LightStream port at the other end of the frame relay, frame forwarding, or ATM UNI virtual circuit. |
| Dest Oper VCI | The virtual channel identifier (VCI) for this ATM UNI VCC. |
| Dest Operational Node | The destination node. |
| Dest Operational Port | The destination port. |
| Discarded Output Packets | Number of output packets discarded due to resource limitation. If the statistic has increased since the last polling, the increase is displayed by the rate of increase on this port. |
| Discarded Packets Rcvd | The number of received packets that were received but discarded on this port. |
| Discarded Rcvd Packets | The number of packets discarded due to resource limitation. If the statistic has increased since the last polling, the increase is displayed by the rate of increase on this port. |
| DS3 Line Type | The type of DS3 line used on this ATM UNI port. |
| Echo source | The value of the echo source attribute. If the attribute value is on (default), the commands in script files are displayed as they are executed. If the value is off, the commands are not displayed. |
| Ending Time | This indicates the end time for the specified collection. (A collection runs from its begin time to its ending time. If the begin and ending times are not specified, the collection runs continuously.) |
| Errs | The switch error statistics for neighborhood discovery (ND) process (given for both In Cells and Out Cells). |
| Ethernet Address | The IP address for the NP's Ethernet interface. This address is not associated with a particular NP or slot; it points to the active NP in the chassis that is used for network management. |
| Ethernet IP Mask | The Ethernet IP Mask of the IP address. |
| File | The name of a collection record. |
| File Size | The size (in KB) of a collection record. |
| Finish Time | This indicates the begin time of the specified collection. |
| Flash | A read only memory (ROM) that can be erased at common signal levels. |
| Flash Initialization | This indicates the condition of the flash initialization as collected by the test and control system (TCS) for a particular card in the chassis. |
| Frame forwarding connections list | This displays the list of frame forwarding connections. If a connection is down an asterisk (*) appears in the state (S) column for that connection. |
| Frame Relay DLCI connections list | The list of frame relay data link connection identifiers (DLCIs). |
| Frame Relay DLCI list | This displays the list of frame relay DLCI connections. If a connection is down an asterisk (*) appears in the state (S) column for that connection. |
| Full Enquiry Interval | The number of status enquiry intervals that pass before a full status enquiry message is issued. |
| GID Process ID (PID) | The process identification number (PID) of the global information distribution (GID) process. |
| Hostname | The name of the current target switch. |
| Initstring | The current contents of the modem initialization string for the switch card (stored in EEPROM on the midplane). |
| Interval | The time interval for collection of data collection for a collection. |
| IP Addresses Managed by Gid | This field identifies the Internet addresses managed by the global information distribution (GID) process. |
| iso | The highest level object of the MIB tree. |
| iso.org | The subtree below the iso level of the MIB tree. |
| LC Software Version | This indicates the version of the LC software. |
| LCC Software Version | This indicates the version of the line card control process (LCC) that is running. |
| Line edit | The value of the CLI line edit attribute. If the line edit attribute value is on (default), you have access to an emacs-like editor. If the attribute value is off, line edit characters are not supported. |
| Local LMI State | The local management interface (LMI) that is active on the frame relay port. |
| Location | The physical location of the device. |
| Logging | The indication that the logging attribute is off (default) or on. If the logging attribute value is off, no logging takes place. To set the logging attribute to on, enter a log file name as the value. |
| Max Query Period | The maximum length of time that unanswered status enquiries are tolerated before the system declares the LMI port unreliable at the network end. |
| Max Status Query Errs | The maximum number of unanswered status enquiries tolerated before the system declares the LMI port unreliable at the network end. |
| Max Supported VCs | The maximum number of virtual circuits (VCs) allowed for this interface. |
| Maximum Interval between Permit Limit Updates | The maximum interval specification (in milliseconds) for trunk and outgoing edge cards to report permit limits. |
| Measured Bit Rate | The received bit rate for a frame relay or frame forwarding port on a low-speed edge line card. |
| Memory Allocation Failures | The number of memory allocation failures. |
| Memory In Use | This indicates the amount of memory (given in bytes) in use by the specified process. |
| MIB2 Type | The MIB2 type as shown for the specified port. |
| Minimum Interval between CA Updates | The minimum interval specification (in milliseconds) at which congestion avoidance information processes distribute aggregated congestion avoidance (CA) updates to input edge cards. |
| Minimum Interval between Permit Limit Updates | The minimum interval specification (in milliseconds) for trunk and outgoing edge cards to report permit limits. |
| MMA Collection Size | The amount of memory available to the Master Management Agent (MMA) for data collection. |
| MMA PID | The process identification number of the MMA. |
| MMA Trap Filter Level | The priority level of traps sent from the MMA to the CLI or an NMS. Priority levels are 1 - operational, 2 - informational, 3 - trace, and 4 - debug. |
| MMA Trap Logging State | The trap logging state of the MMA. The settings are on (default) or off. |
| Multicast Packets Rcvd | Number of broadcast/multicast packets delivered (a portion of the total). If the statistic has increased since the last polling, the increase is displayed by the rate of increase. |
| Multicast Packets Sent | Number of broadcast/multicast packets sent (a portion of the total). If the statistic has increased since the last polling, the increase is displayed by the rate of increase. |
| Name | Depending on the CLI command you entered, this field may specify a card, collection, collection item, MIB object, node, process (alias name), traplog file, or groups file. |
| ND Clients | The list of neighborhood discovery (ND) clients. |
| ND Process ID (PID) | This indicates the process identification number (PID) of the neighborhood discovery (ND) process. |
| ND Switch Statistics | The statistics for slot, in cells, out cells, and errors for the neighborhood discovery (ND) process. |
| Neighbor Generic Announcements Received | The number of Neighbor Generic Announcements received. |
| Neighbor Generic Announcements Transmitted | The number of Neighbor Generic Announcements transmitted. |
| Neighbor IP Announcements Received | The number of Neighbor IP Announcements received. |
| Neighbor IP Announcements Transmitted | The number of Neighbor IP Announcements transmitted. |
| Neighbor Link Announcements Received | The number of Neighbor Link Announcements received. |
| Neighbor Link Announcements Transmitted | The number of Neighbor Link Announcements transmitted. |
| Neighbor New Announcements Received | The number of Neighbor New Announcements received. |
| Neighbor New Generic Announcements Received | The number of Neighbor New Generic Announcements received. |
| Neighbor New Link Announcements Received | The number of Neighbor New Link Announcements received. |
| Neighbor NPs known to ND | The neighbor network processors (NPs) known to the neighborhood discovery (ND) process. |
| Neighborhood Announcements Received | The number of Neighbor Announcements received. |
| Neighborhood New Announcements Received | The number of Neighborhood New Announcements received. |
| Neighbors in Exchange Start State | The number of neighbors in exchange start state. |
| Neighbors in Exchange State | The number of neighbors in exchange state. |
| Neighbors in Existent Sync State | The number of neighbors in existent sync state. |
| Neighbors in Full Sync State | The number of neighbors in full sync state. |
| Neighbors in Loading Sync State | The number of neighbors in loading sync state. |
| Neighbors Managed by Gid | The list of neighbors managed by the global information distribution (GID) process. |
| Net Interface Type | The type of frame relay network interface on this port. The types are user network interface (UNI) and network to network interface (NNI). |
| New Neighbor IP Announcements Received | The number of New Neighbor IP Announcements received. |
| Normal Packets Rcvd | Number of unicast packets received by the indicated port. If the statistic has increased since the last polling, the increase is displayed by the rate of increase. |
| Normal Packets Sent | Number of unicast packets sent by the indicated port. If the statistic has increased since the last polling, the increase is displayed by the rate of increase. |
| Number of Line Cards managed by ND | The number of line cards managed by the neighborhood discovery (ND) process. |
| Octets Rcvd | Total octets received from the media from the indicated port. If the statistic has increased since the last polling, the increase is displayed by the rate of increase. |
| Octets Sent | Total octets sent on the media by the indicated port. If the statistic has increased since the last polling, the increase is displayed by the rate of increase. |
| Oper CSU Type | The channel service unit (CSU) type for the named port. |
| Oper DCE Bit Rate | The DCE bit rate for the named port. |
| Oper Expected DTE Rate | The expected DTE rate for the named port. |
| Oper Interval | The channel service unit (CSU) type for the named port. |
| Oper Net Interface Type | The interface type for the named port. |
| Oper Protocol | The protocol operating on the interface. |
| Oper Status | The operational status (up or down) of the named port. |
| Operational Max Frame Size | The maximum frame size (in bytes) for the named port. |
| Operational Status | This indicates the status (up or down) of the card in the named slot. |
| Output Errors | Packets discarded due to error. If the statistic has increased since the last polling, the increase is displayed by the rate of increase. |
| Paddle Card | This indicates the current status of the access card (presence and condition) as collected by the test and control system (TCS) for a particular card in the chassis. |
| Paddle Card Override | This indicates the current condition of the access card override (enabled or disabled) as collected by the test and control system (TCS) for a particular card in the chassis. |
| PID | The process identification number. |
| PID Administrative Status | This indicates the administrative status (active or inactive) of the named process. |
| PID Alias | This indicates the alias name for the specified process. |
| PID Name | This indicates the name for the specified process. |
| PID Operation Status | The operation status of the process. |
| PID Trap Level | This indicates the trap level setting for the specified process. Values are oper, info (default), trace, or debug. |
| PID Up Time | The length of time the process has been running. |
| CP Scrambling | This indicates whether the cell payload scrambling is enabled or disabled for the named card. (The default is disabled.) |
| Port Data Cell Capacity | The available data cell capacity for the named port. |
| Port Frame Forwarding Name | The name of the frame forwarding port. |
| Port Frame Relay Name | The name of the frame relay port. |
| Port MTU | The maximum transmission unit number for the specified port. |
| Port Name | The name of the specified port. |
| Port Speed | The speed (in bps) for the specified port. |
| Port Type | The port type (MS Trunk or LS Edge, for example). |
| Port Unreserved Capacity | The available capacity (in cells) for the named port. |
| Ports Managed by Gid | The list of ports managed by the global information distribution process. |
| POST | This indicates the current condition of the power on self test (POST) as collected by the test and control system (TCS) for a particular card in the chassis. |
| Power Supply | This indicates the current condition of the power supply as collected by the test and control system (TCS) for a particular card in the chassis. |
| Power Supply A | This indicates the condition of the bulk power tray in power slot A of the LightStream chassis. If this slot is unused, Empty will appear in this field. |
| Power Supply A Type | This indicates the power type in power slot A of the LightStream chassis. If this slot is unused, Empty will appear in this field. |
| Power Supply B | This indicates the condition of the bulk power tray in power slot B of the LightStream chassis. If this slot is unused, Empty will appear in this field. |
| Power Supply B Type | This indicates the power type in power slot B of the LightStream chassis. If this slot is unused, Empty will appear in this field. |
| Primary Addr | This indicates the IP address for the primary NP's switch interface. |
| Primary Switch | This identifies the primary active switch card (SA or SB). |
| PROGRAM: | The program name and its compile time. |
| Receive Errors | The packets discarded due to format error. If the statistic has increased since the last polling, the increase is displayed by the rate of increase. |
| Registered ND Client Processes | The list of registered neighborhood discovery (ND) processes. |
| Remote LMI State | The state of the remote LMI. LMI is local management interface; a frame relay protocol for getting the status of frame relay circuits from attached frame relay devices. |
| Request Interval | The maximum number of seconds specified that the system expects to elapse between status enquiry messages from the user end of the frame relay connection. |
| SCSI Power | This indicates the current condition of the SCSI power as collected by the test and control system (TCS) for a particular card in the chassis. |
| Secondary Addr | This indicates the IP address for the secondary NP. |
| Slot # | This indicates the type of card in Slot #. If the slot is unused, Empty will appear in this field. |
| Slot # Config Assembly | This identifies the configuration assembly as collected by the test and control system (TCS) for the card in the indicated slot of the chassis. |
| Slot # Config Postcode | This identifies the configuration post code as collected by the test and control system (TCS) for the card in the indicated slot of the chassis. |
| Slot # Config Serialnum | This identifies the configuration serial number as collected by the test and control system (TCS) for the card in the indicated slot of the chassis. |
| Slot # Config Slavecode | This identifies the configuration slave code as collected by the test and control system (TCS) for the card in the indicated slot of the chassis. |
| Slot # Config Type | This identifies the configuration type as collected by the test and control system (TCS) for the card in the indicated slot of the chassis. |
| Slot # Daughter Assembly | This identifies the daughter assembly number as collected by the test and control system (TCS) for the card in the indicated slot of the chassis. |
| Slot # Daughter Serialnum | This identifies the daughter serial number as collected by the test and control system (TCS) for the card in the indicated slot of the chassis. |
| Slot # Oem Assembly | This identifies the OEM assembly number as collected by the test and control system (TCS) for the card in the indicated slot of the chassis. |
| Slot # Oem Serialnum | This identifies the OEM serial number as collected by the test and control system (TCS) for the card in the indicated slot of the chassis. |
| Slot # Paddle Assembly | This identifies the access card assembly number as collected by the test and control system (TCS) for the card in the indicated slot of the chassis. |
| Slot # Paddle Serialnum | This identifies the paddle serial number as collected by the test and control system (TCS) for the card in the indicated slot of the chassis. |
| Slot # State | The temperature conditions (top and bottom) as collected by the test and control system (TCS) for the card in the indicated slot of the chassis. |
| Slot # Voltage
TCS VCC Voltage VCC Voltage SCSI Voltage VPP Voltage | This indicates the TCS VCC, VCC, SCSI, and VPP voltages as collected by the test and control system (TCS) for the card in the indicated slot of the chassis. The current voltages are shown as well as the normal voltage ranges. |
| Slot 2 | This indicates the type of card in slot 2. If the slot is unused, Empty will appear in this field. |
| Slot 3 | This indicates the type of card in slot 3. If the slot is unused, Empty will appear in this field. |
| Slot 4 | This indicates the type of card in slot 4. If the slot is unused, Empty will appear in this field. |
| Slot 5 | This indicates the type of card in slot 5. If the slot is unused, Empty will appear in this field. |
| Slot 6 | This indicates the type of card in slot 6. If the slot is unused, Empty will appear in this field. |
| Slot 7 | This indicates the type of card in slot 7. If the slot is unused, Empty will appear in this field. |
| Slot 8 | This indicates the type of card in slot 8. If the slot is unused, Empty will appear in this field. |
| Slot 9 | This indicates the type of card in slot 9. If the slot is unused, Empty will appear in this field. |
| Slot 10 | This indicates the type of card in slot 10. If the slot is unused, Empty will appear in this field. |
| Slot of Primary NP | This indicates the slot that contains the primary active NP. |
| Slot of This NP | This indicates the slot that contains the NP being displayed. |
| Slot SA | This indicates the type of card in slot SA. If the slot is unused, Empty will appear in this field. |
| Slot SB | This indicates the type of card in slot SB. If the slot is unused, Empty will appear in this field. |
| Software Version Number | The version number of the specified application. |
| Source Node | The node at the source of the service. |
| Source Port | The port at the source of the service. |
| Source VCI | The source virtual channel identifier (VCI) for the VCC. |
| Src Admin Insured Burst | The maximum amount of data (in bytes or cells) that the LightStream network will transfer under normal conditions from the destination port to the source port during the measurement interval. |
| Src Admin Insured Rate | The data throughput (in bits per second or cells) that the LightStream network is committed to support under normal network conditions. The insured rate (IR) is specified in bits per second for FF and FR interfaces, in cells per second for ATM UNI. |
| Src Admin Max Burst | The maximum amount (insured plus uninsured) data (in bytes or cells) that the LightStream network will attempt to deliver under normal conditions from destination to source during the measurement interval. (Measurement interval is calculated by dividing maximum burst size by maximum rate.) |
| Src Admin Max Rate | The maximum amount (insured plus uninsured) data (in bps or cps) that the LightStream network will attempt to deliver under normal conditions from destination to source. (The uninsured data may be dropped if the network is congested.) |
| Src DLCI | The LightStream node at the other end of the frame relay, frame forwarding, or ATM UNI virtual circuit. |
| Src Node | The node at the source of the service. |
| Src Oper Insured Burst | The data throughput on a given virtual circuit that the LightStream network commits to transfer during a specified interval. |
| Src Oper Insured Rate | The data throughput specification in bps or cps that the LightStream network supports under normal network conditions. |
| Src Oper Max Burst | The maximum insured plus uninsured data throughput on a given virtual circuit that the LightStream network commits to transfer during a specified interval, in bytes (for FF and FR) or cells (for ATM UNI), |
| Src Oper Max Rate | The maximum, insured plus uninsured data throughput rate that the LightStream network will attempt to deliver on a given virtual circuit. The uninsured data may be dropped if the network is congested. This throughput is the highest that the virtual circuit will ever deliver. |
| Src Port | The LightStream port at the other end of the frame relay, frame forwarding, or ATM UNI virtual circuit. |
| State | The state of the cards managed by the neighborhood discovery (ND) process. |
| Status Query Period | The maximum length of time that unanswered status enquiries are tolerated before the system declares the LMI port unreliable at the network end. |
| Subnet Mask | The address mask used to identify which bits in the address are network significant, subnet significant, and host significant portions of the complete address. |
| System Up Time | The length of time the system has been up. The time is given in hours, minutes, and seconds. |
| TCS Hub | This indicates the current condition of the TCS hub as collected by the test and control system (TCS) for a particular card in the chassis. |
| TCS VCC Power | This indicates the current condition of the test and control system (TCS) VCC (+5V) power as collected by the TCS for a particular card in the chassis. |
| TCS Voltage | This indicates the TCS voltage of the named card. |
| Temperature | This indicates the current temperature condition collected by the test and control system (TCS) for a particular card in the chassis. |
| Temperature Bottom | The temperature indicated by the bottom sensor of the named card. |
| Temperature Paddle Card Region 1 | The temperature in region 1 of the named access card. |
| Temperature Paddle Card Region 2 | The temperature in region 2 of the named access card. |
| Temperature Top | The temperature indicated by the bottom sensor of the named card. |
| Terminal Type | This indicates the terminal type you are using. |
| Timer | The CLI timer that indicates the time since the CLI was restarted or since this timer was reset. |
| Top Temperature | The temperature indicated by the top sensor of the named card. |
| Traplevel | The level that the CLI debug attribute has been set to. (Values are off, oper, info, trace, or debug.) |
| Type | The type of service for this ATM UNI circuit (guaranteed or insured). |
| Unknown Protocols Rcvd | The number of packets received that were destined for unknown protocols. If the statistic has increased since the last polling, the increase is displayed by the rate of increase. |
| User Monitored Events | The number of monitored events. |
| User Polling Interval | The number of seconds specified between consecutive status enquiries sent by the user portion of a frame relay interface that has a local management interface (LMI). |
| Value | The alias name of a PID. |
| VCC Power | This indicates the current condition of the VCC (+5 V) power as collected by the TCS for a particular card in the chassis. |
| VCC Voltage | This indicates the VCC (+5 V) voltage of the named card. |
| VEE Power | This indicates the current condition of the VEE power as collected by the TCS for a particular card in the chassis. |
| VPP Power | This indicates the current condition of the VPP power as collected by the TCS for a particular card in the chassis. |
| XILINX Load | This indicates the current condition of the XILIN Load as collected by the test and control system (TCS) for a particular card in the chassis. |
|
|