|
|

Product Numbers: PA-A2-4T1C-OC3SM(=), PA-A2-4T1C-T3ATM(=), PA-A2-4E1XC-OC3SM(=), PA-A2-4E1XC-E3ATM(=), PA-A2-4E1YC-OC3SM(=), PA-A2-4E1YC-E3ATM(=)
This configuration note describes the installation and configuration of the dual-wide ATM-CES port adapter, which can be used in Cisco 7200 series routers.
For complete descriptions of interface subcommands and the configuration options that support ATM-CES port adapter functionality, refer to the appropriate software configuration publication listed in the section "If You Need More Information," page 2.
This configuration note has four parts:
The section "Cisco Connection Online," page 82, includes general reference information.
The Cisco Internetwork Operating System (Cisco IOS) software running your router contains extensive features and functionality. For information on the configuring of Cisco 7200 series routers that goes beyond the material presented in this document, use the following resources:
The ATM-CES port adapter is a dual-wide module. It has four T1 (1.544 Mbps) or four E1 (2.048 Mbps) ports (75- or 120-ohm) that can support both structured (N x 64 kbps) and unstructured ATM Forum compliant circuit emulation services (CES), and a single port of an OC-3 (155 Mbps) single-mode intermediate reach or a T3 (45 Mbps) or E3 (34 Mbps) standards-based ATM interface. (See Figure 1, Figure 2, Figure 3, and Figure 4 for examples of each version.)
The target application of the ATM-CES port adapter is access to a broadband public or private ATM network where multiservice consolidation of voice, video, and data traffic over a single ATM link is a requirement.
Table 1 lists the different types of the ATM-CES port adapter and their associated part numbers.
| ATM-CES Type1 | Part Number |
|---|---|
| 4 T1 CES ports and 1 OC-3 ATM SM port | PA-A2-4T1C-OC3SM |
| 4 T1 CES ports and 1 T3 ATM port | PA-A2-4T1C-T3ATM |
| 4 E1 120-ohm CES ports and 1 OC-3 ATM SM port | PA-A2-4E1XC-OC3SM |
| 4 E1 120-ohm CES ports and 1 E3 ATM port | PA-A2-4E1XC-E3ATM |
| 4 E1 75-ohm CES ports and 1 OC-3 ATM SM port | PA-A2-4E1YC-OC3SM |
| 4 E1 75-ohm CES ports and 1 E3 ATM port | PA-A2-4E1YC-E3ATM |


The PA-ATM-CES port adapter can be installed on a Cisco 7200 series router. There are no restrictions on slot location or sequence; you can install an ATM-CES port adapter in any available, horizontally aligned, pair of port adapter slots.
The ATM-CES port adapter supports the following features:
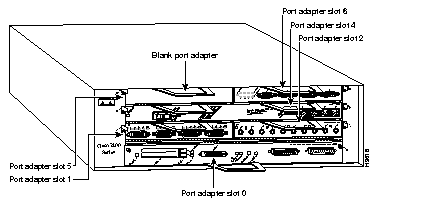
Figure 5 shows a Cisco 7206 router with port adapters installed. In the Cisco 7206 router, port adapter slot 1 is in the lower left position, and port adapter slot 2 is in the lower right position. (The ATM-CES port adapter can be installed in any horizontal pair of these slots; use the slot number associated with the right-side slots.)
Voice and video services (circuit emulation) allow you to interconnect existing T1/E1 interfaces and other kinds of constant bit rate (CBR) equipment. CBR services include such features as PBX interconnect, consolidated voice and data traffic, and video conferencing.
With circuit emulation, data received from an external device at the edge of an ATM network is converted to ATM cells, sent through the network, reassembled into a bit stream, and passed out of the ATM network to its destination. T1/E1 circuit emulation does not interpret the contents of the data stream. All the bits flowing into the input edge port of the ATM network are reproduced at one corresponding output edge port.
An emulated circuit is carried across the ATM network on a PVC, which is configured through the network management system.
The ATM-CES port adapter offers two types of services:
These services are described in the following sections.
CES-IWF is a service based on ATM Forum standards that allows communications to occur between CBR and ATM UNI interfaces, that is, between non-ATM telephony devices (such as classic PBXs or TDMs) and ATM devices (such as Cisco 7200 series routers). Thus, a Cisco 7200 series router equipped with an ATM-CES port adapter offers a migration path from classic T1/E1 CBR data communications services to emulated CES T1/E1 unstructured (clear channel) services or structured (N x 64) services in an ATM network.
Figure 6 is a simplified representation of CES-IWF functions in an ATM network.

The circuit emulation services offered by the ATM-CES port adapter are discussed in the following sections:
Unstructured CES services in an ATM network emulate point-to-point connections over T1/E1 leased lines. This service maps the entire bandwidth necessary for a T1/E1 leased line connection across the ATM network, allowing users to interconnect PBXs, TDMs, and video conferencing equipment. Unstructured CES operations do not decode or alter the CBR data in any way.
The ATM-CES port adapter supports DSX-1 physical interfaces, providing T1/E1 unstructured (clear channel) CBR data transmission services to Cisco 7200 series router users at a rate of 1.544 Mbps for T1 and 2.048 Mbps for E1.
The use of an ATM-CES port adapter for unstructured CES services simulates a point-to-point T1/E1 leased line across your ATM network.
Figure 7 is a generalized representation of how T1/E1 unstructured CES services are set up in conjunction with a Cisco 7200 series router equipped with an ATM-CES port adapter.

Figure 8 is a generalized example of unstructured CES applications in an ATM network. In unstructured CES services, user CBR data received from an edge device at one side of the network is segmented into ATM cells and propagated through the ATM network. After traversing the network, the ATM cells are reassembled into a CBR bit stream that matches the original user data. This CBR data is then passed out of the network to the edge device at the destination endpoint.

The T1/E1 structured (N x 64) CES services enable a CES module to function like a classic digital access and crossconnect system (DACS) switch.
The ATM-CES port adapter supports DSX-1 physical interfaces, providing T1/E1 channelized data transmission services at a rate of 1.544 Mbps for T1 and 2.048 Mbps for E1.
Using an ATM-CES port adapter, you can map a single DS0 channel or multiple DS0 channels across an ATM network. Each T1 port has up to 24 time slots and each E1 port has up to 31 time slots for allocation to structured CES circuits. Each time slot can transmit CBR data at a rate of 64 kbps, or at 56 kbps, if you choose to use optional channel associated signaling (CAS). The section "Channel-Associated Signaling (for Structured CES Services Only)," page 11 describes the CAS mechanism.
Figure 9 illustrates the digital crossconnect and channelized mapping functions offered by a Cisco 7200 series router equipped with an ATM-CES port adapter. Single or multiple DS0 time slots can be mapped across the ATM network. Each time slot (or DS0 channel) represents a single N x 64 circuit that can transmit CBR data at a rate of 64 kbps.
Multiple N x 64 circuits can be connected to a single port, if separate time slots are used.
With T1/E1 structured CES services, network designers can simplify networks by eliminating TDM devices, using ATM-CES port adapters instead as a means of allocating T1/E1 bandwidth to PBXs and teleconferencing equipment.

As Figure 9 demonstrates, structured services in an ATM-CES port adapter allow T1/E1-formatted CBR data to be provisioned into individual DS0 channels (PVCs) or groups of DS0 channels.
Data from these channels can be sent to multiple individual output ports on a CES module, where the data can be combined with CBR data from other DS0 channels or groups of DS0 channels to form an outgoing T1/E1 bit stream. Thus, you can combine structured CBR data with great flexibility for transport across an ATM network.
Figure 10 gives one example of how 24 available N x 64 time slots for T1 (31 time slots for E1 not shown) in an ATM-CES port adapter can be combined to accomplish structured CBR data transport in an ATM network. The DS0 channels can be grouped as either contiguous or noncontiguous time slots.
The ingress (source) DS0 channels can be mapped into different DS0 channels upon egress from the ATM network at the destination node.

For CES structured services, each DS0 time slot represents a data bandwidth of 64 kbps for CBR data transport. If optional channel associated signaling (CAS) is being used, however, a data bandwidth of 56 kbps per DS0 time slot is available for CBR data transport.
Figure 10 shows one end of three PVCs that have been provisioned for structured CBR data transport. Think of these DS0 channels as the source ends of the PVCs. The destination ends of the PVCs each require the allocation of an identical number of DS0 time slots.
However, the actual DS0 numbers assigned at the destination node can differ from those assigned at the source node. In other words, the DS0 numbers at each end of the PVC need not correspond one for one. Only the actual numbers of time slots provisioned at each end of the PVC must agree.
For example, the circuit identified as PVC No. 3 in Figure 10 requires a similar bundling of three time slots at the destination end of the PVC (representing a data bandwidth of 192 kbps) in order for the circuit to operate properly.
Since the ATM-CES port adapter emulates constant bit rate services over ATM networks, it must be capable of providing support for handling channel-associated signaling (CAS) information introduced into structured CES circuits by PBXs and time-division multiplexing (TDM) devices. An optional CAS feature for the ATM-CES port adapter meets this requirement.
With respect to the CAS information carried in a CBR bit stream, an ATM-CES port adapter can be configured to operate as follows:
When the CAS feature is enabled for a CES circuit, the bandwidth of the DS0 channel is limited to 56 kbps for user data, because CAS functions consume 8 kbps of channel bandwidth for transporting the ABCD signaling bits. These signaling bits are passed transparently from the ingress node to the egress node as part of the ATM AAL1 cell stream.
In summary, when the optional CAS and on-hook detection features are enabled, the following conditions apply:
A later section entitled "Configuring a Hard PVC for Structured CES Services (with CAS Enabled)," page 73 outlines the procedures for enabling the CAS feature using CLI commands.
Also, a later section entitled "Configuring Structured CES Services (with CAS and On-Hook Detection Enabled)," page 75 outlines the additional steps necessary in setting up a 1 x 64 structured circuit through CLI commands to take advantage of the bandwidth-release feature.
Circuit emulation services internetworking functions (CES-IWF) and constant bit rate (CBR) traffic relate to a quality of service (QOS) classification defined by the ATM Forum for Class A (AAL1) traffic in ATM networks. In general, Class A traffic pertains to voice and video transmissions.
In an ATM networking environment, CBR refers to a particular class of traffic that is generated by edge (source) devices and propagated into ATM networks for transmission to other edge (destination) devices in the network.
The ATM-CES port adapter has been designed specifically to handle CBR traffic in an ATM networking environment. To provide requisite timing functions in support of CES operations, you can specify any one of three clocking modes:
However, to support synchronous clocking or SRTS clocking in your ATM networking environment, your network must incorporate the following facilities:
Any constant bit rate (CBR) edge device that communicates with another CBR edge device across an ATM network must be driven by a clocking signal of identical frequency. This "synchronized" signal controls the rate of CBR data insertion into the network, as well as the rate of extraction of CBR data from the network. If the clock frequency is not synchronized at both the ingress and egress nodes of the circuit, the data queues and buffers in the network will either overflow or underflow, resulting in line errors.
Distributing a clocking signal within the network ensures that each CBR device has access to a common reference clocking signal, called Primary Reference Source (PRS), for synchronizing CBR data transport.
Any module in a Cisco 7200 series router that can receive and distribute a network timing signal can propagate that signal to any other module in the chassis that has similar capabilities.
By issuing the network-clock-select command with appropriate parameters, you can define a particular port in a Cisco 7200 series router to serve as the source of a PRS for the entire chassis or for other devices in the networking environment. This command enables you to designate a particular port in a Cisco 7200 series router to serve as a "master clock" source in distributing a single clocking signal throughout the chassis or to other network devices. This clocking signal can be distributed wherever needed in the network to globally synchronize the flow of CBR data. The use of this command is described in the section "Defining Clock Sources and Priorities for an ATM-CES Port Adapter," page 59.
When equipped with an ATM-CES port adapter and appropriate software, any Cisco 7200 series router can serve as a means for receiving and distributing a PRS to other devices in the network.
A Cisco 7200 series router can make use of a PRS that originates from any one of several sources in the networking environment (see Figure 11).
Figure 11 shows three possible sources of a PRS when two Cisco 7206 routers are connected back-to-back. However, you should not interpret that to mean that only three such clocking signals can be made available for use in the ATM network. In fact, more than three clocking signals may be present in the Cisco 7200 series router operating environment.
The important concepts that you should take from Figure 11 include the following:

Each PRS depicted in Figure 11 is externally generated--that is, the timing signal originates from a source outside the router. Also shown is an OC-3 trunk line that can propagate a PRS between adjacent router/network devices.
If the Router No. 1 priority 1 PRS fails (CBR 4/0), the network clock synchronization service automatically recovers network timing by using the Router No. 1 priority 2 PRS (CBR 4/3).
Assume, for example, that the T1/E1 line (CBR 4/0) at router No. 1 in Figure 11 is currently supplying PRS to the network. If this PRS fails, the T1/E1 line (CBR 4/3) at the same router is used as PRS.
Router No. 2 has ATM 2/0 as its PRS. If the ATM 2/0 port fails, there is no configured alternate clock source for PRS. The default clock source is the local oscillator. But, in this case, this is not a problem because the traffic from the T1/E1 CBR ports is also disrupted. In the Cisco 7200 series router, all T1/E1 traffic goes only on the ATM WAN uplink. When ATM 3/0 comes up, the PRS is automatically recovered.
If the Router No. 1 priority 1 PRS is restored to service, the network clock synchronization service automatically reverts to this PRS for timing purposes, regardless of which lower priority PRS may be active at the time.
Figure 12 illustrates Cisco 7206 routers connected to an ATM network. This figure shows how a PRS can be derived from the ATM network and provided to an edge node and propagated through the network to synchronize the flow of CBR data between the communicating ATM end nodes.
In Figure 12, when the PRS clock source is taken from the ATM network, all the transmit nodes at the edge of the network on T1/E1 trunk lines on the ATM-CES port adapter in Routers 1, 2, and 3 are synchronized.

Figure 13 illustrates a typical configuration of a network clock source. In this figure, the PBX T1/E1 transmit clocks, ATM-CES T1/E1 transmit clocks, ATM-CES OC-3/T3/E3 ATM WAN uplinks, and ATM network OC-3/T3/E3 ATM port transmit clocks are all derived from/referenced to a single clock source, the PRS. This limits the jitter and wander in the emulated circuits.

For CES operations, three clocking modes can be used in conjunction with any ATM-CES port adapter. These clocking modes are described in the following sections in their recommended order of consideration and use.
Synchronous clocking mode requires a PRS and network clock synchronization services. When equipped with an ATM-CES port adapter and appropriate software, any Cisco 7200 series router can serve as a means for synchronizing the flow of user CBR traffic through the network.
Synchronous clocking can be used for unstructured service (clear channel) and is the only clocking mode for structured (N x 64 kbps) CES services. It is the recommended option for three reasons:
For these reasons, synchronous clocking is the default clocking mode for all CES services.
Synchronous residual time stamp (SRTS) clocking requires a PRS and network clock synchronization services. SRTS, which can be used only for unstructured services, carries asynchronous DS1 circuits. In this case, the input service clock frequency must be recovered at the output CES-IWF. SRTS is one of the clocking modes that can be used for recovering this clock frequency.
The SRTS clocking mode, which requires a network-wide reference clock, measures the service clock input frequency against a network-wide synchronization signal that must be present in the CES-IWF, and sends different signals, called residual time stamps, in the AAL1 header to the reassembly IWF. At the output IWF, the differences can be combined with the network-wide synchronization signal, to re-create the input service clock. The network-wide reference clock is described in the section "Network Clock Distribution in a Cisco 7200 Series Router," page 13.
Adaptive clocking mode requires neither a PRS nor network clock synchronization services for effective handling of CBR traffic. However, as is the case with SRTS clocking, adaptive clocking can be used only for unstructured (clear channel) CES services.
The term adaptive clocking is used because the rate at which CBR data is propagated through an ATM network is driven by the rate at which such data is introduced into the network by the user's edge equipment.
For example, adaptive clocking in an ATM-CES port adapter derives timing for data transport by calculating the "average" rate at which data arrives and conveying that data to the output port of the module at an equivalent rate. For this reason, the actual rate of CBR data flow through the network may vary from time to time when adaptive clocking is used, depending on how rapidly CBR data is being introduced into the network.
CBR data transport through the network occurs in a "pseudo synchronous" manner that ensures the integrity of the data.
Rather than using a clocking signal to convey CBR traffic through an ATM network, adaptive clocking obtains appropriate timing for data transport by calculating an average data rate for the CBR traffic.
For example, if CBR data is arriving at an ATM-CES port adapter at a rate of so many bits per second, then that rate is used, in effect, to govern the flow of CBR data through the network. Meanwhile, however, the ATM-CES port adapter automatically calculates the average data rate by means of microcode (firmware) built into the board. This calculation occurs while user data traverses the network.
When the ATM-CES port adapter senses that its segmentation and reassembly (SAR) buffer is filling up, it increases the rate of the transmit (TX) clock for its output port, thereby "draining" the buffer.
Similarly, the ATM-CES port adapter slows down the transmit clock of its output port if it senses that the buffer is being "drained" faster than CBR data is being received. In this manner, adaptive clocking attempts to minimize wide variations in SAR buffer loading while providing an effective means of propagating CBR traffic through the network.
Implementing adaptive clocking is simple and straightforward, because it does not require network clock synchronization services, a PRS, or the advance planning typically associated with the development of a logical network timing map. However, adaptive clocking does not support structured CES services, and it exhibits relatively high wander characteristics.
Table 2 summarizes the characteristics of the three clocking modes available for handling CBR traffic in an ATM networking environment. Although the wander and jitter characteristics of these clocking modes differ, each mode preserves the integrity of the user's CBR data, ensuring its error-free transport from source to destination.
| Clocking Mode | Advantages | Limitations |
|---|---|---|
| Synchronous | Supports both unstructured (clear channel) and structured CBR traffic.
Exhibits superior wander and jitter characteristics. | Requires network clock synchronization services.
Ties the CES interface to the network clock synchronization services clocking signal (PRS). |
| SRTS (synchronous residual time stamp) | Conveys externally generated user clocking signal through ATM network, providing independent clocking signal for each CES circuit. | Requires network clock synchronization services.
Supports only unstructured (clear channel) CBR traffic. Exhibits moderate wander characteristics. |
| Adaptive | Does not require network clock synchronization services. | Supports only unstructured (clear channel) CBR traffic.
Exhibits poorest wander characteristics. |
The following factors affect the functioning of CES circuits:
Network designers and administrators calculate a maximum allowable CDV value for the network in order to establish network cell delay tolerance limits. Thus, to some degree, the network's maximum allowable CDV value is a measure of the network's expected performance.
Once a CDV threshold for the network is established, appropriate buffer sizing can be derived for the network devices involved in any given CES circuit. This helps to ensure that the network will operate as expected.
In the case of an ATM-CES port adapter, for example, the maximum allowable CDV value for the network is used to determine an appropriate size (depth) for the segmentation and reassembly (SAR) buffer built into the board. This sizing of the SAR buffer prevents buffer overflow or underflow conditions. An overflow condition can cause a loss of frames, and an underflow condition can cause frames to be repeated.
The actual CDV value for a circuit varies according to the particular data path used for the circuit. Consequently, the depth of the SAR buffer may increase or decrease in proportion to the CDV value for the CES circuit being set up.
You can issue the show ces circuit interface command in an unstructured (clear channel) circuit to measure the current CDV value. See Step 3 in the section "Verifying a Configured Hard PVC (with Adaptive Clocking)," page 65.
For an unstructured hard PVC, the CDV value for the circuit (including all hops) should not exceed a maximum allowable CDV value. The procedure for setting up a hard PVC is described in the section "ATM-CES Port Adapter Configuration for CES Services," page 57.
For an unstructured hard PVC, the network automatically determines the best data path through the network and handles the routing of CBR traffic. The network accomplishes this dynamically by means of the ATM connection admission control (CAC) mechanism. The CAC determines the best path through the network by executing a routing algorithm that consults local routing tables in network devices.
If the requested data path is equal to or less than the maximum allowable CDV value established by the network administrator, the connection request is granted. If the requested CES circuit exceeds the maximum allowable CDV value, the connection request is denied. These connection admission control processes occur "on the fly" as network connection requests are initiated.
For example, when a user requests a connection from source node A at one edge of the network to destination node B at the opposite edge of the network, the CAC mechanism takes into account the CDV value for each hop in the requested connection to determine a suitable path through the network that does not exceed the network's maximum allowable CDV value.
The ATM UNI specification defines the required management information base (MIB) functionality for ATM interfaces. MIB attributes are readable and writable across the Interim Local Management Interface (ILMI) through use of the Simple Network Management Protocol (SNMP). The ILMI uses SNMP, without UDP, and Internet Protocol (IP) addressing along with the ATM MIB.
The ATM-CES port adapter supports RFC 1213, RFC 1406, RFC 1407, and SONET MIB RFC 1595 interface MIBs. Refer to the ATM UNI specification for additional details of the MIBs.
This section discusses the interface cables and LEDs that are associated with the ATM-CES port adapter when the adapter is used on the Cisco 7200 series router.
Cables on the ATM-CES port adapter fall into two categories:
ATM-CES port adapter interfaces are full-duplex. You must use the appropriate ATM interface cable and CBR cable to connect the ATM-CES port adapter with an external ATM network. The ATM-CES port adapter, shown in Figures 1 to 4, provides an interface to ATM switching fabrics for transmitting and receiving data at rates of up to 155 Mbps bidirectionally for OC-3 , 44.736 Mbps bidirectionally for DS3 over T3, and 34 Mbps bidirectionally for E3.
Cables can be obtained from the following cable vendors:
Two types of cables are available for use with the ATM-CES port adapter's OC-3 and T3/E3 ATM ports:
Both ATM cables conform to the EIA/TIA-612 and EIA/TIA-613 specifications. The ATM port on the ATM-CES port adapter is a DTE device.
For OC-3 single-mode, the ATM-CES port adapter connects to the SONET/SDH 155-Mbps single-mode optical fiber physical layer, either STS-3C or STM-1. The connection is made by means of single-mode OC-3 ATM cables with SC connectors (see Figure 14). The SONET single-mode SC connector is shipped with removable dust covers on each SC connector. Keep covers on any connectors that are not being used.
For SONET/STC-3C single-mode connections, use one duplex SC connector (see Figure 14) or two single SC connectors (see Figure 15).


For T3/E3 connections, use a 75-ohm coaxial interface cable (see Figure 16). The T3/E3 75-ohm coaxial cable is available from Cisco in five different lengths: 10, 25, 50, 75, and 100 feet. They are not available from outside commercial vendors. The typical maximum distance between stations for T3 transmissions is 450 feet (135 meters) and for E3 transmissions is 1300 feet (390 meters).

The T3/E3 line interface performs physical layer translation from the ATM-CES port adapter to the T3/E3 line interface in accordance with ATM Forum UNI specification Version 3.1, ACCUNET T45 service specifications, and ANSI T1E1.107.
The four CBR interface receptacles on the ATM-CES port adapter are RJ-48C for T1 and E1 (120 ohm). Each connection supports T1 or E1 (120 ohm) interfaces that meet T1E1.403 and ACCUNET TR62411 standards. The RJ-48C connection does not require an external transceiver. The CBR ports are T1 interfaces that use UTP 100-ohm twisted pair cables and E1 interfaces that use UTP 120-ohm twisted pair cables (see Figure 17) or 75-ohm coaxial cables (see Figure 18). The typical maximum distance between stations for T1 and E1 transmissions is 1000 feet (300 meters).

Table 3 lists the pinouts and signal descriptions for the CBR RJ-48C connector.
| Pin | Signal1 |
|---|---|
| 1 | Rx ring |
| 2 | Rx tip |
| 3 | NC |
| 4 | Tx ring |
| 5 | Tx tip |
| 6 | NC |
| 7 | NC |
| 8 | NC |
The ATM-CES port adapter has 13 LEDs that indicate the status of the port adapter, the status of the uplink ports, and the status of the CBR ports. (See Figure 19 and Figure 20.)


Table 4 describes the LED that indicates port adapter status.
| Name | Color | State | Description |
|---|---|---|---|
| Enable | Green | On | Indicates that the port adapter is ready. |
After system initialization, the Enabled LED goes on to indicate that the port adapter has been enabled for operation.
The following conditions must be met before the ATM-CES port adapter is enabled:
If any of these conditions is not met, or if the initialization fails for other reasons, the enabled LED does not go on.
Table 5 describes the LEDs that indicate uplink port status.
| Name | Color | State | Description |
|---|---|---|---|
| RCLK | Green | On | Indicates that a receive clock has been detected. |
| FERF | Yellow | On | Indicates that Framer detected Far End Receive Failure. |
| OOF | Yellow | On | Indicates that Framer detected Out of Frame. |
| AIS | Yellow | On | Indicates that Framer detected Alarm Indication Signal. |
Table 6 describes the LEDs that indicate CBR port status. There are four Enable and four Alarm LEDs, one for each port.
| Enable LED State | Alarm LED State | Description |
|---|---|---|
| Off | Off | Indicates that port is administratively down |
| Off | On (yellow) | In loop mode |
| On (green) | Off | Indicates that the port is enabled (normal state) |
| On (green) | Blinking (yellow) | Integrating state, idle state, yellow or blue alarm |
| On (green) | On (yellow) | Red alarm condition |
The SONET specification for fiber-optic transmission defines two types of fiber: single-mode and multimode. Modes can be thought of as bundles of light rays entering the fiber at a particular angle. Single-mode fiber allows only one mode of light to propagate through the fiber, while multimode fiber allows multiple modes of light to propagate through the fiber. Because multiple modes of light propagating through the fiber travel different distances, depending on the entry angles, they arrive at the destination at different times (a phenomenon called modal dispersion). The typical maximum distance between stations, as defined by SONET, for single-mode transmissions is up to 9 miles (15 kilometers). The ATM-CES port adapter uses single-mode fiber, which is capable of higher bandwidth and greater cable run distances than multimode fiber.
Use the power budget calculations in the following section to determine actual distances. If the distance between two connected stations is greater than this maximum distance, significant signal loss can result, making transmission unreliable.
To design an efficient optical data link, evaluate the power budget. The power budget is the amount of light available to overcome attenuation in the optical link and to exceed the minimum power that the receiver requires to operate within its specifications. Proper operation of an optical data link depends on modulated light reaching the receiver with enough power to be correctly demodulated.
Attenuation, caused by the passive media components (cables, cable splices, and connectors), is common to single-mode transmission.
The following variables reduce the power of the signal (light) transmitted to the receiver in single-mode transmission:
Attenuation is significantly lower for optical fiber than for other media. For fiber-optic transmission, chromatic and modal dispersion reduce the available power of the system by the combined dispersion penalty (measured in decibels). The power lost over the data link is the sum of the component, dispersion, and modal losses. However, at OC-3 speeds on single-mode fiber, dispersion and modal losses are minimal.
The single-mode signal source is an injection laser diode. Single-mode transmission is useful for longer distances, because there is a single transmission path within the fiber and smear does not occur. In addition, chromatic dispersion is also reduced because laser light is essentially monochromatic.
The maximum overload specification on the single-mode receiver is -8 dBm. The single-mode receiver can be overloaded when you are using short lengths of fiber, because the transmitter can transmit up to -8 dB, but no damage to the receiver will result from an overload.
Higher order mode loss (HOL) results from light from the LED entering the fiber and being radiated into the fiber cladding. A worst case estimate of power margin (PM) for single-mode transmissions assumes minimum transmitter power (PT), maximum link loss (LL), and minimum receiver sensitivity (PR). The worst case analysis provides a margin of error; not all of the parts of an actual system will operate at the worst case levels.
The following equation lists the calculation of the power budget:
The SONET specification requires that the signal meet the worst case parameters listed in Table 7.
| Single-mode | |
|---|---|
| PT | -15 dBm |
| PR | -31 dBm |
| PB | -16 dB |
In the following example of a single-mode power budget, two buildings, 8 kilometers apart, are connected through a patch panel in an intervening building with a total of 12 connectors.
The power margin is equal to the PB value minus the link loss:
The value of 6 dB indicates that this link has sufficient power for transmission and does not exceed the maximum receiver input power.
If the power margin is positive, as a rule, the link will work.
Table 8 lists the factors that contribute to link loss and the estimate of the link loss value attributable to each factor.
| Link Loss Factor | Estimate of Link Loss Value |
|---|---|
| Higher order mode losses | 0.5 dB |
| Clock recovery module | 1 dB |
| Modal and chromatic dispersion | Dependent on fiber and wavelength used |
| Connector | 0.5 dB |
| Splice | 0.5 dB |
| Fiber attenuation | 1 dB/km |
The power margin (calculated above) should be greater than zero. Circuits whose results are less than zero may have insufficient power to operate the receiver.
Statistical models more accurately determine the power budget than the worst case method. Determining the link loss with statistical methods requires accurate knowledge of variations in the data link components. Statistical power budget analysis is beyond the scope of this document. For further information, refer to UNI Forum specifications, ITU-T standards, and your equipment specifications.
The following publications contain information on determining attenuation and power budget:
The following sections include information specific to the ATM-CES port adapters and their use on a Cisco 7200 series router:
This section provides software requirements, a list of parts and tools you will need to perform the port adapter installation, and safety and ESD-prevention guidelines to help you avoid injury and damage to the equipment during installation. This section also includes information on the systems in which port adapters can be installed and overview information on interface specifications.
The following sections present general information and information about port adapter installation requirements:
The ATM-CES port adapter requires Cisco IOS Release 11.1(14)CA or later. It is compatible with the Cisco 7200 series routers.
To determine if your Cisco 7200 series router is compatible with the ATM-CES port adapter, use the show version command to display the current hardware configuration of the router, including the system software version that is currently loaded and running. You can check the version of the default ROM image by removing the board and checking the ROM labels, or by configuring the interface or system software to boot from ROM, restarting the system, and using these same commands to check the running version.
Use the show version command to display the current system software version. In the following example, the running system software is Release 11.1(14)CA.
Router> show version
Cisco Internetwork Operating System Software
IOS (tm) 7200 Software (C7200-J-M), Version 11.1(14)CA
Synced to mainline version: 11.1(9)
Copyright (c) 1986-1997 by cisco Systems, Inc.
Compiled Tue 18-Feb-97 19:12
If your system lacks the required system software and microcode, contact a customer service representative for upgrade information.
You need the following parts and tools to install an ATM-CES port adapter. If you need additional equipment, ask your service representative for ordering information.
This section provides safety guidelines that you should follow when you are working with any equipment that connects to electrical power or telephone wiring.
The single-mode transmitter in the ATM-CES port adapter uses a small laser to transmit the light signal to the network ring. Keep the transmit port covered whenever a cable is not connected to it.
Here is an example of the laser warning label that appears on the product:

 | Warning Invisible laser radiation may be emitted from the aperture ports of the single-mode ATM-CES port adapter when no fiber cable is connected. Avoid exposure and do not stare into open apertures. (For translated versions of this warning, refer to the section "Translated Safety Warnings," page 79.) |
| Warning Class 1 laser product. (For translated versions of this warning, refer to the section "Translated Safety Warnings," page 79.) |
Follow these basic guidelines when working with any electrical equipment:
Use the following guidelines when working with any equipment that is connected to telephone wiring or to other network cabling:
Electrostatic discharge (ESD) damage, which can occur when electronic cards or components are improperly handled, results in complete or intermittent failures. Port adapters and processor modules consist of printed circuit boards that are fixed in metal carriers. Electromagnetic interference (EMI) shielding and connectors are integral components of the carrier. Although the metal carrier helps to protect the board from ESD, use a preventive antistatic strap during handling.
Use these guidelines to prevent ESD damage:
 | Caution For safety, periodically check the resistance value of the antistatic strap. The measurement should be between 1 and 10 megohms. |
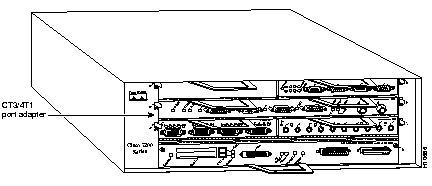
The ATM-CES port adapter, which is dual-wide, can be installed in any available, horizontally aligned pair of port adapter slots in a Cisco 7200 series router. Figure 21 shows an ATM-CES port adapter installed in port adapter slot 3 and slot 4 of a Cisco 7206 router.

You might need to install a new port adapter in a Cisco 7200 series router or replace a failed port adapter in the field. In either case, no tools are necessary; any port adapter available for the Cisco 7200 series routers connects directly to the router midplane and is locked into position by a port adapter lever. When removing and replacing a port adapter, you need the following:
If you plan to remove an ATM-CES port adapter or some other dual-wide port adapter from a Cisco 7200 series router and replace it with an ATM-CES port adapter, use the instructions in these two sections:
If, however, you are replacing two single-width port adapters (or port adapter blanks) in a Cisco 7200 series router with a new ATM-CES port adapter, you first need to remove the port adapter slot divider before you can install the ATM-CES port adapter. To do so, use the instructions in these sections:
When a port adapter slot is not in use, a blank port adapter must fill the empty slot. This allows the router to conform to EMI emissions requirements and helps provide proper air flow across the port adapters. If you plan to install a new port adapter in a slot that is not in use, you must first remove a blank port adapter.
The ATM-CES port adapter is a dual-wide port adapter and requires two adjacent port adapter slots in a Cisco 7200 series router.
Here is the procedure for removing a port adapter from a Cisco 7200 series router:
Step 1 Attach an ESD-preventive wrist strap to yourself and to an unfinished chassis surface.
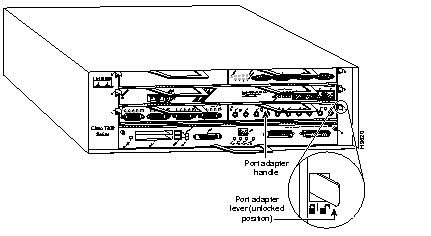
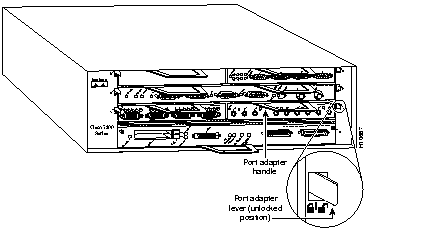
Step 2 Move the port adapter lever for the desired port adapter slot to the unlocked position. (See Figure 22.)
Step 3 Grasp the two handles on the port adapter and pull the port adapter from the midplane, about halfway out of its slot. If you are removing a blank port adapter, pull the blank port adapter out of the chassis slot.
Step 4 With the port adapter halfway out of the slot, disconnect all cables from the port adapter.
Step 5 After disconnecting the cables, pull the port adapter from its chassis slot.
| Caution Always handle the port adapter by the carrier edges and handles; never touch the port adapter's components or connector pins. (See Figure 23.) |
Step 6 Place the port adapter on an antistatic surface with its components facing upward, or in a static shielding bag. If you are returning the port adapter to Cisco, immediately place it in a static shielding bag.
The following sections explain how to remove and replace a port adapter slot divider in a Cisco 7200 series router. If you are replacing an ATM-CES port adapter, this slot divider is already removed and you can proceed to the section "Installing a Dual-Wide Port Adapter," page 34.
Following is the procedure for removing a port adapter slot divider from a Cisco 7200 series router:
Step 1 Remove the port adapters from the slots on both sides of the port adapter slot divider. Refer to the previous section "Removing a Port Adapter," page 31 when removing a port adapter from a Cisco 7200 series router.
Step 2 With one hand, raise the slot divider lever to unlock the slot divider from the chassis. (See Figure 24.)

Step 3 With the slot divider lever still raised, use your other hand to pull the slot divider from the chassis. (See Figure 25.)
Step 4 Store the slot divider for use at a later date.
This completes the procedure for removing a port adapter slot divider from a Cisco 7200 series router. Proceed to the section "Installing a Dual-Wide Port Adapter," page 34.
Following is the procedure for installing a port adapter slot divider in a Cisco 7200 series router.
Step 1 Position the slot divider so that the slot divider lever faces you and is at the bottom.
Step 2 Align the left and right edges of the slot divider between the guides in the port adapter slot. (See Figure 26.)
Step 3 With the left and right edges of the slot divider aligned in the slot guides, slide the slot divider all the way into the slot until you feel the slot divider lock into place (listen for a click).
This completes the procedure for installing a port adapter slot divider in a Cisco 7200 series router.
Following is the procedure for installing a new dual-wide port adapter in a Cisco 7200 series router:
Step 1 Attach an ESD-preventive wrist strap to yourself and to an unfinished chassis surface.
Step 2 Use both hands to grasp the port adapter by its metal carrier edges with the adapter components facing downward. (See Figure 23.)
Step 3 Align the left and right edges of the port adapter metal carrier between the guides in the port adapter slot. (See Figure 27.)

Step 4 With the metal carrier edges aligned in the slot guides, gently slide the port adapter halfway into the slot.
| Caution Do not slide the port adapter all the way into the slot until you have connected all cables. Doing so disrupts normal operation of the router. |
Step 5 With the port adapter halfway into the slot, connect all required cables to the port adapter.
Step 6 After connecting all required port adapter cables, carefully slide the port adapter all the way into the slot until you feel the port adapter's connectors mate with the midplane.
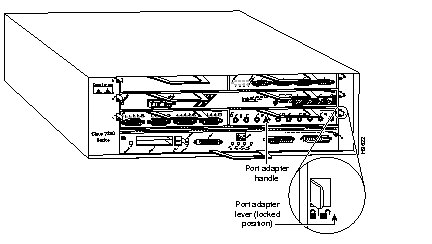
Step 7 After feeling the connectors mate, move the port adapter lever to the locked position. Figure 28 shows the port adapter lever in the locked position.
This completes the procedure for installing a new port adapter in a Cisco 7200 series router.
Depending on the circumstances, you might need to change the configuration of the ATM-CES port adapter's receive interface from ungrounded to grounded. (The ATM-CES port adapter is configured in manufacturing for ungrounded at the receive interface.) The following steps explain how to set the configuration for grounded or ungrounded:
Step 1 Attach an ESD-preventive wrist strap to youself and to an unfinished chassis surface.
Step 2 Remove the ATM-CES port adapter from the chassis. To do so, follow the steps in the section "Removing a Port Adapter," page 31.
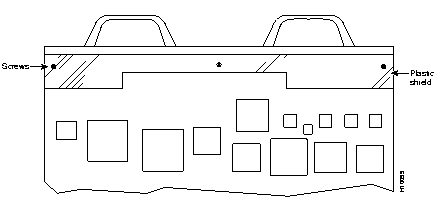
Step 3 With the ATM-CES port adapter on an antistatic mat, use a number 1 Phillips screwdriver to remove the three screws that secure the plastic shield to the ATM-CES port adapter's printed circuit board. (See Figure 29.) Save the screws.
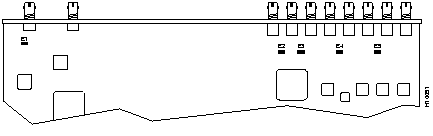
Step 4 Set the jumper(s) on the ATM-CES port adapter to grounded (covered pins) or ungrounded (uncovered pins). These jumpers are at location E1 to E5 (depending on which version of the port adapter you are using) on the port adapter's circuit board. See Figure 30, Figure 31, and Figure 32.


Step 5 Replace the plastic shield over the ATM-CES port adapter's jumpers and secure it to the port adapter's printed circuit board using a number 1 Phillips screwdriver and the three screws that you saved.
Step 6 Replace the ATM-CES port adapter in the chassis. To do so, follow the instructions in the section "Installing a Dual-Wide Port Adapter," page 34.
This completes the procedure for setting the ATM-CES port adapter's jumper(s).
The following sections describe the tasks needed to configure and customize the ATM-CES port adapter for use on a Cisco 7200 series router. You can change the ATM-CES port adapter default values so that they are correct for your network environment. (For information on configuring for CES services, see the section "ATM-CES Port Adapter Configuration for CES Services," page 57.)
See "ATM-CES Port Adapter Configuration Examples," page 76 for configuration examples.
If you installed a new ATM-CES port adapter or if you want to change the configuration of an existing interface, you must enter configuration mode using the configure command. If you replaced an ATM-CES port adapter that was previously configured, the system will recognize each new ATM-CES port adapter and bring it up in the previous existing configuration.
After you verify that the new ATM-CES port adapter is installed correctly (the enabled LED goes on), use the privileged-level configure command to configure the new interfaces. Be prepared with the information you will need, such as the following:
For a summary of the configuration options available and instructions for configuring the ATM-CES on a Cisco 7200 series router, refer to the appropriate configuration publications. They are listed in the section "If You Need More Information," page 2.
The configure command requires privileged-level access to the EXEC command interpreter, which usually requires a password. Contact your system administrator if necessary to obtain EXEC-level access.
In order to configure the ATM-CES port adapter for LANE, see the Wide-Area Networking Configuration Guide.
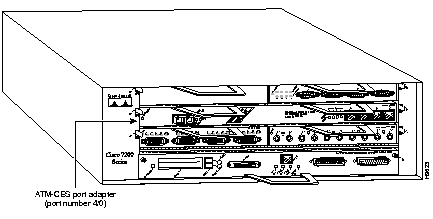
This section describes the first step in configuring the ATM-CES port adapter. The Cisco 7200 series router identifies an interface address by its slot number (slots 0 to 6) and interface port number in the format slot/port. Because each ATM-CES port adapter contains a single ATM interface, the port number is always 0. For example, the slot/port address of an ATM interface on an ATM-CES port adapter installed in slot 4 is 4/0 (see Figure 33).
You can identify interface ports by physically checking the slot/port location on the front of the router or by using show commands to display information about a specific interface or all interfaces in the router.
To begin to configure the ATM-CES port adapter, start the following task in privileged EXEC mode:
| Task | Command |
|---|---|
| Step 1 At the privileged EXEC prompt, enter configuration mode from the terminal. | configure1 [terminal] <CR> |
| Step 2 Specify an ATM-CES port adapter interface. | interface atm slot/02 |
| Step 3 If IP routing is enabled on the system, you can assign a source IP address and subnet mask to the interface. | ip address ip-address mask3 |
To enable the ATM-CES port adapter, perform the following task in interface configuration mode:
| Task | Command |
|---|---|
| Change the shutdown state to up and enable the ATM interface, thereby starting the segmentation and reassembly (SAR) operation on the interface. | no shutdown1 |
The no shutdown command passes an enable command to the ATM-CES port adapter, which then begins SAR operations. It also causes the ATM-CES port adapter to configure itself, based on the previous configuration commands sent.
To configure the ATM-CES port adapter for digital signal level 3 (DS3), perform the following tasks in interface configuration mode:
| Task | Command |
|---|---|
| Step 1 Set the line build out length (0 to 50 feet is short and >50 feet is long). Use the no form of this command to return to the default, 0. | [no] atm lbo {short | long} |
| Step 2 Select the internal clock source. By default, the internal clock source is selected. Use the no form of this command to negate the default value. | [no] atm clock internal |
| Step 3 Enable DS3 scrambling. Use the no form of this command to restore the default value. | [no] atm ds3-scramble |
| Step 4 Specify DS3 framing m23plcp, cbitplcp, m23adm, and cbitadm. Use the no form of this command to return to the default, cbitadm. | [no] atm framing {m23plcp | cbitplcp | m23adm | cbitadm} |
To configure the ATM-CES port adapter for E3, perform the following tasks in interface configuration mode:
| Task | Command |
|---|---|
| Step 1 Set the line build out length (0 to 50 feet is short and >50 feet is long). Use the no form of this command to return to the default, 0. | [no] atm lbo {short | long} |
| Step 2 Select the internal clock source. By default, the internal clock source is selected. Use the no form of this command to negate the default value. | [no] atm clock internal |
| Step 3 Enable E3 scrambling. Use the no form of this command to restore the default, enabled. | [no] atm e3-scramble |
| Step 4 Specify E3 framing g832adm, g751adm, and g751plcp. Use the no form of this command to return to the default, G.751 PLCP framing. | [no] atm framing {g832adm | g751adm | g751plcp} |
A virtual circuit (VC) is a point-to-point connection between remote hosts and routers. A VC is established for each ATM end node with which the router communicates. The characteristics of the VC are established when the VC is created and include the following:
Each VC supports the following router functions:
By default, fast switching is enabled on all ATM-CES port adapter interfaces. These switching features can be turned off with interface configuration commands. Autonomous switching must be explicitly enabled for each interface.
To use a permanent virtual circuit (PVC), you must configure the PVC in both the router and the ATM switch. PVCs remain active until the circuit is removed from either configuration. Also, you can optionally configure the amount that the cell transmision rate increases or decreases in response to flow control information from the network or destination for available bit rate (ABR) VCs.
When a PVC is configured, all the configuration options are passed on to the ATM-CES port adapter. These PVCs are writable into the nonvolatile RAM (NVRAM) and are used when the route processor (RP) image is reloaded.
Some ATM switches might have point-to-multipoint PVCs that do the equivalent of broadcasting. If a point-to-multipoint PVC exists, it can be used as the sole broadcast PVC for all multicast requests.
To configure a PVC, perform the two required tasks in the following sections:
To create a non-ABR PVC on the ATM-CES port adapter interface on a Cisco 7200 series router, perform the following task in interface configuration mode:
| Task | Command |
|---|---|
| Create a PVC. | atm pvc vcd vpi vci aal-encap [[peak average {burst}]] [oam {seconds}] [{inarp {seconds}] |
To create an Available Bit Rate (ABR) PVC, you must specify the abr keyword and optional peak cell rate (pcr) and minimum cell rate (mcr) values.
When you create any PVC, you create a virtual circuit descriptor (VCD) and attach it to the VPI and VCI. A VCD is an ATM-CES port adapter-specific mechanism that identifies to the ATM-CES port adapter the VPI-VCI pair to be used for a particular packet. The ATM-CES port adapter requires this feature in order to manage the packets for transmission. The number chosen for the VCD is independent of the VPI-VCI pair used.
When you create any PVC, you also specify the ATM adaption layer (AAL) and encapsulation. Omitting a peak and average value causes the PVC and those values to be set to the line rate, with the peak and average value being equal.
You can configure the PVC for communication with the Interim Local Management Interface (ILMI). Doing so enables the router to receive Simple Network Management Protocol (SNMP) traps and new network prefixes. Refer to the Wide-Area Networking Configuration Guide for details.
You can also configure the PVC to send Operation, Administration, and Maintenance (OAM) F5 loopback cells, which verify connectivity on the virtual circuit. The remote end must respond by echoing back such cells.
For example:
router(config-if)#interface atm 2/0router(config-if)#atm pvc 2048 255 128 aal5snap 10 10 2046
vpi--The ATM network VPI to use for this VC in the range of 0 through 255.
vci--The ATM network VCI to use for this VC in the range of 0 through 65,535.
encapsulation--The encapsulation type to use on this VC. Use one of the following:
protocol-type-for-mux--A protocol type compatible with the MUX is required.
peak-rate--(Optional.) The maximum rate, in kilobits per second, at which this VC can transmit.
average-rate--(Optional.) The average rate, in kilobits per second, at which this VC will transmit.
burst--(Optional.) The burst cell size is an integer value, in the range 1 through 64,000. This relates to the maximum number of ATM cells that the virtual circuit can transmit to the network at the peak rate of the PVC.
abr--The abr cell rate to use on this VC. Optionally, you can use one of the following values:
The atm pvc command creates PVC n and attaches the PVC to VPI and VCI. The AAL used is specified by aal and encapsulation by encap. The peak and avg rate selection values are specified in kilobits per second. Not specifying a peak and avg value causes the PVC to default to the line rate.
The default for peak-rate and average-rate is that peak rate = average rate = line rate.
See examples of PVC configurations in the section "ATM-CES Port Adapter Configuration Examples," page 76.
This section describes the procedure for mapping a protocol address to a PVC, which is a required task if you are configuring a PVC. The ATM interface supports a static mapping scheme that identifies the ATM addresses of remote hosts or routers. This address is specified as a virtual circuit descriptor (VCD) for a PVC (or an NSAP address for SVC operation).
You enter mapping commands as groups. You first create a map list and then associate it with an interface. Begin the following task steps in global configuration mode:
| Task | Command |
|---|---|
| Step 1 Create a map list by naming it, and enter map-list configuration mode. | map-list name |
| Step 2 Associate a protocol and address to a specific virtual circuit. | protocol protocol-address atm-vc vcd [broadcast] |
| Step 3 Specify an ATM interface and enter interface configuration mode. | interface atm slot/port1 |
| Step 4 Create a PVC.
or Create an ABR PVC. | atm pvc vcd vpi vci aal-encap [[peak average burst]] [oam seconds]
atm pvc vcd vpi vci aal-encap [abr[pcr mcr]] [oam seconds] |
| Step 5 Associate a map list to an interface. | map-group name |
A map list can contain multiple map entries, as Steps 2 and 3 in the preceding task table illustrate. The broadcast keyword specifies that this map entry is to be used when the corresponding protocol sends broadcast packets to the interface (for example, any network routing protocol updates). If you do not specify broadcast, the ATM software is prevented from sending routing protocol updates to the remote hosts.
If you do specify broadcast, but do not set up point-to-multipoint signaling, pseudobroadcasting is enabled. To eliminate pseudobroadcasting and set up point-to-multipoint signaling on virtual circuits configured for broadcasting, refer to the Wide-Area Networking Configuration Guide.
When the map list is complete, you associate the map list with an ATM interface by using the name argument (see Step 5).
You can create multiple map lists, but only one map list can be associated with an interface. Different map lists can be associated with different interfaces. See "ATM-CES Port Adapter Configuration Examples," page 76.
For further information on configuring the ATM-CES port adapter for PVCs, see the Wide-Area Networking Configuration Guide.
ATM switched virtual circuit (SVC) service operates much like X.25 SVC service, although ATM allows much higher throughput. Virtual circuits are created and released dynamically, providing user bandwidth on demand. This service requires a signaling protocol between the router and the switch.
The ATM signaling software provides a method of dynamically establishing, maintaining, and clearing ATM connections at the User-Network Interface (UNI). The ATM signaling software conforms to ATM Forum UNI 3.0.
In UNI mode, the user is the router and the network is an ATM switch. This is an important distinction. The Cisco router does not perform ATM-level call routing. Instead, the ATM switch does the ATM call routing, and the router routes packets through the resulting circuit. The router is viewed as the user and the LAN interconnection device at the end of the circuit, and the ATM switch is viewed as the network.
Figure 34 illustrates the router position in a basic ATM environment. The router is used primarily to interconnect LANs via an ATM network. The workstation connected directly to the destination ATM switch illustrates that you can connect not only routers to ATM switches, but also any computer with an ATM interface that conforms to the ATM Forum UNI specification.

Complete the required tasks in the following sections to use SVCs:
For further information on configuring the ATM-CES port adapter for SVCs, see the Wide-Area Networking Configuration Guide.
Unlike X.25 service, which uses in-band signaling (connection establishment done on the same circuit as data transfer), ATM uses out-of-band signaling. One dedicated PVC exists between the router and the ATM switch, over which all SVC call establishment and call termination requests flow. After the call is established, data transfer occurs over the SVC, from router to router. The signaling that accomplishes the call setup and teardown is called Layer 3 signaling or the Q.2931 protocol.
For out-of-band signaling, a signaling PVC must be configured before any SVCs can be set up. In Figure 35, a signaling PVC from the source router to the ATM switch is used to set up two SVCs. This is a fully meshed network; workstations A, B, and C all can communicate with each other.

To configure the signaling PVC for all SVC connections, perform the following task in interface configuration mode:
| Task | Command |
|---|---|
| Configure the signaling PVC for a major interface that uses SVCs. | atm pvc vcd vpi vci qsaal |
The VPI and VCI values must be configured consistently with the local switch. The standard value of VPI is 0; the standard value of VCI is 5.
See "Example of SVCs in a Fully Meshed Network," page 78, for a sample ATM signaling configuration.
Every ATM interface involved with signaling must be configured with a network service access point (NSAP) address. The NSAP address is the ATM address of the interface and must be unique across the network.
You can do one of the following to configure an NSAP address:
When you configure the ATM NSAP address manually, you must enter the entire address in hexadecimal format; that is, each digit entered represents a hexadecimal digit. To represent the complete NSAP address, you must enter 40 hexadecimal digits in the following format:
XX.XXXX.XX.XXXXXX.XXXX.XXXX.XXXX.XXXX.XXXX.XXXX.XX
Because the interface has no default NSAP address, you must configure the NSAP address for SVCs. To set the ATM interface's source NSAP address, perform the following task in interface configuration mode:
| Task | Command |
|---|---|
| Configure the ATM NSAP address for an interface. | atm nsap-address nsap-address |
In the following example, NSAP address AB.CDEF.01.234567.890A.BCDE.F012.3456.7890.1234.12 is assigned to ATM interface 4/0:
interface ATM4/0
atm nsap-address AB.CDEF.01.234567.890A.BCDE.F012.3456.7890.1234.12
You can display the ATM address for the interface by executing the show interface atm command.
In order for you to use this method of entering the router's NSAP address, the switch must be capable of delivering the NSAP address prefix to the router via ILMI, and the router must be configured with a PVC for communication with the switch via ILMI.
To configure the router to get the NSAP prefix from the switch and use locally entered values for the remaining fields of the address, complete the following tasks in interface configuration mode:
| Task | Command |
|---|---|
| Configure a PVC for communicating with the switch via ILMI. | atm pvc vcd 0 16 ilmi |
| Enter the ESI and Selector fields of the NSAP address. | atm esi-address esi.selector |
In the atm esi-address command, the esi argument is 6 hexadecimal bytes long (12 digits), and the selector argument is 1 hexadecimal byte long (2 digits).
In the following example on a Cisco 7200 series router, the ESI and Selector field values are assigned, and the ILMI PVC is set up:
interface atm 4/0
atm pvc 2 0 16 ilmi
atm esi-address 345678901234.12
Cisco implements both the ATM Address Resolution Protocol (ARP) server and ATM ARP client functions described in RFC 1577. RFC 1577 models an ATM network as a logical IP subnetwork on a LAN.
The tasks required to configure classical IP and ARP over ATM depend on whether the SVCs or PVCs are in the environment. For further information, refer to the Wide-Area Networking Configuration Guide.
You can customize the ATM-CES port adapter. The features you can customize have default values that will probably suit your environment and not need to be changed. However, you might need to enter configuration commands, depending on the requirements for your system configuration and the protocols you plan to route on the interface. Perform the tasks in the following sections if you need to customize the ATM-CES port adapter:
Each ATM interface has a default maximum packet size or maximum transmission unit (MTU) size. On the ATM-CES port adapter, this number defaults to 4470 bytes, the range being 64 through 9188 bytes. To set the maximum MTU size, perform the following task in interface configuration mode:
| Task | Command |
|---|---|
| Set the maximum MTU size. | mtu bytes1 |
By default, the ATM interface allows the maximum of 2048 virtual circuits. However, you can configure a lower number (in the range of 64 through 2048), thereby limiting the number of virtual circuits on which the ATM-CES port adapter allows segmentation and reassembly to occur. Limiting the number of virtual circuits does not affect the VPI-VCI pair of each virtual circuit.
To set the maximum number of virtual circuits supported (including PVCs and SVCs), perform the following task in interface configuration mode:
| Task | Command |
|---|---|
| Limit the number of virtual circuits. | atm maxvc number |
In STM-1 mode, the ATM-CES port adapter sends idle cells for cell-rate decoupling. In STS-3C mode, the ATM-CES port adapter sends unassigned cells for cell-rate decoupling. The default SONET setting is STS-3C. To configure for STM-1, perform the following task in interface configuration mode:
| Task | Command |
|---|---|
| Configure SONET framing | atm sonet stm-1 |
To change back to STS-3C, use the no atm sonet stm-1 command.
By default, the ATM-CES port adapter uses the internal clock. The internal clock source is selected using the network clock select command.
| Task | Command |
|---|---|
| Select the internal clock source. | network-clock-select priority interface |
For more information on setting the clock source, see the section "Defining Clock Sources and Priorities for an ATM-CES Port Adapter," page 59.
You can control the amount that the cell transmission rate for ABR VCs increases or decreases in response to flow control information from the network or destination by setting the Available Bit Rate (ABR) rate factors. To set the ABR rate increase factor (rif) and rate decrease factor (rdf), perform the following task in interface configuration mode:
| Task | Command |
|---|---|
| Change ABR rate factor. | atm abr [[rif] [rdf]] |
You can select the number of transmit channels2 used by the interface. The atm tx-channels command can be used to divide the available number (fixed) of transmit descriptors across the configured number of transmit channels.Typically, you think of a one-to-one association between a transmit channel and a VC; however the ATM-CES port adapter supports other types of VCs than data VCs (for example CES VCs). Also, the ATM-CES port adapter can multiplex one or more VCs over a shaped single virtual path (VP) that only requires a single transmit channel. Therefore, the term transmit channel is used rather than virtual circuit.
To set the number of transmit descriptors, perform the following task in interface configuration mode:
| Task | Command |
|---|---|
| Select the number of transmit descriptors | atm tx-channels number |
The maximum burst of packets that are allowed per VC is limited by the number of transmit descriptors allocated per VC. Because the total number of transmit descriptors available is limited by the available SRAM space, configuration of the number of transmit channels for the interface determines the number of transmit descriptors for each transmit channel. Hence, the burst size for each transmit channel is determined by the atm tx-channels command. For example, for 64 (default) numbers of transmit channels for the interface, 255 transmit descriptors are associated per transmit channel; for 512 numbers of transmit channels for the interface, 31 transmit descriptors are associated per transmit channel.
To display information on the transmit channels, use the show atm interface atm EXEC command.
After configuring the new interface, you can display its status. You can also display the current state of the ATM network and connected virtual circuits. To show current virtual circuits and traffic information, perform the following tasks in EXEC mode:
The ATM-CES port adapter supports the traffic shaping parameters defined in Table 8. This ensures that generated traffic conforms to the Available Bit Rate (ABR) service category specified in the ATM Forum Traffic Management Specification Version 4.0.
| Traffic Parameter | Range | Default | Note |
|---|---|---|---|
| Peak rate | 1 kbps to 155 Mbps | If not defined, each new VC is set to the maximum physical layer rate. | |
| Average rate | 0< avg < peak | Average = peak rate. | |
| Maximum burst size | 1 to 64,000 | Equal to the ATM CES port adapter's MTU size. (User-configurable on ATM interface only.) | |
| Minimum rate | 0 to peak | 0 | Used for ABR PVCs |
The ATM-CES port adapter supports multiplexing of one or more virtual channels (VCs) over a virtual path (VP) that is shaped at a constant bandwidth. To use this feature, you configure a permanent virtual path (PVP) with a specific virtual path identifier (VPI). Any VCs that are created subsequently with the same VPI are multiplexed onto this VP; the traffic parameters of individual VCs are ignored.
The traffic shaping conforms to the peak rate that is specified when you create the VP. Any number of data VCs can be multiplexed onto a VP. However, the number of CES VCs that are multiplexed depends on the bandwidth requirement. Because of this requirement, the CES VCs cannot be oversubscribed.
PVP creation, by default, creates two VCs (vci=3 and vci=4). These VCs are created for VP end-to-end loopback and segment loopback oam support.
To create a permanent virtual path (PVP), perform the following task in interface configuration mode:
| Task | Command |
|---|---|
| Create a PVP | atm pvp vpi [peak-rate] |
The vpi value is the virtual path identifier to be associated with the PVP (valid values are in the range 0 to 255 inclusive). The peak rate argument is the maximum rate (in kbps) at which the PVP is allowed to transmit. Valid values are in the range 84 kbps to line rate (155,000 kbps for OC-3, 45,000 kbps for DS3, and 34,000 kbps for E3) with line rate being the default.
This command will be rejected if a non-multiplexed VC with the specified vpi value already exists. This could happen if a VC is created first with a given vpi value and then you subsequently enter this command.
To delete a permanent virtual path (PVP), perform the following task in interface configuration mode:
| Task | Command |
|---|---|
| Delete a PVP | no atm pvp vpi |
The vpi value is the virtual path identifier to be associated with the PVP (valid values are in the range 0 to 255 inclusive). This command will be rejected if there are existing VCs using the specified VPI.
The following example shows a typical configuration for the ATM-CES port adapter with VP shaping on a Cisco 7200 series router.
   router(config)#interface atm6/0
   router(config-if)#atm pvp 1 2000
   router(config-if)#atm pvc 13 1 13 aal5snap
   router(config-if)#interface cbr6/0
   router(config-if)#ces circuit 0
   router(config-if)#ces pvc 0 interface atm6/0 vpi 1 vci 100
   router(config-if)#^Z
The above sequence creates a VP with the vpi value of 1 and with a peak rate of 2000 kbps. The subsequent VCs created, one data VC and one CES VC, are multiplexed onto this VP.
After configuring the new interface, you can display the statistics for all VPs on an interface by using the show atm vp command. You can also display the statistics for a given VP by using the show atm vp command with a vpi value, as in the following example:
router# show atm vp 1
   ATM6/0  VPI: 1, PeakRate: 155000, CesRate: 1742, DataVCs: 1, CesVCs:1, Status: ACTIVE

     VCD    VCI   Type   InPkts   OutPkts   AAL/Encap     Status
     1      100   PVC    n/a      n/a       CES-AAL1      ACTIVE
     13     13    PVC    0        0         AAL5-SNAP     ACTIVE
     409    3     PVC    0        0         F4 OAM        ACTIVE
     410    4     PVC    0        0         F4 OAM        ACTIVE

   TotalInPkts: 0, TotalOutPkts: 0, TotalInFast: 0, TotalOutFast: 0, TotalBroadcasts: 0
The ATM-CES port adapter maintains a count of certain errors. In addition to keeping a count of these errors, the ATM-CES port adapter also snapshots the last VCI/VPI that caused the error. Each ATM-CES port adapter error counter is 16 bits.
Errors counted include the following:
The following debug commands can be used to help solve ATM network problems:
To create a dump of all ATM packets, use the following command:
debug atm packet
The debug atm packet command displays the contents of the SNAP/NLPID header, followed by the first 40 bytes of a packet in hexadecimal format.
To display errors, use the following command:
debug atm errors
The debug atm errors command displays information from all detected ATM errors. This includes such errors as encapsulation failures and errors during ATM configuration.
To display ATM events, use the following command:
debug atm events
The debug atm events command displays event changes to the ATM-CES port adapter. Reset, VC configurations, and ATM-CES port adapter configurations are displayed here.
To display information about OAM cells, use the following command:
debug atm oam
The debug atm oam command displays the contents of OAM cells as they arrive from the network.
After using a debug command, turn off debugging with the no debug command.
ATM show commands display the current state of the ATM network and the connected VCs.
To show current VCs and traffic information, use the following command:
show atm vc [vcd]
Specifying a VCD displays specific information about that VCD.
To show current information about an ATM interface, use the following command:
show atm interface atm slot/0
To show current ATM traffic, use the following command:
show atm traffic
The show atm traffic command displays global information about traffic moving to and from all ATM networks connected to the router.
To show the current ATM mapping, use the following command:
show atm map
The show atm map command displays the active list of ATM static maps to remote hosts on an ATM network.
The show controllers command displays the internal status of each port adapter slot location.
router#sh controllers atm6/0
Interface ATM6/0
Hardware is ATM-CES
PCI registers:
  bus_no=13, device_no=0
  CFID=0xA102104C, CFCS=0x02000006, CFRV=0x02030001, CFLT=0x0000FF00
  CFBA=0x4E000000, CFIT=0x02010100
  bus_no=13, device_no=2
  CFID=0x000E1137, CFCS=0x04000002, CFRV=0x00000201, CFLT=0x00000000
  CFBA=0x4E120000, CFIT=0x00000000
(display text omitted)
The show atm vc command displays the following values for all PVCs:
router#show atm vc
                                     AAL /         Peak   Avg.  Burst
Interface     VCD   VPI   VCI Type  Encapsulation  Kbps   Kbps  Cells Status
ATM6/0          1     0    16  PVC  AAL5-ILMI     155000 155000    94 ACTIVE
ATM6/0          2     0     5  PVC  AAL5-SAAL     155000 155000    94 ACTIVE
ATM6/0.1      303     0   282  SVC  LANE-LES      155000 155000    32 ACTIVE
ATM6/0.1      304     0   281  SVC  LANE-LEC      155000 155000    32 ACTIVE
ATM6/0.1      307     0   286 MSVC  LANE-LEC      155000 155000    32 ACTIVE
ATM6/0.1      308     0   285 MSVC  LANE-LES      155000 155000    32 ACTIVE
ATM6/0.1      309     0   288  SVC  LANE-BUS      155000 155000    32 ACTIVE
ATM6/0.1      310     0   287  SVC  LANE-LEC      155000 155000    32 ACTIVE
ATM6/0.1      311     0   290 MSVC  LANE-LEC      155000 155000    32 ACTIVE
ATM6/0.1      312     0   289 MSVC  LANE-BUS      155000 155000    32 ACTIVE
ATM6/0.1      314     0   292  SVC  LANE-LES      155000 155000    32 ACTIVE
ATM6/0.1      315     0   293  SVC  LANE-BUS      155000 155000    32 ACTIVE
Use the show atm vc n command, where n is the vcd, to display statistics for a given data or CES VC.
For example, for CES VCs:
router#show atm vc 1
ATM6/0: VCD: 1, VPI: 10, VCI: 10, etype:0x0, CES - AAL1, Flags: 0x20138
PeakRate: 2310, Average Rate: 2310, Burst Cells: 94, VCmode: 0x0
OAM DISABLED, InARP DISABLED
Received Cells: 0, Transmit Cells: 334272
Status: ACTIVE
For data VCs:
router#show atm vc 4
ATM6/0: VCD: 4, VPI: 4, VCI: 4, etype:0xBAD, AAL5 - MUX, Flags: 0x34
PeakRate: 0, Average Rate: 0, Burst Cells: 0 *32cells, VCmode: 0xE200
InPkts: 164, OutPkts: 0, InFast: 0, OutFast: 0, Broadcasts: 0
Status: ACTIVE
Use the show interfaces command without arguments to display statistics for all interfaces in the system. Use the show interfaces atm slot/port command to display statistics for the ATM interface you specify by its slot/port address. For example:
router#show int atm 6/0
ATM interface ATM6/0:
AAL enabled:  AAL5 , Maximum VCs: 2048, Current VCCs: 3
Maximum Transmit Channels: 64
Tx buffers 256, Rx buffers 256, Exception Queue: 32, Raw Queue: 32
VP Filter: 0x7B, VCIs per VPI: 1024, Max. Datagram Size:4496
PLIM Type:SONET - 155Mbps, TX clocking: INTERNAL
0 input, 59 output, 0 IN fast, 0 OUT fast
ABR parameters, rif: 16 rdf: 16
Config. is ACTIVE
Use the show atm map command to display the PVC map:
router#show atm map
Map list test : PERMANENT
ip 128.1.1.1 maps to VC 6
ip 128.1.1.2 maps to VC 6
Use the show atm traffic command to display the interface traffic:
router#show atm traffic
4915 Input packets
0 Output packets
2913 Broadcast packets
0 Packets for non-existent VC
0 Packets with CRC errors
0 OAM cells received
0 Cells lost
Use the show sscop command to display SSCOP details for the ATM interface.
The show version command displays the configuration of the system hardware (the number of each interface processor type installed), the software version, the names and sources of configuration files, and the boot images.
Router> show version
Cisco Internetwork Operating System Software
IOS (tm) 7200 Software (C7200-J-M), Version 11.1(14)CA
Synced to mainline version: 11.1(9)
Copyright (c) 1986-1997 by Cisco Systems, Inc.
Compiled Tue 18-Feb-97 19:12
Image text-base: 0x600088F0, data-base: 0x6076E000
ROM: System Bootstrap, Version 11.1(11855)
ROM: 7200 Software (C7200-BOOT-M), Version 11.1(472), RELEASE SOFTWARE (fc1)
cisco 7206 (NPE150) processor with 57344K/8192K bytes of memory.
R4700 processor, Implementation 33, Revision 1.0 (512KB Level 2 Cache)
Last reset from power-on
Bridging software.
SuperLAT software copyright 1990 by Meridian Technology Corp).
X.25 software, Version 2.0, NET2, BFE and GOSIP compliant.
TN3270 Emulation software (copyright 1994 by TGV Inc).
8 Ethernet/IEEE 802.3 interfaces.
1 FastEthernet/IEEE 802.3 interface.
4 Serial network interfaces.
1 FDDI network interface.
1 ATM network interface.
125K bytes of non-volatile configuration memory.
1024K bytes of packet SRAM memory.
20480K bytes of Flash PCMCIA card at slot 0 (Sector size 128K).
4096K bytes of Flash internal SIMM (Sector size 256K).
Configuration register is 0x0
(display text omitted)
The show protocols command displays the global (system-wide) and interface-specific status of any configured Layer 3 protocol.
The show running-config command displays the currently running ATM-CES port adapter configuration in RAM. For example:
router#show running-config
interface atm2/0
ip address 131.110.162.110 255.255.255.0
atm pvc 1 1 1 aal5mux ip
atm pvc 3 3 3 aal5snap
atm pvc 4 4 5 aal5snap 4000 3000
appletalk address 10.1
appletalk zone atm
This section presents information for configuring the ATM-CES port adapter for both unstructured and structured CES services. You should read the information in this section before attempting to configure an ATM-CES port adapter. Then, proceed directly to the section "Configuring the ATM-CES Port Adapter for Unstructured CES Services," page 62
Two methods are available for configuring an ATM-CES port adapter for use in a Cisco 7200 series router operating environment:
The configuration procedures throughout this document are based on the following assumptions and conventions. These sample procedures demonstrate typical or common configuration tasks and may not reflect your particular ATM-CES port adapter configuration requirements.
router# prompt, which indicates that the chassis is ready to receive interface configuration commands).
You will encounter the following prompts in the configuration procedures:
router>
router#
router(config)#
router(config-if)#
To establish a command session with a target Cisco 7200 series router, take any one of the following actions, as appropriate:
ping router
telnet router
xxxxxxxx (your privileged EXEC mode password)
Having established a privileged command session on the target chassis, you can begin the configuration of the ATM-CES port adapter. Go to the section entitled "Configuring the ATM-CES Port Adapter for Unstructured CES Services," page 62.
You may be unfamiliar with the Cisco 7200 series router network clock synchronization services and the various clocking modes applicable to the handling of CBR traffic in an ATM networking environment. If that is so, read the earlier section entitled "Network Timing Services for CES Operations," page 12, before attempting to configure your ATM-CES port adapter for service.
To establish the sources and priorities of the requisite clocking signals for an ATM-CES port adapter in a Cisco 7200 series router, perform the following steps:
Step 1 At the privileged EXEC mode prompt, enter the following command:
configure terminal
Step 2 To establish a priority 1 clock source for a CBR port, enter the following command at the global configuration mode prompt:
network-clock-select 1 cbr 2/0
This command establishes a priority 1 clock source for CBR port 0 on the ATM-CES port adapter.
Step 3 To establish a priority 2 clock source for an ATM port, enter the following command:
network-clock-select 2 atm 2/0
This command establishes a priority 2 clock source for port 0 on the ATM interface module.
Step 4 At the global configuration mode prompt, enter the following command:
^Z
This command returns you to the privileged EXEC mode prompt.
You can specify up to four network clock sources for a Cisco 7200 series router. The highest priority active port in the chassis supplies PRS to all other chassis interfaces that require network clock synchronization services.
To verify the clock signal sources and priorities that you established in the previous procedure for your ATM-CES port adapter, issue the following command at the privileged EXEC mode prompt:
show network-clocks
This command displays the priorities and clock sources currently configured for your Cisco 7200 series router. Under normal operating conditions, the priority 1 clock source is assumed to be the active source.
The Cisco 7200 series router distributes the clocking signal derived from the network clock source to all the ports on the chassis that require network clock synchronization services. To direct a CBR port to use the network-derived clock, you issue the ces dsx1 clock source network-derived command, as shown in Step 3 of the section "Configuring a Hard PVC (with Synchronous Clocking)," page 66.
The CES modules support the framing formats and line coding options indicated in Table 10.
| ATM-CES Port Adapter | Framing Format | Line Coding Options |
|---|---|---|
| T1 | Super frame (SF)
Extended super frame (ESF) | ami or b8zs (b8zs is default) |
| E1 (75 or 120 ohm) | E1 CRC multiframe e1_crc_mf_lt Configure line type to e1_crc_mf, without CAS enabled.
E1 CRC multiframe e1_crc_mfCAS_lt Configure line type to e1_crc_mf, with CAS enabled. E1 e1_lt E1 multiframe e1_mfCAS_lt | ami or hdb3 (hdb3 is default) |
Before you configure new interfaces for an ATM-CES port adapter, you may want to determine which interfaces have already been defined for CES modules in your Cisco 7206 router. To do so, issue the following command at the privileged EXEC mode prompt:
router#show ces stat
Here is an example of the display that results when you issue the command:
   Interface      IF      Admin        Port  Channels in
     Name       Status   Status        Type      use
------------- -------- --------- ----------- -----------
    CBR6/0       UP        UP           T1       1
    CBR6/1       UP        UP           T        1
    CBR6/2       UP        UP           T1       1-24
    CBR6/3       UP        UP           T1
router#
As the example given here indicates, this command displays key information regarding the presently configured CBR interfaces in your Cisco 7206 router. In this particular case, the output shows that an ATM-CES port adapter is installed in chassis slot 6 and that all four ports (0 to 3) of the module are configured for service.
Use the following commands to manually change any of the default configuration values:
| Task | Command |
|---|---|
| At the privileged EXEC prompt, enter configuration mode from the terminal. | configure [terminal] |
| Specify an ATM-CES port adapter interface and enter interface configuration mode. | interface cbr slot/port |
| Configure the type of clocking. | ces aal1 clock {adaptive | srts | synchronous} |
| Configure the service type. | ces aal1 service {structured | unstructured} |
| Configure the DSX-1 clock source. | ces dsx1 clock source {loop-timed | network-derived} |
| Configure the DSX-1 framing type (T1). | ces dsx1 framing {sf | esf} |
| Configure the DSX-1 framing type (E1). | ces dsx1 framing {e1_crc_mfCAS_lt | e1_crc_mf_lt | e1_lt|e1_mfCAS_lt} |
| Configure the DSX-1 line build out. | ces dsx1 lbo {0_110 | 110_220 | 220_330 | 330_440 | 440_550 | 550_660 | 660_above | square_pulse} |
| Configure the DSX-1 line code type (T1). | ces dsx1 linecode {ami | b8zs} |
| Configure the DSX-1 line code type (E1). | ces dsx1 linecode {ami | hdb3} |
| Configure the DSX-1 loopback test method. | ces dsx1 loopback {line | noloop | payload} |
| Configure the circuit cell delay variation. | ces circuit 0 [cdv 1-65535] |
| Configure the PVC. | ces pvc 0 interface atm slot/port [vpi 0-4095 vci 1-16383] |
This section presents the command-based procedures you use in configuring ATM-CES port adapters for unstructured (clear channel) CES services.
A circuit that you set up on a CBR port for unstructured service is always identified as "circuit 0," because only one such circuit can be established on any given CBR port. Such a circuit consumes the entire bandwidth of a T1 port (1.544 Mbps) or an E1 port (2.048 Mbps), which is provisioned manually at the time you set up the unstructured circuit and remains dedicated to that port, whether that port is actively transmitting CBR data or not.
The procedures in this section begin with the simplest of the configuration tasks for unstructured CES services, namely, configuring a hard PVC to use adaptive clocking.
However, synchronous clocking is the default clocking mode for all CES modules. (It is the clocking mode appropriate to most CES applications.) Accordingly, you may want to go directly to the section "Configuring a Hard PVC (with Synchronous Clocking)," page 66.
A CES module converts CBR traffic into ATM cells for propagation through an ATM network. The ATM cell stream is directed to an outgoing ATM port or CBR port. If the outgoing port is an ATM port on the same Cisco 7200 series router, the PVC is called a "hard PVC."
As a general rule, when you are setting up a hard PVC, you must interconnect a CBR port and an ATM port in the same Cisco 7200 series router.
For procedural purposes, assume that a CES module (identified as CBR6/0) and an ATM module (identified as ATM6/0) are the two interface modules to be involved in the hard PVC; assume further that this hard PVC will use adaptive clocking.
To set up a hard PVC on the target Cisco 7206 router that satisfies the above assumptions, perform the following steps:
Step 1 At the privileged EXEC mode prompt for the target chassis, enter the following command:
configure terminal
The configure command sets the chassis to the global configuration mode; terminal is a keyword that identifies the terminal (console) as the source of subsequent configuration commands.
Step 2 At the global configuration mode prompt, enter the following command:
interface CBR6/0
This command sets the Cisco 7206 router to the interface configuration mode and identifies interface CBR6/0 as the chassis element to which subsequent configuration commands are to be applied.
This command also causes router software to assign particular VPI and VCI values automatically to the source port (CBR6/0) (see Figure 36). These implicit VPI/VCI values are hardware dependent, that is, they are assigned by the system, based on the particular port being configured.
In effect, the CBR6/0 parameter is the port ID for the CES module--which tells you that the ATM-CES port adapter is installed in chassis slot 6.
Step 3 At the interface configuration mode prompt, enter the following commands:
no shutdown
ces aal1 service unstructured
ces aal1 clock adaptive
The first of these commands places the CES module in an operationally "UP" (operational) state, enabling all CES functions on the module.
The second command directs the module to perform unstructured CES services.
The third command directs the module to use adaptive clocking.
Step 4 To define the destination port (ATM6/0) for the hard PVC, enter the following commands:
ces circuit 0 circuit-name CBR-PVC-A
ces pvc 0 interface ATM 6/0 vpi 0 vci 100
^Z
Here the first command identifies the hard PVC as "circuit 0" and assigns it the logical circuit name "CBR-PVC-A" (see Figure 36). This logical name has been chosen for demonstration purposes only--it can be any ASCII string of your choosing.
If you do not explicitly specify the "circuit-name" and "logical-name" parameters in the command line, the system automatically assigns a unique default name for the circuit being configured. This default name takes the form CBRx/y:#. Here the default name for this particular circuit would be "CBR6/0:0," where the notation preceding the colon uniquely identifies the port being configured, and the number following the colon identifies the circuit number (which, for unstructured CES services, is always 0).
The second command identifies a particular ATM interface module, port, and VPI/VCI value for the destination end of the hard PVC (see Figure 36).
The third command exits from the interface configuration mode and returns you to the privileged EXEC mode prompt.
After the above procedure is performed, a hard PVC (circuit number 0) named CBR-PVC-A exists between the specified source port in the CES module and the specified destination port in the ATM module.
This CES circuit enables bidirectional, unstructured CBR traffic to flow between these two modules. Figure 36 is a logical representation of this circuit.

To verify the hard PVC established in the procedure above, perform the following steps:
Step 1 To display the configured CES-IWF ATM address(es) for the local Cisco 7206 router, enter the following command at the privileged EXEC mode prompt:
Here is an example of the display that results when you issue the command:
This command displays the CES-IWF ATM address for the destination end of the circuit named CBR-PVC-A (see Figure 36). This address results from Step 4 in the section above entitled "Configuring a Hard PVC (with Adaptive Clocking)," page 62.
Step 2 To display basic information about the hard PVC, enter the following command:
Here is an example of the display that results when you issue the command:
This command verifies the source and destination port IDs of the hard PVC and indicates that the circuit is functional (in an operationally "UP " state).
Step 3 To display detailed information about the hard PVC, enter the following command:
Here is an example of the display that results when you issue the command:
This command displays all the configuration information relevant to the hard PVC that you set up in the preceding section.
The "Port-Type" field in the second line of the output example above identifies the type of CES module that you have configured (which, in this case, is a T1 interface).
Any hard PVC that you set up for unstructured CES services always carries the circuit identifier "Circuit_id 1," as shown in the first line of the output example above. There can be only one such circuit in an unstructured hard PVC.
In other words, a hard PVC that you set up for unstructured CES services on any CBR port is always labeled circuit 0, because the entire bandwidth of the T1 port is dedicated to that circuit.
For consistency, this procedure includes references to the same port IDs that you used in setting up a hard PVC in the earlier section entitled "Configuring a Hard PVC (with Adaptive Clocking)," page 62.
To set up a hard PVC on a target Cisco 7206 router with synchronous clocking, perform the following steps:
Step 1 At the privileged EXEC mode prompt, enter the following command:
Step 2 At the resulting global configuration mode prompt, enter the following command:
This command sets the Cisco 7206 router to the interface configuration mode and identifies interface CBR6/0 as the chassis element to which subsequent configuration commands are to be applied.
Step 3 At the interface configuration mode prompt, enter the following commands:
The first of these commands directs interface CBR6/0 to use the network-derived clocking signal (PRS) for network clock synchronization services. In the synchronous clocking mode, the PRS is always derived from the networking environment. Thus, you must set the CBR port to use this clocking signal for synchronizing CBR data transport.
The second command temporarily disables all functions relating to circuit 1 on port CBR6/0.
The third command defines the synchronous clocking mode for use by port CBR6/0.
The fourth command enables all functions for circuit 1 on the CES module.
The last command exits from the interface configuration mode and returns you to the privileged EXEC mode prompt.
To verify the configuration information for a hard PVC with synchronous clocking, enter the following command at the privileged EXEC mode prompt:
Here is an example of the display that results when you issue the command:
The output from this command verifies the configuration information for the source and destination ports for the hard PVC, confirms synchronous clocking for the circuit named CBR-PVC-A, and indicates that the circuit is fully functional ("UP").
In this section, you are assumed to be referencing the same port IDs (CBR6/0 and CBR6/1) as those used in previous procedures.
To delete a previously configured PVC, perform the following steps:
Step 1 At the privileged EXEC mode prompt, enter the following command:
This command displays the CES circuits currently in effect.
Step 2 To establish the global configuration mode and identify the console as the source of user input, enter the following command:
Step 3 At the global configuration mode prompt, enter the following command:
This command sets the Cisco 7206 router to the interface configuration mode and identifies port CBR6/0 as the chassis element to which subsequent configuration commands are to be applied.
Step 4 At the interface configuration mode prompt, enter the following commands:
The first of these commands deletes the previously configured CES circuit on port 0.
The second command causes you to exit from the interface configuration mode and returns you to the global configuration mode.
Step 5 At the global configuration mode prompt, enter the following command:
This command sets the Cisco 7206 router to the interface configuration mode and identifies port CBR6/1 as the chassis element to which subsequent configuration commands are to be applied.
Step 6 At the interface configuration mode prompt, enter the following commands:
The first of these commands deletes the previously configured CES circuit on port 1.
The second command causes you to exit from the interface configuration mode and returns you to the global configuration mode.
The third command causes you to exit from the global configuration mode and returns you to the privileged EXEC mode prompt.
This procedure is based on the actions taken in the preceding section. It enables you to verify the deletion of a previously configured circuit.
To verify the deletion of a previously established PVC, perform the following steps:
Step 1 At the privileged EXEC mode prompt, enter the following command:
The absence of output in response to the show ces circuit command verifies that the CES circuit has been deleted.
Step 2 Similarly, at the privileged EXEC mode prompt, enter the following command:
Again, the absence of output in response to the show ces address command verifies that the previous CES-IWF addresses have been deleted.
This section presents the command-based procedures you use in configuring ATM-CES port adapters for T1/E1 structured (N x 64 kbps) CES services.
Structured CES services differ from unstructured CES services in that the structured services allow you to allocate T1/E1 bandwidth in a highly flexible and efficient manner. With the structured services, you use only the T1/E1 bandwidth actually required to support the active structured circuit(s) that you configure.
For example, in configuring an ATM-CES port adapter for structured service, you can define multiple hard PVCs for any given ATM-CES port adapter's T1/E1 port. The ATM-CES port adapter provides up to 24 DS0 time slots per T1/E1 port for defining structured CES circuits. In order to see the bandwidth that is required on an ATM link for this particular circuit, use the show ces circuit interface command.
In the ATM-CES port adapter, any bits not available for structured CES services are used for framing and out-of-band control.
With structured CES services, you can invoke a function called channel associated signaling (CAS) that enables you to detect "on hook" and "off hook" conditions for any given structured CES circuit. The "on hook" state indicates that the CES circuit is idle (unconnected). The "off hook" state indicates that the circuit is in use (connected).
The CAS mechanism allows T1/E1 bandwidth to be dynamically allocated and released by hard PVCs that you have configured for structured CES services.
For simplicity in demonstrating configuration tasks for structured CES services, the procedures in this section are directed primarily at setting up a single CES circuit per T1/E1 port. However, these procedures outline the essential steps and command syntax that you would use if you were to set up multiple CES circuits on a T1/E1 port.
Structured CES services require network clock synchronization by means of the synchronous clocking mode. You must select the clock source and define its priority locally for each Cisco 7200 series router in your network. You do this by means of the network-clock-select command. See the section "Defining Clock Sources and Priorities for an ATM-CES Port Adapter," page 59.
For continuity, the structured CES configuration procedures in this section are based on the conventions outlined in the earlier section entitled "Conventions Adopted for ATM-CES Port Adapter Configuration Procedures," page 58. Also, the assumptions pertaining to a particular structured CES configuration task are listed at the beginning of the procedure.
Three assumptions are made here regarding the configuring of a hard PVC for structured CES services:
To set up a hard PVC for structured CES services according to these three assumptions, perform the following steps:
Step 1 At the privileged EXEC mode prompt, enter the following command:
router#configure terminal
This command sets the Cisco 7206 router to the global configuration mode and identifies the console (terminal) as the source of subsequent configuration commands.
Step 2 At the global configuration mode prompt, enter the following command:
router(config)#interface cbr 6/0
This command sets the Cisco 7206 router to the interface configuration mode and identifies port CBR6/0 as the chassis element to which subsequent configuration commands will be applied. In effect, this port becomes the source port of the hard PVC (see Figure 37).
The VPI/VCI values shown for the source port in Figure 37 are automatically (implicitly) assigned by port adapter hardware. These values are hardware-dependent entities that uniquely identify the port being configured.
Step 3 At the interface configuration mode prompt, enter the following command:
router(config-if)#ces dsx1 clock source network-derived
This command directs port CBR6/0 to use the network-derived clocking signal (PRS) for network clock synchronization services. In the synchronous clocking mode, the PRS is always derived from the networking environment. Therefore, you must set the CBR port to use this clocking signal for synchronizing CBR data transport.
Step 4 To direct the port to support B8ZS coding for the DSX-1 physical layer, enter the following command:
router(config-if)#ces dsx1 linecode b8zs
Step 5 To direct the port to use the extended super frame (ESF) framing format for the T1/E1 interface, enter the following command:
router(config-if)#ces dsx1 framing esf
Step 6 To enable the port, enter the following command:
router(config-if)#no shutdown
Step 7 To establish structured CES services for the port, enter the following command:
router(config-if)#ces aal1 service structured
Step 8 To establish the synchronous clocking mode for the port, enter the following command:
router(config-if)#ces aal1 clock synchronous
At the conclusion of Step 8, you have completed the configuration of the desired port for the structured CES circuit. You can now create the hard PVC.
Step 9 To specify the four DS0 time slots to be used by the hard PVC, enter the following command:
router(config-if)#ces circuit 1 timeslots 1-3,7
Step 10 To give the hard PVC a logical name by which it will be identified, enter the following command:
router(config-if)#ces circuit 1 circuit-name CBR-PVC-A
The logical name CBR-PVC-A is used for demonstration purposes only--it can be any ASCII string of your choosing. If you do not explicitly specify the "circuit-name" and "logical-name" parameters in the command line, the system automatically assigns a unique default name in the form CBRx/y:# for the circuit being configured.
The default name for this particular circuit is "CBR6/0:1," where the notation preceding the colon uniquely identifies the port, and the number following the colon uniquely identifies the circuit being configured. For structured CES services, the circuit number sequence always begins at 1 for each port in an ATM-CES port adapter.
Step 11 To enable the hard PVC, enter the following command:
router(config-if)#no ces circuit 1 shutdown
Step 12 To define the destination end of the hard PVC and exit from the interface configuration mode, enter the following commands:
router(config-if)#ces pvc 1 interface atm 6/0 vpi 0 vci 100
router(config-if)#^Z
These commands define a particular ATM port as the destination end of the hard PVC and return you to the privileged EXEC mode prompt.
At the conclusion of this procedure, you have created a hard PVC configured for structured CES services (see Figure 37).

To verify the hard PVC that you set up in the previous procedure, perform the following steps:
Step 1 At the privileged EXEC mode prompt, enter the following command:
This command displays the 20-byte CES-IWF ATM address assigned to the source end of the hard PVC. This address is automatically (implicitly) assigned by the CES hardware to identify the source end of the hard PVC.
Step 2 To display the details of the hard PVC, enter the following command:
Interface Circuit Circuit-Type X-interface X-vpi X-vci Status
CBR6/0 1 HardPVC ATM6/0 0 1000 UP
router#
Step 3 To display the interface details for port CBR6/0, enter the following command:
The procedures in this section build on the configuration information already established for the hard PVC created in the earlier section entitled "Configuring a Hard PVC for Structured CES Services (without CAS)," page 70.
The only difference between the earlier procedure and the one that follows is that the latter enables CAS for the hard PVC.
The following procedure is based on five assumptions:
To set up a hard PVC for structured CES services with CAS according to these five assumptions, perform the following steps:
Step 1 At the privileged EXEC mode prompt, enter the following command:
router#configure terminal
This command sets the Cisco 7200 series router to the global configuration mode and identifies the console (terminal) as the source of configuration commands.
Step 2 At the global configuration mode prompt, enter the following command:
router(config)#interface cbr 6/0
This command sets the Cisco 7200 series router to the interface configuration mode and identifies port CBR6/0 as the chassis element to which configuration commands are to be applied.
In effect, this port is the source port for the hard PVC.
Step 3 At the configuration interface mode prompt, enter the following commands:
Respectively, these commands
In performing this procedure, you create a hard PVC configured for structured CES services (with CAS).
To verify the hard PVC that you set up in the previous procedure, perform the following steps:
Step 1 To display the details of the CES circuit, enter the following command at the privileged EXEC mode prompt:
Step 2 To display the interface details for the source port (CBR6/0), enter the following command:
This section outlines the additional steps that you must take to activate the on-hook detection (bandwidth-release) feature in a 1 x 64 structured CES circuit. These steps are summarized briefly below:
Step 1 Configure the structured CES circuit, with CAS enabled. Detailed steps for configuring such a circuit are presented in the earlier section entitled "Configuring a Hard PVC for Structured CES Services (with CAS Enabled)," page 73.
Step 2 Configure the circuit using only one DS0 time slot at each end of the connection.
Step 3 Enable the on-hook detection feature for the circuit by issuing the following CLI command:
The parameter "2" in the command example above is a decimal representation of the four hexadecimal ABCD bits of the CAS mechanism. For this example, you can assume that the hexadecimal number 2, or binary bit pattern 0010, has been chosen to represent the on-hook state for the CES circuit.
These four ABCD bits in the CAS mechanism are device-specific. They are determined by the manufacturer of the voice/video telephony device that is generating the CBR traffic. That is why the ABCD bits of the CAS mechanism are said to be user-configurable.
After configuring the new CES interface, you can display its status. You can also display the current state of the ATM-CES port adapter and connected virtual circuits. To show current virtual circuits and traffic information, perform the following tasks in EXEC mode:
The examples in the following sections illustrate how to configure an ATM interface on the Cisco 7200 series routers:
In the following example, PVC 5 is created on ATM interface 4/0. LLC/SNAP encapsulation is used over AAL5. The interface is at IP address 1.1.1.1 with 1.1.1.5 at the other end of the connection. The static map list named atm declares that the next node is a broadcast point for multicast packets from IP.
interface atm 4/0
ip address 1.1.1.1 255.255.255.0
atm pvc 5 0 10 aal5snap
ip route-cache cbus
map-group atm
map-list atm
ip 1.1.1.5 atm-vc 5 broadcast
The following example shows a typical ATM configuration for a PVC:
interface atm 4/0
ip address 172.21.168.112 255.255.255.0
map-group atm
atm pvc 1 1 1 aal5snap
atm pvc 2 2 2 aal5snap
atm pvc 6 6 6 aal5snap
atm pvc 7 7 7 aal5snap
decnet cost 1
clns router iso-igrp comet
!
router iso-igrp comet
net 47.0004.0001.0000.0c00.6666.00
!
router igrp 109
network 172.21.0.0
!
ip domain-name CISCO.COM
!
map-list atm
ip 172.21.168.110 atm-vc 1 broadcast
clns 47.0004.0001.0000.0c00.6e26.00 atm-vc 6 broadcast
decnet 10.1 atm-vc 2 broadcast
Figure 38 illustrates a fully meshed network. The configurations for Routers A, B, and C follow the figure. In this example, the routers are configured to use PVCs. Fully meshed indicates that any workstation can communicate with any other workstation. The two map-list statements configured in Router A identify the ATM addresses of Routers B and C. The two map-list statements in Router B identify the ATM addresses of Routers A and C. The two map list statements in Router C identify the ATM addresses of Routers A and B.

Router A
ip routing
!
interface atm 4/0
ip address 172.21.168.1 255.255.255.0
atm pvc 1 0 10 aal5snap
atm pvc 2 0 20 aal5snap
map-group test-a
!
map-list test-a
ip 172.21.168.2 atm-vc 1 broadcast
ip 172.21.168.3 atm-vc 2 broadcast
Router B
ip routing
!
interface atm 2/0
ip address 172.21.168.2 255.255.255.0
atm pvc 1 0 20 aal5snap
atm pvc 2 0 21 aal5snap
map-group test-b
!
map-list test-b
ip 172.21.168.1 atm-vc 1 broadcast
ip 172.21.168.3 atm-vc 2 broadcast
Router C
ip routing
!
interface atm 4/0
ip address 172.21.168.3 255.255.255.0
atm pvc 2 0 21 aal5snap
atm pvc 4 0 22 aal5snap
map-group test-c
!
map-list test-c
ip 172.21.168.1 atm-vc 2 broadcast
ip 172.21.168.2 atm-vc 4 broadcast
The following example also shows a configuration for the fully meshed network in Figure 38, but in this example SVCs are used. PVC 1 is the signaling PVC.
Router A
interface atm 4/0
ip address 172.21.168.1 255.255.255.0
map-group atm
atm nsap-address AB.CDEF.01.234567.890A.BCDE.F012.3456.7890.1234.12
atm pvc 1 0 5 qsaal
!
map-list atm
ip 172.21.168.2 atm-nsap BC.CDEF.01.234567.890A.BCDE.F012.3456.7890.1334.13
ip 172.21.168.3 atm-nsap BC.CDEF.01.234567.890A.BCDE.F012.3456.7890.1224.12
Router B
interface atm 2/0
ip address 172.21.168.2 255.255.255.0
map-group atm
atm nsap-address BC.CDEF.01.234567.890A.BCDE.F012.3456.7890.1334.13
atm pvc 1 0 5 qsaal
!
map-list atm
ip 172.21.168.1 atm-nsap AB.CDEF.01.234567.890A.BCDE.F012.3456.7890.1234.12
ip 172.21.168.3 atm-nsap BC.CDEF.01.234567.890A.BCDE.F012.3456.7890.1224.12
Router C
interface atm 4/0
ip address 172.21.168.3 255.255.255.0
map-group atm
atm nsap-address BC.CDEF.01.234567.890A.BCDE.F012.3456.7890.1224.12
atm pvc 1 0 5 qsaal
!
map-list atm
ip 172.21.168.1 atm-nsap AB.CDEF.01.234567.890A.BCDE.F012.3456.7890.1234.12
ip 172.21.168.2 atm-nsap BC.CDEF.01.234567.890A.BCDE.F012.3456.7890.1334.13
In the following example, an ATM interface is configured for SVCs by means of multipoint signaling:
interface atm 2/0
 ip address 4.4.4.6
 map-group atm_pri
 atm nsap-address de.cdef.01.234567.890a.bcde.f012.3456.7890.1234.12
 atm multipoint-signaling
 atm pvc 1 0 5 qsaal
!
map-list atm_pri
!
ip 4.4.4.4 atm-nsap cd.cdef.01.234566.890a.bcde.f012.3456.7890.1234.12 broadcast
ip 4.4.4.7 atm-nsap 31.3233.34.353637.3839.3031.3233.3435.3637.3839.30 broadcast
Warning
Because invisible laser radiation may be emitted from the aperture of the port when no cable is connected, avoid exposure to laser radiation and do not stare into open apertures.
Here is an example of the laser warning label that appears on the product:
Waarschuwing Omdat er onzichtbare laserstraling uit de opening van de poort geëmitteerd kan worden wanneer er geen kabel aangesloten is, dient men om blootstelling aan laserstraling te vermijden niet in de open openingen te kijken.
Varoitus Kun porttiin ei ole kytketty kaapelia, portin aukosta voi vuotaa näkymätöntä lasersäteilyä. Älä katso avoimiin aukkoihin, jotta et altistu säteilylle.
Attention Etant donné qu'un rayonnement laser invisible peut être émis par l'ouverture du port quand aucun câble n'est connecté, ne pas regarder dans les ouvertures béantes afin d'éviter tout risque d'exposition au rayonnement laser.
Warnung Aus der Öffnung des Ports kann unsichtbare Laserstrahlung austreten, wenn kein Kabel angeschlossen ist. Kontakt mit Laserstrahlung vermeiden und nicht in offene Öffnungen blicken.
Avvertenza Poiché quando nessun cavo è collegato alla porta, da quest'ultima potrebbe essere emessa radiazione laser invisibile, evitare l'esposizione a tale radiazione e non fissare con gli occhi porte a cui non siano collegati cavi.
Advarsel Usynlige laserstråler kan sendes ut fra åpningen på utgangen når ingen kabel er tilkoblet. Unngå utsettelse for laserstråling og se ikke inn i åpninger som ikke er tildekket.
Aviso Evite uma exposição à radiação laser e não olhe através de aberturas expostas, porque poderá ocorrer emissão de radiação laser invisível a partir da abertura da porta, quando não estiver qualquer cabo conectado.
¡Advertencia! Cuando no esté conectado ningún cable, pueden emitirse radiaciones láser invisibles por el orificio del puerto. Evitar la exposición a radiaciones láser y no mirar fijamente los orificios abiertos.
Varning! Osynliga laserstrålar kan sändas ut från öppningen i porten när ingen kabel är ansluten. Undvik exponering för laserstrålning och titta inte in i ej täckta öppningar.
| Warning Class 1 laser product. |
Waarschuwing Klasse-1 laser produkt.
Varoitus Luokan 1 lasertuote.
Attention Produit laser de classe 1.
Warnung Laserprodukt der Klasse 1.
Avvertenza Prodotto laser di Classe 1.
Advarsel Laserprodukt av klasse 1.
Aviso Produto laser de classe 1.
¡Atención! Producto láser Clase I.
Varning! Laserprodukt av klass 1.
The following sections provide compliance information that pertains to the ATM-CES port adapter, which has been designed to meet these requirements. Modifications to this product that are not authorized by Cisco Systems, Inc., could void the various approvals and negate your authority to operate the product.
This equipment has been tested and found to comply with the limits for a Class A digital device, pursuant to part 15 of the FCC rules. These limits are designed to provide reasonable protection against harmful interference when the equipment is operated in a commercial environment. This equipment generates, uses, and can radiate radio-frequency energy and, if not installed and used in accordance with the instruction manual, may cause harmful interference to radio communications. Operation of this equipment in a residential area is likely to cause harmful interference, in which case users will be required to correct the interference at their own expense.
You can determine whether your equipment is causing interference by turning it off. If the interference stops, it was probably caused by the Cisco equipment or one of its peripheral devices. If the equipment causes interference to radio or television reception, try to correct the interference by using one or more of the following measures:
The BABT607114 marking on the ATM-CES port adapter signifies that the port adapter's E3 ATM port meets United Kingdom directive 607114 and has been designed to BABT standards, which complies with the TBR24 specification. The BABT label is located on the top of the ATM-CES port adapter; Figure 39 shows the BABT label for the E3 ATM port of the ATM-CES port adapter.

The CE0168 marking on the ATM-CES port adapter signifies that the port adapter's 120-ohm E1 ports meet United Kingdom directive 0168 and has been designed to CE standards, which complies with the CTR12 and TBR13 specifications. The CE label is located on the top of the ATM-CES port adapter; Figure 40 shows the CE label for the 120-ohm E1 ports of the ATM-CES port adapter.

Cisco Connection Online (CCO) is Cisco Systems' primary, real-time support channel. Maintenance customers and partners can self-register on CCO to obtain additional information and services.
Available 24 hours a day, 7 days a week, CCO provides a wealth of standard and value-added services to Cisco's customers and business partners. CCO services include product information, user documentation, software updates, release notes, technical tips, the Bug Navigator, configuration notes, brochures, descriptions of service offerings, and download access to public and authorized files.
CCO serves a wide variety of users through two interfaces that are updated and enhanced simultaneously: a character-based version and a multimedia version that resides on the World Wide Web (WWW). The character-based CCO supports Zmodem, Kermit, Xmodem, FTP, and Internet e-mail, and it is excellent for quick access to information over lower bandwidths. The WWW version of CCO provides richly formatted documents with photographs, figures, graphics, and video, as well as hyperlinks to related information.
You can access CCO in the following ways:
For a copy of CCO's Frequently Asked Questions (FAQ), contact cco-help@cisco.com. For additional information, contact cco-team@cisco.com.
|
|