|
|

This chapter describes how to configure the Cisco DistributedDirector (the Director) and the primary domain DNS server for HTTP session redirector mode.
To configure the Director for HTTP session redirector mode, you need to set up the software on the following network equipment:
DNS caching name server mode works for all IP services. HTTP session redirector mode works only for HTTP services. You should choose the mode that best meets your networking requirements for a particular group of distributed servers. The Director supports multiple groups of distributed servers, and each group can operate in different configurations and modes.
HTTP session redirector mode configuration is described in the following sections:
For more complete information about Director commands, see the chapter "Command Summary and Reference."
You need to gather or assign the following:
The Director can be placed anywhere in the corporate intranet. For ease of management, you should install the Director topologically close to the primary DNS server.
The following sections describe how to configure the Director and the DNS server for HTTP session redirector mode:
For information on advanced configuration options, refer to the chapter "Configuring Advanced Features."
Perform the following steps to configure the Director for HTTP session redirector mode. Tasks associated with each step are provided in the subsections that follow:
Step 1 Specify the IP Address on Which the Director Receives HTTP Requests
Step 2 Specify the DNS Server to Which the Director Sends Requests
Step 3 Configure the Default Weight Metrics
Step 4 Define an Access List to Enable Security for DRP
Step 5 Configure a Regular Expression for Address Sorting
Step 6 Set Up MD5 Authentication With Passwords as Another Security Measure
Perform the following steps in global configuration mode to specify the IP address on which the Director will receive HTTP requests:
| Task | Command |
|---|---|
| Step 1 Configure the Ethernet interface. | Refer to the chapter "Configuring Cisco DistributedDirector Interfaces." |
| Step 2 Specify the IP address on which the Director will receive HTTP requests. | ip director ip-address Director-virtual-IP-address
|
For example:
ip director ip-address 10.0.0.4
You can specify multiple IP addresses with separate commands. The IP address must be a valid address for the subnet to which the Director is connected. (A good choice is the next host number after the Director interface address.)
Perform the following task in interface configuration mode:
| Task | Command |
|---|---|
| Specify the DNS server to which the Director should send requests. | ip name-server DNS-server-IP-address
|
This is the Director's default DNS server (the primary domain's DNS primary server).
To configure default weight metrics, perform the following task in global configuration mode:
| Task | Command |
|---|---|
| Configure the default weight metrics. | ip director default-weights {[drp-int n] [drp-ext n] [drp-ser n] [random n] [admin n]} |
Default weights are used for all host names sorted by the Director. Following are the valid metric options:
When the associated metric is referenced in the sorting decision, it is always multiplied by the appropriate metric weight. In this way, you can specify that some metrics weigh more heavily than others. You may determine the weights you want to use through experimentation. The weights do not need to add to 100.
To override default weights for a certain host, specify host-specific weights in the Director configuration. For more information, also refer to the section "Setting Metrics and the Server Connection Parameter" in the chapter "Configuring Advanced Features."
To view the default weights setting, use the show ip director default-weights command.
Perform the following tasks in global configuration mode to define an access list to enable security for DRP:
In the following example, replies from DRP server agents with IP addresses 10.0.0.2, 11.0.0.2, and 12.0.0.2 are allowed:
access-list 1 permit 10.0.0.2
access-list 1 permit 11.0.0.2
access-list 1 permit 12.0.0.2
access-list 1 deny any
ip drp access-group 1
Perform the following tasks in global configuration mode to configure a regular expression which the Director uses to match against host names. If the host name in the incoming DNS A (address) query matches the pattern specified in the Director access list, then the Director will be asked to sort the addresses. If not, all addresses will be returned in the response as normal.
For example:
ip director access-list 1 permit "^www."
ip director access-list 1 deny any
ip director access-group 1
If ip director access-group is not configured, then all host names are considered "interesting" to the Director. All incoming DNS A queries will then be passed to the Director for address sorting before the creation of the A response.
Perform the following tasks in global configuration mode to set up MD5 authentication with passwords:
| Task | Command |
|---|---|
| Step 1 Set up a key chain and password. | key chain name-of-chain |
| Step 2 Enable the DRP authentication key chain. | ip drp authentication key-chain name-of-chain |
The key chain is an encrypted password that helps prevent DRP-based denial-of-service attacks, which can be a security threat. The key chain (a character string without spaces) must match the key chain of the DRP server agents to which the Director communicates.
The tasks associated with these steps are described in the subsections that follow:
Step 1 Identify the Subdomain Name and IP Addresses of the Distributed Servers
Step 2 Associate Each Distributed Server With its DRP Server Agent (if you intend to configure DRP metrics)
Step 3 Specify Information for Server Verification
Step 4 Specify Host-Specific Weights or Metric Priorities
Step 5 Set Up Server Preferences
Perform the following task in global configuration mode:
| Task | Command |
|---|---|
| Identify the subdomain name and IP addresses of the distributed servers. | ip host name address1 [ddress2...address8] |
For example, you might use the following command:
ip host www-servers.sleet.com 10.0.0.2 11.0.0.2 12.0.0.2
This identifies the distributed servers with IP addresses 10.0.0.2, 11.0.0.2, and 12.0.0.2, as members of the www-servers.sleet.com domain.
If you intend to configure any DRP metrics, associate each distributed server with its DRP server agent.
Perform the following task in global configuration mode:
| Task | Command |
|---|---|
| Associate each distributed server with its DRP server agent. | ip director server {hostname | host-ip-address} drp-association {name | ip-address} |
The following example associates the distributed server with the IP address 11.0.0.2 with the DRP server agent at IP address 11.0.0.3:
ip director server 11.0.0.2 drp-association 11.0.0.3
or
ip director server www-west.sleet.com. drp-association drp-west.sleet.com.
The Director will query its default DNS server for name-to-address bindings. If you use host/router names instead of IP addresses, make sure you configure the appropriate A records in the Director's default DNS server. You should use your primary domain server as the Director's default DNS server to ensure that all such name-to-address binding requests can be satisfied.
Perform the following task in global configuration mode:
| Task | Command |
|---|---|
| Specify information for server verification. | ip director host name connect port connection-interval |
For example, you would use the following command to instruct the Director to create a TCP connection to port 80 on each distributed server associated with www.sleet.com every 15 minutes:
ip director host www-servers.sleet.com connect 80 15
Servers that yield unsuccessful TCP connections are marked as unavailable. Subsequent successful TCP connections to the server will reinstate it as available. See "Specifying the Server Connection Parameter" in the chapter "Configuring Advanced Features" for more details.
To specify host-specific weights or metric priorities, perform either or both of the following tasks in global configuration mode:
An example for host-specific weights follows:
ip director host www-servers.sleet.com weights drp-ext 80 random 10 admin 10
An example for metric priorities follows:
ip director host www-servers.sleet.com priority drp-ext 1 admin 2 random 3
Because there is no default prioritization, all metrics with nonzero weights are considered at the same time and after all other prioritized metrics. Metric priorities must be explicitly configured.
See the section "Setting Metrics and the Server Connection Parameter" in the chapter "Configuring Advanced Features" for more information.
You might want to configure DRP-associations, host-specific weights, and priorities in the Director's default DNS server. This may be useful if you use scripting tools to generate and maintain your DNS configurations.
See the "Configuring Advanced Features" chapter for more information.
To set a preference for a distributed server based on cost, perform the following task in global configuration mode:
| Task | Command |
|---|---|
| Assign a preference for a distributed server (host). | ip director server {hostname | host-ip-address} preference [cost] |
For example, to set a preference in the Director for the distributed server www-west.sleet.com, you might use the following command:
ip director server www-west.sleet.com preference 50
or
ip director server 10.0.0.2 preference 50
This example makes the www-west.sleet.com host less preferred to others because it has a higher "cost" than the others (a cost of 50 in this case).
Perform these steps to configure the primary DNS server for HTTP session redirector mode:
For example, the following record associates the host name www.sleet.com with the Director virtual IP address 10.0.0.4:
www.sleet.com. in a 10.0.0.4
Client web browsers requesting service from www.sleet.com will connect to this Director.
An example of a record that associates the virtual IP address 10.0.0.4 with the Director web-server host name www.sleet.com follows:
4.0.0.10.in-addr.arpa. in ptr www.sleet.com.
An example showing the addition of "-servers" and their bindings in the DNS record follows:
www-servers.sleet.com.	 in a 10.0.0.2
www-servers.sleet.com. in a 11.0.0.2
www-servers.sleet.com. in a 12.0.0.2
An example showing the Director's configuration that binds the distributed server IP addresses to the virtual host name follows:
ip host www-servers.sleet.com 10.0.0.2 11.0.0.2 12.0.0.2
You can test the HTTP session redirector configuration by accessing the URL (for example, http://www.sleet.com) and noticing to which URL you are connected.
You can test this functionality at a low level by using Telnet. For example, enter the following command to connect to the web redirector server:
telnet www.sleet.com 80
Next, issue a simple HTTP command, such as:
GET /
In reply, you should receive a message similar to the following, after which the connection closes:
HTTP/1.0 302 Webredirector
Location: http://11.0.0.2/
Content-type: text/html
HTML-document
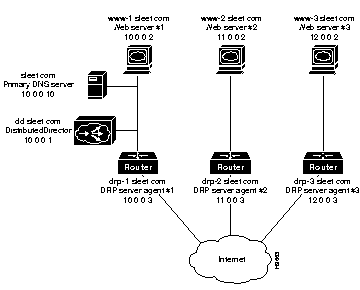
This section shows a sample configuration for HTTP session redirector mode, using the network arrangement in Figure 7-1.
Here is an overview of how the Director functions in HTTP session redirector mode:
If the URL originally requested had been:
http://www.sleet.com/Weather/index.html
Then the new URL would be:
http://12.0.0.2/Weather/index.html
Because this is only a temporary relocation, the client web browser should bookmark the original URL (http://www.sleet.com), so users who later return to this URL will once again be connected to the "best" web server for that moment. (In reality, most browsers do not bookmark the correct URL. Browser vendors are likely to fix this behavior.)
After configuring the Ethernet interface, you might enter the following commands to configure the Director.
ip director ip-address 10.0.0.4
ip name-server 10.0.0.10
ip director default-weights drp-int 10 drp-ext 90
access-list 1 permit 10.0.0.2
access-list 1 permit 11.0.0.2
access-list 1 permit 12.0.0.2
access-list 1 deny any
ip drp access-group 1
ip director access-list 1 permit "^www."
ip director access-list 1 deny any
ip director access-group 1
key chain violet
key 5
key-string carnation
exit
ip drp authentication key-chain violet
You could use the following commands to configure parameters on the Director:
ip director server 10.0.0.2 drp-association 10.0.0.3
ip director server 11.0.0.2 drp-association 11.0.0.3
ip director server 12.0.0.2 drp-association 12.0.0.3
The preceding commands tell the Director which DRP server agents are associated with each distributed server.
You could either use IP addresses (as shown) or use host names, as follows (see Figure 7-1):
ip director server www-1.sleet.com drp-association drp-1.sleet.com
ip director server www-2.sleet.com drp-association drp-2.sleet.com
ip director server www-3.sleet.com drp-association drp-3.sleet.com
The Director will query its default DNS server for name-to-address bindings. If you use host/router names instead of IP addresses, you must make sure to configure the appropriate A records in the Director's default DNS server. You should use your primary domain server as the Director's default DNS server to ensure that all such name-to-address binding requests can be satisfied.
You could also configure the IP addresses of the hosts shown with the following commands in the Director:
ip host www-1.sleet.com 10.0.0.2
ip host www-2.sleet.com 11.0.0.2
ip host www-3.sleet.com 12.0.0.2
ip host drp-1.sleet.com 10.0.0.3
ip host drp-2.sleet.com 11.0.0.3
ip host drp-3.sleet.com 12.0.0.3
In any case, make sure to configure the appropriate A records for such host names in your primary server so that external queries will receive correct DNS responses.
To add host-specific weights, you would add more information to the Director. For example, you could configure host-specific weights like this:
ip director host www-servers.sleet.com weights drp-ext 80 random 10 admin 10
The weights do not need to add up to 100. When the associated metric is referenced in the sorting decision, it will always be multiplied by the appropriate metric weight. In this way, you can specify that some metrics should weigh more heavily than others.
To use metric priority, you could use this configuration on the Director:
ip director host www-servers.sleet.com priority drp-ext 1 admin 2
With this configuration, all clients would be assigned to the server that is closest to them according to BGP hop count distance. If two or more servers are at the same distance, the choice should be according to administrative preference.
You could set up some an administrative preference with the following command:
ip director server www-west.sleet.com preference 50
This example makes the www-west.sleet.com host less preferred to others because it has a higher "cost" than the others (a cost of 50 in this case).
For more information, refer to the section "Setting Metrics and the Server Connection Parameter" in the chapter "Configuring Advanced Features."
The steps below configure a primary DNS server for the sleet.com domain.
Step 1 You need the following records on the primary DNS server for the sleet.com domain:
The first record is passed to the Internet as the standard IP address for the www.sleet.com server. Clients will connect to the Director at this address. The Director then queries for the DNS host name associated with the 10.0.0.4 address and receives www.sleet.com through the second record.
Step 2 Add the following DNS records to the primary domain DNS server:
or
Bind the distributed server IP addresses to the virtual host name in Director itself using the ip host command:
These commands define the IP addresses associated with the www-servers.sleet.com for the Director. The Director will embed one of these IP addresses in a URL, and return it, along with an HTTP status code 302, to the requesting client, thus redirecting the client to the best server.
|
|