|
|

You can configure the PIX Firewall by entering commands on your console computer or terminal that are similar in context to those you use with Cisco IOS technology.
The following sections provide preliminary information about use of the PIX Firewall command line interface.
The PIX Firewall contains a command set based on Cisco IOS technologies, which provides three administrative access modes:
Help information is available from the PIX Firewall command line by entering help or a question mark to list all commands, or after a command to list command syntax; for example, arp ?.
The number of commands listed when you use the question mark or help command differs by access mode so that unprivileged mode offers the least commands and configuration mode offers the greatest number of commands.
In addition, you can enter the clear, no, and show commands by themselves on the command line and then press Enter to view the commands that start with these keywords.
You can abbreviate most commands down to the fewest unique characters for a command; for example, you can enter wr t to view the configuration instead of entering the full command write terminal, or you can enter en to start privileged mode and co t to start configuration mode.
In addition, you can enter 0 instead of 0.0.0.0.
You can use the following commands to edit or view previously entered commands:
If you are using a VT100-compatible terminal, such as HyperTerminal with Windows 95 or Windows NT, the up and down arrow keys have the same effect as ^p and ^n. In addition, the left arrow key works as a backspace.
The command line history consists of 10 lines in a circular buffer. When you enter the 11th command, it replaces the first entered and so on. When you are at the first line in the history and enter ^n, the 10th line appears.
The following commands must be used together:
| If You Use this Command: | You Need to Use this Command Next: |
|---|---|
| aaa authentication | aaa authorization |
| link | linkpath and age |
| nat | global |
| outbound | apply |
| radius-server or tacacs-server | aaa authentication |
| static | conduit |
| syslog host | syslog output |
On commands such as help or ?, show, show xlate, or other commands that provide long listings, you can determine if the information displays a screenful and pauses, or lets the command run to completion. The pager command lets you choose the number of lines to display before the More prompt appears.
When paging is enabled, the following prompt appears:
<--- More --->
The More prompt uses syntax similar to the UNIX more command:
The following literal names can be used instead of a numerical port value in command lines: dns, ftp, h323, http, ident, ipsec, nntp, ntp, pop2, pop3, pptp, rpc, smtp, snmp, snmptrap, sqlnet, telnet, tftp. You can specify literals in port ranges; for example, ftp-h323.
When you create an internal network, we recommend that you use one of the following address groups for hosts reserved by the Network Working Group (RFC 1918) for use with private network addressing:
Configuring the PIX Firewall consists of the following steps:
Step 1 Read Installing PIX Firewall and PIX10000 before starting to install your software and prepare a terminal for use as the console.
Step 2 Enter configuration mode by entering the enable command in unprivileged mode and the configure terminal command in privileged mode. The enable command does not require an initial password, so press the Enter key at the password prompt. The prompts should appear as follows:
pixfirewall> enable
Password:
pixfirewall# configure terminal
pixfirewall(config)#
Step 3 Initially configure the PIX Firewall using the commands described in the section that follows, "Initially Configuring the PIX Firewall."
Step 4 Change the default privileged mode password with the enable password command.
Step 5 Monitor the network interface traffic with the show interface command. If both interfaces show that packets are input and output, then the firewall is functioning. If not, ensure that the interface and route commands are specified correctly.
Step 6 Use the ping command as described in "Testing the Configuration" to ensure that hosts on the inside and outside of the network are visible to the firewall.
Step 7 Configure the following tasks, which are described in greater detail later in this chapter:
Step 8 Use ^z to exit configuration mode and return to privileged mode. From privileged mode, use the disable command or ^z to return to unprivileged mode. The command prompt changes for each mode.
Access configuration mode and enter the commands that follow to initially configure the firewall.
Enter the initial configuration as:
Lines 1 and 2 let you specify the type of network interfaces installed on your firewall. These are either Ethernet or Token Ring. For Ethernet interfaces, replace hardware_id with ethernet0 for the outside network, ethernet1 for the inside network, and so on. For Token Ring interfaces, replace hardware_id with token0 for the outside network, token1 for the inside network, and so on. Insert one interface statement for each network interface on your PIX Firewall.
The auto keyword in lines 1 and 2 can only be used with the Intel 10/100 automatic speed sensing network interface card, which shipped with the PIX Firewall in units manufactured after
November 1996. If your system contains 3Com Ethernet boards, replace auto with 10baseT or any of the derivations shown on the interface command page in Chapter 3, "Command Reference." If your system contains Token Ring boards, replace auto with either 4mbps or 16mbps.
Lines 3 and 4 assign the IP addresses to the network interface cards. The inside address can be any unique address available on the inside network.
The nat statement in line 5 lets all inside users start outbound connections and provides name address translation (described in "Providing Outbound Access"). If the capability of letting all inside users start outbound connections does not agree with your security policy, you can create access control lists with the outbound command and the apply command. Refer to the outbound command page in "Command Reference" for more information.
Line 6 creates a pool of global addresses that inbound connections can use when the internal address is translated to an external address. If the external network connects to the Internet, specify the global command with a NIC-registered address. If the external network is an intranet, use IP addresses for that network. The global statement lets nat group 1 use the pool of global addresses. Enter a class address such as this example address of 192.168.42.1-192.168.42.254 to assign IP addresses 192.168.42.1 through 192.168.42.254. Alternatively, you can enter a single IP address for use with the Port Address Translation (PAT) feature that lets one IP address handle up to 64,000 inside hosts--provided none use multimedia applications.
Lines 7 and 8 let you assign default routes to the inside and outside network interfaces. If your system lets routers advertise default routes using the RIP protocol, these lines can be omitted.
Line 9 writes the current configuration to flash memory.
Ensure that the IP addresses for any network interface are not the same as those in the pool of global addresses created with the global command, those assigned as default routes, or the global addresses you specify for the static or mailhost commands.
When you ping from an internal or external host during testing, use the trace debug on command to ensure that traffic is moving through the firewall correctly.
For the steps that follow, you will need access to the PIX Firewall console and to at least one host on both the internal and external networks.
The troubleshooting information in this section is based on Figure 2-1.
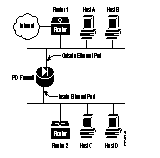
Use the steps that follow to determine that the firewall is functioning correctly.
Step 1 Use the show ip address command to ensure that the IP address you expect is associated with each network interface.
Step 2 Use the show interface command to ensure that the interface is functioning and that the cables are connected correctly. If the display contains "line protocol is up," then the cable type used is correct and connected to the firewall. If the display states that each interface "is up," then the interface is ready for use. If both of these are true, check "packets input" and "packets output." If packets are being received and transmitted, the firewall is correctly configured and a cable is attached.
Step 3 Use the show arp command to see if the PIX Firewall has connectivity by seeing if entries are in the ARP cache. If there are entries, clear the ARP cache with the clear arp command and check to see if new entries appear by repeating the show arp command.
Step 4 Use the PIX Firewall ping command to test the firewall's ability to reach hosts on each network interface. Note that the PIX Firewall ping command cannot test the firewall's inside or outside network interfaces or any of its global addresses. When you ping from a host other than the firewall, view information about the ping with the trace debug on command.
Run these tests with ping:
(a) See if you can ping hosts on the inside network. If not, move to a host on the inside network and use that host's ping command to test the inside network interface port on the PIX Firewall from a host on the inside network. If this does not work, the problem is on your internal network.
(b) From the inside host, try pinging another host on the same segment; for example,
C to D in Figure 2-1. If you cannot, the problem is on the inside network and not with the PIX Firewall. Check the routing setup on the internal network(s) and the default gateways for the problem, if RIP listening is not in effect. If a router is present on the inside network, hosts on the inside segment must have gateways pointing to the router, and the router must point to the PIX Firewall. For example, the default routes for C and D must point to Router 2, and the default route for Router 2 must point to the PIX Firewall.
(c) Ping a host on the outside interface. If this does not work, move to a host on the interface and repeat the procedure in Step (b) for the outside network. If present, ping the perimeter interface in the same manner.
The Java-based PIX Firewall Manager lets you manage multiple PIX Firewall units from an inside Windows NT Server version 4.0 workstation. Remote PIX Firewall units can also be managed if Private Link is configured on each firewall.
Use the commands in the "Initially Configuring the PIX Firewall" section to prepare the PIX Firewall prior to use. Then use the PIX Firewall telnet command to permit access to the PIX Firewall from the Windows NT server running PIX Firewall Manager. The syntax for the telnet command is:
telnet local_ip maskThe local_ip parameter is the IP address of the Windows NT server running PIX Firewall Manager. The mask parameter is the network mask that specifies which hosts can access the PIX Firewall console with Telnet. Use 255.255.255.255 to limit Telnet console access to a single host or 255.255.255.0 to permit all hosts on the local network to access the console.
Refer to the PIX Firewall Manager Version 4.1 Release Notes for more information about configuring the PIX Firewall Manager.
Before providing outbound access to inside hosts, you need to consider the following security issues:
To configure outbound access:
Step 1 To let all inside hosts start outbound connections, use the nat 1 0.0.0.0 command. NAT stands for name address translation, which shields IP addresses on the inside network from the outside network. The nat 1 0.0.0.0 command enables name address translation and lets all hosts (specified as 0.0.0.0) start outbound connections. The nat command can also specify single hosts or ranges of hosts, to make access more selective.
Use the nat command to specify which hosts can start outbound connections. Then use the global command to create a pool of global addresses and specify which nat statements can use the address pool.
Inherent in the use of nat is the idea of address translation, which means that no matter what numbering scheme is present on the inside or perimeter networks, the only IP addresses visible on the outside of the firewall are those in the address pool created by the global command, those defined by the static command, or by the mailhost command.
Address translation protects your inside and perimeter hosts from intruders on the outside network. The following commands let hosts 10.1.2.1 through 10.1.2.254 (because the 10.1.2.0 address actually means 10.1.2.1 through 10.1.2.254) create outbound connections and then assigns the global addresses 204.31.17.1 through 204.31.17.254 in a pool to accommodate the outbound connections:
The number to the right of the (interface) specification in the global command is the nat_id_set, which lets you specify which nat statements are permitted to access the global addresses in the pool. When more than two interfaces are present, this value lets you choose which nat statements can access which external interface.
Step 2 By default, whichever inside hosts you let start outbound connections can use all services during the outbound connection. You can expand this capability with access control lists that let you do the following:
Use the outbound and apply commands to create access control lists. The following commands deny outbound web access and permit a group of hosts access:
The first outbound command denies web access to all inside hosts. The next outbound command permits hosts 10.1.2.1 through 10.1.2.10 access to the web. The third outbound command specifies that for host 10.1.2.5, this user is not permitted to execute Java applets on the inside network. The apply command indicates that the access control list pertains to inside hosts starting outbound connections.
Step 3 If you want a specific IP address to always be used for outbound access, you can use the static command to map a global IP address to a local IP address.
Step 4 Another feature for outbound connections is the ability to control which IP addresses are visible on the outside. The nat 0 command lets you disable address translation so that inside IP addresses are visible on the outside without address translation. Use of nat 0 depends on your security policy.
The last two zero's are abbreviations for 0.0.0.0. By itself, nat 0 lets all inside IP addresses start connections on the outside without address translation. If you want these same addresses to be visible on the outside, then you need to use nat 0 in conjunction with the static command described in the next section. The following commands let a group of inside NIC-registered addresses be visible on the outside without translation:
Step 5 Another aspect of address translation is the ability to have addresses on the internal network be NIC-registered addresses but not visible on the outside. In this case, users may eventually need to access an IP address on the outside that is also being used as an inside address. You can use the alias command to create an alternate address for the address on the outside so that users can access the outside address transparently by domain name or explicitly by specifying the alternate IP address instead of the outside IP address.
Refer to Chapter 3, "Command Reference" for more information about each command and additional examples.
By default, the PIX Firewall prevents all outside connections from accessing inside servers. If your security policy requires that outside users access inside servers, use the static command to specify which NIC-registered IP addresses are visible on the outside for users to access and use the conduit command to specify which services users can access on the servers.
Whenever you permit outside users to access your network, you should establish a user authentication and authorization system as described in the next section. Without it, your network is only as secure as the inside server. For many networks, this risk is too great.
An exception to the use of static and conduit is provided for SMTP mail hosts, which require additional security from attacks. The mailhost command takes the place of the static and conduit commands and lets you create a secure mail server on the inside network. This server is protected by the PIX Firewall's special Mail Guard feature that regulates which commands in the SMTP protocol can be used to access the server.
User authentication and authorization starts with your security policy and the respective inside RADIUS or TACACS+ server that you have.
Authentication determines whether a user has access to the inside or outside network. Authorization determines what services a user can use to access a host.
From the configuration on this server you need to determine which users can access the network, which services they can use, and what hosts they can access. Once you have this information, you can configure the PIX Firewall to either enable or disable authentication or authorization.
In addition, you can also configure the firewall to permit users access to specific hosts or services. However, if you configure the firewall to this degree, you risk the information being different between the authentication server and the firewall. After you enable authentication and authorization, the PIX Firewall provides credential prompts to inbound or outbound users for FTP, Telnet, or HTTP (web) access. The actual decision about who can access the system and with what services is handled by the authentication and authorization servers.
To provide user authentication and authorization:
Step 1 For inbound authentication, create the static and conduit statements required to permit outside hosts to access servers on the inside network. This is described in "Providing Outbound Access."
Step 2 If the external network connects to the Internet, create a global address pool of NIC-registered IP addresses, or if the network connects to an intranet, a pool of those addresses with the global command. Then specify which inside hosts can start outbound connections with the nat command and with the access control lists features found in the outbound and apply commands. This is described in "Providing Access to Inside Servers and to a Mail Server."
Step 3 Specify which server handles authentication or authorization with the radius-server or the tacacs-server commands. RADIUS can provide authentication but not authorization.
Step 4 Enable authentication with the aaa authentication command. It is best to use this command only to enable authentication with one or both of the following commands:
In these commands, if the server is RADIUS, use radius instead of tacacs+. While the aaa authentication command lets you specify hosts that can be authenticated or specific hosts, if you implement this level of management in the firewall, you run the risk that your authentication server and the firewall can have different information. For example, if the authentication server is only accepting Telnet logins and you set the firewall for FTP, no users will be authenticated.
Step 5 Enable authorization with the aaa authorization command. Even though this command lets you specify which services and inside hosts an authorized user can access, it is best to not set it here and only use this command to enable authorization. The authorization server should make the decision. Use one or both of the following commands:
The configuration that follows provides an overview of how the various commands are used to create a configuration.
This configuration shows the use of PAT (port address translation), denying Java applets, using the AAA commands, creating a mail host, permitting NFS, initializing SNMP, and setting console access with Telnet and HTTP.

The configuration is as follows:
1 syslog output 20.7
2 no syslog console
3 syslog host 10.1.1.11
4 nameif ethernet0 inside security100
5 nameif ethernet1 outside security0
6 interface ethernet0 auto
7 interface ethernet1 10baset
8 ip address inside 10.1.1.1 255.0.0.0
9 ip address outside 204.31.17.10 255.255.255.0
10 arp timeout 6400
Line 1 sets SYSLOG to send all possible messages to the SYSLOG host in line 3. Line 2 disables displaying messages to the console.
Lines 4 and 5 specify the names and security levels for the inside and outside interfaces. This command is not necessary for firewalls with two network interfaces but is a good practice to specify in the event that another interface is added later.
Lines 6 and 7 establish that the network interfaces are Ethernet and specify their line speed.
Lines 8 and 9 assign IP addresses and the subnet mask to each interface.
Line 10 sets an ARP timeout to 6,400 seconds (one hour and 45 minutes). This is useful when you are setting up a network and changing inside and outside host addresses often.
11 nat (inside) 3 3.3.3.0 255.255.255.0
12 nat (inside) 1 10.0.0.0 255.0.0.0
13 global (outside) 1 204.31.17.25-204.31.17.27
14 global (outside) 1 204.31.17.28
15 global (outside) 3 204.31.18.1-204.31.18.254
16 outbound 11 deny 3.3.3.3 255.255.255.255 1720
17 outbound 10 deny 0 0 80
18 outbound 10 permit 3.3.3.3 255.255.255.255 80
19 outbound 10 deny 3.3.3.3 255.255.255.255 java
20 outbound 11 permit 10.1.1.11 255.255.255.255 80
21 apply (inside) 10 outgoing_src
22 apply (inside) 11 outgoing_src
Lines 11 and 12 let you specify address translation for internal hosts starting outbound connections.
Lines 13 to 15 create two pools of global addresses to let the nat statements use the address pools for translating internal IP addresses to external addresses. The global command in line 14 specifies an IP address for port address translation address (PAT) so that up to 64,000 hosts can share this PAT address.
Lines 16 to 19 create access lists to determine which hosts can access services. Line 16, denies
host 3.3.3.3 from accessing H323 (port 1720) services such as MS NetMeeting or InternetPhone. Line 17 denies all hosts from accessing the web (port 80). Lines 18 and 19 let host 3.3.3.3 use the web, but denies its users from downloading Java applets.
Line 20 permits host 10.1.1.11 access to the web (at port 80) and to download Java applets. This permit statement outweighs the previous deny regardless of the order in which the statements are entered into the configuration.
Lines 21 and 22 specify that the access lists in lines 16 to 20 pertain to connections started on the inside network to access outside services.
23    no rip outside passive
24 no rip outside default
25 rip inside passive
26 rip inside default
27 route outside 0 0 204.31.17.1 1
28 route outside 171.69.74.25 255.255.255.255 204.31.17.2 1
29 tacacs-server host 10.1.1.12 1q2w3e
30 aaa authentication (inside) any outbound 3.3.3.3 255.255.255.255 tacacs+
31 aaa authorization (inside) any outbound 3.3.3.3 255.255.255.255
32 static (inside, outside) 192.150.50.0 3.3.3.0
33 conduit (inside, outside)192.150.50.0 h323 tcp 0 0
Lines 23 and 24 disable outside interface RIP listening and broadcasting of a default route.
Lines 25 and 26 enable inside interface RIP listening and broadcasting a default route.
Line 27 sets the outside default route to 204.31.17.1. (0 is an abbreviation for 0.0.0.0.)
Line 28 creates an additional static route for the outside interface.
Lines 29 to 31 establish outbound connection authentication and authorization using TACACS+.
Line 32 creates a net static. A net is a static statement static for a class IP address, in this case for IP addresses 192.150.50.1 through 192.150.50.254.
Line 33 allows users on the Internet to send InternetPhone (port h323) requests to users on 3.3.3.x while addressing them as 192.150.50.x.
34 static (inside, outside) 204.31.17.29 80 tcp 10 30
35 conduit (inside, outside) 204.31.17.29 80 tcp 0 0
36 conduit (inside, outside) 204.31.17.29 rpc udp 204.31.17.17 255.255.255.255
37 conduit (inside, outside) 204.31.17.29 2049 udp 204.31.17.17 255.255.255.255
Line 34 shows the use of the connection limit and the embryonic limit arguments. The maximum number of connections limits the number of connections a host can use. This line permit access to only 10 users and up to 30 SYNs (embryonic connections). In tandem with the conduit statement in line 35, these statements establish an externally visible IP address for web access (port 80 in line 35). Note that static command's maximum connections option applies to both inbound and outbound connections so if 30 SYN flooders come in, the web server cannot go out itself.
Line 36 opens the RPC portmapper on UDP port 111. Refer to the UNIX /etc/rpc file and rpc(3N) for more information. Once you create a conduit for RPC, you can use the following command from outside 204.31.17.17 to track down the activity of a PCNFSD on RPC 150001:
rpcinfo -u 204.31.17.29 150001
Another use of RPC is with the following command to see the exports of 204.31.17.29 if you want to allow NFS mounting from outside in.
showmount -e 204.31.17.29
Many protocols based on RPC, as well as NFS, are insecure and should be used with caution.
Line 37 permits NFS access (port 2049) between the outside and inside, such that 204.31.17.17 can mount 10.1.1.11.
38 mailhost (inside, outside) 204.31.17.30 10.1.1.3 10 11
39 conduit (inside, outside) 204.31.17.30 113 tcp 0.0.0.0 0.0.0.0
40 snmp-server host 3.3.3.2
41 snmp-server location building 42
42 snmp-server contact polly hedra
43 snmp-server community ohwhatakeyisthee
44 telnet 10.1.1.11 255.255.255.255
45 telnet 3.3.3.0 255.255.255.0
Line 38 designates an SMTP mail host. The Mail Guard feature in the PIX Firewall defines that only the seven commands described in section 4.5.1 of RFC 821 be permitted for access to the mail host. (The commands are HELO, MAIL, RCPT, DATA, RSET, NOOP, and QUIT.) The mailhost command in line 38 makes the mail server on 10.1.1.3 visible on 204.31.17.30 with 10 maximum connections and up to 11 embryonic connections.
The Internet DNS MX record for this organization should point to 204.31.17.30.
Line 39 creates a conduit for port 113, the IDENT protocol. If the mail server has to talk to many mail servers on the outside which connect back with the now obsolete and highly criticized IDENT protocol, use this conduit to speed up mail transmission.
Lines 40 to 43 specify the SNMP server IP address, the server's location, and the name of its administrator. Line 43 specifies the community key in place at the SNMP server.
Lines 44 and 45 permit host access to the PIX Firewall console. Line 44 permits a single host, 10.1.1.11 to access the PIX Firewall console with Telnet. The 255 value in the last octet of the netmask means that only the specified host can access the console.
Line 45 permits PIX Firewall console access from hosts on the 3.3.3.0 network. The 0 value in the last octet of the netmask permits all hosts in that network access. However, Telnet only permits 16 hosts simultaneous access to the PIX Firewall console over Telnet.
Use the failover command without an argument after you connect the optional failover cable between your primary firewall and a secondary firewall. The default is failover on. Enter no failover in the configuration file for the PIX Firewall if you will not be using the failover feature. Use the show failover command to verify the status of the connection and to determine which unit is active.
Failover works by passing control to the secondary unit should the primary unit fail. For Ethernet, failover detection should occur within 15 seconds.
The markings on the cable let you choose which PIX Firewall unit is primary and which is secondary. Refer to Installing the Failover Connector Assemblies and Cable on the PIX Firewall supplied with the failover cable option for more information about upgrading a PIX Firewall unit to accept the failover cable. The PIX Firewall units manufactured after November 1996 come equipped with the failover cable connectors; for these units, you need only connect the failover cable between the PIX Firewall units.
Enable the failover feature by adding the failover command (without the active parameter) to the configuration files for both the primary and secondary PIX Firewall units.
When you use Telnet to access the PIX Firewall, only the active unit serves the connection. Use the hostname command on both units to identify a unique name for each unit. Using the host name, you can tell if you are communicating with the primary or secondary unit. If you are using Telnet when a failure occurs, you need to disconnect the Telnet session and restart it to the IP address.
If a failure occurs, the host name in the telnet command prompt gives you positive acknowledgment that the secondary unit is active. In addition, SYSLOG messages indicate whether the primary or secondary unit failed. Use the show failover command to verify which unit is active.
If you want to force a PIX Firewall to be active or go to standby you can use the failover active or no failover active command. Use this feature to force a PIX Firewall offline for maintenance or to return a failed unit to service.
Use the show failover command to verify the status of the connection and to determine which unit is active.
You can create your own failover cable by connecting the pin outs as shown in Table 2-1.
| Primary End of Cable Pins | Secondary End of Cable Pins |
|---|---|
| 1 | 10 |
| 9 | 14 |
| 2 | 3 |
| 10 | 1 |
| 3 | 2 |
| 4, 11, and 12 connect inside Primary | 6 |
| 5 | 5 and 12 connect inside Secondary |
| 6 | 4 and 11 connect inside Secondary |
| 14 | 9 |
Follow these guidelines for configuring both units the same:
This section contains some frequently asked questions about the failover feature.
In the messages that follow, P|S can be either Primary or Secondary depending on which the PIX Firewall is sending the message. Failover messages always have a SYSLOG priority level of 2, which indicates critical condition. Refer to the syslog output command description for more information on SYSLOG messages.
The SYSLOG messages sent to record failover events are:
The link command creates an encrypted path between version 4 Private Link-equipped PIX Firewall units. You can specify up to seven encryption keys for data access between your unit and the remote unit. The key-ID and key values must be the same on each side of the Private Link. Once you specify the same keys on both sides of the connection, the systems alert each other when a new key takes effect. You can use the age command to specify the number of minutes that a key is in effect.
Specify the link command once for each key you want to specify; for example, if you want seven keys, enter the link command in the configuration seven times.
The PIX Firewall Private Link consists of an encryption card and software that permits the PIX Firewall units to provide encrypted communications across an unsecure network such as the Internet. This optional feature is available to domestic customer sites.
The PIX Firewall allows up to 256 Private Links. At least two PIX Firewall units are required along with the hardware/software option to use this feature.
Private Link works by checking packets that arrive at the PIX Firewall inside interface. If a route link previously created by the linkpath command exists that matches the destination network address, the packet is encrypted and encapsulated in an AH/ESP frame. The frame has a destination address of the remote PIX Firewall and a source address of the local PIX Firewall. When the packet arrives at the remote PIX Firewall unit, the data in the packet is decrypted and then sent through the inside interface to the original IP address specified. No translation takes place on packets that traverse the PIX Firewall Private Link. The addressing and data remains completely unchanged.
The PIX Firewall allows up to 512 link paths.
You can manage remote PIX Firewall units through the Private Link interface.
To configure a Private Link, refer to the example setup in Figure 2-3.

Before configuring Private Link, you would initially configure the systems using the standard commands.
When you configure a Private Link, follow these steps:
Step 1 Agree on up to seven hexadecimal encryption keys for use between the PIX Firewall Private Link local and remote units; for example, one key could be like the hexadecimal value fadebacbeebeee. Be sure to select unique keys that are difficult to guess. The key can be up to 56 bits in length (14 hexadecimal digits).
Step 2 Use the link command to create an encrypted link for each key you want to specify.
Step 3 Use linkpath to specify the IP address of the network on the inside of the remote firewall.
Step 4 On PIX Firewall A, in the previous illustration, enter these commands to configure the Private Link:
Step 5 On PIX Firewall B, enter these commands:
Step 6 Test the connection to each foreign PIX Firewall with the ping inside command. For example, to test firewall B from firewall A, use these commands to test accessibility to the outside interface (192.168.37.1), inside interface (10.3.1.1), and a host on the inside network (10.3.1.8, not shown in figure):
The snmp-server command causes the PIX Firewall to send SNMP traps so that the firewall can be monitored remotely. Use snmp-server host to specify which systems receive the SNMP traps. You can specify up to five systems and all must be on the inside network of the firewall.
Use snmp-server contact and snmp-server location to specify your name and the location of the PIX Firewall so that hosts receiving SNMP traps can contact you if monitored problems occur.
Using SNMP, you can monitor system events on the PIX Firewall.
The PIX Firewall SNMP MIB-II groups available are System and Interfaces.
The PIX Firewall SNMP traps available to an SNMP server are:
Use CiscoWorks for Windows (Product Number CWPC-2.0-WIN) or any other SNMP V1, MIB-II compliant browser to receive SNMP traps and browse a MIB. SNMP traps occur at UDP port 162. Up to five hosts can receive SNMP traps. SNMP events can be read, but information on the PIX Firewall cannot be changed with SNMP.
To receive security and failover SNMP traps from the PIX Firewall, compile the Cisco SYSLOG MIB into your SNMP management application. If you do not compile the Cisco SYSLOG MIB into your application, you only receive MIB-II traps for link up or down, and firewall cold and warm start.
To compile Cisco SYSLOG Enterprise MIB files into your browser using CiscoWorks for Windows (SNMPc), complete the following steps:
Step 1 Get the Cisco SYSLOG Enterprise MIB files.
Step 2 Start SNMPc.
Step 3 Go to Config|Compile MIB.
Step 4 Scroll to the bottom of the list, and select the last entry.
Step 5 Click the Add button.
Step 6 Find the file CISCO-SMI.my and click OK.
Step 7 Scroll to the bottom of the list, and select the last entry.
Step 8 Click the Add button again.
Step 9 Find the file CISCO-SYSLOG-MIB.my and click OK.
Step 10 Click Load All.
Step 11 If there are no errors, restart SNMPc.
The syslog output command configures the facility and level of SYSLOG messages. Because network devices share the eight facilities, syslog output lets you set the facility marked on all messages. Messages are sent to the SYSLOG host over UDP. The syslog output command also starts sending messages onto the network. Use the syslog host command to specify which systems receive the messages.
You can use show syslog to view previously sent messages.
The PIX Firewall generates SYSLOG messages for system events, such as security alerts and resource depletion. SYSLOG messages may be used to create email alerts and log files, or displayed on the console of a designated host using UNIX SYSLOG conventions.
A PC WinSock version of syslogd also will work.
The PIX Firewall sends SYSLOG messages to document the following events:
Logging is enabled by configuring the PIX Firewall with the IP address of the log host.
The syslog output command syntax lets you specify the SYSLOG facility and level for how messages are sent to the SYSLOG host.
The facility consists of eight facilities LOCAL0(16) through LOCAL7(23); the default is LOCAL4(20). Hosts file the messages based on the facility number in the message.
The level specifies the types of messages sent to the SYSLOG host. Setting the level to 3, for example, allows messages with levels 0, 1, 2, and 3 to display. The default is 3. The levels are:
To configure a UNIX system to accept SYSLOG messages:
Step 1 Use the PIX Firewall syslog host command to configure the PIX Firewall to send SYSLOG messages to the UNIX host's IP address.
Step 2 Log into the UNIX system as root (superuser) and execute the following commands; change name to the log file in which you want SYSLOG messages to appear:
While still logged in as root, edit the /etc/syslog.conf file with a UNIX editor and add the following selector and action pairs for each message type you want to capture:
| Message Priority | UNIX syslog.conf File Keyword |
|---|---|
| 0 -- Emergency | localn.emerg |
| 1 -- Immediate action | localn.alert |
| 2 -- Critical condition | localn.crit |
| 3 -- Error | localn.err |
| 4 -- Warning | localn.warning |
| 5 -- Notice | localn.notice |
| 6 -- Information | localn.info |
| 7 -- Debug | localn.debug |
In the syslog.conf file, you code each selector and action pair for the messages you want to receive. For example, if you want to receive messages in a file called pixfirewall for message priorities 0, 1, 2, and 3, using the default LOCAL4 facility, the syslog.conf statements would be:
This configuration directs the PIX Firewall SYSLOG message to the specified file. Alternatively, if you want the message sent to the logging host console or emailed to a system administrator, refer to the UNIX syslog.conf(4) manual page.
Entries in /etc/syslog.conf must follow these rules:
(a) Comments, which start with the pound (#) character, are only allowed on separate lines.
(b) Separate the selector and action pairs with a tab character. Blanks are not acceptable.
(c) Ensure that there are no trailing spaces after the file names.
Step 4 Inform the SYSLOG server program on the UNIX system to reread the syslog.conf file by sending it a HUP (hang up) signal with the following command:
The first command lists the SYSLOG process ID. This number may vary by system. The second command sends SYSLOG the HUP signal to cause it to restart.
Step 5 Configure the PIX Firewall to send SYSLOG messages to the UNIX host:
Examples of the PIX Firewall SYSLOG messages resemble the following:
Jul 11 17:59:47 ant.oak.com 199002 PIX startup completed. Beginning operation.
Jul 11 17:59:47 ant.oak.com 305002 Translation built for gaddr 192.150.49.196 to laddr 171.69.74.26
Jul 11 17:59:47 ant.oak.com 305002 Translation built for gaddr 192.150.49.195 to laddr 171.69.74.27
Jul 11 18:02:19 ant.oak.com 111001 Begin configuration: writing to tftp
Jul 11 18:02:19 ant.oak.com 111004 End configuration: SUCCEEDED
Jul 11 18:03:16 ant.oak.com 199002 PIX startup completed. Beginning operation.
Jul 11 18:03:16 ant.oak.com 305002 Translation built for gaddr 192.150.49.196 to laddr 171.69.74.26
Jul 11 18:03:16 ant.oak.com 305002 Translation built for gaddr 192.150.49.195 to laddr 171.69.74.27
Jul 11 18:04:04 ant.oak.com 199002 PIX startup completed. Beginning operation.
Jul 11 18:04:04 ant.oak.com 305002 Translation built for gaddr 192.150.49.196 to laddr 171.69.74.26
Jul 11 18:04:04 ant.oak.com 305002 Translation built for gaddr 192.150.49.195 to laddr 171.69.74.27
And so on. Items you may see in SYSLOG messages include gaddr which precedes a global IP address, laddr, which precedes a local IP address on the inside network, and faddr, which precedes a foreign IP address on the outside network. The starting numbers have no meaning other than to uniquely identify each message.
You can log FTP commands and WWW URLs when SYSLOG is enabled. FTP and URL messages are logged to SYSLOG level 7. The following example output shows what to expect:
<166> 192.168.69.71 accessed URL 10.0.0.1/secrets.gif
<166> 192.168.69.42 Retrieved 10.0.0.42:feathers.tar
<166> 192.168.42.54 Stored 10.0.42.69:privacy.zip
You can view these messages at the PIX Firewall console with the show syslog command.
|
|