|
|

This chapter provides detailed instructions for installing the Catalyst 1700 on a table, shelf, or in a rack, and for connecting the Catalyst 1700 to the network. It also describes the hub's default settings.
After unpacking the Catalyst 1700 and ensuring that all items are included (see the "Packing List" section in the "Fast Install Guide" preface), the first step is to mount the Catalyst 1700 on a rack, shelf, or table.
Rackmount ears are integrated on the Catalyst 1700 front panel for maximum support and ease-of-installation. To install the Catalyst 1700 in a rack, follow these steps.
Step 1 Position the Catalyst 1700 on the rack.
 | Caution Do not connect the power cord to the Catalyst 1700 and to the power source until the Catalyst 1700 is installed in the rack. |
Step 2 Match the holes in the rack with the holes in the Catalyst 1700 mounting ears, as shown in Figure 4-1.
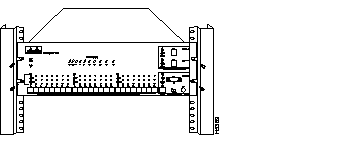
Step 3 Attach the Catalyst 1700 to the rack with the four provided screws.
Step 4 Connect the power cord to the Catalyst 1700 and to the power outlet.
Step 5 Turn the Catalyst 1700 on using the power switch on the rear panel.
The power LED will turn on, and the Catalyst 1700 will automatically begin running a self test. This self test is described later in this chapter in "Self-Test."
Follow these instructions to install the Catalyst 1700 on a table or shelf.
Step 1 Attach the 4 rubber feet included in the Catalyst 1700 cushioning kit to the bottom of the unit.
Step 2 Place the Catalyst 1700 on the table or shelf close to a power source.
Step 3 Connect the power cord to the Catalyst 1700 and to the power outlet.
Step 4 Turn the Catalyst 1700 on using the power switch on the rear panel.
The power LED will turn on and the Catalyst 1700 will automatically begin running a self- test. This self-test is described in the next section.
When first powered-on, all LEDs light and a self-test automatically begins. (Refer to "Troubleshooting" for a description of each test.) Tests are run in reverse numerical order, beginning with test 14. While a test is running, the column of Personal Ethernet port LEDs with that test number will be off. When the test passes, its LEDs are turned back on and the next test is performed.
Each test lasts only a few seconds, with the exception of tests 8 and 9, which last approximately 30 seconds each.
If a test fails, the associated LED column remains off during the remainder of the tests. Upon completion of all tests, the LED display will stay fixed with the column of LEDs for each passed test turned on and each failed test turned off. When all tests pass, all LEDs are turned off.
The Catalyst 1700 is now ready to run using the default settings described in the next section.
The Catalyst 1700 is shipped with the following configuration default settings:
These configuration defaults as well as how to change them are described in detail in "Catalyst 1700 Concepts Overview." See "In-Band Management" and "Out-of-Band Management" for details on network management-related default settings.
Once the Catalyst 1700 is installed, you are ready to connect devices to the Catalyst 1700 using the Personal Ethernet and Fast Ethernet ports.
You can connect workstations to the Catalyst 1700 using the Personal Ethernet RJ-45 ports on the front panel by following these instructions:
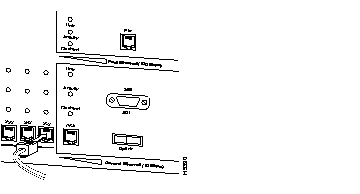
Step 1 Insert the RJ-45 connector into one of the Personal Ethernet ports as shown in Figure 4-2.
Step 2 Insert the other end of the cable into the 10Base-T adapter installed in the target workstation.
The Link LED will light when both the Catalyst 1700 and the workstation are turned on. If the Link LED does not light, there may be a cable problem or a problem with the adapter installed in the workstation. Refer to "Troubleshooting" for more details.
Step 3 Reboot the workstation as necessary.
Using the default Dynamic Learning Mode, the Catalyst 1700 learns the port address by reading the source address of an incoming packet from an attached workstation. Until the Catalyst 1700 receives the first packet, it will discard packets destined for that workstation. To minimize this, it is recommended that the attached workstation be rebooted upon initial connection to the Catalyst 1700 hub.
The workstation is now connected to the Catalyst 1700. Repeat steps 1-3 for each workstation you want to add to the Catalyst 1700 hub.
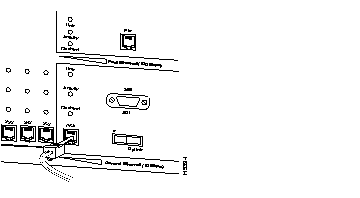
You can connect servers or interconnect the Catalyst 1700 and other 100Base-X compatible hubs using the Fast Ethernet ports on the front panel. Follow these instructions to connect devices using the Fast Ethernet ports.
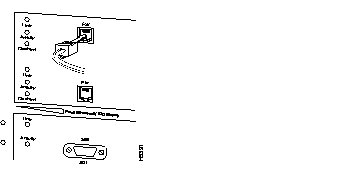
Step 1 Insert the RJ-45 connector into one of the Fast Ethernet ports as shown in Figure 4-3.
Step 2 Insert the other end of the cable into a 100Base-X compatible adapter installed in a server or into the Fast Ethernet port of another Catalyst 1700 or 100Base-X compatible hub.
Step 3 Repeat steps 1-3 to connect the second Fast Ethernet port to a 100Base-X compatible adapter installed in a server.
The Link LEDs will light when both the Catalyst 1700 and the server or second hub are turned on. If the Link LEDs do not light, there may be a cable problem or a problem with the adapter installed in the server. Refer to "Troubleshooting" for more details.
After these devices are connected, you can connect the Catalyst 1700 to the rest of your network.
After you connect devices to the Catalyst 1700, you can connect the Catalyst 1700 to the network. This section describes how to connect the Catalyst 1700 to the network using one of the connectors of the General Ethernet port.
The Catalyst 1700 will self-sense which General Ethernet port connector is attached to the network; configuration is not necessary at power-up.
If you decide to change the cabled connector at a later time, it must also be changed using the MIB object sysConfigG25Connector as described in "In-Band Management" or the System Configuration Menu as described in "Out-of-Band Management." Using these methods, you can either configure the Catalyst 1700 for the new connection type or configure it to self-sense the new connection.
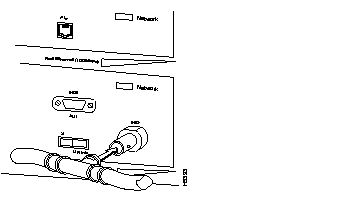
You can use the AUI connector on the front panel to connect to an external transceiver for attachment to a thin coaxial cable, thick coaxial cable, fiber-optic, or twisted pair network. Follow these instructions to connect the Catalyst 1700 to the network using the AUI port.
Step 1 Install the appropriate external transceiver on the network. Refer to the transceiver manual for installation instructions.
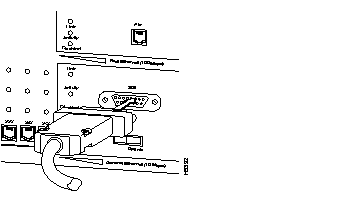
Step 2 Insert the AUI connector on one end of the cable into the AUI connector on the Catalyst 1700 as shown in Figure 4-4.
Step 3 Slide the latch into the closed position.
Step 4 Attach the other end of the cable to the transceiver.
You can use the BNC connector on the front panel to connect directly to thin coaxial network cable as described in the following instructions.
Attach the thin coax cable to the BNC connector as shown in Figure 4-5.
You can use the General Ethernet port RJ-45 connector on the front panel to directly connect to a twisted pair network. Follow these instructions to connect the Catalyst 1700 to the network using the twenty-fifth RJ-45 port.
Step 1 Insert the RJ-45 connector on one end of the cable into the General Ethernet port RJ-45 connector as shown in Figure 4-6.
Step 2 Attach the other end of the cable to the network or multi-address device. If you are connecting the Catalyst 1700 to another hub, you must use a crossover cable or use a straight-through cable and set the Uplink switch to the Uplink setting.
The Link LED will light when both the Catalyst 1700 and the attached device are turned on. If the Link LED does not light, there may be a cable problem. Refer to "Troubleshooting" for more details.
You are now ready to configure and manage the Catalyst 1700. Proceed to "In-Band Management" for in-band information and "Out-of-Band Management" for out-of band management information.
|
|