If the switch is too heavy to lift into position in the equipment rack, you must remove the modules and power supplies from the chassis. When the chassis is secure in the rack, reinstall the modules and power supplies.

| Caution Electrostatic discharge (ESD) can damage equipment and impair electrical circuitry. Always ensure that the chassis is electrically connected to earth ground. Wear an ESD-preventive wrist or ankle strap connected to the chassis when handling modules or coming into contact with internal components.
|
This section applies to all Catalyst 5000 series switch models.
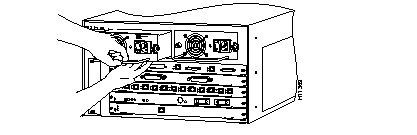
To remove a module from a Catalyst 5000 series switch (see Figure A-1):
- Loosen the captive screws on the module using a flat-blade screwdriver.
- Push the left and right ejector levers outward simultaneously to release the module from the backplane connector.
- Pull the module straight out of the slot. Handle the module by the carrier-edges only.
- Place the module on an antistatic mat or antistatic foam. If the slot is to remain empty, install a filler plate in the empty slot.
Figure A-1: Removing or Installing a Module in a Catalyst 5000 Series Switch

To install a module in a Catalyst 5000 series switch (see Figure A-1):
- Remove the filler plate from the slot, if present.
- Insert the module in the slot and align the notch on the module carrier with the groove in the slot.
- Keeping the module horizontal, slide the module into the slot until the module faceplate contacts the ejector levers.
- Push the left and right levers in simultaneously to seat the module in the backplane connector.
- Use a flat-blade screwdriver to tighten the captive installation screws.
This section applies to the Catalyst 5000, Catalyst 5505, and Catalyst 5500 switches.
To remove an AC power supply from the chassis (see Figure A-2):
- Turn OFF (0) the power switch on the power supply.
- If the power supply is connected to an AC-power source, disconnect the power cord from the power source and from the power supply.
- Use a flat-blade screwdriver to loosen and remove the captive installation screw(s).
- Grasp the power supply handle and pull the supply out of the bay. Install a filler plate if the bay is to remain empty.
Figure A-2: Removing or Installing a Power Supply in a Catalyst 5000 Series Switch
To remove a DC power supply from the chassis (see Figure A-2):
- Turn OFF (0) the power switch on the power supply.
- If the power supply is connected to a DC-power source:
(a) Turn off the power to the DC circuit connected to the power supply.
(b) Remove the terminal block cover from the power supply.
(c) Disconnect the DC-input wires from the terminal block. Disconnect the ground wire last.
(d) Disconnect the central office (CO) ground from the CO ground connector.
- Use a screwdriver to loosen and remove the captive screw(s) on the power supply.
- Grasp the power supply handle and pull the supply out of the bay. Install a filler plate if the bay is to remain empty.
To install an AC or DC power supply in the chassis (see Figure A-2):
- Ensure that the power switch on the power supply is turned OFF (0).
- Grasp the power supply handle and slide the power supply into the power supply bay.
- Use a flat-blade screwdriver to tighten the captive installation screw(s).


