|
|

This chapter describes how to use the command-line interface (CLI) to configure the Fast Ethernet ports on the supervisor engine module, the Ethernet switching module, and the Fast Ethernet switching module. This chapter also contains information on such features as the Spanning-Tree Protocol and CLI Ethernet connectivity.
Ethernet and Fast Ethernet switching modules share the following features:
For additional information on all commands discussed in this chapter, refer to the Catalyst 5000 Series Command Reference publication.
The default values of the Ethernet and Fast Ethernet module features are as follows:
To customize the Ethernet ports, complete the tasks in the following sections.
You can assign names to all ports on the Ethernet and Fast Ethernet modules. It may be particularly useful to assign names to the Fast Ethernet ports on the supervisor engine module to facilitate switch administration.
To assign a name to a port, perform the following task in privileged mode:
| Task | Command |
|---|---|
| Assign a name to a port. | set port name mod_num/port_num [name_string] |
After entering the set port name command, you see a display similar to the following:
Console> (enable)set port name 1/1 Router ConnectionPort 1/1 name set. Console> (enable)set port name 1/2 Server 1Port 1/2 name set.
To verify that you set the port name correctly, enter the show port mod_num/port_num command. You see this display:
Console> (enable) show port
Port Name                 Status   Vlan     Level  Duplex Speed Type
---- -------------------- -------- -------- ------ ------ ----- -------
1/1  Router Connection    ready    2        high     half   100 100BaseTX
1/2  Server 1             ready    1        high     half   100 100BaseTX
2/1                       ready    10       normal   half    10 10BaseT
2/2                       disabled 10       normal   half    10 10BaseT
2/3                       connect  10       normal   half    10 10BaseT
2/4                       connect  10       normal   half    10 10BaseT
.
.
.
2/23          0          0          0          0          0          0
2/24          0          0          0          0          0          0
Port Align-Err  FCS-Err    Xmit-Err   Rcv-Err
---- ---------- ---------- ---------- ----------
1/1           0          0          0          0
1/2           1          0          0          0
2/1           0          0          0          0
2/2           0          0          0          0
2/3           0          0          0          0
2/4          30          0          0          0
2/5           0          0          0          0
2/6           0          0          0          0
2/7           0          0          0          0
2/8           0          0          0          0
2/9           0          0          0          0
2/10          0          0          0          0
2/11          0          0          0          0
2/12          0          0          0          0
Port Single-Col Multi-Coll Late-Coll  Excess-Col Carri-Sens Giants
---- ---------- ---------- ---------- ---------- ---------- ----------
1/1           0          0          0          0          0          0
1/2         680        418          0          1          0          -
2/1         756         99          0          0          0          0
2/2           0          0          0          0          0          0
2/3           0          0          0          0          0          0
2/4         409        403          0         11          0       1256
2/5           0          0          0          0          0          0
2/6           0          0          0          0          0          0
2/7           0          0          0          0          0          0
2/8           0          0          0          0          0          0
2/9           0          0          0          0          0          0
2/10          0          0          0          0          0          0
2/11          0          0          0          0          0          0
2/12          0          0          0          0          0          0
Last-Time-Cleared
--------------------------
Thu Jun 8 1995, 07:58:06
Console> (enable)
Configure the priority level of each port. When ports request simultaneous access to the switching bus, the Catalyst 5000 series switch uses the port priority level to determine the access order of ports to the switching bus.
To set the priority level, perform this task in privileged mode:
| Task | Command |
|---|---|
| Configure the priority level for each port. | set port level mod_num/port_num normal | high |
After entering the set port level command, you see this display:
Console> (enable) set port level 1/1 high
Port 1/1 level set to high.
Console> (enable) set port level 1/2 high
Port 1/2 level set to high.
To verify that the port priority level is correct, enter the show port mod_num/port_num command. After entering this command, you see a display similar to the verification example in the section "Setting the Port Name."
Configure the port speed for 10/100BaseTX ports on the 10/100-Mbps Fast Ethernet Switching module if desired.
To set the port speed for a port, perform this task in privileged mode:
| Task | Command |
|---|---|
| Set the port speed of a port. | set port speed mod num/port num [10 | 100 | auto] |
After entering the set port speed mod num/port num [10 | 100 | auto] command, you see this display:
Console> (enable) set port speed
Usage: set port speed <mod_num/port_num> <10|100|auto>
Console> (enable) set port speed 2/1 auto
Port 2/1 speed set to auto-sensing mode.
Console> (enable) set port speed 2/2 10
Port 2/2 speed set to 10 Mbps.
Console> (enable) set port speed 2/3 100
Port 2/3 speed set to 100 Mbps.
To verify that you set the port speed correctly, enter the show port mod_num/port_num command. After entering this command, you see a display similar to the verification example in the section "Setting the Port Name."
Set the transmission type to full or half duplex for the ports that will be used.
To set the transmission type of a port, perform this task in privileged mode:
| Task | Command |
|---|---|
| Set the transmission type of a port. | set port duplex mod num/port num full | half |
After entering the set port duplex command, you see this display:
Console> (enable) set port duplex 2/1 half
Port 2/1 set to half-duplex.
Console> (enable) set port duplex 2/2 half
Port 2/2 set to half-duplex.
To verify that you set the transmission type correctly, enter the show port mod_num/port_num command. After entering this command, you see a display similar to the verification example in the section "Setting the Port Name."
Use the ping command to test the connection between an Ethernet or Fast Ethernet module in the Catalyst 5000 series switch and a host residing anywhere in your network. The ping command pings a host once per second until a normal response is received by the sending module. The host must be connected to a port with an address on the same IP network. Otherwise, you must configure a static route entry to reach the host network. To stop pinging, enter Ctrl-C.
To check connectivity using the ping command, perform these steps:
| Task | Command |
|---|---|
| Step 1 Send an echo request from the Catalyst 5000 series switch to the host. | ping host |
| Step 2 If the host is unresponsive, check the configuration for the IP address of the Catalyst 5000 series switch and default IP route. | show interface
show ip route |
After entering the ping command, you see this display:
Console> (enable) ping 171.69.192.3
171.69.192.3 is alive
Sample results of using the ping command are as follows:
You can configure the specialized features in this section on your Ethernet and Fast Ethernet modules.
The Catalyst 5000 series switch uses Spanning-Tree Protocol (IEEE 802.1D bridge protocol) on all Ethernet and Fast Ethernet port- based VLANs. When creating fault-tolerant internetworks, a loop-free path must exist between all nodes in a network. A spanning-tree algorithm is used to calculate the best loop-free path throughout a Catalyst 5000 series switched network. Spanning-tree packets are sent and received by switches in the network at regular intervals.
The packets are not forwarded by the switches participating in the Spanning-Tree Protocol, but are instead used by the switches to identify the loop-free path. Spanning-Tree Protocol performs this function for Catalyst 5000 series switches. The default configuration has all Spanning-Tree Protocols enabled.
To configure Spanning-Tree Protocol, perform this task:
| Task | Command |
|---|---|
| Enable Spanning-Tree Protocol. | set spantree enable [vlan] |
After enabling Spanning-Tree Protocol, you see this display:
Console> (enable) set spantree enable 1
VLAN1 bridge spanning tree enabled
Console< (enable)
To disable Spanning-Tree Protocol, enter the set spantree disable command. To set the bridge forward delay for a VLAN, enter the set spantree fwddelay delay [vlan] command. For more information on Spanning-Tree Protocol commands, refer to the Catalyst 5000 Series Command Reference publication.
To display all spanning-tree information, enter the show spantree command.
Console>  show spantree ?
Usage: show spantree [vlan]
       show spantree <mod_num/port_num>
Console> (enable) show spantree 1
VLAN 1
Spanning tree enabled
Designated Root             00-1f-00-40-0b-90-c9-00
Designated Root Priority    45
Designated Root Cost        0
Designated Root Port        1/0
Root Max Age   20 sec    Hello Time 2  sec   Forward Delay 20 sec
Bridge ID MAC ADDR          00-40-0b-90-c9-00
Bridge ID Priority          45
Bridge Max Age 20 sec    Hello Time 2  sec   Forward Delay 20 sec
Port      Vlan  Port-State     Cost   Priority  Fast-Start
--------  ----  -------------  -----  --------  ----------
1/1       1     forwarding        10        32   disabled
2/3       1     not-connected    100        32   disabled
2/4       1     not-connected    100        32   disabled
2/5       1     not-connected    100        32   disabled
2/6       1     not-connected    100        32   disabled
2/7       1     not-connected    100        32   disabled
2/8       1     forwarding       100        32   disabled
2/9       1     not-connected    100        32   disabled
2/10      1     not-connected    100        32   disabled
2/11      1     not-connected    100        32   disabled
2/12      1     not-connected    100        32   disabled
2/13      1     Learning         100        32   disabled
2/14      1     not-connected    100        32   disabled
2/15      1     not-connected    100        32   disabled
2/16      1     not-connected    100        32   disabled
2/17      1     not-connected    100        32   disabled
2/18      1     not-connected    100        32   disabled
2/19      1     not-connected    100        32   disabled
2/20      1     not-connected    100        32   disabled
2/21      1     not-connected    100        32   disabled
2/22      1     not-connected    100        32   disabled
2/23      1     not-connected    100        32   disabled
2/24      1     not-connected    100        32   disabled
4/13-24   1     not-connected    100        32   disabled
4/25-36   1     not-connected    100        32   disabled
4/37-48   1     not-connected    100        32   disabled
Console> (enable)
Use these commands to perform additional Spanning-Tree Protocol functions:
| Task | Command |
|---|---|
| Disable the Spanning-Tree Protocol algorithm for a VLAN. | set spantree disable [vlan] |
| Set the bridge forward delay for a VLAN. | set spantree fwddelay delay [vlan] |
| Set the bridge hello time for a VLAN. | set spantree hello interval [vlan] |
| List the available set spantree commands. | set spantree help |
| Set the bridge maximum aging time for a VLAN. | set spantree maxage agingtime [vlan] |
| Set the bridge path cost for a port. | set spantree portcost mod_num/port_num cost |
| Allow a port that is connected to a single workstation or PC to start faster. | set spantree portfast mod_num/port_num {enable | disable} |
| Set the bridge priority for a port in spanning-tree algorithm. | set spantree portpri mod_num/port_num priority |
| Set the port priority for a subset of VLANs in the trunk port. | set spantree portvlanpri mod_num/port_num priority [vlans] |
| Set the bridge priority for a VLAN. | set spantree priority bridge_priority [vlan] |
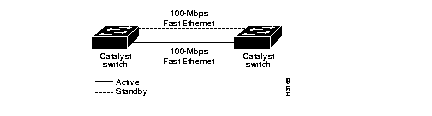
You can design fault-tolerant connections using Ethernet only or Ethernet combined with other topologies. Figure 4-1 and Figure 4-2 show fault-tolerant Fast Ethernet topologies using the Spanning-Tree Protocol.

Spanning-Tree Protocol is a link management protocol that provides path redundancy while preventing undesirable loops in the network. For an Ethernet network to function properly, only one active path must exist between two stations.
Multiple active paths between stations cause loops in the network. If a loop exists in the network topology, the potential exists for duplication of messages. When loops occur, some switches see stations appear on both sides of the switch. This condition confuses the forwarding algorithm and allows duplicate frames to be forwarded.
To provide path redundancy, Spanning-Tree Protocol defines a tree that spans all switches in an extended network. Spanning-Tree Protocol forces certain redundant data paths into a standby (blocked) state. If one network segment in the Spanning-Tree Protocol becomes unreachable, or if Spanning-Tree Protocol costs change, the spanning-tree algorithm reconfigures the spanning-tree topology and reestablishes the link by activating the standby path.
Spanning-Tree Protocol operation is transparent to end stations, which are unaware whether they are connected to a single LAN segment or a switched LAN of multiple segments.
All switches in an extended LAN participating in Spanning-Tree Protocol gather information on other switches in the network through an exchange of data messages. These messages are Bridge Protocol Data Units (BPDUs). This exchange of messages results in the following actions:
The Spanning-Tree Protocol root switch is the logical center of the spanning-tree topology in a switched network. All paths that are not needed to reach the root switch from anywhere in the switched network are placed in Spanning-Tree Protocol backup mode. Table 4-1 describes the root switch variables, that affect the entire spanning-tree performance.
| Variable | Description |
|---|---|
Hello Time | Determines how often the switch broadcasts its hello message to other switches. |
| Maximum Age Timer | Measures the age of the received protocol information recorded for a port and ensures that this information is discarded when its age limit exceeds the value to the maximum age parameter recorded by the switch. The timeout value for this timer is the maximum age parameter of the switches. |
| Forward Delay Timer | Monitors the time spent by a port in the learning and listening states. The timeout value is the forward delay parameter of the switches. |
BPDUs contain information about the transmitting switch and its ports, including switch and port Media Access Control (MAC) addresses, switch priority, port priority, and port cost. The Spanning-Tree Protocol uses this information to elect the root switch and root port for the switched network, as well as the root port and designated port for each switched segment.
Figure 4-3 shows how BDPUs enable a Spanning-Tree Protocol topology.

The stable active topology of a switched network is determined by the following:
Each configuration BPDU contains the following minimal information:
The switch sends configuration BPDUs to communicate and compute the spanning-tree topology. A MAC frame conveying a BPDU sends the switch group address to the destination address field. All switches connected to the LAN on which the frame is transmitted receive the BPDU. BPDUs are not directly forwarded by the switch, but the information contained in the frame can be used to calculate a BPDU by the receiving switch, and, if the topology changes, instigate a BPDU transmission.
A BPDU exchange results in the following:
If all switches are enabled with default settings, the switch with the lowest MAC address in the network becomes the root switch. The network in Figure 4-4 assumes that Switch A has the lowest MAC address and is therefore the root switch. However, due to traffic patterns, number of forwarding ports, or line types, Switch A might not be the ideal root switch. By increasing the priority (lowering the numerical priority number) of the ideal switch so that it then becomes the root switch, you force a Spanning-Tree Protocol recalculation to form a new, stable topology.

When the stable Spanning-Tree Protocol topology is based on default parameters, the path between source and destination stations in a switched network might not be the most ideal. For instance, connecting higher speed links to a port that has a higher number than the current root port can cause a root-port change. The point is to make the fastest link the root port.
For example, assume that Port 2 on Switch B in Figure 4-5 is a fiber-optic link, and that Port 1 on Switch B (a UTP link) is the root port. Network traffic might be more efficiently handled over the high-speed fiber-optic link. By changing the Port Priority parameter for Port 2 to a higher priority (lower numerical value) than Port 1, Port 2 becomes the root port. The same change can occur by changing the Port Cost parameter for Port 2 to a lower value than that of Port 1.

Propagation delays can occur when protocol information is passed through a switched LAN. As a result, topology changes can take place at different times and at different places in a switched network. When a switch port transitions directly from non-participation in the stable topology to the forwarding state, it can create temporary data loops. Ports must wait for new topology information to propagate through the switched LAN before starting to forward frames. They must also allow the frame lifetime to expire for frames that have been forwarded using the old topology.
Each port on a switch using Spanning-Tree Protocol exists in one of the following five states:
A port moves through these five states as follows:
Figure 4-6 illustrates how a port moves through the five states.
You can modify each port state by using management software. When Spanning-Tree Protocol is enabled, every switch in the network goes through the blocking state and the transitory states of listening and learning at power up. If properly configured, the ports then stabilize to the forwarding or blocking state.
When the spanning-tree algorithm determines that a port should be placed in the forwarding state, the following occurs:
A port in the blocking state does not participate in frame forwarding, as shown in Figure 4-7. After initialization, a BPDU is sent to each port in the switch. A switch initially assumes it is the root until it exchanges BPDUs with other switches. This exchange establishes which switch in the network is really the root. If only one switch resides in the network, no exchange occurs, the forward delay timer expires, and the ports move to the listening state. A switch always enters the blocking state following switch initialization.

A port in the blocking state performs as follows:
The listening state is the first transitional state a port enters after the blocking state, when Spanning-Tree Protocol determines that the port should participate in frame forwarding. Learning is disabled in the listening state. Figure 4-8 shows a port in the listening state.
A port in the listening state performs as follows:
A port in the learning state is preparing to participate in frame forwarding. This is the second transitional state through which a port moves in anticipation of frame forwarding. The port enters the learning state from the listening state through the operation of Spanning-Tree Protocol.
A port in the learning state performs as follows:
A port in the forwarding state forwards frames, as shown in Figure 4-9. The port enters the forwarding state from the learning state through the operation of Spanning-Tree Protocol.
A port in the forwarding state performs as follows:
 | Caution Use the immediate-forwarding (portfast) mode only on ports connected to individual workstations to allow these ports to come up and go directly to the forwarding state, rather than having to go through the entire spanning-tree initialization process. To prevent illegal topologies, enable Spanning-Tree Protocol on ports connected to switches or other devices that forward messages. |
A port in the disabled state does not participate in frame forwarding or the operation of Spanning-Tree Protocol, as shown in Figure 4-10. A port in the disabled state is virtually nonoperational.

A disabled port performs as follows:
The Catalyst 5000 series switch allows you to group end stations with a common set of requirements into logical LAN segments called virtual LANs (VLANs). For example, several end stations in different physical locations attached to different switches can be grouped as a department, such as engineering or accounting. If the end stations are located near one another, they can be grouped into a LAN segment. If any of the end stations are on a different LAN segment, which is typically located in a different building or location, they can be grouped into a VLAN.
For more information about configuring VLANs, refer to "Configuring VLANs."
Fast EtherChannel provides parallel bandwidth of up to 800 Mbps between a Catalyst 5000 series switch and another switch or host by grouping multiple Fast Ethernet interfaces into a single logical transmission path.
Fast EtherChannel segments must be contiguous ports on a Fast Ethernet line card module. You can configure Fast Ethernet ports into Fast EtherChannel groups containing two or four segments, yielding 400- or 800-Mbps bidirectional bandwidth, respectively.
Ports are automatically disabled when channeling is turned off. This prevents broadcast storms and network loops from occurring.
Inbound broadcast and multicast packets on one segment in a channel are blocked from returning on any other segment of the channel. Outbound broadcast and multicast packets are sent through only one channel segment (but are evenly distributed between segments).
If a segment within a channel fails, traffic previously carried over the failed link switches to the remaining segments within the channel. Switchover occurs within 1 second of link loss. A trap is sent upon a failure identifying the switch, the channel, and the failed link.
The Switch Port Analyzer (SPAN) feature can be used to monitor individual ports in an Ethernet channel, but not the channel as a whole.
Channels are configured using the standard CLI or Simple Network Management Protocol (SNMP).
| Caution Fast EtherChannel will not operate properly unless you disable Spanning-Tree Protocol on all channeled VLANs. To prevent loops in the connection and prevent channeled ports from being incorrectly placed in blocking and forwarding states, enable channeling on the desired ports before disabling Spanning-Tree Protocol for the VLAN to which the channeled ports belong. |
| Caution Use caution when executing the clear config module_num command on a module with channeled ports. Executing this command can create network loops. |
Fast EtherChannel can cause network loops and other problems if improperly configured. Use the following guidelines to avoid configuration problems:
To configure an Ethernet channel, perform the following steps:
| Task | Command |
|---|---|
| Step 1 Make sure that the ports you want to channel are configured correctly. (Refer to the Fast EtherChannel Configuration Guidelines earlier in this chapter.)
Step 2 Ensure a loop-free topology for all channeled VLANs. Step 3 Create an Ethernet channel. Step 4 Disable Spanning-Tree Protocol for all channeled VLANs. | set port channel port_list on set spantree disable vlan |
To remove an Ethernet channel, perform this task:
| Task | Command |
|---|---|
| Remove an Ethernet channel. | set port channel port_list off |
To verify that Fast EtherChannel is configured correctly, enter the show port channel mod_num/port_num command. After entering the show port channel command, you see this display:
Console> show port channel 4
Port   Status      Channel  Channel      Neighbor                   Neighbor
                   mode     status       device                     port
-----  ----------  -------  -----------  -------------------------  ----------
4/1    connected   on       channel      WS-C5000 012345678         5/5
4/2    connected   on       channel      WS-C5000 012345678         5/6
-----  ----------  -------  -----------  -------------------------  ----------
4/3    connected   off      not channel
4/4    connected   off      not channel
4/5    notconnect  off      not channel
4/6    notconnect  off      not channel
4/7    notconnect  off      not channel
4/8    notconnect  off      not channel
-----  ----------  -------  -----------  -------------------------  ----------
4/9    connected   on       channel      WS-C5000 987654321         3/1
4/10   connected   on       channel      WS-C5000 987654321         3/2
4/11   notconnect  on       channel
4/12   connected   on       channel      WS-C5000 987654321         3/4
-----  ----------  -------  -----------  -------------------------  ----------
When using the channel as a trunk, follow these guidelines:
The two-port supervisor engine modules that support Fast EtherChannel (model numbers WS-X5505, WS-X5506, and WS-X5509) on Catalyst 5000 series switches support a single configuration: one channel of two ports.
The 12-port 10/100BaseTX Fast EtherChannel Switching Module (model number WS-X5203) and the 12-port 100BaseFX Fast EtherChannel Switching Module (model number WS-X5201) support a number of configurations.
The 12 ports on these modules form three groups of four ports each (ports 1-4, 5-8, and 9-12). A Fast EtherChannel must be composed of contiguous ports from the same group. A channel cannot have some ports from one group and some ports from another. Each group of four ports can be channeled in any the following ways:
The Catalyst 5000 series switch increases network throughput by supporting simultaneous, parallel conversations between Ethernet segments. Switched connections between Ethernet segments last only for the duration of the packet. New connections can be made between different segments for the next packet.
The Catalyst 5000 series switch solves congestion problems caused by high bandwidth devices and a large number of users by assigning each of the devices, for example, servers, to its own 10- or 100-Mbps segment. Because each Ethernet port on the Catalyst 5000 series switch represents a separate Ethernet segment, servers in a properly configured switched environment achieve full access to the bandwidth.
Because the major bottleneck in Ethernet networks is usually due to collisions on devices, an effective solution is full-duplex communication, an option for each port on the Catalyst 5000 series switch. Normally, Ethernet operates in half-duplex communication mode, which means that stations can either receive or transmit. With full-duplex technology, two communicating stations can transmit and receive at the same time. When packets can flow in both directions simultaneously, effective Ethernet bandwidth doubles from 10 Mbps to 20 Mbps for 10BaseT ports and to 200 Mbps for Fast Ethernet ports.
Each Ethernet port on the Catalyst 5000 series switch can be connected to a single workstation or server, or to a hub through which workstations or servers connect to the network.
Ports on a typical Ethernet hub are all connected to a common backplane within the hub, and the bandwidth of the network is shared by all devices attached to the hub. If two stations establish a session that uses a significant level of bandwidth, the network performance of all other stations attached to the hub is degraded.
To reduce degradation, the Catalyst 5000 series switch treats each port as an individual segment and, when stations on different ports need to communicate, switches frames from one port to the other at wire speed. The switching ensures that each session receives the full 10 Mbps of bandwidth.
In order to switch frames between ports efficiently, the Catalyst 5000 series switch maintains an address table in hardware. When a frame enters the Catalyst 5000 series switch, it associates the MAC address of the sending station with the port on which it was received.
The Catalyst 5000 series switch builds the address table by using the source address of the frames received. When the switch receives a frame for a destination address not yet listed in its address table, it floods the frame to all ports of the same VLAN except the port that received the frame. When the destination station replies, the switch adds its relevant source address and port ID to the address table. The Catalyst 5000 series switch then forwards subsequent frames to a single port without flooding to all ports.
The address table can store at least 16,000 address entries without having to flood any entries. The Catalyst 5000 series switch uses an aging mechanism, defined by a configurable aging timer, so that, if an address remains inactive for a specified number of seconds, it is removed from the address table.
Figure 4-11 shows an example Ethernet configuration for a single Catalyst 5000 series switch. For simplicity, this example shows all devices on each module as either full duplex or half duplex. However, each port on each module can be independently configured for either full- or half-duplex operation. This example also shows a direct correlation between port speed and traffic priority, although the two parameters are completely independent.
The example configuration shown in Figure 4-11 is based on the following assumptions:
Step 1 Configure a name for the port by entering the set port name command. You see this display:
Step 2 Configure the priority level for the port by entering the set port level command. You see this display:
Step 3 Configure a name for the port by entering the port speed command. You see this display:
Step 4 Configure the transmission type of the port (half or full duplex) by entering the set port duplex command. You see this display:
To verify the Ethernet configuration, enter the show port command. After entering this command, you see a display similar to the verification example in the section "Setting the Port Name."
|
|

