|
|

Periodic maintenance includes
CiscoWorks databases are maintained by use of SMIT. Some maintenance tasks should be performed on a regular schedule, and others on an as-needed basis.
Use this SMIT utility (or /usr/nms/etc/cw_move_db) to move a Sybase database from one location to another. The move can be from the control of one Sybase server to another Sybase server on the same host or a different host, or from one directory to another under control of the same Sybase server. A local migration is a move in which the database stays under control of the same Sybase server.
A database can also be migrated from an AIX file system to a raw partition. This task must be performed as a nonlocal migration.
Before using SMIT to move a database, verify the following:
To execute this utility, use SMIT as follows on the host of the destination Sybase server:
Step 1 Log in as the root user.
For details, see "Becoming the Root User" in the chapter "Preparing to Install CiscoWorks."
Step 2 Start SMIT by entering the following at the command prompt:
smit
Step 3 On the System Management menu, select Communications Applications and Services.
Step 4 On the next menu, select Cisco Network-Management Applications for AIX.
Step 5 On the next menu, select CiscoWorks-3.0.
Step 6 On the next menu, select Maintain.
Step 7 On the next menu, select Database Utilities.
Step 8 On the next menu, select Move database.
Step 9 Respond to the prompts:
If you respond n, go to Step 10. If you respond y, go to Step 13.
Step 10 If this is not a local migration, continue here.
Enter the name and password of the Sybase server that will control the database in the destination directory. The Sybase server you enter must be on the local host:
SYBASE_DIFFERENT
password
Step 11 Enter the name of the Sybase server that currently controls the database to be moved. To accept the default CW_SYBASE, just press Return.
CW_SYBASE
Step 12 If you have entered the same name for the source and destination Sybase servers, the utility gives you the opportunity to specify that the database is to be moved from a file system to a raw partition:
Enter y or n, and then skip to Step 14.
Step 13 If this is a local migration, continue here.
Enter the name and password of the Sybase server that controls the database in the source directory and which will control the database in the destination directory. The Sybase server you enter must be on the local host:
CW_SYBASE
password
Step 14 Enter the names of the source and destination databases:
polldb
polldb2
The utility displays the values you entered and requests verification:
y
Step 15 If the values are correct, enter y or press Return.
SMIT now displays the name and size of each file involved in the selected database. For example:
y
Step 16 Enter y or press Return to continue the move process.
Step 17 For each numbered device (file) involved in the selected database, SMIT prompts you to enter the directory to which you want it moved. Be sure to move each device file in a given database to the same directory.
After you specify a directory for each file, the Sybase server assigns a new virtual device number (vdevno) to each file. If Sybase cannot assign the vdevno because they are unavailable, the entire move process fails. In this case, configure Sybase to be able to create additional vdevnos and attempt this procedure again.
Step 18 Terminate SMIT by pressing F12 or by clicking Exit SMIT on the Exit menu.
To execute this maintenance utility, use SMIT as follows:
Step 1 Log in as the root user.
For details, see "Becoming the Root User" in the chapter "Preparing to Install CiscoWorks."
Step 2 Start SMIT by entering the following at the command prompt:
smit
Step 3 On the System Management menu, select Communications Applications and Services.
Step 4 On the next menu, select Cisco Network-Management Applications for AIX.
Step 5 On the next menu, select CiscoWorks-3.0.
Step 6 On the next menu, select Maintain.
Step 7 On the next menu, select Database Utilities.
Step 8 On the next menu, select Backup database.
The Database Backup dialog appears, as shown in Figure 6-1.
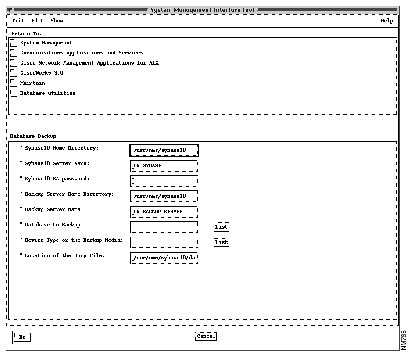
Step 9 Accept the defaults or modify each of the following fields:
Step 10 Click Do, read the output, and then click Done.
Step 11 Terminate SMIT by pressing F12 or by clicking Exit SMIT on the Exit menu.
To execute this maintenance utility, use SMIT as follows:
Step 1 Log in as the root user.
For details, see "Becoming the Root User" in the chapter "Preparing to Install CiscoWorks."
Step 2 Start SMIT by entering the following at the command prompt:
smit
Step 3 On the System Management menu, select Communications Applications and Services.
Step 4 On the next menu, select Cisco Network-Management Applications for AIX.
Step 5 On the next menu, select CiscoWorks-3.0.
Step 6 On the next menu, select Maintain.
Step 7 On the next menu, select Database Utilities.
Step 8 On the next menu, select Enlarge database.
The "Enlarge Database" dialog appears, as shown in Figure 6-2.
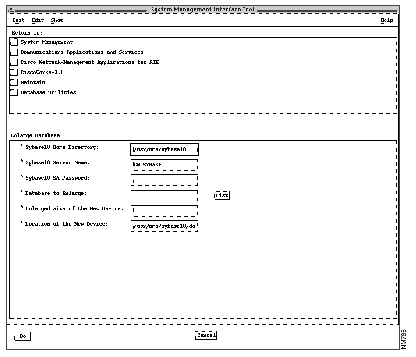
Step 9 Accept the defaults or modify each of the following fields:
Step 10 Click Do, read the output, and then click Done.
Step 11 Terminate SMIT by pressing F12 or by clicking Exit SMIT on the Exit menu.
If you must recover the master database, perform the following steps before using the SMIT-based procedure that follows. If you are recovering the nms or polldb databases, or the nms transaction log, do not perform the preliminary steps.
Perform this procedure before recovering the master database, but not before recovering any other database.
Step 1 Log in as the root user.
For details, see "Becoming the Root User" in the chapter "Preparing to Install CiscoWorks."
Step 2 Log in to the Sybase server by entering the following on the command line:
$SYBASE/bin/isql -Usa -Padmin-password
admin-password was set when you configured the Sybase server.
Step 3 Ascertain the dataserver user processes by entering:
sp-who
A list of processes is displayed. The process numbers appear in the spid column.
Step 4 Terminate each and every process by entering commands such as the following:
kill 28
kill 29
kill 32
Step 5 Log out from the dataserver:
quit
Step 6 Use SMIT to stop the Sybase dataserver. Refer to "Viewing CiscoWorks Daemons and the Sybase 10 Dataserver" in the chapter "Validating CiscoWorks Installation."
Step 7 Start the dataserver in single-user mode by entering the following on the command line:
startserver -f data_server_name -m
For example, enter:
startserver -f CW_SYBASE -m
Step 8 Go to the next procedure, "To Recover Any Database."
To recover any database, use SMIT as follows.
Step 1 Log in as the root user.
For details, see "Becoming the Root User" in the chapter "Preparing to Install CiscoWorks."
Step 2 Start SMIT by entering the following at the command prompt:
smit
Step 3 On the System Management menu, select Communications Applications and Services.
Step 4 On the next menu, select Cisco Network-Management Applications for AIX.
Step 5 On the next menu, select CiscoWorks-3.0.
Step 6 On the next menu, select Maintain.
Step 7 On the next menu, select Database Utilities.
Step 8 On the next menu, select Recover database.
The Recover Database dialog appears, as shown in Figure 6-3.
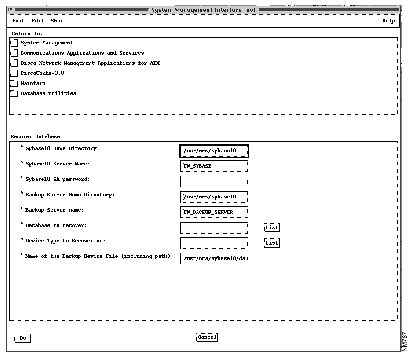
Step 9 Accept the defaults or modify each of the following fields:
Step 10 Click Do, read the output, then click Done.
Step 11 Terminate SMIT by pressing F12 or by clicking Exit SMIT on the Exit menu.
If you must de-install all files related to CiscoWorks, perform these steps:
Step 1 Log in as the root user.
For details, see "Becoming the Root User" in the chapter "Preparing to Install CiscoWorks."
Step 2 Start SMIT by entering the following at the command prompt:
smit
Step 3 On the System Management menu, select Communications Applications and Services.
Step 4 On the next menu, select Cisco Network-Management Applications for AIX.
Step 5 On the next menu, select CiscoWorks-3.0.
Step 6 On the next menu, select Maintain.
Step 7 On the next menu, select De-Install CiscoWorks 3.0.
The Deinstall dialog appears, as shown in Figure 6-4.

Step 8 In the Deinstall dialog (shown in Figure 6-4), click the "De-install" List button.
Step 9 In the Multi-select List dialog (also shown in Figure 6-4), select all five object names so that all are highlighted simultaneously, then click OK.
Step 10 In response to the "ARE YOU SURE?" prompt, click OK.
While the animated man is running, SMIT de-installs all files related to CiscoWorks.
If the man raises his hands and SMIT displays OK, the de-installation process has succeeded.
If the man falls on his face, de-installation has failed. Contact a TAC representative.
Step 11 Terminate SMIT by pressing F12 or by clicking Exit SMIT on the Exit menu.
|
|