|
|

The Cisco SwitchProbe models include Ethernet, Token Ring, Fast Ethernet, Copper Distributed Data Interface (CDDI), Fiber Distributed Data Interface (FDDI), and wide area network (WAN). This chapter contains information about the SwitchProbe models:
Refer to the appendix "Specifications" for complete physical specifications.
 | Warning Read the installation instructions before you connect the system to its power source. |
| Warning Only trained and qualified personnel should be allowed to install or replace this equipment. |
To see the warnings in multiple languages, refer to the appendix, "Translated Safety Warnings."
Figure 2-1 shows the front panel indicators and switches on the small chassis model (Ethernet, Token Ring and WAN interfaces). Figure 2-2 shows the front panel indicators and switches on the large chassis model (Fast Ethernet, FDDI, CDDI, Multiport Ethernet, or multiport WAN interfaces).
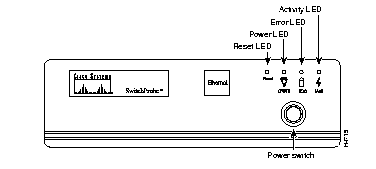
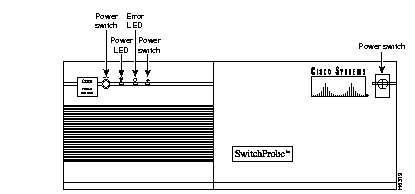
There are three LEDs on the front panel. Each LED indicates different information, as shown in Table 2-1. In SwitchProbe models with multiple interfaces, the network activity LED indicates traffic on either LAN interface.
| LED | Color | Status | Meaning |
|---|---|---|---|
| PWR | Green | On | Indicates clean power supply to the SwitchProbe device. This LED is normally on. |
| ERR | Red | Off On or blink | Indicates the SwitchProbe device is ready and working correctly.
Indicates a hardware or software error in the SwitchProbe device. |
| ACT | Amber | On
Blink Off | Indicates heavy traffic on the network.
Indicates moderate traffic on the network. Indicates no traffic on the network. |
After the system is powered up, the system undergoes a set of self-tests before it actually boots. During a normal boot-up or reset, you should see the following sequence:
Step 1 All LEDs come on at power up. System diagnostics run for about 30 seconds.
Step 2 A short beep signals that system diagnostics are complete. The agent sends status information to the user terminal, if one is connected. The error (red) and network activity (amber) LEDs turn off briefly, then display the agent status, as shown in Table 2-1.
In addition to the LEDs, there are two switches on the front panel for power and reset. Table 2-2 lists the switch functions.
| Switch | Meaning |
|---|---|
| Power | Powers up the SwitchProbe unit |
| Reset | Reboots the SwitchProbe unit |
The SwitchProbe device rear panels have multiple ports, including a power inlet, a power outlet, and a keyboard port. The power outlet and keyboard port are not used.
 | Caution To prevent damage to the SwitchProbe unit, do not use the power outlet at the back. |
| Caution Do not use the keyboard port (5-pin DIN connector) at the back of the SwitchProbe unit to connect to a keyboard or any other device; doing so might prevent the SwitchProbe device from operating. |
Each unit is equipped with an AC power cord for connection to an appropriate power source (110 to 230 VAC at 50/60 Hz). Power requirements for Ethernet and Token Ring (P6) models are 60W maximum; Fast Ethernet, FDDI, or CDDI models are 250W (P7) maximum.
| Warning Do not work on the system or connect or disconnect cables during periods of lightning activity. |
| Warning Before working on equipment that is connected to power lines, remove jewelry (including rings, necklaces, and watches). Metal objects heat up when connected to power and ground and can cause serious burns or weld the metal object to the terminals. |
| Warning To prevent the switch from overheating, do not operate it in an area that exceeds the maximum recommended ambient temperature of 104°F (40°C). To prevent airflow restriction, allow at least 3 inches (7.6 cm) of clearance around the ventilation openings. |
| Warning This product relies on the building's installation for short-circuit (overcurrent) protection. Ensure that a fuse or circuit breaker no larger than 120 VAC, 15A U.S. (240 VAC, 10A international) is used on the phase conductors (all current-carrying conductors). |
| Warning The device is designed to work with TN power systems. |
| Warning Care must be given to connecting units to the supply circuit so that wiring is not overloaded. |
| Warning A voltage mismatch can cause equipment damage and may pose a fire hazard. If the voltage indicated on the label is different from the power outlet voltage, do not connect the chassis to that receptacle. |
To see the warnings in multiple languages, refer to the appendix, "Translated Safety Warnings."
Figure 2-3 through Figure 2-12 illustrate the rear panels on SwitchProbe devices.
Figure 2-3 shows the rear panel and the indicators, switches, and ports on the Ethernet SwitchProbe model. The Ethernet card shown on the left side of the illustration is only present in the dual Ethernet SwitchProbe models.
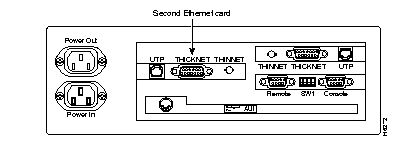
Figure 2-4 illustrates the rear panel and the indicators, switches, and ports available on the Token Ring SwitchProbe model. The Token Ring card shown on the left side of the illustration is present only in the dual Token Ring SwitchProbe model.
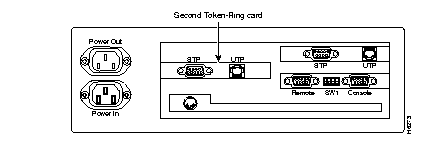
Figure 2-5 illustrates the rear panel and the indicators, switches, and ports available on Ethernet and Token Ring probes.
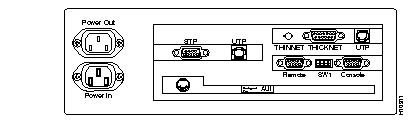
Figure 2-6 illustrates the rear panel and the indicators, switches, and ports available on the WAN and Ethernet SwitchProbe devices. On the WAN and Token Ring Switchprobe devices, the Ethernet interface is replaced by a Token Ring interface.
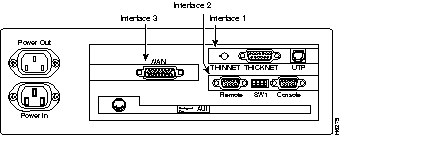
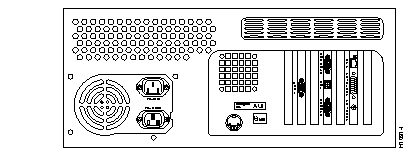
Figure 2-7 shows indicators, switches, and ports on the rear panel of the FDDI Dual Attachment Station (DAS) SwitchProbe model. The rear panel of the CDDI and FDDI single attachment station (SAS) SwitchProbe models are similar, but they have only one connector of the appropriate type on the CDDI or FDDI interface card. This figure also shows the interface cards installed. In Token-Ring configurations, the Ethernet card shown in the center of the illustration is replaced with a Token-Ring card.
Install the interface cards for the FDDI or CDDI probes as follows:
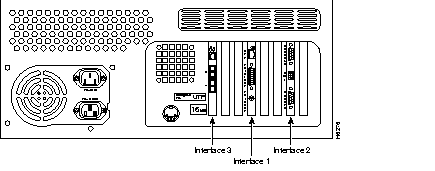
Figure 2-8 shows the Fast Ethernet Half-Duplex SwitchProbe rear panel indicators, switches, and ports available. This figure shows the interface cards installed. On the 100BaseFX SwitchProbe model, the RJ-45 connector on the Fast Ethernet interface card is replaced with a fiber-optic SC connector.
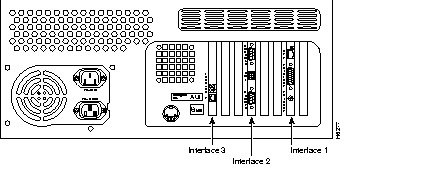
Figure 2-9 illustrates the rear panel and the indicators, switches, and ports available on the 100BaseTX Fast Ethernet full-duplex SwitchProbe model. A full-duplex SwitchProbe model has two Fast Ethernet interface cards, one for DTE and one for DCE. On a 100BaseFX SwitchProbe model, the RJ-45 connectors on the Fast Ethernet interface cards are replaced with fiber-optic SC connectors.
The interface cards for the Fast Ethernet probes are as follows:
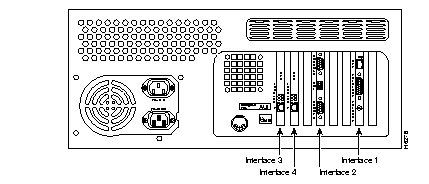
Figure 2-10 shows the indicators, switches, and ports on the rear panel of the Multiport Ethernet probes. This figure shows the 12-port Ethernet probe with three multiport Ethernet cards, each containing four UTP connectors.
The interface cards for the Multiport 10BaseT Ethernet probes are as follows:
With a multiport card in the chassis, the interface numbering begins at Interface 3 with the top port of the interface card closest to Interface 2.
Each probe interface card contains four RJ-45 connectors for 10BaseT UTP Ethernet connections. The ports on an individual card are numbered sequentially (1 to 4) starting from the top and working down the first interface card. Three multiport cards can be installed in a single probe chassis. When more than one card is installed, the numbering continues at the top port of the next interface card to the left.
Models can have 4, 8, or 12 probe Ethernet ports and a management Ethernet interface.
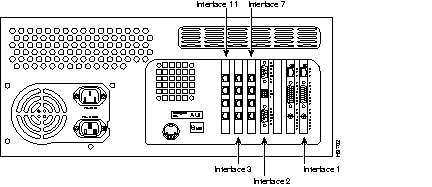
Figure 2-11 shows the indicators, switches, and ports available on the rear panel of the multiport WAN probe with four WAN interface cards. On the Token Ring models, the Ethernet interface in the second port from the left is replaced with a Token Ring interface card.
The interface cards for the Multiport WAN probes are as follows:
Additional WAN interface cards are installed to the right of Interface 2; the numbering is sequential, from left to right, starting with Interface 4.
Figure 2-11 shows the Multiport WAN with multiple WAN interface cards installed.
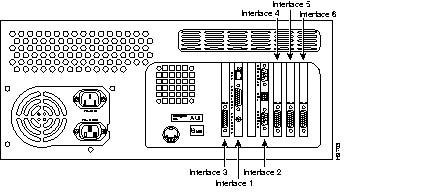
Figure 2-12 illustrates the indicators, switches, and ports available on the HSSI SwitchProbe (T3). The Ethernet model consists of an Ethernet interface, a single HSSI interface, console port, and remote port supporting SLIP protocol.
The back panel of the SwitchProbe devices has two serial ports. Each serial port is a 9-pin male D-type connector supporting EIA/TIA-232 signals. The first serial port, labeled "Console," is the configuration and debug port. While installing the SwitchProbe agent, the IP address, gateway address, and the network mask are programmed into the agent through this port by attaching to an ASCII data terminal. The ASCII data terminal is used to display debug and boot messages or to change configuration parameters. For more information about working with the SwitchProbe device and the ASCII data terminal, see the "ASCII Terminal Procedure" section in the "Installation" chapter. A modem can be attached to this port for remote debugging.
The second serial port, labeled "Remote," is the Serial Line Interface Protocol (SLIP) port. This port can be used as an additional path to communicate to a client. Table 2-3 shows the specifications for both the console and remote serial ports.
| Serial Port Item | Specification |
|---|---|
| Line rate | 9600 bps (default) |
| Line code | ASYNC |
| Line interface | EIA/TIA-232 |
| No. of bits | 8 |
| No. of stop bits | 1 |
| Parity | None |
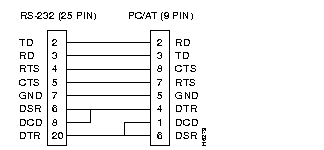
Use a null-modem cable to connect the console port to an ASCII terminal. Sample wiring is shown in Figure 2-13:
Using Switch1 (SW1) on the back panel, set the rate of the console port and the boot mode of the SwitchProbe device:
A switch at the back panel lets you set the rate of the console port and the boot mode of the probe. Switch 1 specifies whether the probe boots from FLASH or the EPROM. Switches 3 and 4 specify the console port bit rate. On the small chassis models, off is down, and on is up. On the large chassis models, off is right, and on is left. Table 2-4 shows the settings available. Default settings are shown in boldface type.
| Switch | State | Results |
|---|---|---|
| 1 | off
on | Boot from FLASH
Boot from EPROM |
| 2 | off | Reserved |
3-4 | 3 off
4 off | 1200 bps |
| 3 off
4 on | 2400 bps | |
| 3 on
4 off | 9600 bps | |
| 3 on
4 on | 19200 bps |
|
|