|
|
This chapter describes how to configure the Cisco IOS software for line, terminal, and modem connections. Cisco devices have four types of terminal lines: console, auxiliary, asynchronous, and virtual (network) lines. Different routers have different numbers of these line types. Refer to the hardware user guide shipped with your device for exact configurations.
For a complete description of the commands mentioned in this chapter, refer to the "Terminal Line and Modem Support Commands" chapter in the Access Services Command Reference.
For more information about making connections to network hosts through your router, refer to the Cisco Access Connection Guide.
This section describes the different line types available on Cisco routers. It also describes the relationship between lines and interfaces.
Table 1 presents the types of lines that can be configured on Cisco routers.
| Line Type | Port | Description | Numbering Rules |
|---|---|---|---|
| CON or CTY | Console | Typically used to log in to the router for configuration purposes. | Line 0 |
| TTY | Asynchronous | Same as asynchronous interface. Available on access server models only (Cisco 2509, 10, 11, 12, AS5100, and Cisco 1001). Used typically for remote-node dial-in sessions that use such protocols as SLIP, PPP, and XRemote. | Line n (1 through 8 [Cisco 2509, Cisco 2510] or 1 through 16 |
| AUX | Auxiliary | RS-232 DTE port used as a backup asynchronous port (TTY). Cannot be used as a second console port. | Last_TTY + 1 |
| VTY | Virtual terminal | Used for incoming Telnet, LAT, X.25 PAD, and protocol translation connections into synchronous ports (such as Ethernet and Serial interfaces) on the router. | Last_TTY + 2 through m (maximum number of VTY lines specified.1) |
This section describes the relationship between lines and interfaces on Cisco routers. It describes following functions:
Asynchronous interfaces correspond to physical terminal (TTY) lines. Commands entered in asynchronous interface mode enable you to configure protocol-specific parameters for asynchronous interfaces, while commands entered in line configuration mode permit you to configure the physical aspects of the same port.
For example, to enable IP dialin to a router, configure the lines and asynchronous interfaces as follows:
encapsulation ppp
async mode interactive
async default ip address 198.192.16.132
router igrp
network 30
enable secret mysecret
username kendra
The remote node services SLIP, PPP, and XRemote are configured in asynchronous interface mode. AppleTalk Remote Access is configured in line configuration mode on VTY or TTY lines.
For more information about configuring interfaces, refer to the chapter "Configuring Interfaces" in the Configuration Fundamentals Configuration Guide.
Virtual terminal (VTY) lines provide access to the router through a synchronous interface. VTY lines do not correspond to synchronous interfaces in a one-to-one relationship, as is the case between TTY lines and asynchronous interfaces. The reason is that VTY lines can be created dynamically on the router, whereas TTY lines are static physical ports. When a user connects to the router on a VTY line, that user is connecting into a virtual port on an interface. You can have multiple virtual ports for each synchronous interfaces.
For example, several Telnet connections can be made to an interface, such as an Ethernet or serial interface.
The number of VTY lines available on a router are defined using the line vty number-of-lines global configuration command.
For more information about the relationship between asynchronous interfaces and the AUX port, refer to the chapter "Configuring Interfaces" in the Configuration Fundamentals Configuration Guide.
Use the show line command, to see the status of each of the lines available on a router. See Figure 8.

When you enter line configuration mode, as described in the section "Enter and Exit Line Configuration Mode," you can specify an absolute line number or a relative line number. For example, in Figure 8, absolute line 20 is VTY2 (line 18 is VTY0). Referring to lines in a relative format is often easier than attempting to recall the absolute number of a line on a large system. Internally, the router uses absolute line numbers.
You can view all of the absolute and relative line numbers with the show users all EXEC command. In the following sample display, absolute line numbers are listed at the far left. Relative line numbers are in the third column, after the line type. In this example, the second virtual terminal line, line vty 1, is absolute line number 3.:
Line       User     Host(s)               Idle Location
0 con 0
1 aux 0
2 vty 0             incoming              0 SERVER.COMPANY.COM
3 vty 1
4 vty 2
5 vty 3
6 vty 4
Compare the line numbers in this sample display to the output from the show line command, as shown in Figure 8.
This section contains information to help you to configure most popular modems to work with asynchronous interfaces on Cisco routers (including the Cisco 2509, 2510, 2511, 2512, and AS5100) or with the console or auxiliary port on Cisco routers that do not have asynchronous interfaces.
When configuring TTY lines for modem support, there are a set of core commands that you should configure. These commands are performed in line configuration mode and set line speed, enable flow control on the line, and enable the modem to initiate outgoing calls or accept incoming calls.
To configure lines for modem support, perform the following steps, beginning in global configuration mode:
| Task | Command |
|---|---|
| Step 1 Specify the tty line number. Refer to Table 1 earlier in this chapter for line numbering rules. | line tty line-number |
| Step 2 Set the line speed to the highest common speed for the modem and the router port.1 | speed 115200 |
| Step 3 Set RTS/CTS flow control on the line. | flowcontrol hardware |
| Step 4 Configure the line to drop the connection when CD is lost (cycle DTR to close the connection). | modem inout |
The previous configuration parameters assume the following:
You can set many other parameters. These are simply the most common commands necessary for basic modem communications.
Bit rate information for Cisco devices is as follows:
If flow control is not available on your modem, use 9600 baud as the maximum speed.
You must ensure that a modem always communicates with the router at a set speed, regardless of the speed of any incoming modem connection. To do so, issue commands to the modem starting with "AT" to specify the speed at which you want the modem to communicate with the router.
Using AT modem commands also requires that you set the modem to lock on the data terminal equipment (DTE) speed. The following sections describe how to accomplish this task. Specifically, this section describes the following tasks:
For information about modem settings to be used in strings, refer to the appendix "Configuring Modem Support and Chat Scripts" in the Access Services Command Reference.
If possible, configure your modems by establishing a reverse connection. To make a reverse connection, issue this Telnet command from anywhere on the network that can ping x.x.x.x:
telnet x.x.x.x 20yy
where x.x.x.x is any active, connected, and up interface on the router and yy is the decimal line number to which you want to connect.
If you get a connection refused message, refer to the section "Modem Troubleshooting Tips" in the "Configuring Modem Support and Chat Scripts" appendix in the Access Services Command Reference for a likely cause and resolution.
To establish a connection to the modem, perform the following steps:
Step 1 Connect to the modem using the same speed at which the Cisco router port will be set, as described in "Configure a Reverse Connection." This ensures that you are at the same line speed as the Cisco router.
Step 2 Issue an AT command configured with the appropriate information for your modem as listed in the "Configuring Modem Support and Chat Scripts" appendix in the Access Services Command Reference.
Start with commands listed as required for all modems and then add the EC/Compression pair (either "BEST," or "NO") that best suits your need. This is the minimum that you need to start. For applications that are primarily file transfer, the "BEST" pair is advised. For connections that are primarily ARA, Xremote, or interactive packet-protocol (SLIP/PPP) traffic, the "NO" pair is advised. This is the minimum configuration required to connect the modem.
Step 3 If you have an AUX port (or no modem control), add commands listed under the column Settings for Use with AUX Port in the table "AUX and Platform Specific Settings" in the appendix "Configuring Modem Support and Chat Scripts" in the Access Services Command Reference. Remember to limit to 9600 bps if you have no flow control.
Step 4 End the string with the &W. string.
A Microcom modem with best error correction and compression is configured as follows:
AT&FS0=1&C1&D3\Q3\J0\N6%C1\Q2&W
After having configured your modem to function with the router, refer to the sections "Prepare to Configure Lines," then "Automatically Configure Modems."
The following sections describe line configuration tasks. One of the first things you will need to do for line configuration is to set up the lines for the terminals or other asynchronous devices attached to them. The parameters for each line are configured next. However, the tasks you perform and the order in which you perform them are determined entirely by the requirements of your network environment.
See the end of this chapter for configuration examples. See the Cisco IOS software command references for information about the commands listed in this chapter.
You set terminal-specific parameters in line configuration mode. Line configuration commands can configure physical terminal (TTY) lines, virtual terminal (VTY) lines, the auxiliary (AUX) port, or the console (CON) port. This section describes how to enter line configuration mode so you can configure these line types. It also describes absolute versus relative line numbers. Specifically, this section describes the following tasks:
To enter line configuration mode, perform the following task:
| Task | Command |
|---|---|
| Step 1 At the privileged EXEC prompt, enter configuration mode from the terminal. | configure1[terminal] |
| Step 2 From global configuration mode, begin to configure a line. | line [aux | console | tty | vty] line-number [ending-line-number] |
| Step 3 Enter commands listed in this chapter to configure the line. | Use the commands listed in this chapter. |
| Step 4 Exit line configuration mode and return to EXEC mode. | exit |
| Step 5 Save the configuration changes to NVRAM. | copy running-config startup-config1 |
Once a line is configured, you can check its status by entering the EXEC command show users all. To view configuration parameters before saving them to your startup configuration, enter the EXEC command show running config. To view configuration parameters after you saved them, enter the EXEC command show startup-config.
To leave line configuration mode, type exit. You can also enter another configuration mode by issuing the mode-specific command (such as interface type number).
The AUX ports sends a DTR signal only when a Telnet connection is established. To understand the differences between standard asynchronous interfaces and AUX ports configured as an asynchronous interface, refer to the table "Differences between Auxiliary (AUX) Port and Asynchronous Port" in the chapter "Configuring Interfaces" in the Configuration Fundamentals Configuration Guide. To enable the auxiliary port, perform the following task:
| Task | Command |
|---|---|
| Enable the auxiliary serial DTE port. | line aux line-number |
You cannot use the auxiliary port as a second console port. You must order a special cable from your technical support personnel for use with this auxiliary port.
The Cisco IOS software permits you to create as many virtual terminal (VTY) lines as you need. To understand what a VTY line is, refer to the section "Cisco Line and Interface Paradigm" earlier in this chapter.
The line vty command accepts a line number larger than 5 (up to the maximum allowed on a router platform with its current configuration). The Cisco IOS software dynamically creates all of the new virtual terminal lines between the current highest-numbered line and the number that you specify with the line vty command. You can then configure those lines with additional line configuration commands.
See the section "Creating Additional Virtual Terminal Lines Example" at the end of this chapter for an example of how to add virtual terminal lines.
To delete virtual terminal lines, perform the following task:
| Task | Command |
|---|---|
| Step 1 At the privileged EXEC prompt, enter configuration mode from the terminal. | configure1 terminal |
| Step 2 From global configuration mode, delete virtual terminal lines. | no line vty line-number |
The Cisco IOS software deletes the line number and all virtual terminal line numbers above that number.
You cannot delete virtual terminal lines that are in use; attempting to do so results in a warning message. Virtual terminal lines should be deleted on an idle system only. See the section "Eliminating Virtual Terminal Lines Example" at the end of this chapter for an example of how to eliminate virtual terminal lines.
The tasks in this section describe how to automatically configure your modem to communicate with your route. You can also manually create modem scripts (chat scripts). For more information, refer to the later section "Configure Chat Scripts for Asynchronous Lines."
The Cisco IOS software contains a database of modem capabilities for most of the popular modems. Consequently, you can configure a router to automatically attempt to discover what kind of modem is connected to the line and then to configure that modem. As long as your particular modem is in the database, the modem autoconfigure discovery command will identify it. To automatically discover the modem, perform the following task in line configuration mode:
| Task | Command |
|---|---|
| Discover the type of modem attached to your router. | modem autoconfigure discovery terminal |
After you discover what kind of modem is connected to the router, you can configure that modem automatically. To direct a line to attempt to configure the attached modem, use the modem autoconfigure type command. To automatically configure the modem, perform the following task in line configuration mode:
| Task | Command |
|---|---|
| Automatically configure the modem. | modem autoconfigure type |
To display the list of modems for which the router has entries, perform the following task in EXEC mode.
| Task | Command |
|---|---|
| Display the list of modems for which the router has entries. | show modemcap modem-name |
You can change a modem value that was returned from the show modemcap command. For example, you might want to add the factory default, &F, entry to the configuration file. To change the values in a modem setting, perform the following task in line configuration mode:
| Task | Command |
|---|---|
| Change a modem value that was returned from the show modemcap command. | modemcap edit attribute value |
Configure one attribute of one modem at a time. See the modem-capability values as defined by the show modemcap command.
By default, the Cisco IOS software starts an EXEC process on all lines; however, you can control EXEC processes, as follows:
| Task | Command |
|---|---|
| Turn on EXEC processes. | exec |
| Set the idle terminal timeout interval. | exec-timeout minutes [seconds] |
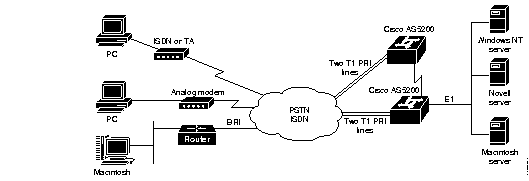
The Cisco AS5200 supports the needs of the following users who access network resources with digital and analog calls:
Figure 1 shows how the AS5200 services these types of users.
You can configure asynchronous services with the Cisco AS5200 using the Cisco IOS software. To access, monitor, test, and manage integrated modems, perform the tasks in the following sections:
The Cisco AS5200 contains integrated V.34 modems that are manageable (also known as select) or nonmanageable (also known as reliable). Each manageable modem has one out-of-band port, which is used for polling modem statistics and creating a directly connected session for transmitting attention (AT) commands. Nonmanageable modems do not have out-of-band ports. As you use this document, note which commands apply to manageable versus nonmanageable modems.
Incoming ISDN and analog calls access the AS5200 through the dual T1 PRI interfaces. Unlike digital calls, incoming analog calls are first terminated and then converted to digital data at the modem card.
Each TTY line is directly mapped to an integrated AS5200 modem as shown in Table 1. The TTY lines 1 through 24 directly connect to modems 1/0 through 1/23, which are installed in the first chassis slot. The TTY lines 25 through 48 directly connect to modems 2/0 through 2/23, which are installed in the second chassis slot.
| TTY Line | Slot/ Modem Port Number | TTY Line | Slot/ Modem Port Number |
|---|---|---|---|
| 1 | 1/0 | 25 | 2/0 |
| 2 | 1/1 | 26 | 2/1 |
| 3 | 1/2 | 27 | 2/2 |
| 4 | 1/3 | 28 | 2/3 |
| 5 | 1/4 | 29 | 2/4 |
| 6 | 1/5 | 30 | 2/5 |
| 7 | 1/6 | 31 | 2/6 |
| 8 | 1/7 | 32 | 2/7 |
| 9 | 1/8 | 33 | 2/8 |
| 10 | 1/9 | 34 | 2/9 |
| 11 | 1/10 | 35 | 2/10 |
| 12 | 1/11 | 36 | 2/11 |
| 13 | 1/12 | 37 | 2/12 |
| 14 | 1/13 | 38 | 2/13 |
| 15 | 1/14 | 39 | 2/14 |
| 16 | 1/15 | 40 | 2/15 |
| 17 | 1/16 | 41 | 2/16 |
| 18 | 1/17 | 42 | 2/17 |
| 19 | 1/18 | 43 | 2/18 |
| 20 | 1/19 | 44 | 2/19 |
| 21 | 1/20 | 45 | 2/20 |
| 22 | 1/21 | 46 | 2/21 |
| 23 | 1/22 | 47 | 2/22 |
| 24 | 1/23 | 48 | 2/23 |
The following example shows TTY line 3 directly connected to modem 1/2, which is the third modem port in the first chassis slot:
AS5200# show modem 1/2
Mdm Typ  Status   Tx/Rx       G  Duration  TX  RX  RTS  CTS  DSR  DCD  DTR
1/2 VFC  Bad*    19200/19200  0  00:17:11   x   x   x    x    x    x    x
Modem 1/2, AS5200 Manageable Modem, TTY3
Firmware (Boot) Rev: 1.0.23(1.0.5)
Modem config: Incoming and Outgoing
Protocol: Normal, Compression: None
Management config: status and AT session polling
TX signals: -17 dBm, RX signals: -33 dBm
    0 incoming completes, 0 incoming failures,
    0 outgoing completes, 0 outgoing failures,
    0 failed dial attempts, 0 ring no answers, 0 busied outs
    0 no dial tones, 0 dial timeouts, 0 watchdog timeouts
    0 no carriers, 0 link failures, 1 resets
    0 protocol timeouts, 0 protocol errors, 0 lost events
                     2400-      2400-14400     14400+
# of connections         0               0          0
Mdm Typ  Status   Tx/Rx       G  Duration  TX  RX  RTS  CTS  DSR  DCD  DTR
You can view various modem statistics and configure modem events using the Cisco IOS software with the Cisco AS5200.
To show modem performance statistics, perform the following tasks in EXEC mode:
| Task | Command |
|---|---|
Show various performance statistics for a modem or group of modems. | show modem [slot/modem-port | group number] |
Show the call switching module status for a modem or group of modems. | show modem csm [slot/modem-port | group number] |
| Show the event log status for a modem or group of modems. | show modem log [slot/modem-port | group number]1 |
| Display the cumulative system statistics for all modems installed in the access server. | show modem summary1 |
| Display all directly connected AT sessions active on the access server. | show modem at-mode1 |
To create an asynchronous interface and use it as a group interface associated with a group of modems, refer to the "Configuring Interfaces" chapter in the Configuration Fundamentals Configuration Guide.
To set the maximum amount of time the call switching module waits for a local modem to respond to a request before it is considered locked in a suspended state, perform the following task in global configuration mode:
| Task | Command |
|---|---|
| Set maximum time local modems will wait for a response. The default is 5 minutes. | modem recovery-time minutes |
This command does not apply to nonmanageable modems.
After the call switching module resets a suspended modem, the module recovers to a default call switching module state.
To configure the size of the history event queue buffer for manageable modems in the access server, perform the following task in global configuration mode:
| Task | Command |
|---|---|
| Define the number of modem events that each modem is able to store. The default is 100 events for each modem. | modem buffer-size number |
This command does not apply to nonmanageable modems.
Use the show modem log command to view modem events.
This section describes how to troubleshoot the integrated modems and remove them from dial-up connection services.
To perform diagnostic testing on all the installed modems during the system's initial power-up or rebooting process, perform the following task in global configuration mode:
| Task | Command |
|---|---|
| Perform diagnostic testing for all modems. | modem startup-test |
The results of the modem startup test are displayed in the Status column of the show modem command's output. Modems that pass the diagnostic test are marked as Idle, Busy, Downloading, and Reset. Modems that fail the diagnostic test are marked as Bad*. These modems cannot be used for call connections. Depending on how many modems are installed, this diagnostic test may take from 5 to 15 minutes to complete.
Perform additional testing on an inoperative modem by executing the test modem back-to-back command. The no modem startup-test command disables startup testing.
See the "AS5200 Configuration Examples" section for the "Modem Startup Test Example."
Perform additional testing on a modem suspected of being inoperable by conducting a series of internal back-to-back connections and data transfers between two modems. All modem test connections occur inside the access server. For example, if mobile users cannot dial into modem 2/5, which is the sixth modem port on the modem board in the second chassis slot, attempt a back-to-back test with modem 2/5 and a known functioning modem such as modem 2/6.
Use the following command in EXEC mode to perform internal back-to-back modem tests between two modems:
| Task | Command |
|---|---|
| Perform internal back-to-back modem tests between two modems. | test modem back-to-back first-slot/modem-number second-slot/modem-number |
You might need to enable this command on several different combinations of modems to determine which one is not functioning properly. A pair of operable modems successfully connect and complete transmitting data in both directions. An operable modem and an inoperable modem do not successfully connect with each other.
See the "AS5200 Configuration Examples" section for the "Back-to-Back Modem Test Example."
To remove modems from service and indicate them as suspected or proven to be inoperable, perform the following task in line configuration mode:
| Task | Command |
|---|---|
| Specify a modem as inoperable. | modem bad |
If you mark a single modem as inoperable using this command, it appears as Bad--without the asterisk (*)--in the Status column of the show modem command's output for that particular modem. A modem marked inoperable by the modem startup-test command appears as Bad* in the show modem command output for that particular modem. Use the no modem bad command to unmark a modem as Bad* or Bad and restore it for dial-up connection services.
See the "AS5200 Configuration Examples" section for the "Inoperable Modem Example."
To reset and isolate the modem hardware for extensive troubleshooting, perform the following task in line configuration mode:
| Task | Command |
|---|---|
| Reset and isolate the modem hardware. | modem hold-reset |
Use this command if you are experiencing extreme modem behavior (for example, if the modem is uncontrollably dialing into the network). This command prevents the modem from establishing software relationships such as those created by the test back-to-back modem command and the modem startup-test command. The modem is unusable while the modem hold-reset command is configured.
This command is also used to reset a modem that is frozen in a suspended state. Disable the suspended modem with the modem hold-reset command, and then restart hardware initialization with the no modem hold-reset command.
A modem decommissioned by the modem hold-reset command does not accept modem firmware upgrades using the copy modem command.
See the "AS5200 Configuration Examples" section for the "Hold and Reset Modem Example."
To disable modems from dialing or answering calls, perform one of the following tasks in line configuration mode:
| Task | Command |
|---|---|
| Gracefully disable a modem from dial-up services. | modem busyout |
| Abruptly shut down a modem from dial-up services. | modem shutdown |
The modem busyout command is not executed until the active modem is idle. No active connections are interrupted when you use this command. In contrast, the modem shutdown command immediately terminates all active connections on the specified modem. The resulting modem status for both these commands is the same.
Enable the no form of these commands to restore a modem for dial-up services.
You can still configure the following commands on a disabled modem:
See the "AS5200 Configuration Examples" section for the "Disable Modem Examples."
To debug a modem or group of modems, perform the following tasks in EXEC mode:
Use the debug modem command to do the following:
To create an asynchronous interface and use it as a group interface associated with a group of modems, refer to the "Configuring Interfaces" chapter in the Configuration Fundamentals Configuration Guide.
See the "AS5200 Configuration Examples" section for the "Debug Modem Example."
Each AS5200 manageable modem has one out-of-band port, which is used to poll modem statistics and transmit AT commands. The Cisco IOS software uses a directly connected session to transfer information to an out-of-band port. To transfer AT commands, you must permit a directly connected session on a modem, open a directly connected session and send AT commands to a modem, and clear a directly connected session from a modem.
To permit a manageable modem to accept a directly connected session, which is enabled by default on all modems, perform the following task in line configuration mode:
| Task | Command |
|---|---|
| Permit a modem to accept a directly connected session. | modem at-mode-permit |
The no modem at-mode-permit command disables a modem from accepting a direct connection, which is useful for ensuring modem security.
See the "AS5200 Configuration Examples" section for the "Directly Connected Session Example."
To open a directly connected session and enable AT command mode, which is needed to transmit to a manageable modem, perform the following command in EXEC mode:
| Task | Command |
|---|---|
| Open a directly connected session and enter AT command mode. | modem at-mode slot/modem-port |
Once you enable this command, you can transmit AT commands directly from your terminal session. Most incoming or outgoing calls on the modem are not interrupted when you open a directly connected session and transmit AT commands. However, some AT commands interrupt a call--for example, the ATH AT command, which hangs up a call.
Open and close one directly connected session at a time. Multiple open directly connect sessions slow down modem performance.
Refer to the 12-Port Modem AT Command Set and Register Summary publication (part of the AS5200 documentation set) for a complete list of AT commands that you can transmit.
See the "AS5200 Configuration Examples" section for the "Transmit AT Command Example."
You can clear or terminate an active directly connected session in two ways:
See the "AS5200 Configuration Examples" section for the "Clear Session from a Second Telnet Session Example."
Each manageable modem has one out-of-band port, which is used for polling modem statistics.
To set the time interval between the polls that are sent to the local modems for reporting modem status and statistics, perform the following task in global configuration mode:
| Task | Command |
|---|---|
| Specify the number of seconds between polls. The default is 12 seconds.The configuration range is 2 to 120 seconds. | modem poll time seconds |
See the "AS5200 Configuration Examples" section for the "Time Interval Example."
To poll for a modem's status and statistics through its out-of-band port, perform the following task in line configuration mode:
| Task | Command |
|---|---|
| Poll for a modem's status and statistics. | modem status-poll |
The no modem status-poll command disables status polling through the out-of-band port for a specified modem.
See the "AS5200 Configuration Examples" section for the "Modem Polling Example."
To set the maximum number of polling attempts used to retrieve a local modem's status or statistics, perform the following task in global configuration mode:
| Task | Command |
|---|---|
| Set maximum number of polling attempts. The default is three polling attempts. The configuration range is from 0 to 10 attempts. | modem poll retry number |
If the number of attempts to retrieve modem status or statistics exceeds the number you define, the out-of-band port is removed from operation. In this case, you must reset the modem hardware using the clear modem command.
See the "AS5200 Configuration Examples" section for the "Polling Attempts Example."
To download firmware to modems in the access server, perform one of the following tasks in EXEC mode:
After you enter a command, you are prompted for the download destination, the remote host name, and the path leading to the source modem firmware as requested by the system software.
If a modem that you wish to upgrade is busy with a call when the copy modem command is enabled, the upgrade for that modem yields until the active call is dropped. All other idle modems in the upgrade range proceed with the downloading operation.
See the "AS5200 Configuration Examples" section for the "Download Firmware Examples."
In line configuration mode, you can set terminal operation characteristics that will be in operation for that line until the next time you change the line parameters. Alternatively, you can change the line settings temporarily with the terminal EXEC commands described in the Cisco Access Connection Guide.
The most commonly used terminal operation characteristics are described in the following sections:
Use the transport preferred command to specify a preferred protocol to be used on connections. Use the transport input and transport output commands to explicitly specify the protocols allowed on individual lines for both incoming and outgoing connections.
 | Caution Cisco routers do not accept incoming network connections to asynchronous ports (TTY lines) by default. You have to specify an incoming transport protocol, or specify transport input all before the line will accept incoming connections. For example, if you are using your router as a terminal server to make console-port connections to routers or other devices, you will not be able to use Telnet to connect to these devices. You will receive the message "Connection Refused." This behavior is new as of Cisco IOS Software release 11.1. Previous to release 11.1, the default was transport input all. If you are upgrading to Cisco IOS software version 11.1(1) or later from Cisco IOS Software release 11.0 or earlier, you must add the transport input {protocol | all} command, or you will be locked out of your router. |
The process of using Telnet to make a connection out of an asynchronous port is referred to as reverse Telnet. For more information, refer to the section "Configure a Reverse Connection" earlier in this chapter.
For routers that support LAT, the default protocol for outgoing connections is LAT. For those that do not support LAT, the default protocol for outgoing connections is Telnet. For incoming connections, all the supported network protocols are accepted (the default is none).
Perform one or more of the following tasks in line configuration mode to specify transport protocols:
| Task | Command |
|---|---|
| Define which protocols can be used to connect to a specific line. | transport input {all | lat | mop | nasi | none | pad | rlogin | telnet | v120} |
| Determine the protocols that can be used for outgoing connections from a line. | transport output {all | lat | mop | nasi | none | pad | rlogin | telnet | v120} |
| Specify the protocol for the router to use if the user did not specify a protocol. | transport preferred {all | lat | mop | nasi | none | pad | rlogin | telnet | v120} |
| Prevent errant connection attempts. | transport preferred none |
The system accepts a host name entry at the EXEC system prompt as a Telnet command. If you enter the host name incorrectly, the system interprets the entry as an incorrect Telnet command and provides an error message indicating that the host does not exist. The transport preferred none command disables this option so that if you enter a command incorrectly at the EXEC prompt, the system will not attempt to make a Telnet connection.
The setting preferred transport specifies a search order when attempting to resolve names that might be valid for multiple protocols. If the address or service does not match the preferred protocol, all other valid output protocols are searched to find a valid match.
To change the default privilege level for a given line or a group of lines, perform the following task in line configuration mode:
| Task | Command |
|---|---|
| Specify a default privilege level for a line. | privilege level level 1 |
You can enable password checking on a particular line so that the user is prompted to enter a password at the system login screen. You must then also specify a password. To do so, perform the following tasks in line configuration mode:
| Task | Command |
|---|---|
| Step 1 Enable password checking on a per-line basis using the password specified with the password command. | login |
| Step 2 Assign a password to a particular line. | password password |
You can enable password checking on a per-user basis, in which case authentication is based on the username specified with the username global configuration command (see the "Managing the System" chapter in the Configuration Fundamentals Configuration Guide). To enable password checking on a per-user basis, perform one of the following tasks in line configuration mode:
| Task | Command |
|---|---|
| Enable password checking on a per-user basis using the username and password specified with the username global configuration command. | login local |
| Select the TACACS-style user ID and password-checking mechanism. | login tacacs or login authentication {default | list-name} |
Use the login tacacs command with TACACS and Extended TACACS. Use the login authentication command with AAA/TACACS+.
By default, virtual terminals require passwords. If you do not set a password for a virtual terminal, it will respond to attempted connections by displaying an error message and closing the connection. Use the no login command to disable this function and allow connections without a password.
For other access control tasks and password restrictions, including the enable password global configuration command that restricts access to privileged mode, see the "Managing the System" chapter in the Configuration Fundamentals Configuration Guide.
The Cisco IOS software supplies the following default serial communication parameters for terminal and other serial device operation:
You can change these parameters as necessary to meet the requirements of the terminal or host to which you are attached. To do so, perform one or more of the following tasks in line configuration mode:
| Task | Command |
|---|---|
| Set the line speed. Choose from line speed, transmit speed, or receive speed. | speed bps txspeed bps rxspeed bps |
| Set the data bits. | databits {5 | 6 | 7 | 8} |
| Set the stop bits. | stopbits {1 | 1.5 | 2} |
| Set the parity bit. | parity {none | even | odd | space | mark} |
You can define or modify the default key sequences to execute functions for system escape, terminal activation, disconnect, and terminal pause. To define or change the default sequence, perform one or more of the following tasks in line configuration mode:
| Task | Command |
|---|---|
| Change the system escape sequence. The escape sequence indicates that the codes that follow have special meaning. The default sequence is Ctrl-^. | escape-character ascii-number |
| Define a session activation sequence or character. Typing this sequence at a vacant terminal begins a terminal session. The default key is Return. | activation-character ascii-number |
| Define the session disconnect sequence or character. Typing this sequence at a terminal ends the session with the router. There is no default sequence. | disconnect-character ascii-number |
| Define the hold sequence or character that causes output to the terminal screen to pause. There is no default sequence. To continue the output, type any character after the hold character. To use the hold character in normal communications, precede it with the escape character. | hold-character ascii-number |
You can reinstate the default value for the escape character or activation character by using the no form of the command. For example, issuing the no escape-character line configuration command returns the escape character to Ctrl-^.
Data transparency enables the Cisco IOS to pass data on a terminal connection without the data being interpreted as a control character.
During terminal operations, some characters are reserved for special functions. For example, ^^x suspends a session. When transferring files over a terminal connection (using the zmodem or kermit protocols, for example), you must suspend the recognition of these special characters to allow a successful file transfer. This process is called data transparency.
Also, the classic U.S. ASCII character set is limited to 7 bits (128 characters) which adequately represents most displays in the U.S. Most defaults on the box work best on a 7-bit path. However, international character sets and special symbol display can require an 8-bit wide path and other handling. The section on international character sets helps you work from the defaults to a workable configuration for you international terminal and location.
You can set a line to act as a transparent pipe so that programs such as Kermit, XMODEM, or CrossTalk can download a file across a terminal line. To temporarily configure a line to act as a pipe for file transfers, perform the following task in EXEC mode:
| Task | Command |
|---|---|
| Set up the terminal line to act as a transparent pipe for file transfers. | terminal download1 |
The terminal download command is equivalent to entering all the following commands:
You can use a 7-bit character set (such as ASCII) or you can enable a full 8-bit international character set (such as ISO 8859) to allow special graphical and international characters for use in banners and prompts, and to add special characters such as software flow control. These settings can be configured globally, by interface, and locally at the user level. Use the following criteria for determining which configuration mode to use to set up this feature:
command.
To specify a character set on a global basis, perform one or both of the following tasks in global configuration mode:
| Task | Command |
|---|---|
| Specify the character set used in EXEC and configuration command characters. | default-value exec-character-bits {7 | 8} |
| Specify the character set used in special characters such as software flow control, hold, escape, and disconnect characters. | default-value special-character-bits {7 | 8} |
To specify a character set based on hardware, software, or on a per-line basis, perform the appropriate task in line configuration mode, as follows:
| Task | Command |
|---|---|
| Set the number of databits per character that are generated and interpreted by hardware. | databits {5 | 6 | 7 | 8} |
| Set the number of databits per character that are generated and interpreted by software. | data-character-bits {7 | 8} |
| Specify the character set used in EXEC and configuration command characters on a per-line basis. | exec-character-bits {7 | 8} |
| Specify the character set used in special characters such as software flow control, hold, escape, and disconnect characters on per-line basis. | special-character-bits {7 | 8} |
You might need to control terminal sessions in high-traffic areas to provide resources for all users. You can define the following limitations for terminal sessions:
| Task | Command |
|---|---|
| Set the maximum number of simultaneous sessions. | session-limit session-number1 |
| Set the idle session timeout interval.
or Set the absolute timeout interval. | session-timeout minutes [output]
or absolute-timeout minutes |
| Warn users of impending timeouts set with the absolute-timeout command. | logout-warning [seconds] |
To switch between two or more active terminal sessions, return to user EXEC command mode and type the session number you want to access using the resume command.
To disable enhanced editing mode and revert to the editing mode of previous software releases, perform the following task in line configuration mode:
| Task | Command |
|---|---|
| Disable the enhanced editing features for a particular line. | no editing1 |
You might disable enhanced editing if you have prebuilt scripts, for example, that conflict when enhanced editing is enabled. You can reenable enhanced editing mode with the editing command.
You can record the location of a serial device. The text provided for the location appears in the output of the EXEC monitoring commands.
| Task | Command |
|---|---|
| Record the location of a serial device. | location text |
If you attempt to connect to a remote device, such as a printer, and the device is busy, the connection attempt is placed in a terminal port queue. If the retry interval is set too high, and several routers or other devices are connected to the remote device, your connection attempt can have long delays. To change the retry interval for a terminal port queue, perform the following task in global configuration mode:
| Task | Command |
|---|---|
| Change the retry interval for a terminal port queue. | terminal-queue entry-retry-interval interval |
This section describes the following less commonly used terminal operating characteristics:
You can change the character padding on a specific output character. Character padding adds a number of null bytes to the end of the string and can be used to make a string an expected length for conformity. To set character padding, perform the following task in line configuration mode:
| Task | Command |
|---|---|
| Set padding on a specific output character for the specified line. | padding ascii-number count |
You can enable a terminal-locking mechanism that allows a terminal to be temporarily locked by performing the following task in global configuration mode:
| Task | Command |
|---|---|
| Enable a temporary terminal locking mechanism. | lockable |
After you configure the line as lockable, you must still issue the lock EXEC command to lock the keyboard.
You can specify the type of terminal connected to a line. This feature has two benefits: it provides a record of the type of terminal attached to a line, and it can be used in Telnet terminal negotiations to inform the remote host of the terminal type for display management. To specify the terminal type, perform the following task in line configuration mode:
| Task | Command |
|---|---|
| Specify the terminal type. | terminal-type terminal-name |
This feature is used by TN3270 to identify the keymap and ttycap passed by the telnet protocol to the end host.
You can configure a terminal to detect the baud rate being used over an asynchronous serial line automatically. To set up automatic baud detection, perform the following task in line configuration mode:
| Task | Command |
|---|---|
| Set the terminal to automatically detect the baud rate. | autobaud |
To start communications using automatic baud detection, type multiple Returns at the terminal. A 600-, 1800-, or 19200-baud line requires three Returns to detect the baud rate. A line at any other baud rate requires only two Returns. If you type extra Returns after the baud rate is detected, the EXEC simply displays another system prompt.
By default, the Cisco IOS software provides a screen display of 24 lines by 80 characters. You can change these values if they do not meet your terminal's requirements. The values you set are passed during Rsh and Rlogin sessions. Perform the following tasks in line configuration mode:
| Task | Command |
|---|---|
| Set the screen length. | length screen-length |
| Set the screen width. | width characters |
The values set can be learned by some host systems that use this type of information in terminal negotiation. To disable pausing between screens of output, set the screen length to a zero.
You can provide the host name, line number, and location of the host each time an EXEC session is started or an incoming connection is made. The line number banner appears immediately after the EXEC banner or incoming banner. This feature is useful for tracking problems with modems because it lists the host and line for the modem connection. Modem type information is also included if applicable.
To provide service line number information, perform the following task in global configuration mode:
| Task | Command |
|---|---|
| Provide service line number information after the EXEC or incoming banner. | service linenumber |
You can configure the Cisco IOS software to save local parameters set with EXEC terminal commands between sessions. This ensures that the parameters the user sets will remain in effect between terminal sessions. This function is useful for servers in private offices. By default, user-set parameters are cleared when the session ends.
| Task | Command |
|---|---|
| Save local settings between sessions. | private |
By default, user-set terminal parameters are cleared with the EXEC command exit or when the interval set with the exec-timeout line configuration command has passed.
You can set up a terminal line to appear as an insecure dial-up line. The information is used by the LAT software, which reports such dial-up connections to remote systems.
| Task | Command |
|---|---|
| Set the line as a dial-up line. | insecure |
In the previous releases of Cisco IOS software, any line that used modem control was reported as dial-up connection through the LAT protocol; this feature allows more direct control of your line.
You can set up a line to inform a user who has multiple, concurrent Telnet connections when output is pending on a connection other than the current one.
| Task | Command |
|---|---|
| Set up a line to notify a user of pending output. | notify |
This task performs the same function on a line as the local EXEC command terminal notify. See the Access Services Command Reference for more information about this command.
The Cisco IOS software supports dispatch sequences and TCP state machines that transmit data packets upon receipt of the defined character or sequence of characters. You can set up dispatch characters that allow packets to be buffered, then transmitted upon receipt of a character. You can set up a state machine that allows packets to be buffered then transmitted upon receipt of a sequence of characters. This allows for packet transmission by pressing a function key, which is typically defined as a sequence of characters, such as "Esc I C."
State machines allow control of TCP processes based upon a set of inputs. The current state of the device determines what will happen next given an expected input. The state-machine commands configure the server to search for and recognize a particular sequence of characters, then cycle through a set of states. The user defines these states--up to eight states can be defined. (Think of each state as a task that the server performs based upon the assigned configuration commands and the type of information received.)
The Cisco IOS software supports user-specified state machines for determining whether data from an asynchronous port should be sent to the network. This is an extension of the concept of the dispatch character and allows, for example, the equivalent of multicharacter dispatch strings.
Up to eight states can be set up for the state machine. Data packets are buffered until the appropriate character or sequence triggers the transmission. Delay and timer metrics allow for more efficient use of system resources. Characters defined in the TCP state machine take precedence over those defined for a dispatch character.
Perform the following tasks, as needed, for your particular system needs.
| Task | Command |
|---|---|
| Specify the transition criteria for the states in a TCP state machine. | state-machine name state firstchar lastchar [nextstate | transmit] |
| Specify the state machine for TCP packet dispatch. | dispatch-machine name |
| Define a character that triggers packet transmission. | dispatch-character ASCII-number [ASCII-number2 . . . ASCII-number] |
| Set the dispatch timer. | dispatch-timeout milliseconds |
Dial-up modems that operate over normal dial-up telephone lines at speeds of 28800 bits per second and higher are now available. These modems do not operate at a guaranteed throughput; instead, they operate at a speed dependent on the quality of the line, the effectiveness of data compression algorithms of the transmitted data, and other variables. These modems use hardware flow control to stop the data from reaching the host by toggling an RS-232 signal when they cannot accept any more.
In addition to hardware flow control, dial-up modems require special software handling. For example, they must be configured to create an EXEC session when a user dials in and to hang up when the user exits the EXEC. These modems must also be configured to close any existing network connections if the telephone line hangs up in the middle of a session.
You can set both hardware and software flow control between the router and devices attached to it. Both types of flow control are bidirectional. When you specify the software flow control option, an additional keyword specifies the direction: in causes the router to listen to flow control from the attached device, and out causes the router to send flow control information to the attached device. If you do not specify a direction, the router enables software flow control in both directions.
For software flow control, the default stop and start characters are Ctrl-S and Ctrl-Q (XOFF and XON), respectively. However, you can define other characters or character sequences to signal the start and end of data transmission when software flow control is in effect. This capability is useful for providing control of data over an asynchronous serial line.
You can also specify hardware flow control. For information about setting up the RS-232 line, see the hardware installation and maintenance manual for your product.
To configure flow control between the router and attached device, perform one or more of the following tasks in line configuration mode:
| Task | Command |
|---|---|
| Set the terminal flow control. | flowcontrol {none | software [in | out] | hardware [in | out]} 1 |
| (Optional.) In EXEC mode, display informational messages about modem control events, such as signal transitions and autobaud progress, on the console terminal. | debug modem (See the Debug Command Reference.) |
| (Optional.) In EXEC mode, display the status of a line. In the detailed command output, a status line with "Idle" identifies inactive modem dialin lines and all other modem lines; a status line with "Ready" identifies lines in use. | show line2 |
| Set the flow control start character. | start-character ascii-number3 |
| Set the flow control stop character. | stop-character ascii-number1 |
To configure the Cisco IOS software to allow an AppleTalk Remote Access (ARA), Point-to-Point Protocol (PPP), or Serial Line Internet Protocol (SLIP) session to start automatically, perform the following task in line configuration mode:
| Task | Command |
|---|---|
| Configure a line to automatically start an ARA, PPP or SLIP session. | autoselect {arap | ppp | slip | during login} |
The autoselect command permits the router to allow an appropriate process to start automatically when a starting character is received. The Cisco IOS software detects either a Return character, which is the start character for an EXEC session, or the start character for the ARA protocol.
The autoselect command bypasses the login prompt and enables the specified session to begin automatically. However, by entering the command with the during login argument, the username or password prompt appears without pressing the Return key. While the username or password name is displayed, you can choose either to answer these prompts or to send packets from an autoselected protocol. Refer to the end of this chapter for line configuration examples.
You can set up a command to execute automatically when the router connects to another host. The Cisco IOS allows any appropriate EXEC command and any switch or host name that occurs with the EXEC command. To define a command, perform the following task in line configuration mode:
| Task | Command |
|---|---|
| Define a command to be automatically executed. | autocommand command |
Connections to an individual line are most useful when a dial-out modem, parallel printer, or serial printer is attached to that line. To connect to an individual line, the remote host or terminal must specify a particular TCP port on the router. If Telnet protocols are required, that port is 2000 (decimal) plus the decimal value of the line number. If reverse XRemote is required, that port is 9000 (decimal) plus the decimal value of the line number.
If a raw TCP stream is required, the port is 4000 (decimal) plus the decimal line number. The raw TCP stream is usually the required mode for sending data to a printer.
The Telnet protocol requires that carriage return characters be translated into carriage returns and line-feed character pairs. You can turn this translation off by specifying the Telnet binary mode option. To specify this option, connect to port 6000 (decimal) plus the decimal line number.
line 10
flowcontrol software
no exec
A host that wants to send data to the printer would connect to the router on TCP port 4008, send the data, and then close the connection. (Remember that line number 10 octal equals 8 decimal.)
Connections can be made to the next free line in a group of lines, also called a rotary or hunt group. A line can be in only one rotary group; a rotary group can consist of a single line or several contiguous lines. The console line (line 0) cannot be in a rotary group.
To configure a rotary group, perform the following task in line configuration mode:
| Task | Command |
|---|---|
| Add a line to the specified rotary group. | rotary group |
Cisco routers use six EIA/TIA-232 signals for each port, so one 50-pin Telco, RJ-11, or RJ-45 connector can support eight sessions. The router can support the most popular forms of modem control and hardware flow control as well as high-speed dial-up modems.
The EIA/TIA-232 output signals are Transmit Data (TXDATA), Data Terminal Ready (DTR), and Ready To Send (RTS, 2500 only). The input signals are Receive Data (RXDATA), Clear to Send (CTS), and RING. The sixth signal is ground. Depending on the type of modem control, these names may or may not correspond to the standard EIA/TIA-232 signals, which have similar names.
Dial-up modems that operate over normal dial-up telephone lines at speeds of 9600 bits per second and higher are now available. These modems do not operate at a guaranteed throughput; instead, they operate at a speed dependent on the quality of the line, the effectiveness of data compression algorithms on the data being transmitted, and other variables. These modems use hardware flow control to stop the data from the host by toggling an EIA/TIA-232 signal when their limit is reached.
In addition to hardware flow control, dial-up modems require special software handling. For example, they must be configured to create an EXEC session when a user dials in and to hang up when the user exits the EXEC. These modems must also be configured to close any existing network connections if the telephone line hangs up in the middle of a session.
The Cisco IOS software supports hardware flow control on its CTS input, which is also used by the normal modem handshake.
You can configure the following modem line characteristics and modem features:
State diagrams accompany some of the tasks in the following sections to illustrate how the modem control works. The diagrams show two processes:
In the diagrams, the current signal state and the signal the line is watching are listed inside each box. The state of the line (as displayed by the EXEC command show line) is listed next to the box. Events that change that state appear in italics along the event path, with actions that the software takes described within the ovals.
Figure 9 illustrates line behavior when no modem control is set. The DTR output is always high, and CTS and RING are completely ignored. The Cisco IOS software creates an EXEC when the user types the activation character. Incoming TCP connections occur instantly if the line is not in use and can be closed only by the remote host.

With the dial-up capability, you can set a modem to dial the phone number of a remote router automatically. This feature offers cost savings because phone line connections are made only when they are needed. You only pay for using the phone line when there is data to be received or sent. To configure a line for automatic dialing, perform the following task in line configuration mode:
| Task | Command |
|---|---|
| Configure a line to initiate automatic dialing. | modem dtr-active |
Using the modem dtr-active command causes a line to raise DTR only when there is an outgoing connection (such as reverse telnet, NASI, or DDR), rather than leave DTR raised all the time. When raised, DTR potentially tells the modem that the router is ready to accept a call.
You can configure a line to answer a modem automatically. You also can configure the modem to answer the telephone on its own as long as DTR is high, drop connections when DTR is low, and use its Carrier Detect (CD) signal to accurately reflect the presence of carrier. (Configuring the modem is a modem-dependent process.) Wire the modem's CD signal (generally pin-8) to the router's RING input (pin-22), and perform the following task in line configuration mode:
| Task | Command |
|---|---|
| Configure a line to automatically answer a modem. | modem dialin |
You can turn on the modem's hardware flow control independently to respond to the status of the router's CTS input. Wire CTS to whatever signal the modem uses for hardware flow control. If the modem expects to control hardware flow in both directions, you might also need to wire the modem's flow control input to some other signal that the router always has high (such as the DTR signal).
Figure 10 illustrates the modem dialin process with a high-speed dial-up modem. When the Cisco IOS software detects a signal on the RING input of an idle line, it starts an EXEC or autobaud process on that line. If the RING signal disappears on an active line, the Cisco IOS software closes any open network connections and terminates the EXEC facility. If the user exits the EXEC or the software terminates because of no user input, the line makes the modem hang up by lowering the DTR signal for five seconds. After five seconds, the modem is ready to accept another call.

You can configure a line for both incoming and outgoing calls by performing the following task in line configuration mode:
| Task | Command |
|---|---|
| Configure a line for both incoming and outgoing calls. | modem inout |
Figure 11 illustrates the modem inout process. If the line is activated by raising the data set ready (DSR) signal, it functions exactly as a line configured with the modem dialin line configuration command described in the section "Automatically Answer a Modem." If the line is activated by an incoming TCP connection, the line functions similarly to lines not used with modems.

You can change the interval that the Cisco IOS software waits for the CTS signal after raising DTR in response to DSR (the default of 15 seconds). To do so, perform the following task in line configuration mode. The timeout applies to the modem callin command only.
| Task | Command |
|---|---|
| Configure modem line timing. | modem answer-timeout seconds |
You can configure a line to close connections from a user's terminal when the terminal is turned off and prevent inbound connections to devices that are out of service. To do so, perform the following task in line configuration mode:
| Task | Command |
|---|---|
| Configure a line to close connections. | modem cts-required |
Figure 12 illustrates the modem cts-required process in the context of a continuous CTS. This form of modem control requires that CTS be high for the entire session. If CTS is not high, the user's typed input is ignored and incoming connections are refused (or sent to the next line in a rotary group).

You can configure automatic line disconnect by performing the following task in line configuration mode:
| Task | Command |
|---|---|
| Configure automatic line disconnect. | autohangup |
The command causes the EXEC to issue the exit command when the last connection closes. This feature is useful for UNIX-to-UNIX copy program (UUCP) applications that require this functionality, because UUCP scripts cannot issue the command that hangs up the telephone. This feature is not often used at this point.
The Cisco IOS software supports dial-in modems that use DTR to control the off-hook status of the telephone line. This feature is supported primarily on old-style modems, especially those in Europe. Perform the following task in line configuration mode to configure the line to support this feature:
| Task | Command |
|---|---|
| Configure a line for a dial-in modem. | modem callin |
Figure 13 illustrates the modem callin process. When a modem dialing line is idle, it has DTR in a low state and waits for a transition to occur on the DSR (RING) input. This transition causes the line to raise DTR and start watching the CTS signal from the modem. After the modem raises CTS, the Cisco IOS software creates an EXEC session on the line. If the timeout interval (set with the modem answer-timeout command) passes before the modem raises CTS, the line lowers DTR and returns to the idle state.
Although you can use the modem callin line configuration command with newer modems, the modem dialin line configuration command described earlier in this section is more appropriate. The modem dialin command frees up CTS for hardware flow control. Modern modems do not require the assertion of DTR to answer a phone line--to take it off-hook.
In addition to initiating connections, the Cisco IOS software can receive incoming connections. This capability allows you to attach serial and parallel printers, modems, and other shared peripherals to the router and drive them remotely from other systems. The Cisco IOS software supports reverse TCP, XRemote, and LAT connections.
The specific TCP port or socket to which you attach the device determines the type of service the Cisco IOS software provides on that line. When you attach the serial lines of a computer system or a data terminal switch to the serial lines of the router, it acts as a network front-end for a host that does not support the TCP/IP protocols. This arrangement is sometimes called front-ending, or reverse connection mode.
The Cisco IOS software supports ports connected to computers that are connected to modems. You can configure the Cisco IOS software to function somewhat like a modem by performing the following task in line configuration mode. This command also prevents incoming calls.
| Task | Command |
|---|---|
| Configure a line for reverse connections and prevent incoming calls. | modem callout |
Figure 14 illustrates the modem callout process. When the Cisco IOS software receives an incoming connection, it raises DTR and waits to see if the CTS becomes high, which indicates that the host has noticed its signal. If the host does not respond within the interval set by the modem answer-timeout subcommand, the software lowers DTR and drops the connection.

The Cisco IOS software supports a subset of the Berkeley UNIX Line Printer Daemon (LPD) protocol used to send print jobs between UNIX systems. This subset of the LPD protocol permits:
The Cisco implementation of LPD permits you to configure a printer to allow several types of data to be sent as print jobs (for example, PostScript or raw text).
To configure a printer for the LPD protocol, perform the following task in global configuration mode:
| Task | Command |
|---|---|
| Configure printer and specify a tty line (or lines) for the device. | printer printername {line number | rotary number} [newline-convert] |
If you use the printer command, you also must modify the /etc/printcap file on the UNIX system to include the definition of the remote printer on the router. Use the optional newline-convert keyword on UNIX systems that do not handle single character line terminators to convert a newline to a carriage-return, linefeed sequence.
The following example includes the configuration of the printer Saturn on the host Memphis:
commlpt|Printer on cisco AccessServer:\
    :rm=memphis:rp+saturn:\
    :sd+/usr/spool/lpd/comm1pt:\
    :lf=?var/log/lpd/commlpt:
The content of the actual file may differ depending on the configuration of your system.
To use a chat script, perform the following steps:
Step 1 Define the chat script in global configuration mode using the chat-script command.
Step 2 Configure the line so that a chat script is activated when a specific event occurs (using the script line configuration command), or start a chat script manually (using the start-chat privileged EXEC command).
To define a chat script, perform the following task in global configuration mode:
| Task | Command |
|---|---|
| Create a script that will place a call on a modem, log on to a remote system, or initialize an asynchronous device on a line. | chat-script script-name expect send... 1 |
A limited list of keywords are supported along with expect/send pairs. Send strings can have special escape modifiers. For an example of how to write scripts, refer to "DDR Configuration Examples" in the chapter "Configuring Dial-on-Demand Routing" in the Wide-Area Networking Configuration Guide.
It is recommended that one chat script (a "modem" chat script) be written for placing a call and another chat script (a "system" or "login" chat script) be written to log onto remote systems, where required.
Chat scripts are not supported on lines where modem control is set for inbound activity that only uses the modem dialin command.
When you create a script name, you should include the modem vendor, type, and modulation separated by hyphens. For example, if you have a Telebit t3000 modem that uses V.32bis modulation, your script name would be telebit-t3000-v32bis.
A suggested naming convention for chat scripts used for dialing is as follows:
vendor-type-modulationIn other words, the syntax of the chat-script command becomes the following:
chat-script vendor-type-modulation expect send...
For example, if you have a Telebit t3000 modem that uses V.32bis modulation, you would name your chat script as follows:
telebit-t3000-v32bis
The chat-script command could become the following:
Router(config)# chat-script telebit-t3000-v32bis ABORT ERROR ABORT BUSY ABORT
"NO ANSWER" "" "ATH" OK "ATDT\T" TIMEOUT 30 CONNECT
Adhering to this naming convention allows you to specify a range of chat scripts using partial chat script names with regular expressions. This is particularly useful for dialer rotary groups and is explained further in the "Configure an Interface to Receive Calls" section in the "Configuring Dial-on-Demand Routing" chapter.
Chat scripts can be activated by any of five events, each corresponding to a different version of the script line configuration command. To start a chat script manually at any point, refer to the section "Start a Chat Script Manually on an Asynchronous Line."
To define a chat script to start automatically when a specific event occurs, perform the following tasks in line configuration mode:
| Task | Command |
|---|---|
| Start a chat script on a line when the line is activated (every time a command EXEC is started on the line). | script activation regexp1 |
| Start a chat script on a line when a network connection is made to the line. | script connection regexp |
| Specify a modem script for DDR on a line. | script dialer2 regexp |
| Start a chat script on a line whenever the line is reset. | script reset regexp |
| Start a chat script on a line whenever the system is started up. | script startup regexp |
You can start a chat script manually on any line that is currently not active by performing the following task in privileged EXEC mode:
| Task | Command |
|---|---|
| Start a chat script manually on any asynchronous line. | start-chat regexp [line-number [dialer-string]] |
If you do not specify the line number, the script runs on the current line. If the line specified is already in use, you cannot start the chat script. A message appears indicating that the line is already in use.
You can configure the Cisco IOS software to call back an asynchronous device that dials in and requests a callback from the router, then disconnects. Asynchronous callback is supported for the following protocols:
Callback is also supported on other interface types for PPP, including ISDN
All callback sessions are returned on physical terminal (TTY) lines. ARA is supported on VTY lines, but is supported on TTY lines also if the vty-arap command is used. PPP, however, is supported on interfaces. Therefore, to enable PPP callback, you must issue the autoselect ppp command on the callback lines.
All current security mechanisms supported in the Cisco IOS software are supported by the callback facility, including the following:
The call originator must have the appropriate permissions set on the router before the it will initiate a callback session.
Callback is useful for two purposes:
You can call back clients that dial into a TTY line and connect to the EXEC. To enable callback, perform the following tasks, starting in global configuration mode:
| Task | Command |
|---|---|
| Step 1 Enable EXEC callback. | service exec-callback |
| Step 2 Define a chat script to be applied when clients dial into the EXEC. | chat-script script-name expect-send1 |
| Step 3 Specify a per-username callback dialstring. | username2 name [callback-dialstring telephone-number] |
| Step 4 Specify a per-username rotary group for callback. | username2 name [callback-rotary rotary-group-number] |
| Step 5 Specify a per-username line or set of lines for callback. | username2 name [callback-line [aux | tty] line-number [ending-line-number]] |
| Step 6 Do not require authentication on EXEC callback. | username2 name [nocallback-verify] |
| Step 7 Enter line configuration mode. | line [tty] line-number [ending-line-number] |
| Step 8 Apply a chat script to the line or a set of lines. | script callback regexp |
| Step 9 Delay the callback for client modems that require a rest period before receiving a callback. | callback forced-wait number-of-seconds |
The recommended EXEC chat script is as follows:
chat-script name ABORT ERROR ABORT BUSY "" "ATZ" OK "ATDT \T" TIMEOUT 30 CONNECT \c
You can call back ARA clients. Perform the following tasks, starting in global configuration mode. These steps assume you have already enabled AppleTalk routing and enabled ARA:
| Task | Command |
|---|---|
| Step 1 Enable callback to an ARA client. | arap callback |
| Step 2 Define a chat script to be applied when an ARA client connects to a TTY line and requests callback. | chat-script script-name expect-send1 |
| Step 3 Enter line configuration mode. | line [tty] line-number [ending-line-number] |
| Step 4 Enable ARA on the line | arap enable 2 |
| Step 5 Configure automatic protocol startup on the line. | autoselect arap 2 |
| Step 6 Enable authentication on the line. | login {authentication | local}3 |
| Step 7 Apply an ARA-specific chat script to a line or set of lines. | script arap-callback regexp |
| Step 8 Delay the callback for client modems that require a rest period before receiving a callback. | callback forced-wait number-of-seconds |
| Step 9 Exit to global configuration mode. | exit |
| Step 10 Specify a per-username callback dialstring. | username3 name [callback-dialstring telephone-number] |
| Step 11 Specify a per-username rotary group for callback. | username3 name [callback-rotary rotary-group-number] |
| Step 12 Specify a per-username line or set of lines for callback. | username 3 name [callback-line [tty] line-number [ending-line-number]] |
The recommended ARA chat script follows. The parts of the string that are bolded are vendor-specific extensions on the Telebit 3000 modem to disable error control. Refer to the manual for your modem for the specific commands to disable error correction for ARA.
You can call back PPP clients that dial in to asynchronous interfaces. You can enable callback to the following two types of PPP clients:
This section describes how to enable callback to each of these types of PPP clients.
To accept a callback request from a PPP-compliant client, perform the following tasks, beginning in interface (asynchronous) configuration mode:
| Task | Command |
|---|---|
| Step 1 Enable callback requests from RFC1570- compliant PPP clients on an asynchronous interface. | ppp callback accept1 |
To configure the Cisco IOS software to call back the originating PPP client, refer to the section "Enable PPP Callback on Outgoing Lines" later in this chapter.
A PPP client can put itself in answer-mode, and can still be called back by the router, even though it cannot specifically request callback. To enable callback on the router to such a client, perform the following step in interface (asynchronous) configuration mode:
| Task | Command |
|---|---|
| Step 1 Initiate callback requests from non-RFC1570- compliant PPP clients on an asynchronous interface. | ppp callback initiate1 |
To configure the Cisco IOS software to call back the originating PPP client, refer to the next section "Enable PPP Callback on Outgoing Lines."
After enabling PPP clients to connect to an asynchronous interface and wait for a callback, you must place one or more TTY lines in PPP mode. Although calls from PPP clients enter through an asynchronous interface, the calls exit to the client on a line placed in PPP mode.
To enable PPP client callback on outgoing TTY lines, perform the following tasks, beginning in global configuration mode:
| Task | Command |
|---|---|
| Step 1 Define a chat script to be applied when a PPP client requests callback. | chat-script1 script-name expect-send |
| Step 2 Specify a per-username callback dialstring. | username2 name [callback-dialstring telephone-number] |
| Step 3 Specify a per-username rotary group for callback. | username3 name [callback-rotary rotary-group-number] |
| Step 4 Specify a per-username line or set of lines for callback. | username3 name [callback-line [tty] line-number [ending-line-number]] |
| Step 5 Enter line configuration mode. | line [tty] line-number [ending-line-number] |
| Step 6 Configure automatic PPP startup on a line or set of lines. | autoselect ppp3 |
| Step 7 Enable authentication on the line. | login {authentication | local}3 |
| Step 8 Apply a chat script to a line or set of lines. | script callback regexp |
| Step 9 Delay the callback for client modems that require a rest period before receiving a callback. | callback forced-wait number-of-seconds |
A client can issue a callback dial string; that dial string is used only if the dial string on the router is specified as NULL, or is not defined.
The recommended PPP chat script follows.
chat-script name ABORT ERROR ABORT BUSY "" "ATZ" OK "ATDT \T" TIMEOUT 30 CONNECT \c
You can enable your router to function as a NetWare Asynchronous Services Interface (NASI) server. A NASI server enables a NASI client to connect to asynchronous network resources, such as modems, without having these resources located on the client's desktop, as shown in Figure 15.

You can configure the Cisco IOS software to enable NASI clients to connect to asynchronous resources attached to your router. The NASI client can connect to any port on the router other than the console port to access network resources. See Figure 16. The NASI clients are connected to the Ethernet 0 interface on the router. When the user on the NASI client uses the Windows or DOS application to connect to the router, a list of available TTY and VTY lines appears, beginning with TTY1. The user selects the desired outgoing TTY or VTY port. You can also configure TACACS+ security on the router so that after the user selects a TTY or VTY port, a username and password prompt appears for authentication, authorization, and accounting purposes.

The NASI client can be on a local LAN or can also be on a remote LAN. If it is on a remote LAN, two requirements must be met:
The fact that you can connect to many different ports on the router means that you can provide access to more than asynchronous resources. When the user gets access to the VTY line, they are connected to the EXEC facility and can issue a Telnet or NASI command to access a remote network. Refer to Figure 17. Only the first available VTY line appears in the list of available ports on the router (and it is titled RCONSOLE).

To configure your router as a NASI server, perform the following tasks, beginning in global configuration mode:
| Task | Command |
|---|---|
| Step 1 Enable IPX routing on the router. | ipx routing1 |
| Step 2 Define an internal IPX network number. | ipx internal-network1 |
| Step 3 Enter interface configuration mode. | interface type number2 |
| Step 4 Enable IPX routing on an interface. | ipx network [network | unnumbered]1 |
| Step 5 Exit to global configuration mode. | exit |
| Step 6 Enable NASI. | ipx nasi-server enable |
| Step 7 Configure TACACS+ security on all lines on the router (optional). | aaa authentication nasi {list-name | default} {methods list}2 |
| Step 8 Enter line configuration mode. | line [aux | tty | vty ] line-number [ending-line-number]3 |
| Step 9 Configure TACACS+ security on a per-line basis (optional). | login authentication nasi {list-name | default}2 |
You can also configure SAP filters to filter SAP updates and access lists to filter NASI traffic between interfaces the router.
You can display the following types of messages to terminal users who connect to the router:
You can also turn on or off message display.
The following sections describe how to configure these messages and how to suppress display of message-of-the-day and line activation banners.
You can configure a message-of-the-day (MOTD) banner to be displayed on all connected terminals. This banner is displayed at login and is useful for sending messages that affect all network users (such as impending system shutdowns). To do so, perform the following task in global configuration mode:
| Task | Command |
|---|---|
| Configure a MOTD banner. | banner motd d message d |
You can configure a line-activation banner to be displayed when an EXEC process (such as a line-activation or incoming connection to a VTY line) is created. To do so, perform the following task in global configuration mode:
| Task | Command |
|---|---|
| Configure a banner to be displayed on terminals with an interactive EXEC session. | banner exec d message d |
You can configure a banner to be displayed on terminals connected to reverse Telnet lines. This banner is useful for providing instructions to users of these types of connections.
To configure a banner that is sent on incoming connections, perform the following task in global configuration mode:
| Task | Command |
|---|---|
| Configure a banner to display on terminals connected to reverse Telnet lines. | banner incoming d message d |
You can configure messages to be displayed on a console or terminal not in use. Also called a vacant message, this message is different from the banner message displayed when an EXEC process is activated. To configure an idle terminal message, perform the following task in line configuration mode:
| Task | Command |
|---|---|
| Display an idle terminal message. | vacant-message [d message d] |
You can display a "line in use" message when an incoming connection is attempted and all rotary group or other lines are in use. Perform the following task in line configuration mode:
| Task | Command |
|---|---|
| Display a "line-in-use" message. | refuse-message d message d |
If you do not define such a message, the user will receive a system-generated error message when all lines are in use. You can also use this message to provide the user with further instructions.
You can display a "host failed" message when a Telnet connection with a specific host fails. Perform the following task in line configuration mode:
| Task | Command |
|---|---|
| Display a "host failed" message. | busy-message hostname d message d |
You can control display of the message-of-the-day (MOTD) and line-activation (EXEC) banners. By default, these banners are displayed on all lines. To suppress or reinstate the display of such banners, perform one of the following tasks in line configuration mode:
| Task | Command |
|---|---|
| Suppress MOTD and EXEC banner display. | no exec-banner |
| Reinstate the display of the EXEC or MOTD banners. | exec-banner |
| Suppress MOTD banner display only. | no motd-banner |
| Reinstate the display of the MOTD banners. | motd-banner |
These commands determine whether the router will display the EXEC banner and the message-of-the-day (MOTD) banner when an EXEC session is created. These banners are defined with the banner motd and banner exec commands. By default, the MOTD banner and the EXEC banner are enabled on all lines.
Disable the EXEC and MOTD banners using the no exec-banner command.
The MOTD banners can also be disabled by the no motd-banner line configuration command, which disables MOTD banners on a line. If the no exec-banner command is configured on a line, the MOTD banner will be disabled regardless of whether the motd-banner command is enabled or disabled. Table 2 summarizes the effects of the exec-banner command and the motd-banner command.
| exec-banner (default) | no exec-banner | |
|---|---|---|
| motd-banner (default) | MOTD banner
EXEC banner | None |
| no motd-banner | EXEC banner | None |
For reverse Telnet connections, the EXEC banner is never displayed. Instead, the INCOMING banner is displayed. The MOTD banner is displayed by default, but it is disabled if either the no exec-banner command or no motd-banner command is configured. Table 3 summarizes the effects of the exec-banner command and the motd-banner command for reverse Telnet connections.
| exec-banner (default) | no exec-banner | |
|---|---|---|
| motd-banner (default) | MOTD banner
INCOMING banner | INCOMING banner |
| no motd-banner | INCOMING banner | INCOMING banner |
Typically, asynchronous protocol features (such as PPP) are configured on asynchronous interfaces in the Cisco IOS software. However, the Cisco IOS software also enables you to configure asynchronous protocol features on VTY lines.
Refer to "Enable SLIP and PPP on Virtual Asynchronous Interfaces" in the "Configuring SLIP and PPP" chapter in this publication for more information about configuring virtual asynchronous interfaces.
The following sections provide line configuration examples:
In the following example, the user configures console line 0, auxiliary line 0, and virtual terminal lines 0 through 4:
line vty 0 4
 login
line con 0
 password poPPee
line aux 0
 password Mypassword
 no exec
 access-class 1 in
 speed 19200
line vty 0
 exec-timeout 0 0
 password Mypassword
line vty 1
 exec-timeout 0 0
 password Mypassword
line vty 2
 exec-timeout 0 0
 password Mypassword
line vty 3
 password Mypassword
line vty 4
 password Mypassword
In the following example, the user creates and configures the maximum 100 virtual terminal lines with the "no login" feature:
line vty 0 99
 no login
In the following example, the user eliminates virtual terminal line number 5 and all higher-numbered virtual terminal lines. Only virtual terminal lines 0 to 4 will remain.
no line vty 5
The following example shows how to use the banner global configuration commands and the no exec-banner line configuration command to notify your users that the server is going to be reloaded with new software:
! The EXEC and MOTD banners are inappropriate for the VTYs.
line vty 0 4
 no exec-banner
!
banner exec /
 This is Cisco Systems training group router.

 Unauthorized access prohibited.
 /
!
banner incoming /
 You are connected to a Hayes-compatible modem.

 Enter the appropriate AT commands.
 Remember to reset anything to change before disconnecting.
 /
!
banner motd /
 The router will go down at 6pm for a software upgrade
 /
When someone connects to the router, the MOTD banner appears before the login prompt. After the user successfully logs in to the router, the EXEC banner or INCOMING banner will be displayed, depending on the type of connection. For a reverse Telnet login, the INCOMING banner will be displayed. For all other connections, the router will display the EXEC banner.
The following example shows password checking enabled for a virtual terminal line 1:
line vty 1
 login
 password letmein
The following example shows password checking enabled on a user basis:
username jksmith password 0 letmein
username lmjones password 0 littlerock
...
line vty 1
 login local
The following sections provide examples for callback:
The following example shows the process of configuring an outgoing callback on the same line as the incoming request. The login local command enables local username authentication on lines 4 and 7. Reauthentication will be required on reconnection.
Router(config)#service exec-callbackRouter(config)#username milarepa callback-dialstring "" password marpaRouter(config)#line 4Router(config-line)#login localRouter(config-line)#exitRouter(config)#line 7Router(config-line)#login local
The following example shows the process of configuring callback to an ARA client on line 7. The login local command enables local username authentication on lines 4 and 7. Line 7 will always be used for ARA callback, whether the incoming call enters line 6, 7, or 8.
Router(config)#appletalk routingRouter(config)#arap callbackRouter(config)#arap network 422 router testRouter(config)#username excalibur callback-dialstring "123456" callback-line 7password guenivereRouter(config)#line 4Router(config-line)#login localRouter(config-line)#modem InOutRouter(config-line)#autoselect arapRouter(config-line)#arap enableRouter(config-line)#exitRouter(config)#line 7Router(config-line)#login localRouter(config-line)#modem InOutRouter(config-line)#autoselect arapRouter(config-line)#arap enableRouter(config-line)#exitRouter(config)#line 8Router(config-line)#login localRouter(config-line)#modem InOutRouter(config-line)#autoselect arapRouter(config-line)#arap enable
The following example shows the process of configuring callback to a PPP client on rotary 77. PAP authentication is enabled for PPP on the asynchronous interfaces. The login local command enables local username authentication on lines 7, 8, and 9. The remote PPP client's hostname is Ted, and the callback number is fixed at 1234567.
Router(config)#username Ted callback-dialstring "1234567" callback-rotary 77password RhodaRouter(config)#interface async7Router(config-if)#ip unnumbered ethernet0Router(config-if)#encapsulation pppRouter(config-if)#no keepaliveRouter(config-if)#async default ip address 1.1.1.1Router(config-if)#async mode interactiveRouter(config-if)#ppp callback acceptRouter(config-if)#ppp authentication papRouter(config-if)#exitRouter(config)#interface async8Router(config-if)#ip unnumbered ethernet0Router(config-if)#encapsulation pppRouter(config-if)#no keepaliveRouter(config-if)#async default ip address 1.1.1.2Router(config-if)#async mode interactiveRouter(config-if)#ppp callback acceptRouter(config-if)#ppp authentication papRouter(config-if)#exitRouter(config)#interface async9Router(config-if)#ip unnumbered ethernet0Router(config-if)#encapsulation pppRouter(config-if)#no keepaliveRouter(config-if)#async default ip address 1.1.1.3Router(config-if)#async mode interactiveRouter(config-if)#ppp callback acceptRouter(config-if)#ppp authentication papRouter(config-if)#exitRouter(config)#line 7Router(config-line)#login localRouter(config-line)#modem InOutRouter(config-line)#rotary 77Router(config-line)#autoselect pppRouter(config-line)#exitRouter(config)#line 8Router(config-line)#login localRouter(config-line)#modem InOutRouter(config-line)#rotary 77Router(config-line)#autoselect pppRouter(config-line)#exitRouter(config)#line 9Router(config-line)#login localRouter(config-line)#modem InOutRouter(config-line)#rotary 77Router(config-line)#autoselect ppp
The following section provides example configurations for the Cisco AS5200:
The first part of the following example shows a successful connection between modem 2/1 and modem 2/0, which verifies normal operating conditions between these two modems. However, when modem 2/1 is tested against modem 2/3, the back-to-back modem test fails. Therefore, modem 2/3 is suspected or proven to be inoperable. Modem 2/3 is removed from dial-up services through the use of the modem bad command on line 28.
AS5200#test modem back-to-back 2/1 2/0Repetitions (of 10-byte packets) [1]:10AS5200# %MODEM-5-B2BCONNECT: Modems (2/1) and (2/0) connected in back-to-back test: CONN ECT9600/REL-MNP %MODEM-5-B2BMODEMS: Modems (2/0) and (2/1) completed back-to-back test: success/ packets = 20/20 AS5200#test modem back-to-back 2/1 2/3Repetitions (of 10-byte packets) [1]:10AS5200# %MODEM-5-BADMODEMS: Modems (2/3) and (2/1) failed back-to-back test: NOCARRIER AS5200#configure terminalAS5200(config)#line 28AS5200(config-line)#modem badAS5200(config-line)#end
Once you enter the test modem back-to-back command, you must define the number of packets transmitted between modems at the Repetitions prompt. The ideal range of packets to transmit and receive is from 1 to 100. The default is 1 packet. The response message (for example, "success/packets = 2/2") tells you how many packets were successfully sent in both directions compared to the total number of packets attempted to be sent in both directions. Because the software reports the packet total in both directions, the reported numbers are two times the number you originally specify.
The following example shows how to execute the modem at-mode command from a Telnet session:
AS5200# modem at-mode 1/1
The following example shows how to execute the clear modem at-mode command from a second Telnet session while the first Telnet session is connected to the modem:
AS5200# clear modem at-mode 1/1
clear "modem at-mode" for modem 1/1 [confirm]
AS5200#
The following output is displayed in the first Telnet session once the modem is cleared by the second Telnet session:
Direct connect session cleared by vty0 (171.69.1.164)
The following example permits modem 1/1 on TTY line 1 to accept a directly connected session using the modem at-mode-permit command:
configure terminal
line 1
modem at-mode-permit
The following example gracefully disables the modem associated with line 1 from dialing and answering calls. The modem is disabled only after all active calls on the modem are dropped.
configure terminal
line 1
modem busyout
The following example abruptly shuts down the modem associated with line 2. All active calls on the modem are dropped immediately.
configure terminal
line 2
modem shutdown
The following example shows how to copy the modem firmware file called modem_upgrade from the TFTP server called Modem_Server to modem 2/0, which is installed in the Cisco AS5200:
AS5200#copy tftp modemModem Firmware Download Modem Numbers?2/0Address or name of remote host [UNKNOWN]?Modem_ServerSource file name?dirt/elem/modem_upgradeAccessing file 'dirt/elem/modem_upgradeonModem_Server... Loading dirt/elem/modem_upgrade.from 223.255.254.254 (via Ethernet0): ! [OK] Loading dirt/elem/modem_upgradefrom 223.255.254.254 (via Ethernet0): !!!!!!!!!!!!!!!!!!!!!!!!!!!!!!!!!!!!!!!!!!!!!!! [OK - 237503/278528 bytes] AS5200# %MODEM-5-DL_START: Modem (2/0) started firmware download %MODEM-5-DL_GOOD: Modem (2/0) completed firmware download: MNPClass10V.34/V.FCModemRev1.0.23/85.23/85
Once the modem firmware successfully downloads, a response message reports the new version number of the installed modem firmware--for example Rev1.0.23/85.23/85--as shown the last line of this example.
The next time you use the copy tftp modem command, the interactive display shows the name of the previously accessed remote server as the default setting. For example, Modem_Server replaces UNKNOWN as shown in this example.
You might want to copy the file to one modem first for testing before copying the file to all the modems in the access server.
The following example shows how to download the same modem firmware file from the TFTP server Modem_Server to all the modems in the Cisco AS5200:
AS5200#copy tftp modemModem Firmware Download Modem Numbers?allAddress or name of remote host [UNKNOWN]?Modem_ServerSource file name?dirt/elem/modem_upgradeAccessing file 'dirt/elem/modem_upgradeonModem_Server... Loading dirt/elem/modem_upgrade.from 223.255.254.254 (via Ethernet0): ! [OK] Loading dirt/elem/modem_upgradefrom 223.255.254.254 (via Ethernet0): !!!!!!!!!!!!!!!!!!!!!!!!!!!!!!!!!!!!!!!!!!!!!!! [OK - 237503/278528 bytes] AS5200# %MODEM-5-DL_START: Modem (2/0) started firmware download %MODEM-5-DL_START: Modem (2/1) started firmware download %MODEM-5-DL_START: Modem (2/2) started firmware download %MODEM-5-DL_START: Modem (2/3) started firmware download %MODEM-5-DL_START: Modem (2/4) started firmware download %MODEM-5-DL_START: Modem (2/5) started firmware download %MODEM-5-DL_START: Modem (2/6) started firmware download %MODEM-5-DL_START: Modem (2/7) started firmware download %MODEM-5-DL_START: Modem (2/8) started firmware download %MODEM-5-DL_START: Modem (2/9) started firmware download %MODEM-5-DL_START: Modem (2/10) started firmware download %MODEM-5-DL_START: Modem (2/11) started firmware download %MODEM-5-DL_START: Modem (2/12) started firmware download %MODEM-5-DL_START: Modem (2/13) started firmware download %MODEM-5-DL_START: Modem (2/14) started firmware download %MODEM-5-DL_START: Modem (2/15) started firmware download %MODEM-5-DL_START: Modem (2/16) started firmware download %MODEM-5-DL_START: Modem (2/17) started firmware download %MODEM-5-DL_START: Modem (2/18) started firmware download %MODEM-5-DL_START: Modem (2/19) started firmware download %MODEM-5-DL_START: Modem (2/20) started firmware download %MODEM-5-DL_START: Modem (2/21) started firmware download %MODEM-5-DL_START: Modem (2/22) started firmware download %MODEM-5-DL_START: Modem (2/23) started firmware download %MODEM-5-DL_GOOD: Modem (2/2) completed firmware download: MNPClass10V.34/V.FCModemRev1.0.23/85.23/85 %MODEM-5-DL_GOOD: Modem (2/10) completed firmware download: MNPClass10V.34/V.FCModemRev1.0.23/85.23/85 %MODEM-5-DL_GOOD: Modem (2/4) completed firmware download: MNPClass10V.34/V.FCModemRev1.0.23/85.23/85 %MODEM-5-DL_GOOD: Modem (2/6) completed firmware download: MNPClass10V.34/V.FCModemRev1.0.23/85.23/85 %MODEM-5-DL_GOOD: Modem (2/7) completed firmware download: MNPClass10V.34/V.FCModemRev1.0.23/85.23/85 %MODEM-5-DL_GOOD: Modem (2/12) completed firmware download: MNPClass10V.34/V.FCModemRev1.0.23/85.23/85 %MODEM-5-DL_GOOD: Modem (2/11) completed firmware download: MNPClass10V.34/V.FCModemRev1.0.23/85.23/85 %MODEM-5-DL_GOOD: Modem (2/13) completed firmware download: MNPClass10V.34/V.FCModemRev1.0.23/85.23/85 %MODEM-5-DL_GOOD: Modem (2/1) completed firmware download: MNPClass10V.34/V.FCModemRev1.0.23/85.23/85 %MODEM-5-DL_GOOD: Modem (2/14) completed firmware download: MNPClass10V.34/V.FCModemRev1.0.23/85.23/85 %MODEM-5-DL_GOOD: Modem (2/19) completed firmware download: MNPClass10V.34/V.FCModemRev1.0.23/85.23/85 %MODEM-5-DL_GOOD: Modem (2/22) completed firmware download: MNPClass10V.34/V.FCModemRev1.0.23/85.23/85 %MODEM-5-DL_GOOD: Modem (2/5) completed firmware download: MNPClass10V.34/V.FCModemRev1.0.23/85.23/85 %MODEM-5-DL_GOOD: Modem (2/8) completed firmware download: MNPClass10V.34/V.FCModemRev1.0.23/85.23/85 %MODEM-5-DL_GOOD: Modem (2/9) completed firmware download: MNPClass10V.34/V.FCModemRev1.0.23/85.23/85 %MODEM-5-DL_GOOD: Modem (2/17) completed firmware download: MNPClass10V.34/V.FCModemRev1.0.23/85.23/85 %MODEM-5-DL_GOOD: Modem (2/0) completed firmware download: MNPClass10V.34/V.FCModemRev1.0.23/85.23/85 %MODEM-5-DL_GOOD: Modem (2/3) completed firmware download: MNPClass10V.34/V.FCModemRev1.0.23/85.23/85 %MODEM-5-DL_GOOD: Modem (2/21) completed firmware download: MNPClass10V.34/V.FCModemRev1.0.23/85.23/85 %MODEM-5-DL_GOOD: Modem (2/16) completed firmware download: MNPClass10V.34/V.FCModemRev1.0.23/85.23/85 %MODEM-5-DL_GOOD: Modem (2/15) completed firmware download: MNPClass10V.34/V.FCModemRev1.0.23/85.23/85 %MODEM-5-DL_GOOD: Modem (2/18) completed firmware download: MNPClass10V.34/V.FCModemRev1.0.23/85.23/85 %MODEM-5-DL_GOOD: Modem (2/20) completed firmware download: MNPClass10V.34/V.FCModemRev1.0.23/85.23/85 %MODEM-5-DL_GOOD: Modem (2/23) completed firmware download: MNPClass10V.34/V.FCModemRev1.0.23/85.23/85
The first part of the following example shows a successful connection between modem 2/1 and modem 2/0, which verifies normal operating conditions between these two modems. However, when modem 2/1 is tested against modem 2/3, the back-to-back modem test fails. Therefore, modem 2/3 is suspected or proven to be inoperable. Modem 2/3 is removed from dial-up services through the use of the modem bad command on line 28 (see Table 1).
AS5200#test modem back-to-back 2/1 2/0Repetitions (of 10-byte packets) [1]:10AS5200# %MODEM-5-B2BCONNECT: Modems (2/1) and (2/0) connected in back-to-back test: CONN ECT9600/REL-MNP %MODEM-5-B2BMODEMS: Modems (2/0) and (2/1) completed back-to-back test: success/ packets = 20/20 AS5200#test modem back-to-back 2/1 2/3Repetitions (of 10-byte packets) [1]:10AS5200# %MODEM-5-BADMODEMS: Modems (2/3) and (2/1) failed back-to-back test: NOCARRIER AS5200#configure terminalAS5200(config)#line 28AS5200(config-line)#modem badAS5200(config-line)#end
The following example disables a suspended modem and resets its hardware initialization:
configure terminal
line 4
modem hold-reset
no modem hold-reset
The following example enables modem status polling through the out-of-band port connected to line 1:
configure terminal
line 1
modem status-poll
The following example shows how to perform a startup test on the integrated AS5200 modems:
configure terminal
modem startup-test
Display the results of the modem-startup test after you reboot the system by enabling the show modem command as shown in the following example:
AS5200# show modem 2/3
   Mdm  Typ  Status   Tx/Rx       G  Duration  TX  RX  RTS  CTS  DSR  DCD  DTR
   2/3  VFC  Bad*    19200/19200  0  00:17:11   x   x   x    x    x    x    x
Modem 2/3, AS5200 Manageable Modem, TTY4
Firmware (Boot) Rev: 1.0.23(1.0.5)
Modem config: Incoming and Outgoing
Protocol: Normal, Compression: None
Management config: status and AT session polling
TX signals: -17 dBm, RX signals: -33 dBm
The following example configures the server to attempt to retrieve statistics from a local modem up to five times before discontinuing the polling effort.
configure terminal
modem poll retry 5
The following example increases the receiver gain by 26 decibels and decreases the transmitting pulse by 7.5 decibels:
AS5200(config)#controller t1 0AS5200(config-controller)#cablelength long gain26 -7.5db
The following example sets the time interval between polls to 10 seconds using the modem poll time configuration command:
configure terminal
modem poll time 10
The following example opens a directly connected session on modem 1/1, enters AT command mode on modem 1/1, and transmits the ATH AT command through modem 1/1's out-of-band port:
AS5200#modem at-mode 1/1You are now entering AT command mode on modem (slot 1 / port 1). Please type CTRL-C to exit AT command mode.at%vMNP Class 10 V.34/V.FC Modem Rev 1.0/85 OKat\sIDLE 000:00:00 LAST DIAL NET ADDR: FFFFFFFFFFFF MODEM HW: SA 2W United States 4 RTS 5 CTS 6 DSR - CD 20 DTR - RI MODULATION IDLE MODEM BPS 28800 AT%G0 MODEM FLOW OFF AT\G0 MODEM MODE AUT AT\N3 V.23 OPR. OFF AT%F0 AUTO ANS. ON ATS0=1 SERIAL BPS 115200 AT%U0 BPS ADJUST OFF AT\J0 SPT BPS ADJ. 0 AT\W0 ANSWER MESSGS ON ATQ0 SERIAL FLOW BHW AT\Q3 PASS XON/XOFF OFF AT\X0 PARITY 8N AT
The manageable modem returns "OK" if the AT command you transmit is successfully enabled.
|
|