|
|

This chapter describes how to configure a Cisco AS5200 to accept incoming calls from a Cisco 766, Cisco 1604, and standalone remote PCs using modems. However, this scenario enables only IP and basic security services.
This section describes the dial-in scenario. Figure 5-1 shows two remote office home gateway routers allowing PCs connected to LANs to dial in to a central site enterprise network, which is called Headquarters. The illustration also shows a telecommuter dialing in with a laptop and internal modem. The laptop dynamically receives its IP address from a pool of addresses defined on the Cisco AS5200; whereas, the Cisco 766 and Cisco 1604 have statically assigned IP addresses and routes. All the required Cisco IOS configuration information for this scenario is provided later in this chapter.

The Cisco AS5200 receives and routes incoming digital and analog calls. By doing so, it provides you with a clear, simple, and easy migration path from today's predominantly analog dial-in services to tomorrow's digital dial-in services. The access server enables dial-in clients to make remote asynchronous and ISDN connections.
Figure 5-2 shows an internal view of the components used to process incoming ISDN and analog calls on the Cisco AS5200. Both analog and digital calls initially come into the Cisco AS5200 through the dual E1/T1 PRI interfaces. Analog calls originated by modem users pass through to the asynchronous interfaces, loopback interface, lines, and modems. Digital calls originated by remote ISDN users pass through to the E1/T1 controllers, ISDN dialer interface, loopback interface, and D-channel serial interfaces.
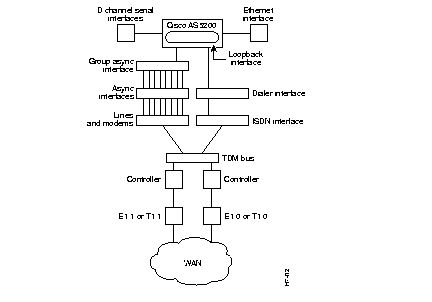
Figure 5-3 shows an external logical view of how remote users dial in.

For step-by-step configuration information for each routing device, refer to the following sections:
This section describes how to configure the Cisco AS5200 to accept incoming calls from the Cisco 766, Cisco 1604, and individual remote clients such as a standalone laptop in a hotel room.
Router is the default name of the Cisco AS5200. Router also appears in the initial system prompt like this router>. You can change this host name to any name you want by using the hostname global configuration command. For example, to change the name of the access server from router> to 5200>, enter the hostname 5200 global configuration command.
Press RETURN to get started" appears. This is not an error. If this message appears, press Return and the router> prompt appears again.
Enter the commands in Table 5-1 to setup the hostname and enable password on the Cisco AS5200.
| Step | Command | Purpose |
|---|---|---|
| 1 | router> enable | Enter privileged EXEC mode. (The prompt changes from router> to router#.)
|
| 2 | router# configure terminal
| Enter global configuration mode. |
| 3 | router(config)# hostname 5200
| Change the name of the access server to a meaningful name, such as 5200. The host name you configure must match the user profile name setup on the Cisco 766. It must also appear in the dialer map statement set up on the Cisco 1604. |
| 4 | 5200(config)# enable secret guessme | Enter a secret enable password, which provides secured access to privileged EXEC mode--the mode you must be in to change the access server's running configuration.
Substitute your own enable secret password instead of using the guessme password. |
| 5 | 5200(config)# line console 05200(config-line)# exec-timeout 0 05200(config-line)# exit5200(config)#
| Enter line configuration mode to configure the console port to which you are connected. You can see when you enter line configuration mode because the prompt changes to 5200(config-line)#. Enter exec-timeout 0 0 to prevent the access server's EXEC facility from timing out if you do not type any information on the console screen for an extended period. Exit back to global configuration mode.
|
To verify that you configured the correct host name and password, use the following commands.
5200(config)# show config
Using 1888 out of 126968 bytes
!
version XX.X
.
!
hostname 5200
!
enable secret 5 $1$60L4$X2JYOwoDc0.kqa1loO/w8/
.
.
5200#exit. 5200 con0 is now available Press RETURN to get started. 5200>enablePassword:guessme5200#
If you are having trouble, check the following:
Assign an IP address to the Ethernet and loopback interfaces. The loopback interface is a virtual interface carrying all the dial-in users, and it exists only inside the access server. The loopback interface makes the network appear as if all the digital and analog dial-in users exist on one Ethernet segment. Use the commands in Table 5-2 to configure these interfaces.
| Step | Command | Purpose |
|---|---|---|
| 1 | 5200# configure terminal
| Enter global configuration mode. |
| 2 | 5200(config)# interface ethernet 0
| Enter Ethernet interface configuration mode. |
| 3 | 5200(config-if)# ip address 10.1.1.10 255.255.255.0
| Assign an IP address and subnet mask to the interface. |
| 4 | 5200(config-if)# ip summary address eigrp 10 10.1.2.0 255.255.255.05200(config-if)# exit
| Configure a summary aggregate address for the Ethernet interface then exit interface configuration mode. |
| 5 | 5200(config)# interface loopback 0
| Create interface loopback 0, which is the logical IP subnet containing all the dial-in users' addresses. |
| 6 | 5200(config-if)# ip address 10.1.2.254 255.255.255.0
| Give the loopback interface an IP address using an existing subnet that is reserved for asynchronous dialin users. |
| 7 | 5200(config-if)# exit 5200(config)# exit
| Return to privileged EXEC mode.
This message is normal and does not indicate an error. |
To verify that you have assigned the correct IP address, use the following command.
5200#show arpProtocol Address Age (min) Hardware Addr Type Interface Internet10.1.1.10_ 0800.207e.bead ARPA Ethernet0 5200#
If you are having trouble, check the following:
Configure global system parameters on the Cisco AS5200 by using the commands in Table 5-3.
| Step | Command | Purpose |
|---|---|---|
| 1 | 5200# configure terminal
| Enter global configuration mode. |
| 2 | 5200(config)# isdn switch-type type
| Enter your telco's switch type. Replace the type keyword with one of the following supported switch types:
|
| 3 | 5200(config)# async-bootp dns-server 10.1.3.1 10.1.3.2
| Specify the list of available DNS servers for dialin clients using PPP applications. |
| 4 | 5200(config)# ip local pool dialin_pool 10.1.2.1 10.1.2.50
| Assign dial-in clients an IP address from the pool named dialin_pool. Individual remote PCs not connected to a LAN dynamically receive their IP addresses from this pool. |
| 5 | 5200(config)# ip default-gateway 10.1.1.1
| Define the default gateway when IP routing is disabled. |
| 6 | 5200(config)# ip classless
| For packets that are destined for a network that has no network default route, forward the packets to the best supernet route. |
| 7 | 5200(config)# dialer-list 1 protocol ip permit
| Define a DDR dialer list to control all dialing by the IP protocol. |
Configure the Cisco AS5200's controllers for ISDN PRI access by using the commands in Table 5-4.
| Step | Command | Purpose |
|---|---|---|
| 1 | 5200(config)# controller {t1 | e1} {0 | 1}
| Enter controller configuration mode to configure the first controller. The Cisco AS5200 has two controllers, which are labeled 0 or 1 on the dual T1/PRI and dual E1/PRI cards. |
| 2 | 5200(config-controller)# framing {esf | sf} {crc4 | no-crc4 [australia]}
| Enter your telco's framing type. For T1, choose the required keyword esf or sf. For E1, choose crc4 or no-crc4, which has optional support for australia. |
| 3 | 5200(config-controller)# linecode {ami | b8zs | hdb3}
| Enter your telco's line code type. |
| 4 | 5200(config-controller)# clock source line primary
| Configure the line to serve as the primary or most stable clock source. |
| 5 | 5200(config-controller)# pri-group timeslots {1-24 | 1-31}
| Configure all channels for ISDN. Enter the pri-group timeslots 1-24 command for T1. If E1, enter the pri-group timeslots 1-31 command. |
| 6 | 5200(config)# controller {t1 | e1} {0 | 1} | Configure the second controller by repeating steps 1 to 6. However, configure the clocking for the second controller as secondary. |
| 7 | 5200(config-controller)# exit
| Return to privileged EXEC mode.
This message is normal and does not indicate an error. |
To verify that you configured the controllers correctly, use the following commands.
5200# show controller t1 0
T1 0 is up.
  No alarms detected.
  Framing is ESF, Line Code is B8ZS, Clock Source is Line Primary.
  Version info of slot 2:  HW: 2, Firmware: 14, NEAT PLD: 13, NR Bus PLD: 19
  Data in current interval (476 seconds elapsed):
     0 Line Code Violations, 0 Path Code Violations
     0 Slip Secs, 0 Fr Loss Secs, 0 Line Err Secs, 0 Degraded Mins
     0 Errored Secs, 0 Bursty Err Secs, 0 Severely Err Secs, 0 Unavail Secs
  Total Data (last 24 hours)
     0 Line Code Violations, 0 Path Code Violations,
     0 Slip Secs, 0 Fr Loss Secs, 0 Line Err Secs, 0 Degraded Mins,
     0 Errored Secs, 0 Bursty Err Secs, 0 Severely Err Secs, 0 Unavail Secs
T1 1 is up.
  No alarms detected.
  Framing is ESF, Line Code is B8ZS, Clock Source is Line Primary.
  Version info of slot 2:  HW: 2, Firmware: 14, NEAT PLD: 13, NR Bus PLD: 19
  Data in current interval (476 seconds elapsed):
     0 Line Code Violations, 0 Path Code Violations
     0 Slip Secs, 0 Fr Loss Secs, 0 Line Err Secs, 0 Degraded Mins
     0 Errored Secs, 0 Bursty Err Secs, 0 Severely Err Secs, 0 Unavail Secs
  Total Data (last 24 hours)
     0 Line Code Violations, 0 Path Code Violations,
     0 Slip Secs, 0 Fr Loss Secs, 0 Line Err Secs, 0 Degraded Mins,
     0 Errored Secs, 0 Bursty Err Secs, 0 Severely Err Secs, 0 Unavail Secs
5200#show isdn statusThe current ISDN Switchtype = primary-5ess ISDN Serial0:23 interface Layer 1 Status: ACTIVE Layer 2 Status: TEI = 0, State = MULTIPLE_FRAME_ESTABLISHED Layer 3 Status: No Active Layer 3 Call(s) Activated dsl 0 CCBs = 0 Total Allocated ISDN CCBs = 0 ISDN Serial1:23 interface Layer 1 Status: ACTIVE Layer 2 Status: TEI = 0, State = TEI_ASSIGNED Layer 3 Status: No Active Layer 3 Call(s) Activated dsl 0 CCBs = 0 Total Allocated ISDN CCBs = 0 5200#
If you are having trouble, check the following:
When you configure the controllers on the Cisco AS5200, two corresponding D-channel serial interfaces are instantly created. For T1 configurations, serial interface 0:23 and 1:23 are created. For E1 configurations, serial interface 0:15 and 1:15 are created. You must configure each D-channel serial interface, which carries the control and signaling information for ISDN and analog calls for each ISDN PRI line.
Use the commands in Table 5-5 to configure the D-channel serial interfaces.
| Step | Command | Purpose |
|---|---|---|
| 1 | 5200# configure terminal
| Enter global configuration mode. |
| 2 | 5200(config)# interface serial {0:15 | 0:23} | Specify the D channel for the first PRI interface. For E1 configurations, specify 0:15. For T1 configurations, specify 0:23. |
| 3 | 5200(config-if)# isdn incoming-voice modem
| Configure all incoming voice calls to go to the modems. |
| 4 | 5200(config-if)# dialer rotary-group 0
| Modularize the configuration under the umbrella of a dialer interface. The dialer interface serves as the parent interface, which contains critical protocol characteristics. |
| 5 | 5200(config-if)# dialer-group 1
| Define which packets reset the idle timer. This dialer group number is used with the dialer-list command to determine which packets will be "interesting" and activate the ISDN connection. Interesting packets meet the criteria specified by the dialer-list command, as shown in Table 5-3. |
| 6 | 5200(config-if)# encapsulation ppp
| Change the default to encapsulation PPP. |
| 7 | 5200(config-if)# no fair-queue
| Disable no fair queuing. |
| 8 | 5200(config-if)# no cdp enable
| Disable the Cisco discovery protocol on the interface and return to global configuration modes. |
| 9 | 5200(config)# interface serial {1:15 | 1:23}5200(config-if)# isdn incoming-voice modem5200(config-if)# dialer rotary-group 05200(config-if)# dialer-group 15200(config-if)# encapsulation ppp 5200(config-if)# no fair-queue5200(config-if)# no cdp enable
| Configure the D channel for the second PRI interface. For E1 configurations, specify 1:15. For T1 configurations, specify 1:23. Except for the serial interface number, the configuration should be the same as the first D channel. |
| 10 | 5200(config-if)# exit 5200(config)# exit | Return to privileged EXEC mode. |
To verify your D-channel configuration, use the show interface command.
5200# show interface serial 1:23
Serial1:23 is up, line protocol is up
  Hardware is DSX1
  Interface is unnumbered. Using address of Ethernet0 (10.1.1.10 255.255.255.0
  MTU 1500 bytes, BW 64 Kbit, DLY 20000 usec, rely 255/255, load 1/255
  Encapsulation PPP, loopback not set
  Last input 00:00:00, output 00:00:00, output hang never
  Last clearing of "show interface" counters never
  Queueing strategy: fifo
  Output queue 0/40, 0 drops; input queue 0/75, 0 drops
  5 minute input rate 0 bits/sec, 0 packets/sec
  5 minute output rate 0 bits/sec, 0 packets/sec
     54 packets input, 214 bytes, 0 no buffer
     Received 0 broadcasts, 10 runts, 0 giants, 0 throttles
     10 input errors, 0 CRC, 0 frame, 0 overrun, 0 ignored, 0 abort
     53 packets output, 211 bytes, 0 overruns
     0 output errors, 0 collisions, 10 interface resets
     0 output buffer failures, 0 output buffers swapped out
     1 carrier transitions
  Timeslot(s) Used:24, Transmitter delay is 0 flags
If you are having trouble, use the following commands.
5200# show interface serial 0:0
Serial0 is up, line protocol is up
  Hardware is BRI
  MTU 1500 bytes, BW 64 Kbit, DLY 20000 usec, rely 255/255, load 1/255
  Encapsulation PPP, loopback not set, keepalive set (10 sec)
  LCP Open
  Open: IPCP, CDP
  Last input 00:00:02, output 00:00:02, output hang never
  Last clearing of "show interface" counters never
  Queueing strategy: fifo
  Output queue 0/40, 0 drops; input queue 0/75, 0 drops
  5 minute input rate 0 bits/sec, 0 packets/sec
  5 minute output rate 0 bits/sec, 0 packets/sec
     16536 packets input, 612628 bytes, 0 no buffer
     Received 0 broadcasts, 0 runts, 0 giants
     0 input errors, 0 CRC, 0 frame, 0 overrun, 0 ignored, 0 abort
     9036 packets output, 208401 bytes, 0 underruns
     0 output errors, 0 collisions, 51 interface resets
     0 output buffer failures, 0 output buffers swapped out
     378 carrier transitions
5200#debug dialerPRI0: Dialing cause: PRI0: ip PERMITPRI0: No dialer string defined. Dialing cannot occur..PRI0: Dialing cause: PRI0: ip PERMITPRI0: No dialer string defined. Dialing cannot occur..PRI0: Dialing cause: PRI0: ip PERMITPRI0: No dialer string defined. Dialing cannot occur..PRI0: Dialing cause: PRI0: ip PERMITPRI0: No dialer string defined. Dialing cannot occur..PRI0: Dialing cause: PRI0: ip PERMITPRI0: No dialer string defined. Dialing cannot occur..
| Message | Description |
|---|---|
PRI0: No dialer string defined. Dialing cannot occur.
| This message is displayed when a packet is received that should cause a call to be placed. However, there is no dialer string configured, so dialing cannot occur. This message usually indicates a configuration problem. |
PRI0: Attempting to dial xxxxxxxxxx
| This message indicates that a packet has been received that passes the dial-on-demand access lists. That packet causes dialing of a phone number. The xxxxxxxxxx variable is the number being called. |
PRI0: Unable to dial xxxxxxxxxx
| This message is displayed if for some reason, the phone call could not be placed. This might be due to a lack of memory, full output queues, or other problems. |
PRI0: disconnecting call
| This message is displayed when the Cisco AS5200 attempts to hang up a call. |
PRI0: idle timeout
| One of these three messages is displayed when its corresponding dialer timer expires. These messages are mostly informational, but they are useful when debugging a disconnected call or call failure. |
5200#debug isdn q931%LINEPROTO-5-UPDOWN: Line protocol on Interface Serial1/0:22, changed state to up ISDN Event: Call to 9086154535 dsl 3 at 64 Kb/s TX -> SETUP dsl = 3 pd = 8 callref = 0x188C Bearer Capability i = 0x8890 Channel ID i = 0xE1808397 Called Party Number i = 0xA1, '95163287448' RX <- RELEASE_COMP dsl = 3 pd = 8 callref = 0x988C Cause i = 0x83E020 - Mandatory IE missing ISDN PRI 3: entering process_rxstate, CALL_CLEARED ISDN PRI 3: received message 1F ISDN Event: Hangup call to call id 0xCE2 on dsl 2
| Message | Description |
|---|---|
TX ->
| Indicates this message is being transmitted from the local router (user side) to the network side of the ISDN interface. |
RX <-
| Indicates this message is being received by the user side of the ISDN interface from the network side. |
SETUP
| Indicates the SETUP message has been sent to initiate call establishment between peer network layers. The message can be sent from the local router or network. |
pd
| Indicates the protocol discriminator. The protocol discriminator distinguishes messages for call control over the user-network ISDN interface from other ITU-T1-defined messages, including other Q.931 messages. The protocol discriminator is 8 for call control messages such as SETUP. |
callref
| Indicates the call reference number in hexadecimal. The field value indicates the number of calls made from the router (outgoing calls) or the network (incoming calls). Note that the originator of the SETUP message sets the high-order bit of the call reference number to 0. The destination of the connection sets the high-order bit to 1 in subsequent call control messages, such as the CONNECT message. For example, callref = 0x04 in the request becomes callref = 0x84 in the response. |
Bearer Capability
| Indicates the requested bearer service to be provided by the network. |
i=
| Indicates the Information Element Identifier. The value depends on the field it is associated with. Refer to the ITU-T Q.931 specification for details about the possible values associated with each field for which this identifier is relevant. |
Channel ID
| Indicates the Channel Identifier. The value 83 indicates any channel, 89 indicates the B1 channel, and 8A indicates the B2 channel. For more information about the Channel Identifier, refer to ITU-T Q.931. |
Called Party Number
| Identifies the called party. This field is only present in outgoing SETUP messages. It can be replaced by the Keypad facility field. This field uses the IA5 character set. |
RELEASE
| Indicates that the sending equipment will release the channel and call reference. The recipient of this message should prepare to release the call reference and channel. |
RELEASE_COMP
| Indicates that the sending equipment has received a RELEASE message and has now released the call reference and channel. |
The ISDN dialer interface is the parent interface that holds the core protocol characteristics for the two ISDN D-channels, which are part of dialer rotary-group 0. Use the commands in Table 5-8 to configure the dialer interface.
| Step | Command | Purpose |
|---|---|---|
| 1 | 5200# configure terminal
| Enter global configuration mode. |
| 2 | 5200(config)# interface dialer 0
| Bring up a dialer interface. |
| 3 | 5200(config-if)# ip unnumbered loopback 0 | Associate all ISDN users with the subnet configured on loopback interface 0. |
| 4 | 5200(config-if)# encapsulation ppp
| Configure PPP on the dialer interface. |
| 5 | 5200(config-if)# peer default ip address pool dialin_pool
| Assign a common IP address pool. PPP packets coming through an asynchronous line and an ISDN line share this common IP pool. |
| 6 | 5200(config-if)# dialer in-band
| Enable the access server to build dynamic mapping of IP addresses to the ISDN B channels. |
| 7 | 5200(config-if)# dialer-group 1
| Define which packets reset the idle timer. The idle timer default is 5 minutes long. |
| 8 | 5200(config-if)# ppp multilink
| Enable PPP multilink, which uses multiple bundled B channels from the remote user who is likely to be running ISDN BRI. |
| 9 | 5200(config-if)# ppp authentication chap pap dialin
| Enable CHAP and PAP authentication on dialer interface 1 for incoming calls. |
| 10 | 5200(config-if)# no fair-queue
| Disable fair queuing. |
| 11 | 5200(config-if)# no cdp enable
| Disable the Cisco discovery protocol on the interface. |
| 12 | 5200(config-if)# no ip mroute-cache
| Turn off multicast static routes. |
| 13 | 5200(config-if)# exit
| Return to global configuration mode. |
A group asynchronous interface is the parent interface that applies specified protocol characteristics to a specified range of asynchronous ports. This convenient interface stores and projects configuration information to asynchronous ports, which usually connect to modems. In this scenario, 48 V.34 modems are installed in the Cisco AS5200.
Use the commands in Table 5-9 to configure the asynchronous group interfaces.
| Step | Command | Purpose |
|---|---|---|
| 1 | 5200(config)# interface group-async 1 | Bring up a single asynchronous group interface. |
| 2 | 5200(config-if)# ip unnumbered loopback0
| Conserve IP addresses by creating a loopback interface. |
| 3 | 5200(config-if)# encapsulation ppp
| Enable PPP to run on all asynchronous interfaces in the group. |
| 4 | 5200(config-if)# async mode interactive
| Configure interactive mode on the asynchronous interface. |
| 5 | 5200(config-if)# ppp authentication chap pap dialin
| Enable CHAP and PAP authentication on the interface for incoming calls. |
| 6 | 5200(config-if)# peer default ip address pool dialin_pool
| Set the address for the remote side of the connection. |
| 7 | 5200(config-if)# no cdp enable
| Disable the Cisco discovery protocol on the interface. |
| 8 | 5200(config-if)# group-range 1 48
| Define the group range of the interface. The number you use with the group-range command depends on the number of modems you have in your access server. That is, if your access server has 48 modems, you have 48 asynchronous interfaces. For 48 modems and a T1 card, issue the group-range 1 48 command. For 60 modems and an E1 card, issue the group-range 1 60 command. |
| 9 | 5200(config-if)# exit 5200(config)# exit
| Return to privileged EXEC mode. |
To verify your group interface configuration, use the show interface async number command.
5200# show interface async 1
Async1 is up, line protocol is up
modem(slot/port)=1/0, csm_state(0x00000204)=CSM_IC4_CONNECTED, bchan_num=18
modem_status(0x0002): VDEV_STATUS_ACTIVE_CALL.

  Hardware is Async Serial
  Interface is unnumbered.  Using address of Ethernet0 (10.1.1.10)
  MTU 1500 bytes, BW 115 Kbit, DLY 100000 usec, rely 255/255, load 1/255
  Encapsulation PPP, loopback not set, keepalive not set
  DTR is pulsed for 5 seconds on reset
  LCP Open
  Open: IPCP
  Last input 00:00:00, output 00:00:00, output hang never
  Last clearing of "show interface" counters never
  Queueing strategy: fifo
  Output queue 0/5, 0 drops; input queue 1/5, 0 drops
  5 minute input rate 37000 bits/sec, 87 packets/sec
  5 minute output rate 0 bits/sec, 0 packets/sec
     31063 packets input, 1459806 bytes, 0 no buffer
     Received 0 broadcasts, 0 runts, 0 giants, 0 throttles
     0 input errors, 0 CRC, 0 frame, 0 overrun, 0 ignored, 0 abort
     33 packets output, 1998 bytes, 0 underruns
     0 output errors, 0 collisions, 0 interface resets
     0 output buffer failures, 0 output buffers swapped out
     0 carrier transitions
Check for errors and the local and remote addresses.
5200# show async status maps
Async protocol statistics:
  Rcvd: 27887 packets, 1294133 bytes
        0 format errors, 0 checksum errors, 0 overrun, 0 no buffer
  Sent: 2141 packets, 117673 bytes, 0 dropped

 Int           Local          Remote Qd     InPack     OutPac Inerr  Drops  MTU
*  1       10.1.1.10        50.2.8.1  0        542         35     0      0 1500
*  2       10.1.1.10        50.3.8.1  0        544         35     0      0 1500
*  3       10.1.1.10       100.2.1.1  0        542         35     0      0 1500
*  4       10.1.1.10        50.1.1.1  0        544         35     0      0 1500
*  5       10.1.1.10        99.2.7.1  0        542         34     0      0 1500
*  6       10.1.1.10        99.1.4.1  0        543         34     0      0 1500
*  7       10.1.1.10       100.2.3.1  0        451         34     0      0 1500
*  8       10.1.1.10       100.2.5.1  0        451         34     0      0 1500
*  9       10.1.1.10       100.2.6.1  0        452         34     0      0 1500
* 10       10.1.1.10       100.2.8.1  0        452         34     0      0 1500
* 11       10.1.1.10        30.2.6.1  0        449         34     0      0 1500
* 12       10.1.1.10        30.3.5.1  0        450         34     0      0 1500
* 13       10.1.1.10        30.2.4.1  0        450         34     0      0 1500
* 14       10.1.1.10        30.2.8.1  0        450         34     0      0 1500
  15       10.1.1.10            None  0          0          0     0      0 1500
* 16       10.1.1.10        50.3.5.1  0        355         27     0      0 1500
To configure the modem lines to allow users to dial in to the network, see Table 5-10.
| Step | Command | Purpose |
|---|---|---|
| 1 | 5200# configure terminal
| Enter global configuration mode. |
| 2 | 5200(config-if)# line 1 48
| Enter the number of modem lines to configure. If you have 48 modems and a T1 card, issue the line 1 48 command. If you have 60 modems and an E1 card, issue the line 1 60 command. Each line directly maps to one modem in the system. |
| 3 | 5200(config-line)# autoselect ppp
| Enable remote IP users running PPP applications to dial in, bypass the EXEC facility, and connect directly to the network. |
| 4 | 5200(config-line)# autoselect during login
| Configure the lines to autodetect the connection oriented protocol and display the username:password prompt upon login. |
| 5 | 5200(config-line)# modem dialin
| Setup the lines to accept incoming calls. For incoming and outgoing calls, use the modem inout command. |
| 6 | 5200(config-line)# login authentication dialin
| Enable TACACS+ for login authentication across all asynchronous lines. |
| 7 | 5200(config-line)# exit 5200(config)# exit
| Return to privileged EXEC mode. |
To verify your modem configuration, use the following commands:
5200# show line
 Tty Typ     Tx/Rx     A Modem  Roty AccO AccI  Uses    Noise   Overruns
*  0 CTY               -    -      -    -    -     0        0        0/0
I  1 TTY 115200/115200 - inout     -    -    -     0        0        0/0
I  2 TTY 115200/115200 - inout     -    -    -     0        0        0/0
   3 TTY 115200/115200 - inout     -    -    -     0        0        0/0
   4 TTY 115200/115200 - inout     -    -    -     0        0        0/0
   5 TTY 115200/115200 - inout     -    -    -     0        0        0/0
   6 TTY 115200/115200 - inout     -    -    -     0        0        0/0
   7 TTY 115200/115200 - inout     -    -    -     0        0        0/0
   8 TTY 115200/115200 - inout     -    -    -     0        0        0/0
   9 TTY 115200/115200 - inout     -    -    -     0        0        0/0
  10 TTY 115200/115200 - inout     -    -    -     0        0        0/0
.
.
.
  90 VTY               -    -      -    -    -     0        0        0/0
5200# show line 1
 Tty Typ     Tx/Rx     A Modem  Roty AccO AccI  Uses    Noise   Overruns
I  1 TTY 115200/115200 - inout     -    -    -     0        0        0/0

Line 1, Location: "", Type: ""
Length: 24 lines, Width: 80 columns
Baud rate (TX/RX) is 115200/115200, no parity, 1 stopbits, 8 databits
Status: none
Capabilities: Hardware Flowcontrol In, Hardware Flowcontrol Out
  Modem Callout, Modem RI is CD, Line usable as async interface
Modem state: Idle
Special Chars: Escape  Hold  Stop  Start  Disconnect  Activation
                ^^x    none   -     -       none
Timeouts:      Idle EXEC    Idle Session   Modem Answer  Session   Dispatch
               00:10:00        never                        none     not set
                            Idle Session Disconnect Warning
                              never
Modem type is unknown.
Session limit is not set.
Time since activation: never
Editing is enabled.
History is enabled, history size is 10.
DNS resolution in show commands is enabled
Full user help is disabled
Allowed transports are pad telnet rlogin.  Preferred is telnet.
No output characters are padded
No special data dispatching characters
modem(slot/port)=1/0, csm_state(0x00000100)=CSM_IDLE_STATE, bchan_num=-1
modem_status(0x0000): VDEV_STATUS_UNLOCKED

Modem hardware state: CTS noDSR  DTR RTS
If you are having trouble, check the following:
5200# debug modem ?
  b2b          Modem Special B2B
  csm          CSM activity
  maintenance  Modem maintenance activity
  oob          Modem out of band activity
  tdm          B2B Modem/PRI TDM
  trace        Call Trace Upload
Assign a routing protocol and related configuration parameters by using the commands in Table 5-11.
| Step | Command | Purpose |
|---|---|---|
| 1 | 5200# configure terminal
| Enter global configuration mode. |
| 2 | 5200(config)# router eigrp 10
| Configure the Enhanced IGRP routing protocol. |
| 3 | 5200(config-router)# network 10.0.0.0
| Enable Enhanced IGRP by specifying a network number. |
| 4 | 5200(config-router)# passive-interface Dialer0
| Disable the sending of routing updates on the dialer interface. |
| 5 | 5200(config-router)# no auto-summary5200(config-router)# exit
| Transmit subprefix routing information across classfull network boundaries. |
Setup basic authentication by using the commands in Table 5-12.
| Step | Command | Purpose |
|---|---|---|
| 1 | 5200(config)# aaa new-model
| Enable the AAA access control model. |
| 2 | 5200(config)# aaa authentication login default local
| For the default login, set AAA authentication at login with the local username database. |
| 3 | 5200(config)# aaa authentication login console enable
| For the console login, set AAA authentication by using the enable password. |
| 4 | 5200(config)# aaa authentication login vty local
| For login over vty lines, set AAA authentication using the local user database. |
| 5 | 5200(config)# aaa authentication login dialin local
| For remote clients dialing in, use the AAA access control model. |
| 6 | 5200(config)# aaa authentication ppp default local
| With the local user database as the default, specify AAA authentication for serial interfaces running PPP. |
| 7 | 5200(config)# aaa authentication ppp dialin if-needed local
| If a user has not already been authenticated on a tty line, then authenticate if needed with the local user database for serial interfaces running PPP. |
To enable the Cisco AS5200 to receive calls from the remote Cisco 766 and Cisco 1604 router, you must set up dialer maps, static routes, and usernames. To do this, issue the commands in Table 5-13. For a view of the network topology, see Figure 5-1 in the section "Dial-In Scenario."
| Step | Command | Purpose |
|---|---|---|
| 1 | 5200(config)# interface dialer 15200(config-if)# dialer map ip 10.2.1.10 name 7665200(config-if)# dialer map ip 10.3.3.10 name 1604dialer map ip 10.2.1.10 name 766 speed 56
| Create dialer maps from the Cisco AS5200 to the Cisco 766 and Cisco 1604.The dialer maps' names (for example, 766 and 1604) must match the device names entered in the username password command, which is configured in Step 3 and Step 4. Dialer maps are needed even to receive calls. If you do not want to place calls from the Cisco AS5200, do not enter a phone number at the end of the dialer map. Depending on your ISDN provider's setup offering, you may need to set the line speed to 56 kbps for long distance ISDN calls. In this case, you enter this replacement command. Likewise you enter the set speed 56 command under the user profile on the Cisco 766. |
| 2 |
|
Exit interface configuration mode and return to global configuration mode. |
| 3 | 5200(config)# ip route 10.2.2.1 255.255.255.0 Dialer0
| Configure a static route from the Cisco AS5200 to the Cisco 766 router. For example, to reach network 10.2.2.1 at netmask 255.255.255.0, the Cisco AS5200 connects to the IP address 10.2.1.10, which is the Cisco AS5200's profile address configured on the Cisco 766 router. |
| 4 | 5200(config)# ip route 10.3.2.1 255.255.255.0 Dialer0
| Configure a static route from the Cisco AS5200 to the Cisco 1604. |
To avoid losing the access server configuration, save it to NVRAM. Use the commands in Table 5-14 to save your configuration changes.
| Step | Command | Purpose |
|---|---|---|
| 1 | 5200(config)# exit
| Exit global configuration mode. |
| 2 |
5200# |
Save the configuration changes to NVRAM so that they are not lost during resets, power cycles, or power outages. |
To enable the Cisco 766 series router to place calls into the Cisco AS5200, issue the commands in the following sections.
| Step | Command | Purpose |
|---|---|---|
| 1 | >
| Enter the host name for the router, which is also used for CHAP authentication between the router and the Cisco AS5200. On the Cisco AS5200's side of the configuration, the dialer map ip command and username password command use this Cisco 766's host name, which is 766. See Table 5-13. |
| 2 |
|
Set PPP and CHAP on the router for incoming and outgoing authentication. |
| 3 | 766> set switch 5ess
| Specify the ISDN switch type that your phone company uses. |
| 4 | 766> set ppp secret client766> Enter new password: letmein766> Enter new password: letmein
| Specify the transmit and receive password for the client, which is the Cisco 766 in this example. You must enter the password (for example, letmein) twice. Next, go to Table 5-16. |
| Step | Command | Purpose |
|---|---|---|
| 1 | 766> set user 5200766> New user 5200 being created
| Enter the profile username of the device that authenticates with the Cisco 766, which is 5200. This entry must match the Cisco AS5200's host name. |
| 2 | 766:5200> set ppp secret host766:5200> Enter new Password: letmein766:5200> Re-Type new Password: letmein
| In the Cisco AS5200 profile, specify the transmit and receive password for the host, which is Cisco AS5200. You must enter the password (for example, letmein) twice for verification. |
| 3 | 766:5200> set bridging off
| Turn off bridging because you are not routing packets to different kinds of networks. |
| 4 | 766:5200> set ip routing on
| Turn on IP routing. |
| 5 | 766:5200> set ip address 10.2.1.51
| Set the profile IP address for the Cisco 766 router, which is one address higher than the pool of addresses reserved for Cisco AS5200 modem connections. The ip local pool dialin_pool command configured on the Cisco AS5200 is using the range of IP addresses 10.1.2.1 to 10.1.2.50. See Table 5-3. |
| 6 | 766:5200> set ip netmask 255.255.255.0
| Set the IP netmask address for the Cisco 766, which must match the netmask address set on the Cisco AS5200 access server. |
| 7 | 766:5200> set ip route destination 0.0.0.0/0 gateway 10.1.1.10
| Because you are not running a routing protocol, which avoids up-time costs on the ISDN line, configure a static IP traffic route from the Cisco 766 router to the Cisco AS5200 access server, which is the gateway. |
| 8 | 766:5200> set ip framing none
| Set IP framing for PPP encapsulation. |
| 9 | 766:5200> set 1 number 2968388766:5200> set 2 number 2968388
| Configure the Cisco 766 router to dial the same number twice to bring up two B channels. Next, go to Table 5-17. |
| Step | Command | Purpose |
|---|---|---|
| 1 | 766:5200> cd lan766:LAN> set ip address 10.2.2.1
| Enter LAN profile mode and assign the extended Ethernet segment, which is connected to the Cisco 766, its own subnet IP address. |
| 2 | 766:LAN> set netmask 255.255.255.0
| Assign an IP netmask for the Ethernet segment. |
| 3 | 766:LAN> set bridging off
| Turn off bridging. |
| 4 | 766:LAN> set ip routing on
| Turn on IP routing. The configuration for the Cisco 766 router is complete. |
To enable the Cisco 1604 router to place calls into the Cisco AS5200, issue the commands in the following sections:
| Step | Command | Purpose |
|---|---|---|
| 1 | router# configure terminalEnter configuration commands, one per line. End with CNTL/Z.
| Enter global configuration mode and assign a host name. The prompt changes from router(config)# to 1604(config)#. The hostname 1604 is used by the dialermap command configured on the Cisco AS5200. The hostname is case sensitive.
|
| 2 | 1604(config)# enable password secret1604(config)# username 1604 password openup1604(config)# username admin password irongate
| Assign enable and username passwords. |
| 3 | 1604(config)# isdn switch-type type
| Configure the ISDN switch type, which must match your carrier's equipment. Replace the type argument with one of the following supported switch types: basic-ts013, basic-1tr6, basic-nwnet3, basic-net3, vn2, vn3, ntt, basic-5ess, basic-dms100, basic-ni1, or basic-nznet3.
If you change the switch type, you must reload the router before the new switch can take effect. Next, go to Table 5-19. |
| Step | Command | Purpose |
|---|---|---|
| 1 | 1604(config)# interface bri 01604(config-if)# ip unnumbered ethernet0
| Bring up the BRI interface and assign it an unnumbered address, which conserves IP address space. |
| 2 | 1604(config-if)# encapsulation ppp
| Enable PPP encapsulation over HDLC for CHAP authentication. |
| 3 | 1604(config-if)# no fair-queue
| Disable fair queuing. |
| 4 | 1604(config-if)# dialer map ip 10.1.1.10 name 5200 14155551234
| Set up a dialer map statement for each ISDN phone number to be called. These statements are used with CHAP authentication to place the initial call to the remote router when traffic is forwarded to the BRI interfaces. The Cisco AS5200's ISDN telephone number is 14155551234. |
| 5 | 1604(config-if)# ppp multilink
| Enable PPP multilink. |
| 6 | 1604(config-if)# dialer load-threshold 100 either
| Configure bandwidth on demand by setting the maximum load before the dialer places an additional call through the second B channel. The load is the calculated weighted average load value for the interface, where 1 is unloaded and 255 is fully loaded. The actual load value you configure depends on the characteristics of your particular network. In this example, the second B channel is activated when the load reaches 39% of maximum utilization, which is 100 divided by 255. |
| 7 | 1604(config-if)# dialer-group 1
| Enable the dialer-list 1 on the BRI interface, which determines which packets activate the ISDN connection. |
| 8 | 1604(config-if)# isdn spid1 408555432101 55543211604(config-if)# isdn spid2 408555987661 5559876
| If your carrier assigned spids to your ISDN line, set them up on the router. Not all service providers setup spids. |
| 9 | 1604(config-if)# ppp authentication chap pap callin1604(config-if)# exit1604(config)# | Enable CHAP authentication and exit interface configuration mode. Next, go to Table 5-20. |
| Step | Command | Purpose |
|---|---|---|
| 1 | 1604(config)# interface ethernet 0
| Bring up the Ethernet interface. |
| 2 | 1604(config-if)# ip address 10.3.2.1 255.255.255.0
| Assign an IP address. |
| 3 | 1604(config-if)# exit1604(config)#
| Exit interface configuration mode and return to global configuration mode. Next, go to Table 5-21. |
| Step | Command | Purpose |
|---|---|---|
| 1 | 1604(config)# router igrp 11604(config-if)# network 10.3.0.01604(config-if)# exit
| Assign a routing protocol and appoint a network IP address. |
| 2 | 1604(config)# ip route 10.1.1.10 255.255.255.0 BRI01604(config)# ip route 0.0.0.0.0.0.0.0 10.1.1.10 1604(config)# ip classless
| Create a static route to the Cisco AS5200's network using the Cisco 1604's BRI interface. A static route is needed because dynamic routes are lost when the ISDN link is down. The Cisco AS5200's target IP Ethernet address is 10.1.1.10. The target network mask is 255.255.255.0. The address of the next hop that can be used to reach the target network is BRI0. |
| 3 | 1604(config)# dialer-list 1 ip permit
| Defile a DDR dialer list to control all dialing by the IP protocol. |
| 4 | 1604(config)# line con 01604(config-line)# exit1604(config)# line vty 0 41604(config-line)# password openup1604(config-line)# login local1604(config-line)# exit1604(config)# exit1604#
| Complete the Cisco 1604 line configuration. |
| 5 | 1604# copy running-config startup-config
| Save the configuration you just created by copying it to NVRAM. The configuration for the Cisco 1604 router is complete. |
|
|