The IPX node can be accessed through a local control port (over an RS-232 or Ethernet TCP/IP link. An administration screen from a control terminal or from the StrataView Plus Network Management Station (NMS) can issue IPX commands. Remote control terminal access is possible using a Virtual Terminal (vt) command if the node has been configured with a name and at least one trunk to the network has been established.
For frame relay connections in both tiered and non-tiered networks StrataView Plus provides end-to-end configuration management using the Connection Manager. When the IPX is configured as an Interface Shelf, it can not be reached by the vt command, and frame relay end-to-end connections are configured from StrataView Plus via the Connection Manager over an in-band LAN connection. (Note: Telnet can be used to access an interface shelf (e.g., IPX shelf or AXIS shelf) if a SV+ workstation is not available to provide in-band management.)
The only type of IPX shelf connections supported for Release 8.1 are frame relay interworking connections. However, on the IPX, all types of DAXCONS (connections in and out the same IPX shelf) are supported, voice, data, etc. For Release 8.1, the AXIS shelf includes frame relay interworking connections.
The basic tasks to configure an IPX are as follows:
- Set up the node
- configure the node name (cnfnodename).
- configure the time zone (cnftmzn).
- configure the LAN interface (cnflan).
- configure the auxiliary or terminal ports to support any necessary external devices such as a local printer, an autodial modem, or an external multiplexer attached to the unit (cnfprt, cnfterm, cnftermfunc).
- If using IPX as an Interface Shelf, configure it as shelf
- Up the trunk from the AIT to the BPX using (uptrk). Shelf trunks must be upped on both the Routing Hub and the Shelf before the Shelf can be joined to the Routing Network
- Contact StrataCom ISC to configure IPX shelf option.
- At the BPX, add the IPX as a shelf to the BPX (addshelf).
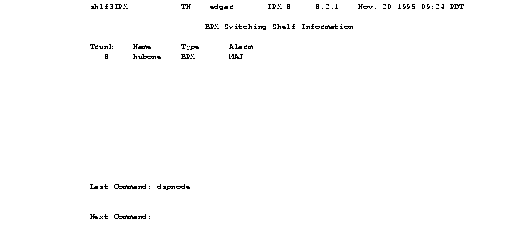
The following are example screens of (addshelf) at the BPX and (dspnode) at the BPX and at the IPX.
Figure 2-1: Addshelf Example
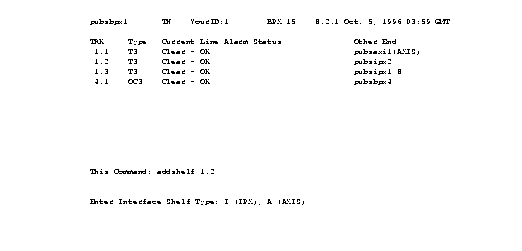
Figure 2-2: The dspnode command from BPX "hubone"
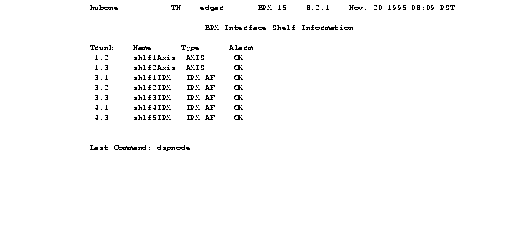
Figure 2-3: Telnet at IPX "Shlf3IPX" showing AIT trunk 8 to BPX "hubone"
- Set up the trunks
- Verify the correct cards are in both the local and remote nodes (dspcds).
- Up the trunk at each node (uptrk).
- Configure any parameters required for the trunk at each node (cnftrk).
- Set up trunk redundancy if desired (addtrkred).
- Set up any subrate trunk interface control templates if desired (cnftrkict).
- Set up voice lines
- Activate the line (upcln).
- Configure the line (cnfcln).
- Configure redundancy (addyred).
- Set up data lines and ports.
- Activate the line (upcln).
- Configure the line (cnfcln).
- Configure redundancy (addyred).
- Set up frame relay lines and ports.
- For E1/T1 add the port using (addfrport)
- Activate the ports (upfrport).
- Set up FastPAD lines and ports.
- Activate the card (upcd).
- Activate the ports (upftcport).
- Configure FastPAD control connection (addfp).
- Set up voice connections.
- Add the connections (addcon).
- Configure connection parameters (cnfvchadv, cnfchdl, cnfchec, cnfchgn, cnfcond, cnfcondsc, cnfrcvsig, cnfsmtsig, cnfvchtp, cnfchutl).
-
- Set up data connections.
- Add the connections (addcon).
- Configure connection parameters (cnfdclk, cnfcldir, cnfict).
-
- Set up frame relay connections
- Configure connection classes (cnfcls).
- Add the connections (addcon).
- Configure connection groups (addcongrp).
- Configure control templates, channel utilization, and channel priorities (cnfict, cnfchutl, cnfchpri).
- Set up FastPAD connections.
- Add the connections (addcon).
- Configure FastPAD switched or permanent voice connections (cnfchgn, cnfchutl, cnfvfpchtp).
- Configure FastPAD data connections (cnfcondsc, cnfdclk, cnfict, cnfchutl).
- Set up ATM to frame relay (ATF) connections
- Add the connections (addcon).
- Configure connection classes (cnfcls).
- Configure connection groups (addcongrp).
- Setup Interface Shelf Frame Relay Connections in Tiered Networks
- Refer to the SV+ Operations Manual
- Only frame relay connections are supported from the IPX Interface Shelf and these are added and managed by the SV+ Connection Manager via the SNMP protocol. All connections are treated as end-to-end.
You can monitor, manage and troubleshoot the IPX using the StrataView Plus Network Management Station. Commands are issued to an IPX node through the Node Administration window. Frame Relay connections are added via the StrataView Plus Connection Manager. You can display and monitor the network's topology, monitor alarms, events, and statistics. Refer to the StrataView Plus Operations Guide for more information.
For detailed configuration information, refer to the Command Reference Manual.
