|
|

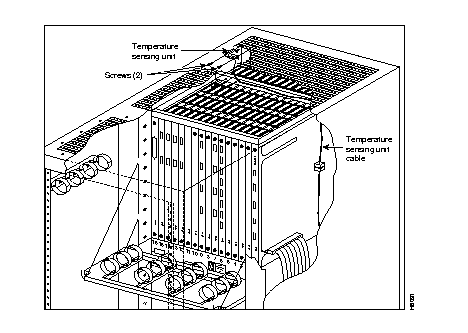
The temperature sensing unit is located at the top of the back of the upper card cage.
To remove a temperature sensing unit (Figure 4-12), perform the following steps:
Step 1 Open the rear door and locate the long, narrow vertical cable shield at the right rear side of the cabinet (it has a finger hole and two black fasteners).
Step 2 With a flat screwdriver or coin, turn both fasteners a quarter turn in either direction to unlatch them. This should loosen the cable shield. Use the finger hole to pull the cable shield slightly rearward.
Step 3 Rotate the cable shield a quarter turn, pull the bottom out slightly, and continue to twist and drop the cable shield until it comes clear. The bottom has to first swing out towards the rear to allow the top to drop clear of the top of the rack. This gives you access to the temperature sensing unit cable.
Step 4 Unplug the temperature sensing unit cable connector.
Step 5 Remove any back cards installed in the top, left six slots to gain access to the temperature sensor.
Step 6 Remove two screws and lock washers that attach the temperature sensing unit to the card cage and remove the temperature sensor.
To install a temperature sensing unit (Figure 4-12), perform the following steps:
Step 1 Secure the temperature sensor to the upper card cage with two screws and lock washers.
Step 2 Run the temperature sensing unit cable along the top of the card cage and down its right side, and plug it into the connector.
Step 3 Reinstall the metal cable shield.
Step 4 Replace any cards removed that were temporarily removed to provide access from the back card slots.
The backplane MUXBUS on the IPX 8 is not field replaceable. The cabinet must be returned to the factory.
The utility buses are replaced as they are in the IPX 16/32 cabinets. See the "Replacing a Power Supply (IPX 16/32)" section earlier in this chapter.
In a node equipped with redundant power supplies, one of the two power supplies may be replaced without disrupting system operation.
 | Warning For protection against shock hazard, verify both power cords are disconnected before servicing unit. |
| Warning Vergewissern sie sich, dass beide netzkabel vom gerat getrennt sind, bevor sie mit den wartungsarbeiten beginnen. |
| Warning Pour iviten tout danger, dibrancher les deux cordons d'alimentation avant toute intervention de maintenance sur cet equipement. |
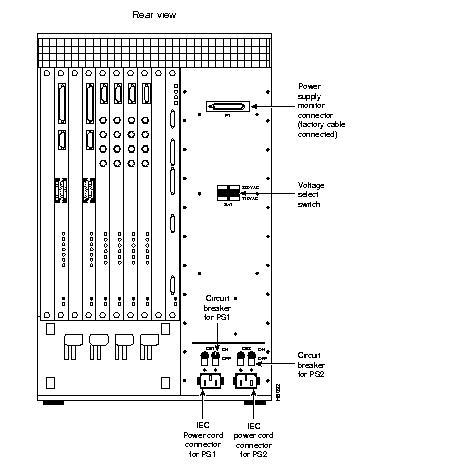
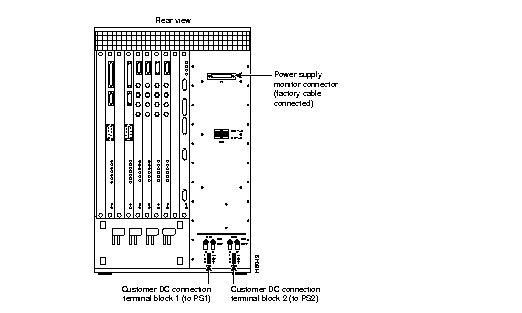
There are two possible power distribution units available for the IPX 8. The AC or the DC power distribution units are factory installed. To replace these units see the following paragraphs.
AC-powered IPX 8 cabinets, shown in Figure 4-13 have two 10A circuit breaker/power switches, CB1 and CB2. CB1 controls the lower power supply, and CB2 controls the upper power supply.
There is a separate power cord and circuit breaker for each of the power supplies for connection to separate power sources. These should be connected to separate outlets in the utility facility. A cable clamp is provided as part of each of the two power cord receptacles to prevent the power cords from accidentally becoming disconnected. Connector P1 is used to carry power sense leads to the SCC where the voltages are monitored. It is not a customer connection.
A two-position sliding voltage selector switch in the center of the AC Power Distribution Unit is used to select either 110 VAC or 220 VAC input. Each AC input is protected by a series line filter mounted on the back of the AC PDU. These line filters suppress any noise that may be induced on the AC line.
DC-powered IPX 8 cabinets shown in Figure 4-14 are powered from 48 VDC from either central office battery supplies or wherever a battery backup is provided to power the IPX 8 during loss of primary AC. Two circuit breakers are provided for overload protection and for turning the input DC power feed on and off.
Two terminal blocks, TB1 and TB2, on the DC Power Distribution Unit terminate the input power and ground wiring. The top screw terminal connects to -48V input, the bottom terminal connects to the 48V return and the middle terminal connects to chassis ground. The DC PDU does not incorporate any line filters.
Both the AC and the DC PDU's are replaced as an assembly. A PDU should not need replacing except for one of the following two conditions:
To replace a PDU, proceed as follows:
Step 1 Remove the source of AC or DC to the unit.
Step 2 Turn both PDU circuit breakers OFF.
Step 3 For DC PDU, remove lower plate covering PDU power connections.
Step 4 For AC PDU's, unscrew the cable clamp(s) and remove the power cable(s). For DC PDU's, unscrew the -48 VDC, RETURN, and CHASSIS ground connections from each terminal block.
Step 5 Disconnect end of the voltage sense cable from plug PI at the top of the PDU.
Step 6 From the front of IPX 8, unscrew the captive screw at the bottom of the power supply and pull out the power supply several inches, enough to disconnect it from its rear connector. The supply does not have to be removed completely.
Step 7 Remove the nine (9) screws around the perimeter of the PDU.
Step 8 From the rear of the IPX 8 pull the PDU straight out to gain access to the fan power cable.
Step 9 Disconnect the fan power cable from connector J2 at the inside, rear of the PDU.
Step 10 Set PDU aside and mark it as failed.
Step 11 Install the replacement PDU in reverse order. If replacing AC PDU, make sure the voltage select switch is in the proper position (110 or 220 VAC) to match the local voltage source.
Step 12 Replace the power supply if removed in Step 6.

If an IPX 8 fan fails, the whole fan assembly is replaced as a unit. Individual fans are not replaceable. Replacement fan assemblies are available from StrataCom. Order a replacement fan assembly before beginning this procedure. Generally, two fans will provide sufficient cooling for the IPX 8, but a fan assembly with a failed fan should be replaced in the event that a second fan should fail.
To replace the IPX 8 fan assembly, refer to Figure 4-16 and proceed as follows:
Step 1 Remove the air filter. Refer to steps 1 through 4 of the procedure for cleaning the air filter.
Step 2 Disconnect the 2-conductor fan power cable from the connector at the top, left side of the fan assembly.
Step 3 Locate and remove the single Phillips-head screw in each of the right and left side plates of fan assembly. These screw into the side of the cabinet from the inside of the fan assembly.
Step 4 Locate the spring-located retainer pin in each side plate just above the Phillips screws removed in the previous step.
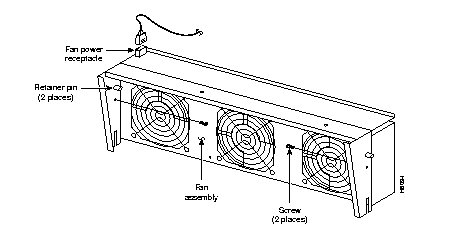
Step 5 While holding out each retainer pin, pull the fan assembly forward one side at a time.
Step 6 Lift the fan assembly out of the cabinet and set it aside. Mark it as failed.
Step 7 Install a replacement fan assembly in the reverse order.
Step 8 Reconnect the fan power cord after the mechanical assembly is complete.
Step 9 Observe that all three fans operate properly.
Step 10 Replace air filter.
|
|