|
|

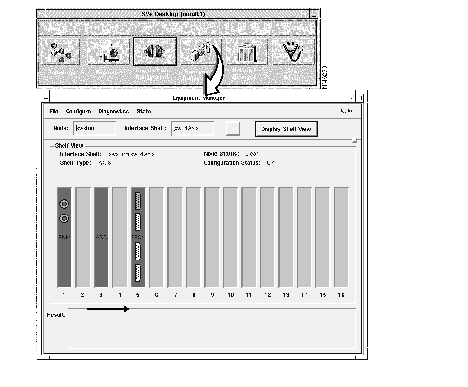
The StrataView Plus Equipment Manager can be presented from either the SV+ desktop icon, or from an AXIS node icon or a BPX node icon (which has AXIS nodes connected to its shelf) on the submap. To launch Equipment manager, the StrataView Plus core processes must be running. The Equipment Manager contains tools for configuring AXIS-shelf cards, lines, and ports and may be viewed by multiple users at various StrataView Plus workstations. However, a single SV+ desktop cannot run multiple sessions of the Equipment Manager.
The Equipment Manager now supports multi-segment voice and data connections.
This chapter describes the SV+ Equipment Manager window elements and subwindows, and provides guidelines for:
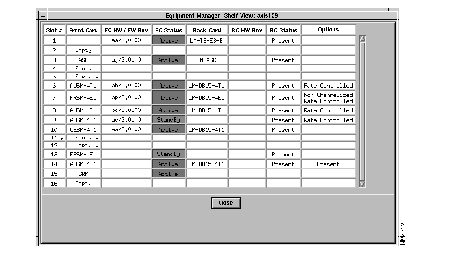
The Equipment Manager window displays the current AXIS cards for a specified shelf and current status.
The status of each card is color coded as follows:
| Green | Active/OK |
| Blue | Standby/OK |
| Red | Failed Mismatch |
| Brown | Self test |
| Wheat | Held in reset |
| Grey | Boot/Empty slot |
The status of each line is color coded as follows:
Green | Clear state |
| Red | Major alarm |
| Yellow | Minor alarm |
| Wheat | Line missing or disabled |
| White | Loopback |
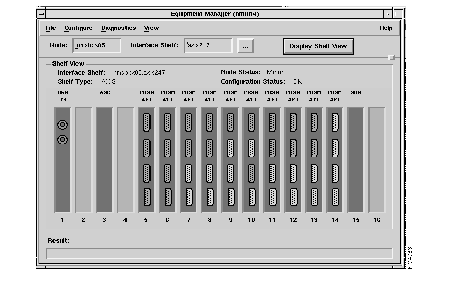
Node Name | Select the name of the node by using the popup dialog box from this field. |
| Interface Shelf | Use this field to specify which interface shelf should be used for card display. The button with the "..." label next to the Interface Shelf name text entry field presents a popup dialog box from which to select a shelf name. |
| Display Shelf View | Use this button to load the card cage display with the cards for the selected node or shelf. |
| Shelf View | This region contains a graphical display of the cards in the interface shelf. The cards are represented as buttons. The card type is printed on the card. Under each card is the slot number. You can select one card at a time for menu item actions. |
| Interface Shelf | Displays the name of the node/shelf. |
| Shelf Type | A read-only field indicating the shelf type. This is currently AXIS. |
| Result | This scrollable text field contains the results of operations done in this window. For example if you enter an invalid node name, the error message displays in the result window. |
| Node Status | The current aggregate alarm state for the node. This is a read-only field that indicates the most critical card, line, port, channel, or peripheral alarm on the node. |
| Configuration Status | A read-only field that indicates the current state of the configuration upload: OK, INIT, SYNC. |
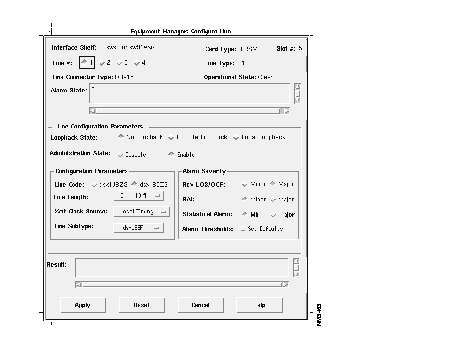
Interface Shelf | Current shelf name |
| Card Type | Current card type |
| Slot # | Current slot number |
| Line # | Line selection area
· For FRSM cards there are 4 lines on each card. · For BNM cards there is only one line on each card, this field is not displayed for BNM cards. Parameters for the selected line are shown in the Configuration Parameters section of this window. |
| Line Type | A read-only field set to one of the following values:
TI E1 |
| Operational State | Current state of the line The state values are: Clear, Alarm, and Disabled. |
| Alarm State | This scrollable window contains descriptions of all of the alarms that are currently active on this line. The alarm strings are derived from the alarm bitmap stored on the NE. They do not have the same level of detail as the alarms that are visible in the Event Browser. |
| Line Configuration Parameters | The line configuration parameters displayed are either T1 or E1 parameters based on card type. This region displays the following parameters: |
| Administrative State | Select either
Enable or Disable |
| Loopback State | Select one of the following:
· No Loopback · Remote Loopback · Local Loopback |
| Configuration Parameters | |
| Line Coding | This is a radio box with the following choices.
· For T1 line types, select either dsx1JBZS (default) or dsx1B8ZS. · For E1 line types, select either dsx1AMI (default) or dsx1HDB3. |
| Line Length | Select from the following ranges for T1 or E1 lines:
TI E1 |
| Xmt Clock Source | This is an option menu with the following choices: LoopTiming, LocalTiming, and ThroughTiming. The default is LocalTiming. |
| Line Subtype | Select from the following ranges for either T1 or E1 lines:
TI E1 |
| Alarm Severity | This region is used to set the severity level for the following alarms: receive LOS and OOF, RAI, and statistical alarms. The severity levels of individual statistical alarms can not be set, they are set as a group. |
| Rcv LOS/OOF | A radio box with two choices: Major and Minor. Defaults to Major. |
| RAI | A radio box with two choices: Major and Minor. Defaults to Minor. |
| Alarm Threshold | When Set Default Values is selected the line is configured with default alarm threshold values.
For Rcv LOS/OOF thresholds the following values are used.
|
| Alarm | 15 Minutes | 24 Hours |
| Line Code Violation (LCV) | 14 | 134 |
| LCV Errored Seconds (LES) | 12 | 121 |
| LCV Severely Errored Seconds (LSES) | 10 | 100 |
| CRCES | 12 | 121 |
| SEFS | 2 | 17 |
| AISS | 2 | 17 |
| UAS | 10 | 10 |
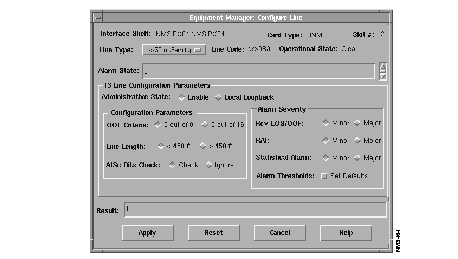
Interface Shelf | Current shelf name. |
| Card Type | Current card type. |
| Slot # | Current slot number. |
| Line # | Line selection area.
For FRSM cards there are 4 lines on each card. For BNM cards there is only one line on each card, this field is not displayed for BNM cards. Parameters for the selected line are shown in the Configuration Parameters section of this window. |
| Line Code | Read-only field set to one of the following values:
T3 E3 |
| Line Type | Select one of the following values:
T3 E3 |
| Operational State | This field describes the actual state of the line. The state values are: OK, Failed, Local Loopback, Remote Loopback, Remote Test. |
| Alarm State | This scrollable window contains descriptions of all of the alarms that are currently active on this line. The alarm strings are derived from the alarm bitmap stored on the NE. They do not have the same level of detail as the alarms that are visible in the Event Display. |
| Line Configuration Parameters | The line configuration parameters displayed are either T1 or E1 parameters based on card type. This region displays the following parameters: |
| Loopback State | This is a radio box with the following choices:
· No loopback · Enable · Disable · Local Loopback |
| Configuration Parameters | Use this configuration area to set T3 or E3 parameters for specific card type. |
| Line Code | Read-only field set to one of the following values:
T3 E3 |
| OOF Criteria | Select either:
· 3 out of 8 or · 3 out of 16 |
| Line Length | This is a option menu with the following choices.... |
| AISc Bits Check | Ignore. |
| Alarm Severity | This region is used to set the severity level of alarms. The configurable alarms are the same as those described for the FRSM Line Configuration screen. The default values for the alarm thresholds are different |
| RAI | A radio box with two choices: Major and Minor. Defaults to Minor. |
| Alarm Threshold | Select Set Defaults to configure the line with default alarm threshold values.
Rcv LOS/OOF Threshold values are the same as those for the FRSM/AUSM cards. Statistical alarms have three additional threshold values: · P-bit Parity Code Violation · PVC Errored Seconds · PVC Severely Errored Seconds The following table lists the default values used for the statistical alarm thresholds: |
| Alarm | 15 Minutes | 24 Hours |
| Line Code Violation | 3870 | 38650 | |
| LCV Errored Seconds | 86 | 864 | |
| LCV Severely Errored Seconds | 4 | 40 | |
| P-bit Parity Code Violation (PCV) | 382 | 3820 | |
| PCV Errored Seconds | 86 | 864 | |
| PCV Severely Errored Seconds | 4 | 40 | |
| Severely Errored Framing Second | 120 | 1200 | |
| Alarm Indication Signal Second | 120 | 1200 | |
| Unavailable Seconds | 120 | 1200 |
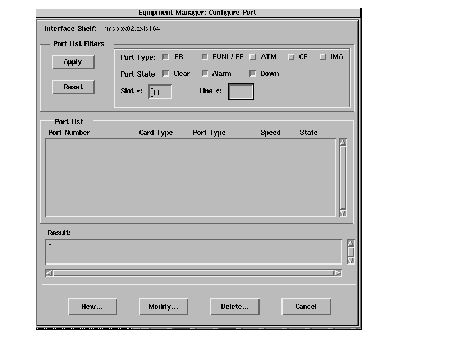
The Port List dialog window is invoked by first selecting a card in the Shelf View region and then selecting Configure->Port from the menu bar of the Equipment Manager window. There are three window types for port configuration, depending on the card type.
| FRSM cards | Ports have to be manually added by selecting New on the Configure Port screen. |
| BNM cards | A single port is automatically added for each line. The "port" on the BNM card refers to the PLCP port (for DS3). |
To see a list of ports, click the Apply button of the Configure Port window. Click on a displayed port name, then use the Add, Modify, or Delete button to configure or remove the selected port.
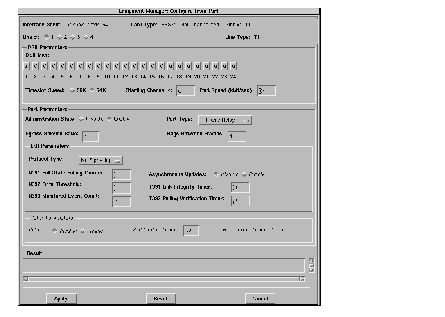
Interface Shelf | Current shelf name. |
| Card Type | Current card type. This field also indicates if the card is channelized. |
| Line Type | Displays line types for T1 or E1. |
| Subtype | Displays subtypes for T1 or E1.
T1 E31 |
| Slot # | A text field that displays the current slot number. The user may modify this field to facilitate the configuring of other cards. |
| Line # | A radio box to select which line. For FRSM cards there will be 4 lines. |
| DS0 Map | This is read-only area that shows all the DS0 timeslots for the line. A T1 line will have 24 timeslots, a E1 line will have 32 timeslots. A "1" indicates that the timeslot is in-use. |
| Timeslot Speed | This is a radio box with two choices: 56K or 64K. |
| Starting Channel Number | This field will be the starting timeslot. The starting channel number is the port number (id) for the port. |
| Port Speed | The port speed for this port. This field is used, along with the Timeslot speed, to determine the number of DS0s that should be allocated for this port. Note: a sub-rate speed will occupy an entire DS0 timeslot. |
| Port Parameters | |
| Egress Service Ratio | This field is the number of times egress queue 2 is serviced for every service of egress queue 3. The values range from 1 to 15. The default is 1. |
| Flags between Frames | A text field that has values from 1 to 10. Default is 1. |
| LMI Fields | |
| Protocol Type | A pull down menu with these choices: No Signalling, StrataLMI, AnnexAUNI, AnnexDUNI, AnnexANNI, AnnexDNNI, and Other. The default is No Signalling. |
| Asynchronous Updates | This is a radio box with two choices: Enable and Disable. The default is Enable. |
| N391 Full Status Polling Counter | This is a text field with a value range of 1.255. The default is 6. |
| N392 Error Threshold | This is a text field with a value range of 1.10. The default is 3. |
| N393 Monitored Event Count | This is a text field with a value range of 1.10. The default is 4. |
| T391 Link Integrity Timer | Type a value range of 5.30. The default is 10. |
| T392 Polling Verification Timer | Type a value range of 5.30. The default is 15. |
| Result | Scrollable read-only window displays the result of the operation (including any error messages). |
| Apply | Use this button to add the new port configurations in the network. The result will be displayed in the Result window. After you press the Apply button, all buttons on this window are disabled and the window stays open till the action is completed. |

Cell Framing | This is a read-only field. For DS3 it is set to PLCP. For E3 it is set to ATM | ||
| Payload Scramble | This is a radio box with two choices: Enable and Disable. The default is Disable. | ||
| Alarm Severity | |||
| Alarm Threshold Values | If Set Default Values is selected, the port will be configured with the default values. The following values are used for Code Connected, Code Rx Link Down and Rx Link Up:
Code Connected = 0 Code Rx Link Down = 3 Code Rx Link Up = 6 The following table lists the defaults for the statistical alarm thresholds: | ||
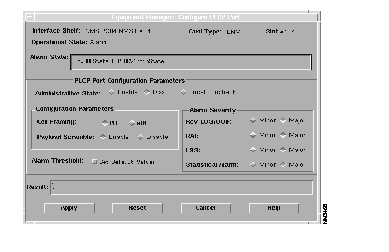
| Cell Framing | This is a read-only field. For DS3 it is set to PLCP. For E3 it is set to ATM. |
| Payload Scramble | This is a radio box with two choices: Enable and Disable. The default is Disable. |
| Alarm Severity | |
| Alarm Threshold Values | If Set Default Values is selected, the port will be configured with the default values.
The following values are used for Code Connected, Code Rx Link Down and Rx Link Up:
· Code Connected = 0 · Code Rx Link Down = 3 · Code Rx Link Up = 6 Table 8-3lists the defaults for the statistical alarm thresholds. |
| Alarm | 15 Minutes | 24 Hours |
| BIP-8 Code Violation | 359,000 | 3584000 |
| BIP-8 Errored Seconds | 86 | 864 |
| BIP-8 Severely Errored Seconds | 4 | 40 |
| Severely Errored Framing Second | 120 | 1200 |
| Unavailable Seconds | 120 | 1200 |
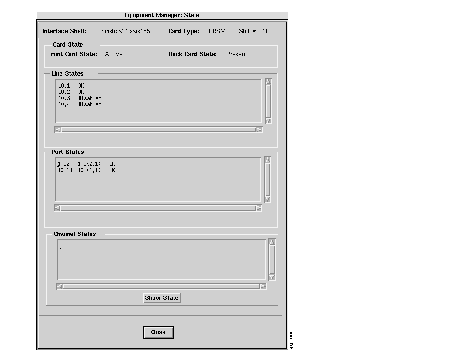
Interface Shelf | This text field displays the current shelf name. |
| Card Type | This text field displays the current card type. |
| Slot # | This text field displays the current slot number. Type in the number of the slot containing the card you want to configure. The other fields will change to reflect the contents of the slot number. |
| Card State | Displays front and back states of cards. |
| Front Card State | This text field displays the state of the front card. The values for this field are: No Card, Standby, Active, Failed, Self Test, Held in Reset, Mismatch, and Unknown. |
| Back Card State | This text field displays the state of the back card (either Present and Not Present). |
| Line Alarms | This region displays the front and back card states. |
| Operational State | This text field contains the current operational state |
| Alarm State | This text field details the current alarm state.
|
|
|