|
|
What Is the Cisco 1000 Series?
The Cisco 1000 series LAN Extender provides a seamless connection between your remote office local-area network (LAN) and your company's main or regional LAN. The LAN Extender is available in two models:
Because the LAN Extender is remotely configured by your company's system administrator, it can be installed quickly and easily.
The LAN Extender connects to a Cisco router in your company's central office location. This router is called a host router because it is at a central location in your company's LAN. The host router provides routing services to your LAN Extender, and your LAN Extender is configured from the host router.
The host router is connected to your LAN Extender through a 56 or 64-kilobit-per-second (kbps) leased line, or through a faster telephone company service called T1 in North America or E1 in Europe.
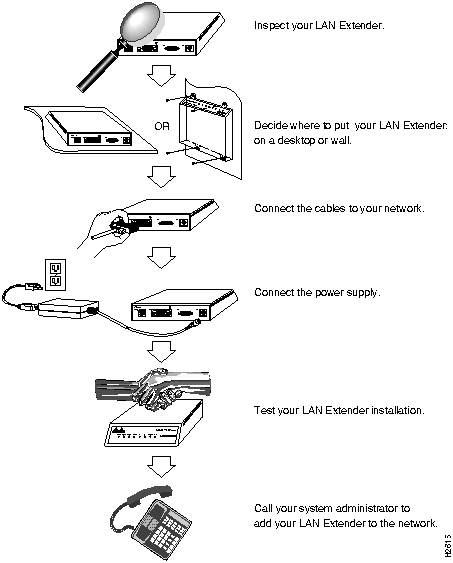
Installation is as simple as inspecting the LAN Extender, deciding where to place it, connecting the cables, connecting the power, checking to make sure it all works, and then contacting your system administrator to configure your LAN Extender into the corporate LAN.
How to Install the Cisco 1000 Series LAN Extender
Installing your LAN Extender takes just a few simple steps:
Because any device that uses electricity must be treated with respect, follow these guidelines to ensure general safety:
Keep the LAN Extender in the shipping container to prevent accidental damage until you have determined where you want it installed, then proceed with the unpacking. Check the packing list to ensure that you received the following items:
A warranty sheet, a service and support card, and optional companion publications are included as specified on your order. Inspect all items for shipping damage. If anything appears to be damaged, contact your system administrator.
Following are the tools and parts required to install your LAN Extender:
In addition, you might need the following external equipment:
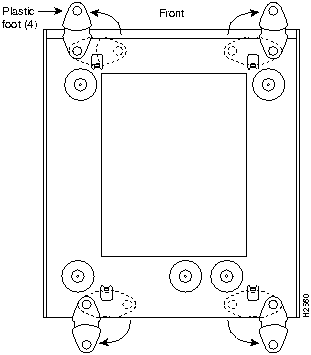
The Cisco 1000 series LAN Extender can be placed on a desktop or bookshelf, or mounted on a vertical surface. It is designed to allow troublefree operation without requiring cooling fans or special equipment closets or racks.
Setting Your LAN Extender on a Desktop
To place your LAN Extender on a desktop, bookshelf, or other flat, secure surface, perform the following steps:
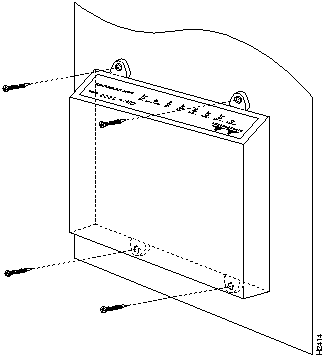
Mounting Your LAN Extender on the Wall
To install your LAN Extender on a wall or under a desktop, perform the following steps:
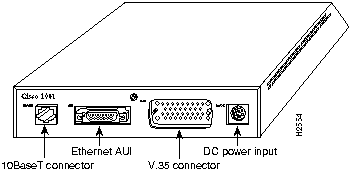
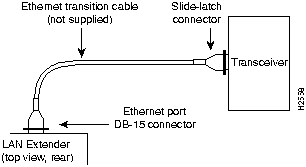
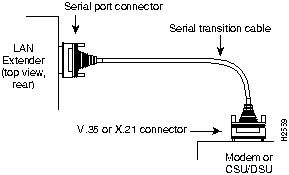
After you have installed your LAN Extender, you need to connect the serial cables to your LAN Extender and then connect it to the network. The rear panel of the LAN Extender has the following interface connectors:
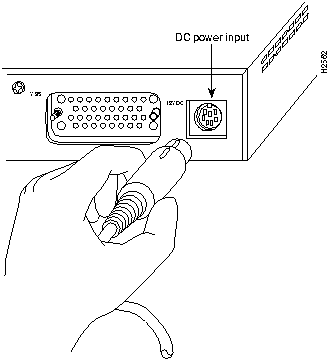
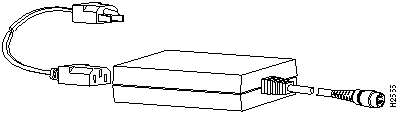
You need cables to connect the power and to connect the LAN Extender to the LAN (through either the modular 10BaseT port or the 15-pin AUI port) and WAN lines (through the V.35 or X.21 serial port).
Take the following steps to connect the external cables to the router:
After you have finished installing your LAN Extender, you should make sure everything works properly by checking the LEDs on the front panel.
If you do not see the correct LED signals, or if they blink once or twice per second instead of flicker, refer to the following section, "Troubleshooting," for more information about LEDs and contact your system administrator for additional instructions.
After you have installed the LAN Extender, your system administrator needs to configure it from the host router over a serial line (V.35 or X.21). Contact your system manager with the MAC address from the label included with your LAN Extender. While your LAN Extender is being configured, your system manager may request that you be available to read the LEDs and verify proper operation.
To order UniverCD, Cisco's online library of product information, or paper documentation, refer to the section "Technical Assistance."
This section includes the following troubleshooting information:
The Cisco 1000 series LAN Extender has several LEDs on the front panel that indicate its current operating condition. The LEDs are used by the system administrator to diagnose or verify the operation of the system. You can observe the LEDs, note any fault conditions that the LAN Extender is encountering, and contact your system administrator.
For more complete network troubleshooting information, refer to the Troubleshooting Internetworking Systems publication.
The following are the specifications for the Cisco 1000 series LAN Extender:
If there is a problem with the cables shipped with your LAN Extender, the pinouts can be used for troubleshooting. The following tables list the pinouts for the cables that can be used with the LAN Extender.
X.21 DTE and DCE Serial Cable Pinouts (DB-15)
V.35 DTE and DCE Serial Cable Pinouts (Winchester-Type 34 Pin)
Ethernet (AUI) Port Pinout (DB-15)
Ethernet 10BaseT Pinout (RJ-45)
Getting Service and Support for Your LAN Extender
This section provides instructions on how to get help if your LAN Extender ever needs service or support after installation.
Cisco Information Online (CIO) is Cisco Systems' primary, real-time support channel. You can use your product serial number to activate CIO for a single user during your warranty period. Maintenance customers and partners can self-register on CIO to obtain additional content and services.
Available 24 hours a day, 7 days a week, CIO provides a wealth of standard and value added services to Cisco's customers and business partners. CIO services include product information, software updates, release notes, technical tips, the Bug Navigator, configuration notes, brochures, descriptions of service offerings, and download access to public and authorized files.
CIO serves a wide variety of users through two interfaces that are updated and enhanced simultaneously---a character-based version and a multimedia version that resides on the World Wide Web (WWW). The character-based CIO (called "CIO Classic") supports Zmodem, Kermit, Xmodem, FTP, Internet e-mail, and fax download options, and is excellent for quick access to information over lower bandwidths. The WWW version of CIO provides richly formatted documents with photographs, figures, graphics, and video, as well as hyperlinks to related information.
You can access CIO in the following ways:
For a copy of CIO's Frequently Asked Questions (FAQ), contact If you are a system administrator and need personal technical assistance with a Cisco product which is under warranty or covered by a maintenance contract, contact Cisco's Technical Assistance Center (TAC) at 800 553-2447 or 408 526-7209, or send an email message to When you contact the TAC for help, have the following information ready:
European Customer Service and Support
Cisco and its European Service Partners coordinate all customer service in Europe, including hardware and software telephone technical support, on-site service, and module exchange and repair. For more information, contact the European Technical Assistance Center (TAC).
European TAC numbers and e-mail address are as follows:
The Cisco Systems 1000 series LAN Extender conforms to the requirements of EMC Directive 89/336/EEC.
This product range falls within the scope of the Telecommunications Terminal Equipment (TTE) Regulations 1992 (Statutory Instrument No. 2423/1992).
However, there is currently no common technical regulation (CTR) in force which covers this particular category of equipment, therefore the TTE regulations do not apply as specified in clauses 2(1), 4(3), and 6(1).
Accordingly, this product range conforms to the requirements of the national standards for connection to the network in accordance with section 22 of the 1984 Telecommunications ACT.
The installation and maintenance procedures in this publication must be followed to ensure compliance with these regulations.
Information for United Kingdom Use Only
Cisco Systems declaration of operating conditions:
The Cisco 1000 series LAN Extender is designed to meet the requirements of NET1 and NET2.
Warnings
Interconnection directly, or by way of other apparatus, of ports marked:
"Safety Warning --- See instructions for use"
with ports marked or not so marked may produce hazardous conditions on the network and that advice should be obtained from a competent engineer before such a connection is made.
The ports marked "Ethernet" have a safety warning applied to them as follows:
"These ports do not provide isolation sufficient to satisfy the requirement of BS6301; apparatus connected to these ports should either have been approved to BS6301 or have previously been evaluated against British Telecommunications plc (Post Office) Technical Guides 2 or 26 and given permission to attach; any other usage will invalidate any approval given to this apparatus."
This apparatus must be connected to a mains socket outlet with a protective earth contact.
Connection of Power Supply. The Cisco 1000 series LAN Extender is intended for use when supplied with power from a supply providing 220-240 VAC, 50/60 Hz up to 5 amps.
Other usage will invalidate any approval given to this apparatus if as a result it ceases to comply with BS6301: 1989.
The Cisco 1000 series LAN Extender is brought into service by the supplier.
Information for European Community Use Only
The ports marked "Ethernet" are SELV circuits. SELV circuits should only be connected to other SELV circuits.
Copyright 1988-1996 © Cisco Systems Inc.
![]()
![]()
![]()

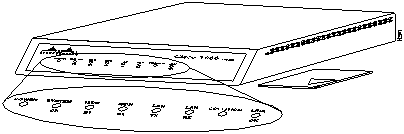
LED
State
Means
Power
On steadily
12 volts DC is being supplied to the LAN Extender.
Off
Power is not reaching the LAN Extender. Verify that the power supply is plugged into the wall receptacle, and that the cable from the power supply to the LAN Extender is connected.
System OK
On steadily
The LAN Extender has passed the power-on diagnostics and is working properly.
Blinking
The system will blink while running its startup diagnostics and will then go on steadily.
If the blinking continues after the startup sequence, a system error has been encountered. Contact your system administrator and disconnect and then reconnect the power to recycle your LAN Extender. If the blinking continues, check your WAN connection and the serial RX and TX LEDs.
Off
An error condition has occurred. Contact your system administrator, disconnect the power cord, and then reconnect it to re-establish power to your LAN Extender.
Serial TX and RX
Flickering
The serial WAN line is transmitting and receiving data normally.
Blinking
A line fault has been detected. The LEDs will go on for several seconds and will then blink a certain number of times to indicate a particular error. The blinking pattern will repeat until the error condition has been corrected:
1 blink = the serial line is down.
2 blinks = no clock signal was received.
3 blinks = an excessive number of cyclic redundancy check (CRC) errors has been received.
4 blinks = the line is noisy.
5 blinks = a loopback condition has occurred.
6 blinks = the point-to-point link has failed.
Contact your system administrator.
LAN TX and RX
Flickering
The Ethernet LAN connection is transmitting and receiving data normally.
Collision
On
Data collisions are being detected. Occasional collisions are normal, if they happen often, contact your system administrator.
Link OK
On
No errors are being detected on the 10BaseT connection.
Description
Design Specification
Dimensions (H x W x D)
1.75 x 8.0 x 8.0" (4.4 x 20.3 x 20.3 cm)
Weight
2 lb (.9 kg)
Input voltage, frequency,
and power dissipation
LAN Extender: 12 volts direct current
External power supply: 100 to 240 volts alternating current at 50 to 60 hertz, 12 watts maximum, 135.5 British thermal units/hr
Network interface options
1 Ethernet and 1 V.35 synchronous serial (Model 1001) 1 Ethernet and 1 X.21 synchronous serial (Model 1002)
Ethernet interface
AUI IEEE 802.3 (DB-15) and 10BaseT
Synchronous serial interfaces
V.35, X.21 nonreturn to zero and data terminal equipment
Operating environment
32 to 104°F (0 to 40°C)
Nonoperating temperature
--40 to 185°F (--40 to 85°C)
Operating humidity
10 to 90%, noncondensing
15 Pin1
Signal
Direction DTE DCE
J2-1
Shield GND
--
J2-2
J2-9
Transmit+
Transmit--
--->
--->
J2-3
J2-10
Control+
Control--
--->
--->
J2-4
J2-11
Receive+
Receive--
<---
<---
J2-5
J2-12
Indication+
Indication--
<---
<---
J2-6
J2-13
Timing+
Timing--
<---
<---
J2-8
Shield
Circuit GND
--
--
--
1 Any pin not referenced is not connected.
34 Pin1
Signal
Direction DTE DCE
J2-A
Frame GND
--
J2-B
Shield
Circuit GND
--
--
--
J2-C
Shield
RTS
--
--->
--
J2-D
Shield
CTS
--
<---
--
J2-E
Shield
DSR
--
<---
--
J2-F
Shield
RLSD
--
<---
--
J2-H
Shield
DTR
--
--->
--
J2-K
Shield
LT
--
--->
--
J2-P
J2-S
SD+
SD--
--->
--->
J2-R
J2-T
RD+
RD--
<---
<---
J2-U
J2-W
SCTE+
SCTE--
--->
--->
J2-V
J2-X
SCR+
SCR--
<---
<---
J2-Y
J2-AA
SCT+
SCT--
<---
<---
1 Any pin not referenced is not connected.
15 Pin
Ethernet Circuit
Signal
1
CI-S
Control In Circuit Shield
2
CI-A
Control In Circuit A
3
DO-A
Data Out Circuit A
4
DI-S
Data In Circuit Shield
5
DI-A
Data In Circuit A
6
VC
Voltage Common
7
CO-A
Control Out Circuit A (not connected)
8
CO-S
Control Out Circuit Shield (not connected)
9
CI-B
Control In Circuit B
10
DO-B
Data Out Circuit B
11
DO-S
Data Out Circuit Shield
12
DI-B
Data In Circuit B
13
VP
Voltage Plus
14
VS
Voltage Shield (L25 and M25)
15
CO-B
Control Out Circuit B (not connected)
Shell
PG
Protective Ground
Pin1
Description
1
TX+
2
TX--
3
RX+
4
--
5
--
6
RX--
7
--
8
--
1 Any pin not referenced is not connected.
http://www.cisco.com
cio.cisco.com
(131.108.89.33)
cio-help@cisco.com.
For additional information, contact
cio-team@cisco.com.
tac@cisco.com.
Emergency technical assistance (for network-down or severe network problems) is available 24 hours a day, seven days a week.
euro-tac@cisco.com
![]()
![]()
![]()
![]()
![]()
![]()
![]()
![]()