Caution For safety, periodically check the resistance value of the antistatic strap, which should be within the range of 1 and 10 Mohms.
Tools and Parts Required
Following are the tools and parts required to install the router:
- Screwdrivers:
- No. 1 Phillips
- Small, 3/16" (0.476 cm), and medium, 1/4" (0.625 cm), flat-blade
- ESD-preventive wrist strap
- Optional rack-mount/wall-mount kit (with documentation)
- One interface cable for each interface you require
In addition, you might need the following additional external equipment:
- Rack- and wall-mount brackets, fasteners, and instructions
- Channel service unit/digital service unit (CSU/DSU) for the serial interfaces
- Ethernet transceiver
- Token Ring media attachment unit (MAU)
- Modem for remote configuration (if required)
- Console terminal (configured for 9600 baud, 8 data bits, no parity, and 2 stop bits) if future reconfiguration is desired
Information on Mounting the Router on a Rack or Wall
Rack and wall mounting procedures are described in a separate publication included with the optional rack mount kit. If you intend to rack mount the router, do so before making the external connections.
Preparing for External Connections
Following are the procedures for making external connections to the router. Figure 1 shows the rear panel of the router with the following connectors:
- Ethernet DB-15 (2102) or Token Ring DB-9 (2202)
- Serial DB-50 (1)
- Console RS-232
- Auxiliary RS-232
- AC power cable
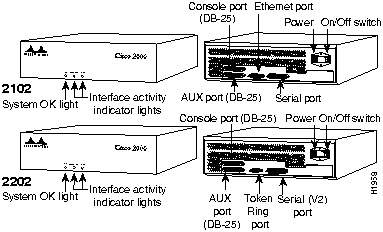
Figure 1 : Router Front and Rear View---Models 2102 and 2202
Information for United Kingdom Use Only
Cisco Systems declaration of operating conditions:
The Cisco 2000 is designed to meet the requirements of NET1 and NET2.
Warnings
Interconnection directly, or by way of other apparatus, of ports marked:
"Safety Warning --- See instructions for use"
with ports marked or not so marked may produce hazardous conditions on the network and that advice should be obtained from a competent engineer before such a connection is made.
The ports marked "Ethernet," "Token Ring," "Console," and "AUX" have a safety warning applied to them as follows:
"These ports do not provide isolation sufficient to satisfy the requirement of BS6301; apparatus connected to these ports should either have been approved to BS6301 or have previously been evaluated against British Telecommunications plc (Post Office) Technical Guides 2 or 26 and given permission to attach; any that other usage will invalidate any approval given to this apparatus."
Connection of Power Supply. The Cisco 2000 is intended for use when supplied with power from a supply providing 220-240 VAC, 50/60 Hz up to 5 Amps.
Other usage will invalidate any approval given to this apparatus if as a result it ceases to comply with BS6301: 1989.
The Cisco 2000 is brought into service by the supplier.
Information for European Community Use Only
The ports marked "Ethernet," "Token Ring," "Console," and "AUX" are SELV circuits. SELV circuits should only be connected to other SELV circuits.
Making External Connections
Follow these steps to make external connections to your router:
Step 1 Connect the Ethernet port to the network as shown in Figure 2.
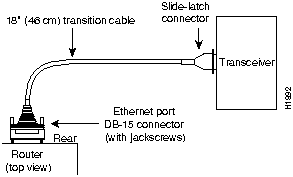
Figure 2 : Ethernet Transition Cable Connections
Step 2 Extend the Ethernet cable as shown in Figure 3.
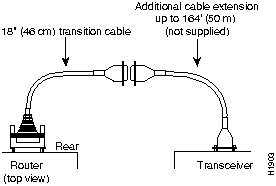
Figure 3 : Extending the Transition Cable from the Router's Ethernet Port
Step 3 Connect the Token Ring port to the network as shown in Figure 4.
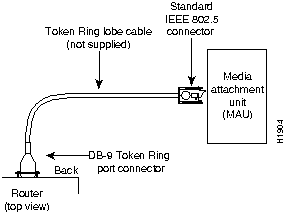
Figure 4 : Token Ring Cable Connections
Step 4 Connect the serial ports to the network as shown in Figure 5.

Figure 5 : Serial Cable Connections
Step 5 Connect the console and auxiliary ports as required for your method of configuration. Your terminal should be configured for 9600 baud, 8 data bits, no parity, and 1 stop bits.
Step 6 Connect the power cable between the router and the AC source.
What to Do after the Router Hardware Is Installed
After the router hardware is installed, the system is ready to be powered on and configured. For software configuration information, refer to the following publications:
- Router Products Getting Started Guide, Router Products Configuration Guide and Router Products Command Summary
- Cisco 2000 Quick-Start Guide (as needed)
- Troubleshooting Internetworking Systems (as needed)
To order these or additional associated publications, refer to the Service and Support card that accompanied your router.
Reference
This section includes the following reference information:
- Troubleshooting information
- System specifications
- Cable pinouts
Note For additional information on the Cisco 2000 router, refer to the Cisco 2000 Quick-Start Guide. For information on installing the router hardware, refer to the section "Installation" on page 1 of this publication.
Troubleshooting
The key to problem solving in this system is to try to isolate the problem to a specific subsystem. By comparing what the system is doing to what it should be doing, the task of isolating a problem is greatly simplified.
Check the following items to help isolate the problem:
- With the power switch on and system LEDs on, does the fan operate? If no, suspect the fan or the 12-volt (V) power supply.
- Does the system shut down after being on a short time?
- Suspect a thermal-induced shutdown.
- Ensure that the chassis intake and exhaust vents are clear.
- Suspect a power supply failure.
- System does not boot up, but System OK LED is on: suspect the 12V power supply.
- System partially boots, but System OK LED is not on: suspect a 5V power supply failure.
The System OK LED should be on after the system initializes correctly. (See Figure 1.)
Note If an interface is extremely busy, the corresponding LED will be on all the time.
System Specifications
Following are the specifications for the router system.
Table 1 : System Specifications
| Dimensions H x W x D
|
13" x 14" x 4" (33 x 35.6 x 10 cm)
|
| Weight
|
15 lb (6.8 kg)
|
| Input voltage, frequency, and power dissipation
|
110/220 VAC at 50 through 60 Hz
55W (max.)
273 Btu/hr
|
| Processor
|
Motorola 68EC030---20 MHz
|
| Memory
|
1-MB primary memory
512-KB shared memory
32-KB nonvolatile configuration RAM
|
| Network interface options
|
1 Ethernet and 1 synchronous serial (2102)
or 1 Token Ring and 1 synchronous serial (2202)
|
| Ethernet interfaces
|
AUI1 IEEE 802.3 (DB-15)
|
| Token Ring
|
IEEE 802.5 (DB-9)
|
| Synchronous serial interfaces
|
RS-232, RS-449, V.35, X.21, EIA-530
|
| Console port
|
Asynchronous RS-232 DB-25 female connector
|
| Auxiliary port
|
Asynchronous RS-232 DB-25 male connector
|
| Operating environment
|
32 to 104°F (0 to 40°C )
|
| Nonoperating temperature
|
--40 to 185°F (--40 to 85°C)
|
| Operating humidity
|
5 to 95%, noncondensing
|
| Noise level
|
40 dBa
|
1 AUI = Attachment unit interface.
Cable Pinouts
The following tables list the pinouts for the cables that can be used with the router:
- Console asynchronous serial port, Table 2, on page 11
- Auxiliary asynchronous serial port, Table 3, on page 11
- EIA-530 synchronous serial DTE, Table 4, on page 12
- RS-232 synchronous serial DTE, Table 5, on page 13
- RS-449 synchronous serial DTE, Table 6, on page 14
- V.35 synchronous serial DTE, Table 7, on page 15
- X.21 synchronous serial DTE, Table 8, on page 16
- Ethernet AUI, Table 9, on page 17
- Token Ring, Table 10, on page 17
Note In the following tables, pinouts representing DTE and DCE cables use arrows to indicate signal direction: ---> indicates DTE to DCE, <--- indicates DCE to DTE.
For more detailed pinout information, refer to the Cisco 2000 Quick-Start Guide.
Table 2 : Console Asynchronous Serial Port RS-232 Pinout (25-Pin D Connector)
| 1
|
Frame Ground
|
--
|
| 2
|
Transmitted Data
|
Input
|
| 3
|
Received Data
|
Output
|
| 4
|
Request To Send
|
Shorted together internally with pin 5
|
| 5
|
Clear To Send
|
--
|
| 6
|
Shorted to pin 8
|
Output
|
| 7
|
Ground
|
--
|
| 8
|
Carrier Detect
|
Output
|
| 20
|
Data Terminal Ready
|
Input
|
1 Any pin not referenced on a connector is not connected.
Table 3 : Auxiliary Asynchronous Serial Port RS-232 Pinout (25-Pin D Connector)
| 1
|
Frame Ground
|
--
|
| 2
|
Transmitted Data
|
Output
|
| 3
|
Received Data
|
Input
|
| 4
|
Request To Send
|
Output
|
| 5
|
Clear To Send
|
Input
|
| 7
|
Ground
|
--
|
| 8
|
Carrier Detect
|
Input
|
| 20
|
Data Terminal Ready
|
Output
|
| 22
|
Ring Indicator
|
Input
|
1 Any pin not referenced on a connector is not connected.
Table 4 : EIA-530 DTE Serial Cable Pinout
J1-5
J1-38
|
Looped
|
|
NC
|
Jumper
|
J1-1
J1-34
|
TXD +
TXD --
|
--->
--->
|
J2-2
J2-14
|
Twisted Pair
|
J1-35
J1-19
|
RXD +
RXD --
|
<---
<---
|
J2-3
J2-16
|
Twisted Pair
|
J1-4
J1-20
|
RTS +
RTS --
|
--->
--->
|
J2-4
J2-19
|
Twisted Pair
|
J1-6
J1-22
|
CTS +
CTS --
|
<---
<---
|
J2-5
J2-13
|
Twisted Pair
|
J1-10
J1-26
|
RLSD + (RR +)
RLSD -- (RR -)
|
<---
<---
|
J2-8
J2-10
|
Twisted Pair
|
J1-2
J1-18
|
SCT +
SCT --
|
<---
<---
|
J2-15
J2-12
|
Twisted Pair
|
J1-37
J1-21
|
SCR +
SCR --
|
<---
<---
|
J2-17
J2-9
|
Twisted Pair
|
J1-43
J1-27
|
SCTE + (TT +)
SCTE -- (TT --)
|
<---
<---
|
J2-24
J2-11
|
Twisted Pair
|
| J1-7
|
LL
|
--->
|
J2-18
|
Twisted Pair
|
J1-48
J1-36
|
Ground
|
|
J2-23
J2-7
|
Twisted Pair
|
| J1-15
|
Shield
|
|
J2-1
|
Single Wire
|
J1-8
J1-24
|
DCE Ready
Ground
|
<---
|
J2-6
J2-23
|
Twisted Pair
|
| J1-41
|
DTE Ready
|
--->
|
J2-20
|
Twisted Pair
|
1 Any pin not referenced on a connector is not connected.
Table 5 : RS-232 DTE Serial Cable Pinout
| J1-3
|
J1-36
|
|
J1-39
J1-40
|
J2-5
J2-4
|
Twisted Pair
|
J1-9
J1-42
|
J2-8
J2-6
|
Twisted Pair
|
J1-11
J1-44
|
J2-2
J2-7
|
Twisted Pair
|
J1-46
J1-30
|
J2-3
J2-20
|
Twisted Pair
|
J1-14
J1-47
|
J2-18
J2-17
|
Twisted Pair
|
J1-31
J1-15
|
J2-15
J2-1
|
Twisted Pair
|
| J1-16
|
J2-24
|
Twisted Pair
|
1 Any pin not referenced on a connector is not connected.
Table 6 : RS-449 DTE Serial Cable Pinout
| J1-5
|
J1-38
|
|
| J1-7
|
J2-10
|
|
J1-1
J1-34
|
J2-4
J2-22
|
Twisted Pair
|
J1-2
J1-18
|
J2-5
J2-23
|
Twisted Pair
|
J1-35
J1-19
|
J2-6
J2-24
|
Twisted Pair
|
J1-4
J1-20
|
J2-7
J2-25
|
Twisted Pair
|
J1-37
J1-21
|
J2-8
J2-26
|
Twisted Pair
|
J1-22
J1-6
|
J2-27
J2-9
|
Twisted Pair
|
J1-8
J1-24
|
J2-11
J2-29
|
Twisted Pair
|
J1-41
J1-25
|
J2-12
J2-30
|
Twisted Pair
|
J1-10
J1-26
|
J2-13
J2-31
|
Twisted Pair
|
J1-43
J1-27
|
J2-17
J2-35
|
Twisted Pair
|
J1-36
J1-15
|
J2-19
J2-1
|
Twisted Pair
|
J1-44
J1-48
|
J2-37
J2-20
|
Twisted Pair
|
1 Any pin not referenced on a connector is not connected.
Table 7 : V.35 DTE Serial Cable Pinout
| J1-3
|
J1-36
|
Jumper
|
MUX
|
To Ground
|
| J1-5
|
J1-38
|
Jumper
|
MUX
|
To Ground
|
J1-14
J1-Shield
|
J2-K
J2-Shield
|
Twisted Pair
|
LTST
Not Used
|
--->
|
J1-2
J1-18
|
J2-Y
J2-AA
|
Twisted Pair
|
SCT +
SCT --
|
<---
<---
|
J1-12
J1-28
|
J2-P
J2-S
|
Twisted Pair
|
TXD +
TXD --
|
--->
--->
|
J1-35
J1-19
|
J2-R
J2-T
|
Twisted Pair
|
RXD +
RXD --
|
<---
<---
|
J1-37
J1-21
|
J2-V
J2-X
|
Twisted Pair
|
SCR +
SCR --
|
<---
<---
|
J1-45
J1-29
|
J2-U
J2-W
|
Twisted Pair
|
SCTE +
SCTE --
|
--->
--->
|
J1-42
J1-Shield
|
J2-E
J2-Shield
|
Twisted Pair
|
DSR
Not Used
|
<---
|
J1-9
J1-48
|
J2-F
J2-A
|
Twisted Pair
|
RLSD
Ground
|
<---
<---
|
J1-40
J1-Shield
|
J2-C
J2-Shield
|
Twisted Pair
|
RTS
Not Used
|
--->
|
J1-2
J1-18
|
J1-3
J1-5
|
Resistor
Resistor
|
SCT +
SCT --
|
R To
Ground
|
J1-35
J1-19
|
J1-36
J1-38
|
Resistor
Resistor
|
RXD +
RXD --
|
R To
Ground
|
J1-37
J1-21
|
J1-44
J1-48
|
Resistor
Resistor
|
SCR +
SCR --
|
R To
Ground
|
J1-30
J1-44
|
J2-H
J2-B
|
Twisted Pair
|
DTR
Ground
|
--->
--->
|
J1-39
J1-Shield
|
J2-D
J2-Shield
|
Twisted Pair
|
CTS
Not Used
|
--->
|
J1-Shield
J1-Shield
|
J2-Shield
J2-Shield
|
Twisted Pair
|
Not Used
Not Used
|
|
| J1-Shield
|
J2-Shield
|
Single
|
Not Used
|
|
1 Any pin not referenced on a connector is not connected.
Table 8 : X.21 DTE Serial Cable Pinout
| J1-5
|
MUX SEL
|
|
J1-38
|
GND
|
| J1-36
|
449 GND
|
|
J2-8
|
X.21 GND
|
J1-41
J1-25
|
449 DTR
|
Jumper
|
J1-6
J1-22
|
449 CTS
|
J1-41
J1-25
|
449 DTR
|
Jumper
|
J1-8
J1-24
|
449 DSR
|
J1-43
J1-27
|
449 SCTE
|
Jumper
|
J1-37
J1-21
|
449 SCR
|
J1-1
J1-34
|
449 TXD
|
Twisted Pair
|
J2-2
J2-9
|
X.21 TXD
|
J1-4
J1-20
|
449 RTS
|
Twisted Pair
|
J2-3
J2-10
|
X.21 CTL
|
J1-35
J1-19
|
449 RXD
|
Twisted Pair
|
J2-4
J2-11
|
X.21 RXD
|
J1-10
J1-26
|
449 RLSD
|
Twisted Pair
|
J2-5
J2-12
|
X.21 IND
|
J1-2
J1-18
|
449 SCT
|
Twisted Pair
|
J2-6
J2-13
|
X.21 CLK
|
1 Any pin not referenced on a connector is not connected.
Table 9 : Ethernet (AUI) Port Pinout
| 1
|
CI-S
|
Control In Circuit Shield
|
| 2
|
CI-A
|
Control In Circuit A
|
| 3
|
DO-A
|
Data Out Circuit A
|
| 4
|
DI-S
|
Data In Circuit Shield
|
| 5
|
DI-A
|
Data In Circuit A
|
| 6
|
VC
|
Voltage Common
|
| 7
|
CO-A
|
Control Out Circuit A (not connected)
|
| 8
|
CO-S
|
Control Out Circuit Shield (not connected)
|
| 9
|
CI-B
|
Control In Circuit B
|
| 10
|
DO-B
|
Data Out Circuit B
|
| 11
|
DO-S
|
Data Out Circuit Shield
|
| 12
|
DI-B
|
Data In Circuit B
|
| 13
|
VP
|
Voltage Plus
|
| 14
|
VS
|
Voltage Shield (L25 and M25)
|
| 15
|
CO-B
|
Control Out Circuit B (not connected)
|
| Shell
|
PG
|
Protective Ground
|
1 Any pin not referenced on a connector is not connected.
Table 10 : Token Ring Port Pinout (DB-9)
| 1
|
--RX
|
| 2
|
NC1
|
| 3
|
NC
|
| 4
|
NC
|
| 5
|
--TX
|
| 6
|
+RX
|
| 7
|
NC
|
| 8
|
NC
|
| 9
|
+TX
|
1 NC stands for not connected.
Copyright 1988-1996 © Cisco Systems Inc.
