Banner
HomeTOCPrevNextGlossSearchHelp

PDF

Table of Contents

Upgrading System Software in the Cisco 4000 Series

Upgrading System Software in the Cisco 4000 Series

Upgrading System Software in the Cisco 4000 Series

Product Numbers:

SW-G4-x.x.x= SW-G4D-x.x.x= SW-G45BS-x.x.x=
SW-G4A-x.x.x= SW-G4DS-x.x.x= SW-G45C-x.x.x=
SW-G4AN-x.x.x= SW-G4DSN-x.x.x= SW-G45CS-x.x.x=
SW-G4B-x.x.x= SW-G4P-x.x.x= SW-G45D-x.x.x=
SW-G4BS-x.x.x= SW-G45A-x.x.x= SW-G45DS-x.x.x=
SW-G4C-x.x.x= SW-G45AN-x.x.x= SW-G45DSN-x.x.x=
SW-G4CS-x.x.x= SW-G45B-x.x.x= BOOT-4000=


Note The x.x.x variable in the product number represents the maintenance release number of your software upgrade. For example, if you were upgrading a Cisco 4000 to Cisco Internetwork Operating System (Cisco IOS) Release 10.2(3), the product number would be SW-G4-10.2.3=.

Read this entire document before attempting any of its procedures.

This publication describes the tasks you must follow to upgrade system software in your Cisco 4000, Cisco 4000-M, Cisco 4500, Cisco 4500-M, Cisco 4700, or Cisco 4700-M via floppy disk. These tasks include the following:


Note Use of the Flash memory is subject to the terms and conditions of the software license agreement that accompanies the product.

If you plan to use an FDDI interface to transfer the system software using TFTP, then you must first install the appropriate boot ROMs. Refer to the section "Upgrading Boot ROMs in the Cisco 4000 and the Cisco 4000-M," then begin the system software upgrade procedure.

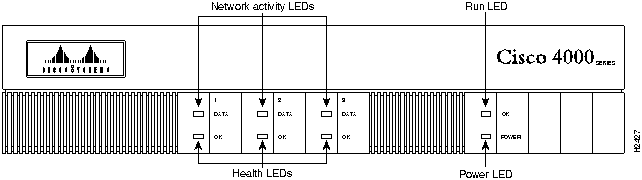
Figure 1 shows the front view of a Cisco 4000 series router.

Figure 1 : Cisco 4000 Series Router---Front View

h2427.gif


About This Document

This document contains the following sections:


Note Instructions for contacting technical assistance are provided at the end of this publication. All warnings in this document appear in multiple languages in the appendix "Translated Safety Warnings" in the Cisco 4000 Series Installation Guide.


Overview of Image Distribution and Upgrade Methods

The Cisco 4000 series supports Flash memory downloading for most new images. Downloadable images enable you to download new images over the network, store the images in the router's Flash memory, and load images from Flash memory at system startup without having to physically access the router. Although for most upgrades you can configure the system to load newer images from Flash memory files to override the default ROM images, some exceptions require ROM replacement to ensure proper startup and operation.

Depending on the type of media in your upgrade kit, proceed as follows:

Review the entire section before beginning either of these procedures to ensure that you are aware of any safety considerations or system prerequisites.


Upgrading from Floppy Disks or TFTP Servers

This section describes the procedures for upgrading system software from a floppy disk by copying the new image to a TFTP server, then loading the new image from the TFTP server to the Flash memory on one or more routers. When ROM replacement is not required, this procedure enables you to upgrade all of the routers in your network remotely, without having to physically access the router to replace components.

The Cisco 4000 series can also netboot from a TFTP file server directly to CPU-local RAM, which does not require storing the image in Flash memory. The procedure is described in the appropriate router software configuration documentation.


Note Cisco documentation and additional literature are available on a C-ROM called Cisco Connection Documentation, Enterprise Series. The CD is updated and shipped monthly so it might be more current than printed documentation. To order the Cisco Connection Documentation, Enterprise Series CD, contact your local sales representative or call Customer Service. The CD is available both as a single CD and as an annual subscription.You can also access Cisco technical documentation on the World Wide Web URL http://www.cisco.com. The Cisco Connection Documentation, Enterprise Series CD was previously called UniverCD.


Prerequisites and Caveats

To successfully upgrade system software and read-only memory on your Cisco 4000 series routers, first read the following prerequisites and caveats.


Prerequisites

  • You must have IP running to the devices you plan to upgrade on the network.

  • Your router was shipped with Flash memory enabled. Flash memory must be enabled on the router to make a write to Flash memory operation possible. Refer to the hardware installation guide or hardware installation and maintenance publication for the router product you are upgrading for appropriate Flash-enabled jumper settings. If jumpered as write-protected, the system makes a write operation impossible.

  • You must have a terminal connection that enables you to issue commands to each router on the network you want to upgrade. If you do not have a direct terminal connection, you must set up a Telnet session on a device attached to the router to be upgraded.

    • If you are using TCP/IP software that permits concurrent Telnet and TFTP server connections, your terminal connection and TFTP session can be from the same PC.

    • If you are using TCP/IP software that permits only the TFTP server to run (such as PC/TCP from FTP Software, Inc.), you need two machines. Set up one for your terminal connection and the other for your TFTP server.

  • A TFTP file server must be active and accessible to the router. You must copy the system software image into the TFTP server directory to download it to the router.

If the TFTP server is a PC, it must have the following minimum configuration:

  • The server must be a PC or a desktop SPARCstation with a 1.44 MB 3.5-inch floppy disk drive.

  • The configuration of the computer must meet the requirements established by the vendor of the TFTP software. Cisco has tested the following software running on an Everex 386/33 running under DOS 5.0 (in both Ethernet and Token Ring environments):

PC/TCP from FTP Software, Inc., version 2.0 and greater. The toll-free number for FTP Software, Inc. is 800 282-4387. The address for FTP Software, Inc. is 100 Brickstone Square, Andover, MA, USA 01810.

Chameleon TCP/IP for Windows from NetManage Inc. To contact NetManage, Inc., call 408 973-7171 or fax 408 257-6405. The address for NetManage, Inc. is 10725 N. DeAnza Blvd., Cupertino, CA 95014.

Cisco has also tested the TFTP server provided by SunOS 4.1x on SPARCstation platforms. A desktop SPARCstation must have a 1.44-MB, 3.5-inch floppy disk drive.

  • The keywords flash and rom are reserved for the boot system configuration commands and indicate that the Flash memory or system ROMs, respectively, are to be used for booting system images. Do not use these reserved keywords for other files you might create.

  • Use of Cisco routers with Flash memory capability requires Software Release 9.1 or later.


Caveats

  • When you install a system software image onto your TFTP server, make sure you have available at least 2 MB of disk space. If you do not have enough space on the disk, the existing space will be filled up with an incomplete image that will not function on your routers.

  • If you have not yet installed your TCP/IP software, you might need to be aware of the following issues when installing it:

    • Use the proper driver for your network interface card and system configuration.

    • Know whether your TFTP server is using a DMA channel.

    • Know the appropriate IRQ value to use for the driver you use and ensure that it does not conflict with a value used by another card in your PC.

    • Know the I/O address to choose for the network interface card in the PC.

    • Obtain an IP address for the PC and identify the number of subnet bits to assign.

  • If you are using Chameleon TCP/IP for Windows, click the Server On check box in the Server Settings dialog box before you use TFTP to transfer the system software image.


Procedural Overview

This section describes the general steps required to upgrade your system software on a Cisco 4000 series router. The sections that follow describe these steps in greater detail.

Step 1 Install the system software from the 3.5-inch floppy disk onto your PC or UNIX machine into the TFTP server directory.

Step 2 Verify that the router you want to upgrade has access to the TFTP server. Then ping from the TFTP server to the router and from the router to the TFTP server.

Step 3 Start the TFTP server if it is not already active.

Step 4 If you do not have a console port connection to the router you plan to upgrade, establish a Telnet session with the router.

Step 5 Back up the existing working system software image currently in Flash memory by copying it to the TFTP server.

Step 6 Copy the system software image from the TFTP server into Flash memory.

Step 7 Ensure that the checksum listed on the bottom line of the output for the copy tftp flash command matches the checksum listed in the README file on the upgrade disk. If it does not, you must invoke the copy tftp flash command again before booting from Flash memory.

Step 8 Make sure your system is configured to boot from the new image in Flash memory.

Step 9 Boot the router from Flash memory. This process writes the image from Flash memory into system RAM.

Step 10 Check all network connections to ensure that the router with the upgraded system software is up and functioning properly. Repeat these steps to upgrade subsequent routers.


Installing System Software onto Your TFTP Server

This section describes how to use the installation program on the disk with your software upgrade to install the system software onto your DOS PC or your desktop SPARCstation.

Refer to the online README file on the software upgrade disk for details about the image for the routers to be upgraded. The README file lists details such as product number, image type, file size, and checksum of the compressed image.


Installing System Software onto a DOS PC

To copy your system software upgrade into the appropriate directory on the PC you plan to use as the TFTP server, use the following procedure. Allow five minutes to complete this procedure.

fig_11.gif Caution Do not install the system software image to the TFTP server a first time, then install it again. If you do, the system appends the second image to the first image rather than writing over it, and the altered image will not function in your routers. If you want to install the image a second time, first delete the image from the destination directory on the TFTP server, then reinstall it.

Step 1 Make a backup copy of the master system software upgrade distribution disk and work from the backup copy. Archive the master disk.

Step 2 Insert the upgrade disk containing the system software upgrade into your 3.5-inch disk drive.

Step 3 Type the following command and press Enter.


C:\> a: install

where a is the drive in which you insert the source disk. The drive letter can be either a or b.

A screen similar to the following appears. This screen is for an 11.1(2) software image. If you are upgrading to a different release of router system software, the header fields (first four lines in the display) will be different.

****************************** yj11120n.DOC ******************************
File Information
----------------
System Software: c4500-j-mz.111-2
Filename: yj11120n
Cisco IOS Version: 11.1(2)
MD5 Authentication Checksum: ab2b45e185c21b9cb6c73d6d4b24f4e6

For a list of features supported in this image and release,
please refer to your Product Catalog which is available
on-line on UniverCD and CIO (http://www.cisco.com).

To install this software in a PCDOS environment enter:
A:install (or use the appropriate drive letter)

To install this software in a UNIX environment enter:
#mount -rt pcfs /dev/fd0 /pcfs
#/pcfs/install.unx (where the user has root privileges)

Copyright (c) 1995 Cisco Systems, Inc.
****************************************************************************

Step 4 A prompt appears asking if you want to continue with the installation. Press Y (or Enter) to continue, or N to abort.

Step 5 A prompt appears, asking where the files will be installed. The default directory is C:\TFTPBOOT. To accept this directory, press Enter. To specify a different directory, type the full path name, then press Enter.

If the nondefault directory you specify does not already exist, a message appears asking if you want to create the directory.

Step 6 To create the directory, press Y. If you do not want to create a new directory on your PC and want to abort this process, press N.

The software displays a set of messages indicating the status of the installation. The copy process takes about one minute.

Step 7 If you have multiple disks, the system prompts you to insert the second disk and press Enter.

When the process is complete, the following message appears. This example shows the 11.1(2) image for the Cisco 4000---yj11120n.

Installation for yj11120n complete!

Step 8 Eject the disk from the disk drive and store it in a safe place.

Step 9 Change to the directory in which you installed the software image. For example, if you installed it in the default directory, type the following command and press Enter:


C:\> cd \tftpboot

Step 10 List the contents of the images in this directory. For example, if you installed a 11.1(2) image for the Cisco 4500-M, type the following command and press Enter:


C:\> dir yj11120n.*

The following two files should appear:

  • yj11120n

  • yj11120n.DOC (the README file that appears when you install the image on the server)

Proceed to the section "Establishing a TFTP Session" later in this document.


Installing System Software onto a Sun Workstation

The following procedures describe how to install the system software upgrade onto a desktop SPARCstation with Sun OS 4.1.x. The workstation must have a 3.5-inch, 1.44-MB floppy disk drive. Allow ten minutes to complete this procedure.

You must have superuser access to install the router system software onto the UNIX system.


Note If you have a different UNIX system, refer to your system's documentation for how to load a PC-DOS formatted floppy disk and how to configure the system as a TFTP server.

fig_12.gif Caution Do not install the system software image to the TFTP server a first time, then install it again. If you do, the system appends the second image to the first image rather than writing over it, and the altered image will not function in your routers. If you want to install the image a second time, first delete the image from the destination directory on the TFTP server, then reinstall it.

Use the following procedure to create a mount point and install the system software image on your TFTP server. Note that filenames are case sensitive.

Step 1 Create a directory named pcfs as follows (you must have superuser capability to execute this instruction):


hostname# mkdir /pcfs

Step 2 Insert the disk containing the system software upgrade into your 3.5-inch floppy disk drive.

Step 3 Mount the floppy disk drive as a device by entering the following command:


hostname# mount -t pcfs /dev/fd0 /pcfs

If the disk is write-protected, you should enter the following command:

hostname# mount -rt pcfs /dev/fd0 /pcfs

The floppy is now set up as the device /pcfs.

Step 4 Copy the router system software to your TFTP directory. To copy it to the default (/tftpboot) directory, enter the following command:


hostname# /pcfs/install.unx

Step 5 A message appears prompting you to specify the device from which the software is being installed. The default is /dev/fd0. To accept the default, press Return. To specify a different directory, type the name of the built-in floppy drive on the SPARCstation.

Step 6 A message appears prompting you to specify the path from the mounted floppy drive. The default is /pcfs. To accept the default, press Return. To specify a different path, type the full path name.

A screen similar to the following appears. This screen is for a 11.1(2) software image on a Cisco 4000. If you are upgrading to a different release of router system software, the header fields (first four lines in the display) will be different.


****************************** yj11120n.DOC ******************************
File Information
----------------
System Software: c4500-j-mz.111-2
Filename: yj11120n
Cisco IOS Version: 11.1(2)
MD5 Authentication Checksum: ab2b45e185c21b9cb6c73d6d4b24f4e6

For a list of features supported in this image and release,
please refer to your Product Catalog which is available
on-line on UniverCD and CIO (http://www.cisco.com).

To install this software in a PCDOS environment enter:
A:install (or use the appropriate drive letter)

To install this software in a UNIX environment enter:
#mount -rt pcfs /dev/fd0 /pcfs
#/pcfs/install.unx (where the user has root privileges)

Copyright (c) 1995 Cisco Systems, Inc.
****************************************************************************

Step 7 Print the README file screen, or note the filename, checksum, and image size in the site log for later reference.

Step 8 A prompt appears asking if you want to continue with the installation. Press Y (or Enter) to continue, or N to abort.

The screen displays a set of messages indicating the status of the installation. The copy process takes five minutes.

Step 9 If you have multiple floppy disks, the system prompts you to insert the second disk and press Enter.

After the image is installed on your TFTP server, the disk is automatically ejected and the disk drive is automatically unmounted. The message that follows appears. This example shows the 11.1(2) image for a Cisco 4000---yj11120n.

Installation for yj11120n complete!

Step 10 Eject the disk from the disk drive and store it in a safe place.

Step 11 Change to the directory in which you installed the system software image. For example, if you installed it in the default directory, enter the following command:


hostname# cd /tftpboot

Step 12 List the contents of the images in this directory. For example, for a11.1(2) system software image for a Cisco 4500-M, enter the following command:


hostname# ls -l yj11120n.*

The following two files should appear for the 11.1(2) image on a Cisco 4500-M. Other image names would be different, such as xk11050z for the 11.0(5) image:

  • yj11120n

  • yj11120n.doc (the README file that appears when you install the software image on the server)

Proceed to the next section, "Making Your Network Connections."


Making Your Network Connections

This section describes the following topics:

  • Testing the TCP/IP software

  • Establishing a TFTP session (to the router)

  • Establishing a Telnet session (from the router to the TFTP server)


Testing the TCP/IP Software

After installing the TCP/IP software you will use to copy the Cisco IOS Release 11.1 software image to the routers on your network, make sure it functions properly by following this procedure:

Step 1 Make sure a router with which you plan to communicate is up and running by transmitting an IP ping from that router to the TFTP server on the network. Use the following syntax for the ping command:


router# ping ip-address

If the router is appropriately connected, you see a series of exclamation points (!!!!!). However, the following messages indicate that you have no connection:

[timed out]
[failed]

Step 2 Verify the connection to the TFTP file server by transmitting a ping from the TFTP file server to the router.

If the connection fails, make sure you reconfigure the interface, check the physical connection to the TFTP file server, and retransmit the ping.
(a) If you are using PC/TCP Network Software for DOS from FTP Software, Inc., you can verify the appropriate driver and IP address by entering the following command:

C:\> ifconfig drivers\drivername show
(b) You can verify your IP configuration by entering the following command:

C:\> ipconfig ftp_3c\ipcust.sys show
(c) If you are using Chameleon TCP/IP for Windows from NetManage, Inc., run its Setup program to verify that you are using the appropriate driver and have configured the TCP/IP software properly.


Establishing a TFTP Session

This section describes how to set up your UNIX system or PC as a TFTP server and start a TFTP session with the router you want to upgrade remotely.

If you are using a PC and do not already have TFTP software, we recommend the following two TCP/IP software packages:

  • PC/TCP Network Software for DOS from FTP Software, Inc. (character-based TFTP software capability)

  • Chameleon software from NetManage, Inc. (a TFTP server based on Microsoft Windows)

The section "Prerequisites and Caveats" on page 4 lists some issues to remember when installing the software.


Setting Up TFTP on a Sun Workstation

To set up the Sun system as a TFTP server, you must verify that the TFTP daemon is enabled, the TFTP environment variable is set correctly, and a tftpboot directory exists.

  • To see if TFTP is enabled, enter the following command:
hostname# netstat -a | grep tftp 


Enabling the TFTP Daemon

The TFTP daemon (tftpd) permits the system to be a TFTP server. If you are using the standard Sun software, verify that tftpd is enabled by completing the following steps:

Step 1 Log in as a superuser.

Step 2 Using a text editor such as vi, edit the /etc/inetd.conf file.

Step 3 Look in the file /etc/inetd.conf for the line that invokes tftpd. If the line is commented out (starts with a pound sign [#]), remove the pound sign with an editor. This example shows sample output for the /etc/inetd.conf file.


# tftp dgram udp wait root /user/etc/in.tftpd
in.tftpd -s /tftpboot

Step 4 Save the changes in the edited file and exit.

Step 5 At the UNIX prompt, enter the following command to display the process ID number for the inetd configuration:


hostname# ps -ax | grep -v grep | grep inetd

The system response is similar to the following:

119 ? S 0:05 inetd

The first number in the output is the process ID of the inetd process. You must kill this inetd process by entering the following command:

hostname# kill -HUP 119

Step 6 Verify that TFTP is enabled by entering the following command:


hostname# netstat -a | grep tftp

The output should be similar to the following:

udp 0 0 *.tftp *.*

If there is no output, tftpd is not enabled. For additional information about TFTP, refer to the UNIX man pages about tftp and tftpd.


Creating a tftpboot Directory

The tftpboot directory can be used to save and store configuration files that are loaded to a device. Device configuration files can be saved as TFTP boot files.


Note The tftpboot directory is accessible to all users. To protect the security of your system, do not leave sensitive files in this directory.

You must have superuser access to perform the following steps. These steps describe how to create a tftpboot directory.

Step 1 If the tftpboot directory does not exist, use the following command to create it:


hostname# mkdir /tftpboot

Step 2 The tftpboot directory must have the appropriate permissions. Modify the permissions with the following command:


hostname# chmod 777 /tftpboot

As a result, all users accessing this directory will have read, write, and execute permissions.

After completing all the preparations required to set up the Sun system as a TFTP server, refer to "Testing the TCP/IP Software" on page 10.


Establishing a Telnet Session

You must be able to issue commands to the router you plan to upgrade. For example, this document instructs you to issue a command to download the image from the TFTP server to the router.

If you have a console port connection to the router, you need not invoke a Telnet session.

If you do not have a console port connection to the router, you must establish a Telnet session with it so that you can issue commands.

You can set up a Telnet session from a Sun workstation or from a PC.

  • If you are using a Sun workstation as a TFTP server, you can also establish a Telnet session from the workstation to the router in addition to the TFTP session.

  • If you are running TCP/IP software on a PC, does the software support multiple Telnet sessions?

    • If only a single Telnet session is supported, you need a second PC from which you can establish a Telnet session.

    • If multiple concurrent sessions are supported, you can open one window for the TFTP session and one window for the Telnet session.


Loading the New Image

This section contains the following topics:

  • Backing up your current system software image (including learning the existing system software image name and copying the image from Flash memory to the TFTP server)

  • Copying the image from a TFTP server to Flash memory

  • Verifying the new image in Flash memory


Backing Up Your Current System Software Image

If you do not already have the current system software image on your TFTP server, make sure you back up this image before copying the new system software image to Flash memory on your router.


Learning the Image Name

First, you must know the exact spelling of the image name. To learn the image name, issue the show flash all command. The following sample output for a compressed Cisco 4000 image (Cisco IOS Release 11.1(2)) displays an image name of yj11120n near the bottom of the screen.

router# show flash all
System flash directory:
File  Length   Name/status
        addr      fcksum  ccksum
  1   4448508  master/california/i7/bin/c4500-aj-mz.111-1 
        0x40      0x52C3  0x52C3
[4448572 bytes used, 3940036 available, 8388608 total]
8192K bytes of processor board System flash (Read/Write)
   Chip    Bank    Code      Size      Name
    1      1       89A2      1024KB    INTEL 28F008SA
    2      1       89A2      1024KB    INTEL 28F008SA
    3      1       89A2      1024KB    INTEL 28F008SA
    4      1       89A2      1024KB    INTEL 28F008SA
    1      2       89A2      1024KB    INTEL 28F008SA
    2      2       89A2      1024KB    INTEL 28F008SA
    3      2       89A2      1024KB    INTEL 28F008SA
    4      2       89A2      1024KB    INTEL 28F008SA
router# 

Use the name near the bottom of your router's show flash all command (in this case, yj11120n) when you back up the image.


Copying the Image from Flash Memory to the TFTP Server

To copy an image from Flash memory to a TFTP server, use the copy flash tftp command:

router# copy flash tftp filename 


The router asks you for the IP address of the TFTP server and the name of the image file you are copying to the server.

A sample of the output for this command using IP address 131.108.10.6 and filename yj11120n follows:

IP address of remote host [255.255.255.255]? 131.108.10.6
Name of file to copy []? yj11120n 
writing yj11120n !!!!!!!!!!!!!!!!!!!!!!!!!!!!!!!!!!!!!!!!!!!
router# 

Use the image you backed up to the TFTP server if the upgrade image becomes damaged.


Copying the Image from a TFTP Server to Flash Memory

The copy tftp flash command retrieves an image from a TFTP server and copies (writes) the image into the router's Flash memory. The TFTP server can be another Cisco router serving ROM or Flash memory system software images, or a PC or UNIX workstation set up as a server for remotely downloading new images to routers on the network. If you have already established a connection with the remote server, proceed to "Downloading the New Image" on page 15.

In some cases, primarily outside of North America, Cisco Systems distributors may choose not to distribute the new software image on floppy disk. Instead, they can place the new image on TFTP servers and provide their customers with the information they will need to access and download the new image. If you are downloading the new image from your distributor with this process, ensure that your distributor has provided you with all of the following information:

  • IP address of the TFTP server that contains the new image

  • Exact image name

  • Image size (length in bytes)

  • Checksum

You must have all of this information from your distributor before you can complete the upgrade. Proceed to the next section, "Verifying the Connection."


Verifying the Connection

Verify the connection between your router and the remote server by pinging the server using the IP address (this may be provided by your distributor). Following is an example of a successful ping command to a remote server with the address 131.131.101.101:

router# ping 131.131.101.101 <Return>
Type escape sequence to abort.
Sending 5, 100-byte ICMP Echoes to 131.131.101.101, timeout is 2 seconds:
!!!!!
Success rate is 100 percent (5/5), round-trip min/avg/max = 1/15/64 ms
router#

The console displays either a series of exclamation points (!!!!!) to indicate a good connection between your router and the server or a series of periods (.....) or the messages [timed out] or [failed] to indicate that the connection failed. If the connection fails, verify that you have the correct IP address for the server and that the server is active (powered on), and repeat the ping command.


Verifying Flash Memory Capacity and Configuration

Before copying the new image to Flash memory, use the show flash all command to verify that Flash memory is not write-protected and that there is sufficient space remaining for the new image. The following example shows that writing to Flash memory is enabled and that Flash memory has approximately 0.75 MB of space available for new images (shown as the amount of bytes free in the last line of the display).


router# show flash all
System flash directory:
File  Length   Name/status
        addr      fcksum  ccksum
  1   4448508  master/california/i7/bin/c4500-aj-mz.111-1 
        0x40      0x52C3  0x52C3
[4448572 bytes used, 3940036 available, 8388608 total]
8192K bytes of processor board System flash (Read/Write)
   Chip    Bank    Code      Size      Name
    1      1       89A2      1024KB    INTEL 28F008SA
    2      1       89A2      1024KB    INTEL 28F008SA
    3      1       89A2      1024KB    INTEL 28F008SA
    4      1       89A2      1024KB    INTEL 28F008SA
    1      2       89A2      1024KB    INTEL 28F008SA
    2      2       89A2      1024KB    INTEL 28F008SA
    3      2       89A2      1024KB    INTEL 28F008SA
    4      2       89A2      1024KB    INTEL 28F008SA
router# 

Compare the amount of memory available (the bytes free value) with the size of the new image to ensure that there is ample space available in Flash memory. If there is not sufficient space available for the new image, you must erase the entire contents of Flash memory before you can copy in the new image; you cannot selectively delete specific files. You should, however, copy the files you want to keep to a TFTP server, then selectively copy the files back into Flash memory after erasing and installing the new image. Refer to "Backing Up Your Current System Software Image" on page 13 for instructions.

If you attempt to copy a new image into Flash memory when there is not enough space available, the copy process will begin but the entire image will not copy into Flash memory. A "Buffer overflow - xxxx/xxxx" failure message will appear, where xxxx/xxxx is the number of bytes read in/number of bytes available. The partial image will remain in Flash memory until it is erased.


Downloading the New Image

When you issue the copy tftp flash command for the first time, you are prompted for the IP address (or domain name) of the TFTP server. This can be another Cisco router serving ROM or Flash memory system software images. You are then prompted for the filename of the software image and given the option to erase the existing Flash memory. Type Y. The filename can be lower- or uppercase; the router will see the name as lowercase. The system clears and initializes Flash memory. The entire copying process takes several minutes. This time differs from network to network.

fig_13.gif Caution Do not make any typographical errors while using the copy tftp flash command in selecting the filename of the system software image you are copying. If you type a filename that does not exist when using the copy tftp flash command, then tell the system to erase the current image, the router erases the existing image in Flash memory. If this happens, the router still has a working image in RAM, so your router will still function. If you think you have tried to load a nonexistent file, do not reboot the router. If you do, your router will not have a functional image in Flash memory. To recover from the accidental Flash memory erasure, execute the copy tftp flash command again to load the appropriate image into Flash memory.

The following sample output shows a system image named yj11120n copied into the current Flash memory configuration:

router# copy tftp flash
File  name/status
 0  xx-k.111-2
 [123816/2097152 bytes free/total]

IP address or name of remote host [255.255.255.255]? 131.108.1.111
Name of file to copy ? yj11120n
Copy yj11120n from 131.108.1.111 into Flash address space ?  [confirm] <Return>
123752 bytes available for writing without erasure.
Erase Flash address space before writing? [confirm] <Return> 
bank 0...zzzzzzzzzzzzzzzzvvvvvvvvvvvvvvvveeeeeeeeeeeeeeee
bank 1...zzzzzzzzzzzzzzzzvvvvvvvvvvvvvvvveeeeeeeeeeeeeeee
Loading from 131.108.1.111: !!!!!!!!!!!!!!!!!!!!!!!!!!!!!!!!!!!!!!!!!!!!!!!!!!!!
!!!!!!!!!!!!!!!!!!!!!!!!!!!!!!!!!!!!!!!!!!!!!!!!!!!!!!!!!!!!!!!!!!!!!!!!!!!!!!!!
!!!!!!!!!!!!!!!!!!!!!!!!!!!!!!!!!!!!!!!!!!!!!!!!!!!!!!!!!!!!!!!!!!!!!!!!!!!!!!!!
!!!!!!!!!!!!!!!!!!!!!!!!!!!!!!!!!!!!!!!!!!!!!!!!! [OK - 1337256/2097088 bytes]
Verify checksum...vvvvvvvvvvvvvvvvvvvv
Verification successful: Length = 1337256, checksum = 0x5A1C


The series of exclamation points (!) in the preceding sample output indicates that the copying process is taking place. The series of Vs indicates that a checksum is being calculated. The last line in the sample configuration indicates that the file transfer is complete.

If the process was successful, refer to the next section, "Verifying Software Images in Flash Memory." If it was not successful, refer to the section "Recovering from a Flash Memory Failure" on page 20.

fig_14.gif Caution If you accidentally erase the image in Flash memory, as well as the system software image in RAM, and the router you are upgrading is on a remote LAN segment, you must issue the ip default-gateway command from the RXBOOT image on the remote router. For more information about Cisco IOS commands, refer to the Cisco IOS configuration guides and command references.


Note To abort the copy process, simultaneously press Control, Shift, and 6. The process will abort; however, the partial file copied before the abort was issued will remain until the entire Flash memory is erased.


Verifying Software Images in Flash Memory

Before booting from Flash memory, you must verify that the checksum of the compressed image shown at the bottom of the screen after you issue the copy tftp flash command matches the checksum listed in the README file on the software upgrade disk.

If the checksum value is not correct according to the value in the README file on the system upgrade disk, enter the copy tftp flash command and compare the checksums again. If the checksum is repeatedly wrong, copy the original system software image back into Flash memory before you reboot the router from Flash memory.

fig_15.gif Caution If you have a bad image in Flash memory and try to boot from Flash memory, the router will not function and must be reconfigured through a direct console port connection.


Booting from Flash Memory

The following sections describe how to boot from Flash memory, both automatically and manually. When you boot a router from Flash memory, the system writes the image from Flash memory into system RAM. Refer to the previous section, "Verifying Software Images in Flash Memory," before you reboot the router.

fig_1.gif Caution If the NVRAM-stored configuration file on your router has the line boot system flash filename, then each time you write a new software image to Flash memory, you must delete this line by issuing the no boot system flash filename system configuration command. Then add a line that reads boot system flash or boot system flash filename, where the filename is the exact name of the new system software image. If you do not do this, the router will repeatedly try to reboot from the now-erased file. If the configuration file includes boot system flash with no argument, you do not need to take these steps. In this case, the router will boot from the first system image in Flash memory by default.

From the enable-mode prompt on the router, enter the EXEC command write terminal to see whether the boot system flash command line in the configuration file has the filename argument, as follows:

router> enable
Password: 
router# wr term
Current configuration: 
!
(text deleted)
boot system flash
(text deleted)


Automatically Booting from Flash Memory

You can configure the router to automatically boot from the image in Flash memory by following this procedure:

Step 1 Issue the configure terminal command in EXEC mode (at the enable [#] prompt).

Step 2 Add the boot system flash filename system configuration command to the router's configuration, where filename is the name of the new software image. If a filename already appears in the configuration file, remove it with the no boot system flash filename command.

Step 3 While still in configuration mode, set the configuration register on the Cisco 4000 series router to boot from Flash memory by entering the config-reg 0x command.

Step 4 Write the configuration to NVRAM with the write memory command.

The following example shows the sequence of steps for replacing a Cisco IOS Release 11.1(1) image with an 11.1(2) image. If you are replacing different images, substitute the different image names.

router# configure terminal
no boot system flash xk11110z (Removes old filename)
boot system flash yj11120n (Tells the system to boot new filename)
^Z
router# write memory
[ok]
router#


Step 5 At this point, you can reboot the router with the reload command. The router will boot the new software image from Flash memory. The following example shows the output of the reload command.


router# reload
[confirm]

%SYS-5-RELOAD: Reload requested
System Bootstrap, Version 5.1(1) [daveu 1], RELEASE SOFTWARE (fc1)
Copyright (c) 1994 by cisco Systems, Inc.
C4500 processor with 32768 Kbytes of main memory
>


Manually Booting from Flash Memory

If you do not have your router set up to automatically boot from Flash memory, as specified in the previous section, you can manually boot from Flash memory by following this procedure:

Step 1 Make sure the configuration register on the router is set to boot from ROM when you reboot the router using the reload command. If you are not sure whether this value is correct on your router, enter configuration mode and issue the config-reg 0x10F command. This command causes the router to be booted from Flash memory and the Break key to be ignored.

Step 2 Write this configuration to NVRAM by issuing the write-memory EXEC command.

Step 3 Enter privileged user mode and issue the reload command, as specified in the previous section.

Step 4 The system enters ROM monitor level. At this point, initialize the system by typing i at the ROM monitor prompt, as shown in the following example:


> i

System Bootstrap, Version 5.1(1) [daveu 1], RELEASE SOFTWARE (fc1)
Copyright (c) 1994 by cisco Systems, Inc.
C4500 processor with 32768 Kbytes of main memory


Step 5 Boot the router manually by issuing the b flash command. If the router has more than one image in Flash memory, it asks for the name of the image from which you want to boot. The following example shows a router booting the only image in Flash memory:


> b flash

Checking Link Status...OK
Booting yj11120n from flash memory RRRRRRRRRRRRRRRRRRRRRRRRRRRRRRRRRRRRRRR
RRRRRRRRRRRRRRRRRRRRRRRRRRRRRRRRRRRRRRRRRRRRRRRRRRRRRRRRRRRRRRRRRRRRRRRRRR
RRRRRRRRRRRRRRRRRRRRRRRRRRRRRRRRRRRRRRRRRRRRRRRRRRRRRRRR
[OK - 1337256/3532618 bytes]
#########################################################################
#########################################################################
#########################################################################
##############################################################
F3: 1926336+46904+183152 at 0x12000

Restricted Rights Legend

Use, duplication, or disclosure by the Government is
subject to restrictions as set forth in subparagraph
(c) of the Commercial Computer Software - Restricted
Rights clause at FAR sec. 52.227-19 and subparagraph
(c) (1) (ii) of the Rights in Technical Data and Computer
Software clause at DFARS sec. 252.227-7013.

cisco Systems, Inc.
170 West Tasman Drive
San Jose, California 94134-1706

Cisco Internetwork Operating System Software
IOS (tm) 4500 Software (C4500-AJ-M), Version 11.1(2)
Copyright (c) 1986-1996 by cisco Systems, Inc.
Compiled Mon 24-May-96 22:46 [mikehub 107]

cisco 4500 (R4K) processor (revision 0x00) with 32768K/4096K bytes of memory.
Processor ID 01242622
R4600 processor, Implementation 32, Revision 1.0
G.703/E1 software, Version 1.0
Bridging software.
SuperLAT software (copyright 1990 by Meridian Technology Corp).
X.25 software, Version 2.0, NET2, BFE and GOSIP compliant.
TN3270 Emulation software (copyright 1994 by TGV Inc.).
2 Ethernet/IEEE 802.3 interfaces.
2 Token Ring/IEEE 802.5 interfaces.
4 ISDN Basic Rate interfaces.
2 Serial network interfaces.
128K bytes of non-volatile configuration memory.
8192K bytes of processor board System Flash (Read/Write)
4096K bytes of processor board Boot Flash (Read/Write)

Press RETURN to get started!
router#


Recovering from a Flash Memory Failure

If the image fails to load properly into Flash memory, the following error message appears:

Error programming flash memory

If you try loading the image into Flash memory three or more times and repeatedly see this message, contact technical support immediately and inform them of the situation. Refer to the section labeled "Cisco Connection Online."

In an attempt to recover from the error, you also can erase the Flash memory and try to download the file again. You can repeat this procedure. To erase the Flash memory, issue the copy tftp flash command and press Return or Y at the following prompt:

erase flash before writing? [confirm]

Having successfully copied an image into Flash memory, you can display the image name by issuing the show flash all command.

router# show flash all
System flash directory:
File  Length   Name/status
        addr      fcksum  ccksum
  1   4448508  master/california/i7/bin/c4500-aj-mz.111-1 
        0x40      0x52C3  0x52C3
[4448572 bytes used, 3940036 available, 8388608 total]
8192K bytes of processor board System flash (Read/Write)
   Chip    Bank    Code      Size      Name
    1      1       89A2      1024KB    INTEL 28F008SA
    2      1       89A2      1024KB    INTEL 28F008SA
    3      1       89A2      1024KB    INTEL 28F008SA
    4      1       89A2      1024KB    INTEL 28F008SA
    1      2       89A2      1024KB    INTEL 28F008SA
    2      2       89A2      1024KB    INTEL 28F008SA
    3      2       89A2      1024KB    INTEL 28F008SA
    4      2       89A2      1024KB    INTEL 28F008SA
router# 


Repeating the Installation Process

Before repeating the system software upgrade process on subsequent machines, make sure the upgraded router functions properly by performing the following steps:

Step 1 Ping from the upgraded router to a system on the local network to make sure you have network connectivity. Refer to "Testing the TCP/IP Software" on page 10.

Step 2 Look at the routing tables in the updated router. To review all of the routes established in your router, issue the show route EXEC command, which has the following syntax: show protocol route network.

Step 3 Make sure the upgraded router is listed properly in the routing tables of nearby routers.

Step 4 If the command boot system flash filename exists as a line in the configuration file on a subsequent router to be upgraded, remove the argument filename from the configuration file before rebooting the router. Refer to "Booting from Flash Memory" on page 17.

Only upgrade subsequent routers if the ping and show route commands generate positive results.


Upgrading Boot ROMs in the Cisco 4000 and the Cisco 4000-M

This section contains procedures to replace the boot ROMs used in the Cisco 4000 and in the Cisco 4000-M.

fig_2.gif Warning Before working on the router, be sure the power is OFF and the power cord unplugged to avoid injury.

fig_3.gif Caution Before opening the Cisco 4000 series chassis, be sure you have discharged all static electricity from your body. Before performing procedures described in this document, review the following sections: "Safety Recommendations," "Safety with Electricity," "Preventing Electrostatic Discharge Damage," and "Removing the Component Tray."


Required Tools

The following tools are required for the boot ROMs' upgrade procedures:

  • ESD cord and wrist strap

  • Screwdrivers, No. 1 and No. 2 Phillips

  • EPROM extraction tool or a small flat-blade screwdriver


Safety Recommendations

Follow these guidelines to ensure general safety:

  • Keep the chassis area clear and dust-free during and after installation.

  • Put removed chassis covers in a safe place.

  • Keep tools away from walk areas where you or others could fall over them.

  • Do not wear loose clothing that could get caught in the chassis. Fasten your tie or scarf and roll up your sleeves.

  • Wear safety glasses when working under any conditions that might be hazardous to your eyes.

  • Do not perform any action that creates a potential hazard to people or makes the equipment unsafe.


Safety with Electricity

fig_4.gif Warning Before working on equipment that is connected to power lines, remove jewelry (including rings, necklaces, and watches). Metal objects will heat up when connected to power and ground and can cause serious burns or can weld to a terminal.

Follow these guidelines when working on equipment powered by electricity:

  • Locate the emergency power-off switch in the room in which you are working. Then, if an electrical accident occurs, you can act quickly to shut the power OFF.

  • Before working on the system, turn OFF the power and unplug the power cord.

  • Disconnect all power before doing the following:

    • Installing or removing a chassis

    • Working near power supplies

    • Accessing the internal components of the router

  • Never assume that power has been disconnected from a circuit. Always check.

  • Do not work alone if potentially hazardous conditions exist.

  • Look carefully for possible hazards in your work area, such as moist floors, ungrounded power extension cables, and missing safety grounds.

  • If an electrical accident occurs, proceed as follows:

    • Use caution; do not become a victim yourself.

    • Turn off power to the system.

    • If possible, send another person to get medical aid. Otherwise, assess the victim's condition and then call for help.

    • Determine if the person needs rescue breathing and/or external cardiac compressions; then take appropriate action.


Preventing Electrostatic Discharge Damage

Electrostatic discharge (ESD) can damage equipment and impair electrical circuitry. It occurs when electronic printed circuit cards are improperly handled and can result in complete or intermittent failures.

Always follow ESD prevention procedures when removing and replacing cards. Ensure that the chassis is electrically connected to earth ground. Wear an ESD-preventive wrist strap, ensuring that it makes good skin contact. Connect the clip to an unpainted chassis frame surface to safely channel unwanted ESD voltages to ground. To properly guard against ESD damage and shocks, the wrist strap and cord must operate effectively.

If no wrist strap is available, ground yourself by touching the metal part of the chassis.


Removing the Component Tray

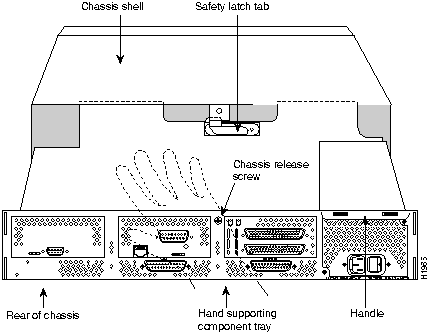
To gain access to the boot ROMs, you must remove the component tray.

Some Cisco 4000 series routers have a safety latch tab on the chassis that affects removing the component tray. (See Figure 2 and Figure 3.)

If you have a chassis with a safety latch tab, follow the procedure in the following section "Removing the Component Tray from a Chassis with a Safety Latch".

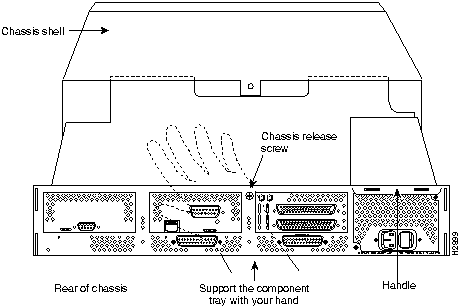
If you have a chassis without a safety latch tab, follow the procedure in the section "Removing the Component Tray from a Chassis without a Safety Latch" later in this chapter.


Removing the Component Tray from a Chassis with a Safety Latch

fig_5.gif Warning Hazardous voltages may exist in or near the power supply, so use extreme caution when working near the power supply. Before starting any of these procedures, turn off power to the system, unplug the power cord, disconnect any cables at the ports, and connect your ESDpreventive wrist strap.

Take the following steps to remove the component tray:

Step 1 Turn OFF the system power.

Step 2 Attach your ESD-preventive wrist strap.

Step 3 Remove all network and power cables.

Step 4 Loosen the (nonremovable) screw in the back of the chassis, labeled Chassis release screw in Figure 2.

Step 5 Slide the component tray out of the chassis shell while facing the chassis rear panel, pulling the handle on the right side of the chassis until the safety latch catches. (See Figure 2.)

fig_6.gif Warning Before releasing the safety latch, support the component tray from underneath, either on your work surface or with your hands, to prevent personal injury. (See Figure 2.)

Step 6 While supporting the component tray with one hand, push down on the safety latch tab while pulling out on the component tray.

Step 7 Set the component tray (see Figure 4) down on your work surface.

Figure 2 : Component Tray Removal for Chassis With a Safety Latch

h1965.gif


Removing the Component Tray from a Chassis without a Safety Latch

Take the following steps to remove the component tray:

Step 1 Turn OFF the system power.

Step 2 Attach your ESD-preventive wrist strap.

Step 3 Remove all network and power cables.

Step 4 Loosen the (nonremovable) screw in the back of the router chassis, labeled Chassis release screw in Figure 3.

fig_7.gif Warning Support the component tray from underneath, either on your work surface or with your hands, to prevent it from falling. (See the hand in Figure 3.)

Step 5 While facing the chassis rear panel, pull the handle on the right side of the router while supporting the component tray with one hand. Slide the component tray out of the chassis shell.

Step 6 Set the component tray (see Figure 4) down on your work surface.

Proceed to the next section, "Replacing Boot ROMs."

Figure 3 : Component Tray Removal for a Chassis Without a Safety Latch

h2899.gif

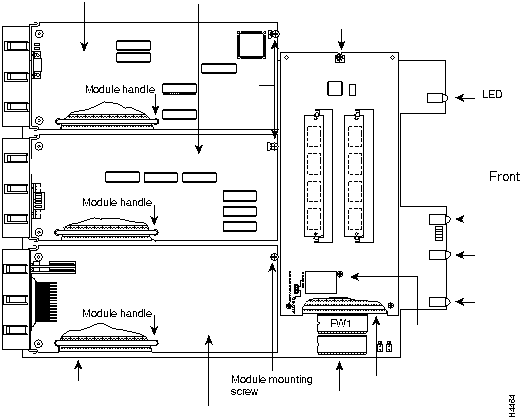
Figure 4 : Typical Cisco 4000 Series Component Tray -- Cisco 4000 Shown

h4464.gif


Replacing Boot ROMs

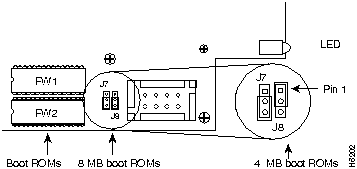
After the boot ROMs, FW1 and FW2, on the system card are exposed (see Figure 4), follow the procedures in this section to replace the ROMs.

fig_8.gif Caution The correct placement of the boot ROMs is crucial. If improperly positioned, the new components could be damaged when the system is powered on. Read through all of the instructions before proceeding. To prevent damage to the ROMs from ESD (when handling the system and its components), follow the ESD procedures described earlier. Also, be careful to not damage or scratch the printed circuit card under the ROMs.


Note It is not necessary to remove the Flash memory EPROM card for this upgrade procedure.

Step 1 Locate the boot ROMs, FW1 and FW2 (see Figure 5 and Figure 6).

Step 2 Using an EPROM extraction tool or a small flat-blade screwdriver, gently remove the boot ROMs and set them aside.

Figure 5 : Cisco 4000 Boot ROMs

h4465.gif

Figure 6 : Cisco 4000-M Boot ROMs

h6202.gif

Step 3 Insert the new boot ROMs in their respective sockets in the orientation shown in Figure 5 and Figure 6, being careful not to bend or crush any of the bottom pins. To straighten out a bent pin, use needlenose pliers. Align the notch in the new ROM with the notch in the ROM socket, ignoring the orientation of the label.

Step 4 If you have a Cisco 4000, jumpers J5 and J6 must be set to designate the capacity of the Boot ROMs. For boot ROMs version Cisco IOS Release10.2(8) and higher short pins 2 and 3 on both jumper locations, J5 and J6 as shown in the 8 MB boot ROMs position. To short pins 2 and 3 on J5 and J6, install the jumper block over the two pins located away from the Flash EPROM card, as shown in the 8 MB boot ROMs position on Figure 5. For 4 MB boot ROMs, which are prior to version 10.2(8), install the jumper on the upper two pins at J6 and the lower two pins at J5.

Step 5 If you have a Cisco 4000-M, jumpers J7 and J8 must be set to designate the capacity of the Boot ROMs. For boot ROMs version Cisco IOS Release10.2(8) and higher short pins 2 and 3 on both jumper locations, J7 and J8 as shown in the 8 MB boot ROMs position. To short pins 2 and 3 on J7 and J8, install the jumper block over the two pins located away from the Flash memory SIMMs, as shown in the 8 MB boot ROMs position on Figure 6. For 4 MB boot ROMs, prior to version 10.2(8), install the jumper on the upper two pins at J8 and the lower two pins at J7.

Step 6 After the boot ROMs have been replaced, and the boot ROM capacity jumpers have been set, replace the chassis component tray in the chassis.


Replacing the Component Tray

Take the following steps to replace the component tray in the chassis shell:

Step 1 Reinsert the component tray into the shell, pushing on the back of the tray while at the same time pressing on the chassis release screw (as shown in Figure 2 and Figure 3) with the thumb of your right hand.

Step 2 Retighten the chassis release screw (see Figure 2 and Figure 3).


Replacing the Final Connections to the Router

Take the following steps to make the final connections to the router:

Step 1 If you have an AC-powered system, plug the system power cord into a 3-terminal, single-phase power source that provides power within the acceptable range (100--240 VAC, 50--60 Hz, 3.0--1.5 A).

Step 2 If you have a DC-powered system, rewire the DC-input power supply (40 to 72 VDC) to the terminal block. The proper wiring sequence is ground to ground, positive to positive, and negative to negative. (See Figure 7.) After connecting the DC power cables, use a screwdriver to reinstall the terminal block cover.

Warning After wiring the DC power supply, remove the tape from the circuit breaker switch handle and reinstate power by moving the handle of the circuit breaker to the ON position.

fig_10.gif

Step 3 Turn ON the system power switch. The power LED on the front should go ON.

Step 4 Check the OK LED on the right side of the front panel (see Figure 1) to verify that it goes ON after a few seconds delay when booting.

Figure 7 : DC-Input Power Supply Connections

h2552.gif


Testing Your Installation

Test your installation by rebooting the system. When you power up a system in which one or more of the boot ROMs has been incorrectly inserted, the system will boot into the ROM monitor or the operating system mode.

If you suspect that your boot ROMs have been inserted incorrectly, reopen the chassis, locate the affected boot ROM and remove it, straighten its pins, and then reinsert the boot ROM and try rebooting again.

If the system boots correctly, follow the procedures in the section "Installing System Software onto Your TFTP Server."


ROM Monitor

This section describes the Cisco 4000 series ROM monitor, the first software to run when the router is powered-up or reset. The ROM monitor can help you isolate or rule out hardware problems encountered when installing your router. A summary of the ROM monitor diagnostic tests and command options is provided.


Entering the ROM Monitor Program

The ROM monitor diagnostics help initialize the processor hardware and boot the main operating system software. If you set the software configuration register (bits 3, 2, 1, and 0) to zero, you can start the router in the standalone ROM monitor. An example of the ROM monitor prompt follows:

rommon 1 >

To enable the Break key, and to default to booting at the ROM monitor while running the system software, reset the configuration register to 0x0 by entering configuration mode, and enter the following configuration command:

config-reg 0x0

The new configuration register value, 0x0, takes effect after the router is rebooted with the reload command. If you set the configuration to 0x0, you will have to manually boot the system from the console each time you reload the router.


Note Break (system interrupt) is always enabled for 60 seconds after rebooting the system, regardless of whether Break is configured to be off by setting the configuration register. During the 60-second window, you can break to the ROM monitor prompt.


Available ROM Monitor Commands

At the ROM monitor prompt, enter ? or help at the rommon 1 > prompt to display a list of available commands and options, as follows:

rommon 1 > ?
help                monitor builtin command help
boot                boot up an external process
dir                 list files in file system 
dev                 list the device table
confreg             configuration register utility
reset               system reset
stack               produce a stack trace
context             display the context of a loaded image
frame               print out a selected stack frame
sysret              print out info from last system return
meminfo             main memory information
rommon 2 > 


Note To display information about a command, enter the command name with a -? option, which will cause the command usage message to be printed.


ROM Monitor Command Conventions

Following are ROM monitor command conventions:

  • Brackets [ ] denote an optional field. If a minus option is followed by a colon (for example: [s:]) the user must provide an argument for the option.

  • A word in italics means that the user must fill in the appropriate information.

  • All of the built-in commands can be aborted (user interrupt signal) by pressing the <break> key at the console.

The following case-sensitive ROM monitor commands are among the most useful:

  • help---The help command prints a summary of the ROM monitor commands to the console screen.This is the same output as entering ?.

  • boot or b---Boot an image. The boot command with no arguments will boot the first image in boot Flash memory. You can include an argument, filename, to specify a file to be booted over the network using the Trivial File Transfer Protocol (TFTP). The local device (see the description of b device following) can be specified by typing the device specifier (devid). If the specified device name is not recognized by the ROM monitor, the system will attempt to netboot the image (imagename). Do not insert a space between devid and imagename. Options to the boot command are -x, load image but do not execute, and -v, verbose. The form of the boot command follows:

boot [-xv] [devid][imagename]

b---Boots the default system software from ROM

b filename [host]---Netboots using TFTP. When a host is specified, either by name or IP address, the boot command will boot from that source.

b flash:---Boots the first file in Flash memory.

b device:---Boots the first file found in the Flash memory device. The Flash memory device specified can be either flash:, to boot the Cisco IOS, or bootflash:, to boot the boot image in Flash memory.

b device:name---An extension of the above command, allows you to specify a particular filename in the Flash memory bank.

  • reset or i---Resets and initializes the system, similar to power-on.

  • dev---Lists boot device identifications on the system.

For example:
rommon 10 > dev
Devices in device table:
        id  name
    flash:  flash 
bootflash:  boot flash 
    eprom:  eprom 

  • dir---Lists the files on the named device. Dir device, where the device is flash or bootflash, lists the available files on that device.

For example:
rommon 11 > dir flash:
         File size           Checksum   filename
       2229799 bytes (0x220627)   0x469e    C4500-k


Debugging Commands

Most of the debugging commands are functional only when the Cisco IOS software has crashed or is aborted. If you enter the debug commands and Cisco IOS crash information is not available, the screen will display the following error message:

"xxx: kernel context state is invalid, can not proceed."

Following are the debugging commands:

  • stack or k---Produces a stack trace.

  • context---Displays the processor context.

  • frame---Displays an individual stack frame.

  • sysret---Displays the return information from the last booted system image. This includes the reason for terminating the image, a stack dump of up to 8 frames, and if an exception is involved, the address where the exception occurred.

For example:
rommon 8 > sysret
System Return Info:
count: 19,  reason: user break
pc:0x60043754,  error address: 0x0
Stack Trace:
FP: 0x80007e78, PC: 0x60043754
FP: 0x80007ed8, PC: 0x6001540c
FP: 0x80007ef8, PC: 0x600087f0
FP: 0x80007f18, PC: 0x80008734

  • meminfo---Displays the size in bytes, the starting address, the available range of the main memory, the starting point and size of packet memory, and the size of nonvolatile memory (NVRAM).
rommon 9 > meminfo
 
Main memory size: 8 MB. Packet memory size: 4 MB
Available main memory starts at 0xa000e001, size 0x7f1fff
Packet memory starts at 0xa8000000
NVRAM size: 0x20000


Configuration Register

The Cisco 4000 series configuration register resides in NVRAM. The configuration register is identical in operation to other Cisco routers. Enter confreg for the menudriven system, or enter the new value of the register in hexadecimal.


Note The value is always interpreted as hexadecimal. The confreg utility will print a before and after view of the configuration register when used in menu-driven mode.

  • confreg [hexnum]---Executing the confreg command with the argument hexnum will change the virtual configuration register to match the hex number specified. Without the argument, confreg will dump the contents of the virtual configuration register in English and allow the user to alter the contents. The user is prompted to change or keep the information held in each bit of the virtual configuration register. In either case the new virtual configuration register value is written into NVRAM and does not take effect until the user resets or power cycles the platform.

For example:
rommon 7 > confreg
 
     Configuration Summary
enabled are:
console baud: 9600
boot: the ROM Monitor
 
do you wish to change the configuration? y/n  [n]:  y
enable  "diagnostic mode"? y/n  [n]:  y
enable  "use net in IP bcast address"? y/n  [n]:  

enable  "load rom after netboot fails"? y/n  [n]:  
enable  "use all zero broadcast"? y/n  [n]:  
enable  "break/abort has effect"? y/n  [n]:  
enable  "ignore system config info"? y/n  [n]:  
change console baud rate? y/n  [n]:  y
enter rate: 0 = 9600, 1 = 4800, 2 = 1200, 3 = 2400  [0]:  0
change the boot characteristics? y/n  [n]:  y
enter to boot:
 0 = ROM Monitor
 1 = the boot helper image
 2-15 = boot system
    [0]:  0
 

    Configuration Summary
enabled are:
diagnostic mode
console baud: 9600
boot: the ROM Monitor
 
do you wish to change the configuration? y/n  [n]:  
 
 
You must reset or power cycle for new config to take effect


Cisco Connection Online

Cisco Connection Online (CCO), formerly Cisco Information Online (CIO), is Cisco Systems' primary, real-time support channel. Maintenance customers and partners can self-register on CCO to obtain additional content and services.

Available 24 hours a day, 7 days a week, CCO provides a wealth of standard and value-added services to Cisco's customers and business partners. CCO services include product information, software updates, release notes, technical tips, the Bug Navigator, configuration notes, brochures, descriptions of service offerings, and download access to public and authorized files.

CCO serves a wide variety of users through two interfaces that are updated and enhanced simultaneously---a character-based version and a multimedia version that resides on the World Wide Web (WWW). The character-based CCO supports Zmodem, Kermit, Xmodem, FTP, Internet e-mail, and fax download options, and is excellent for quick access to information over lower bandwidths. The WWW version of CCO provides richly formatted documents with photographs, figures, graphics, and video, as well as hyperlinks to related information.

You can access CCO in the following ways:

  • WWW: http://www.cisco.com.

  • Telnet: cco.cisco.com.

  • Modem: From North America, 408 526-8070; from Europe, 33 1 64 46 40 82. Use the following terminal settings: VT100 emulation; databits: 8; parity: none; stop bits: 1; and baud rates up to 14.4 kbps.

For a copy of CCO's Frequently Asked Questions (FAQ), contact ccohelp@cisco.com. For additional information, contact ccoteam@cisco.com.


Note If you are a network administrator and need personal technical assistance with a Cisco product that is under warranty or covered by a maintenance contract, contact Cisco's Technical Assistance Center (TAC) at 800 553-2447, 408 526-7209, or tac@cisco.com. To obtain general information about Cisco Systems, Cisco products, or upgrades, contact 800 553-6387, 408 526-7208, or csrep@cisco.com.

fig_9.gif

HomeTOCPrevNextGlossSearchHelp
-

Copyright 1988-1996 © Cisco Systems Inc.