|
|

Upgrading Cisco 4500, Cisco 4500-M, Cisco 4700, and Cisco 4700-M Memory
Product Numbers:
| MEM-NP16M-R4-P=MEM-NP32M-P=MEM-NP64M-P= | MEM-NP8F-P=MEM-NP8F-R4-P=MEM-NP16F-R4-P= |
| MEM-NP8S-R4-P=MEM-NP16S-P= | 17-2062-01 (ROM Monitor 5.1) |
This publication describes the upgrade and replacement of main, shared, Flash, and ROM monitor memory in the Cisco 4500, Cisco 4500-M, Cisco 4700, and Cisco 4700-M. Read this entire publication before upgrading your system. This publication contains the following sections which step you through the upgrade procedures:
When you upgrade Flash memory, a Trivial File Transfer Protocol (TFTP) file server must be available that has the desired Cisco Internetwork Operating System (Cisco IOS) software image---Release 10.2(6) or later. These Cisco IOS files can then be downloaded into the upgraded Flash memory using TFTP. Consult your network administrator about the availability of TFTP file servers and Cisco IOS software on your network. The router will not be fully functional without the system software and running configuration. Consult the appropriate Cisco IOS software publication, which is available on the Cisco Connection Documentation Enterprise Series CD or as a printed document, for TFTP procedures.
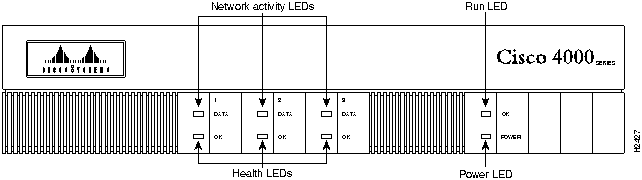
Figure 1 shows the front view of a Cisco 4000 series router.
Figure 1 : Front View of a Cisco 4000 Series Router
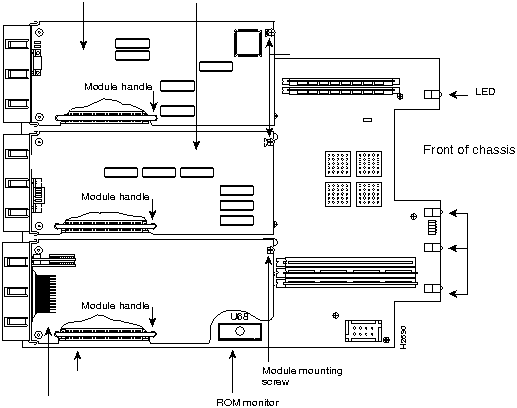
The Cisco 4500, Cisco 4500-M, Cisco 4700, and Cisco 4700-M memory systems (see Figure 2) have the following functions:
Figure 2 : Cisco 4500, Cisco 4500-M, Cisco 4700, and Cisco 4700-M Memory Systems and Software Images
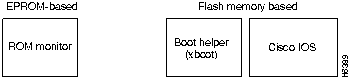
Table 1 lists the Cisco 4500, Cisco 4500-M, Cisco 4700, and Cisco 4700-M processor and memory specifications.
Table 1 : Processor and Memory Specifications
| Description | Cisco 4500 | Cisco 4500-M | Cisco 4700 | Cisco 4700-M |
|---|---|---|---|---|
| Processor | 100-MHz IDT Orion RISC1 | 100-MHz IDT Orion RISC | 133-MHz IDT Orion RISC | 133-MHz IDT Orion RISC |
| Main memory (DRAM2) | 8 or 32 MB | 8, 16, or 32 MB | 16 or 32 MB | 16, 32, or 64 MB |
| Shared memory (DRAM) | 4 or 16 MB | 4, 8, or 16 MB | 4, 8, or 16 MB | 4, 8, or 16 MB |
| Flash memory | 4, 8, 16, 32, or 64 MB | 4, 8, 16, 32, or 64 MB | 4, 8, 16, 32, or 64 MB | 4, 8, 16, 32, or 64 MB |
| NVRAM3 | 128 KB | 128 KB | 128 KB | 128 KB |
| Boot ROM4 | 128 to 512 KB | 128 to 512 KB | 128 to 512 KB | 128 to 512 KB |
| Boot Flash | 4, 8, or 16 MB | 4 to 16 MB | 4 to 16 MB | 4 to16 MB |
Warning Before working on a chassis or working near power supplies, unplug the power cord on AC units; disconnect the power at the circuit breaker on DC units.
![]()
Follow these guidelines to ensure general safety:
Follow these guidelines when working on equipment powered by electricity:
ESD can damage equipment and impair electrical circuitry. It occurs when electronic printed circuit cards are improperly handled and can result in complete or intermittent failures.
Always follow ESD prevention procedures when removing and replacing cards. Ensure that the chassis is electrically connected to earth ground. Wear an ESDpreventive wrist strap, ensuring that it makes good skin contact. Connect the clip to an unpainted surface of the chassis frame to safely channel unwanted ESD voltages to ground. To properly guard against ESD damage and shocks, the wrist strap and cord must operate effectively.
If no wrist strap is available, ground yourself by touching the metal part of the chassis.
The following tools are required to remove and upgrade main, shared, Flash, and ROM monitor memory.
In addition, the ROM monitor device upgrade requires the following:
Proceed to the next section, "Accessing the Internal Components of the Router."
You must open the router chassis to gain access to the router's internal components: the network processor modules, boot ROMs, and jumpers.
Refer to the previous section, "Required Tools," for the tools needed for the following procedures.
Warning Before opening the chassis, disconnect the telephone-network cables to avoid contact with telephone-network voltages.
Warning Do not work on the system or connect or disconnect cables during periods of lightning activity.
Warning Do not touch the power supply when the power cord is connected. For systems with a power switch, line voltages are present within the power supply even when the power switch is off and the power cord is connected. For systems without a power switch, line voltages are present within the power supply when the power cord is connected.
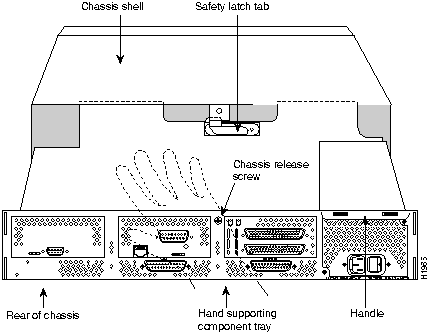
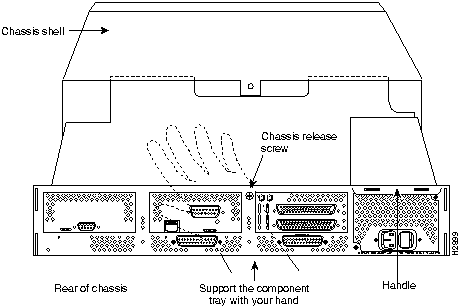
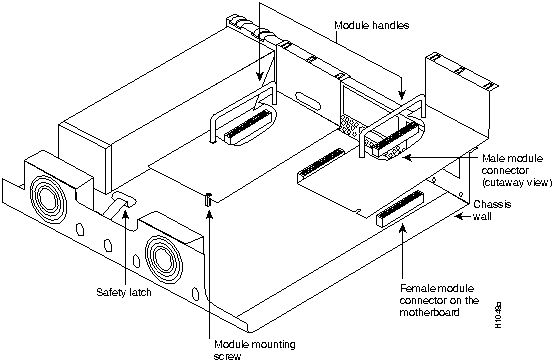
Some Cisco 4000 series routers have a safety latch tab on the chassis that affects removing the component tray. (See Figure 3 and Figure 4.)
If you have a chassis with a safety latch tab, follow the procedure in the next section "Removing the Component Tray from a Chassis with a Safety Latch."
If you have a chassis without a safety latch tab, follow the procedure in the section "Removing the Component Tray from a Chassis without a Safety Latch."
Take the following steps to remove the component tray from a chassis with a safety latch:
Warning Before performing any of the following procedures, ensure that power is removed from the DC circuit. To ensure that all power is OFF, locate the circuit breaker on the panel board that services the DC circuit, switch the circuit breaker to the OFF position, and tape the switch handle of the circuit breaker in the OFF position.
Figure 3 : Component Tray Removal for Chassis with a Safety Latch Proceed to the next section, "Removing Network Processor Modules."
Take the following steps to remove the component tray from a chassis without a safety latch:
Warning Before performing any of the following procedures, ensure that power is removed from the DC circuit. To ensure that all power is OFF, locate the circuit breaker on the panel board that services the DC circuit, switch the circuit breaker to the OFF position, and tape the switch handle of the circuit breaker in the OFF position.
Figure 4 : Component Tray Removal for Chassis without a Safety Latch Proceed to the next section, "Removing Network Processor Modules."
If you are replacing shared memory single in-line memory modules (SIMMs), you must first remove the network processor modules. Follow the steps in this section to remove a network processor module.
Figure 7 shows the network processor module and connector locations.
Figure 5 : Cisco 4500, Cisco 4700 and Older Cisco 4500-M Component Tray Figure 6 : Cisco 4700-M and Newer Cisco 4500-M Component Tray Figure 7 : Network Processor Module and Connector Locations
There are two DRAM systems in Cisco 4500, Cisco 4500-M, Cisco 4700, and Cisco 4700-M routers. One is the shared memory, which is the interface that the network processor modules send data to or transmit data from, and the other is the primary or main memory, which is reserved for the CPU. The ROM monitor is stored in an EPROM device on the motherboard. (See Figure 8.) In addition, these routers have two Flash memory systems: one for the Cisco IOS software image and one for the boot helper image. (See Figure 2.)
The Cisco 4500 and Cisco 4500-M main memory upgrade requires replacing the main memory configuration of 8 MB (two 4-MB SIMMs) with two 8-MB SIMMs (Cisco 4500-M only) or two 16-MB SIMMs (Cisco 4500 and Cisco 4500-M).
The Cisco 4700 and Cisco 4700-M main memory upgrade requires replacing the main memory configuration of 16 MB (two 8-MB SIMMs) with two 16-MB SIMMs for 32 MB (Cisco 4700 and Cisco 4700-M) or with two 32-MB SIMMs for 64 MB (Cisco 4700-M).
The Cisco 4500 and Cisco 4500-M shared memory upgrade permits you to replace the shared memory SIMM with one 16-MB SIMM (Cisco 4500 and Cisco 4500-M) or one 8-MB SIMM (Cisco 4500-M only).
The Cisco 4700 and Cisco 4700-M shared memory upgrade permits you to replace the shared memory SIMM with one 16-MB SIMM or one 8-MB SIMM.
Upgrading the Cisco 4500, Cisco 4500-M, Cisco 4700, and Cisco 4700-M Flash memory requires replacing or adding to the Flash memory configuration of 4 MB with 8, 16, 32, or 64 MB of Flash memory.
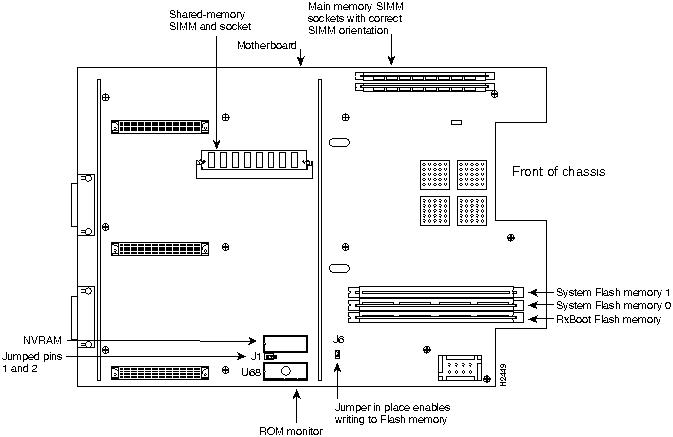
Figure 8 shows the memory component and jumper locations in the Cisco 4500, Cisco 4700, and older versions of the Cisco 4500-M.
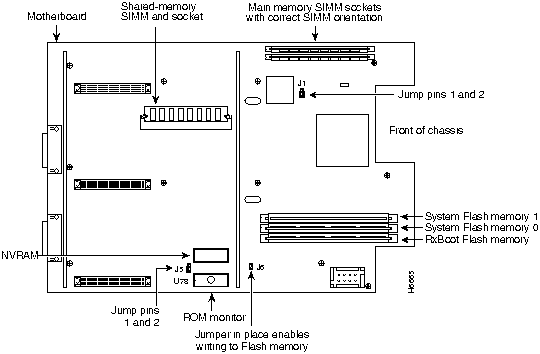
Figure 8 : Cisco 4500, Older Cisco 4500-M , and Cisco 4700 Memory Component Locations Figure 9 shows the memory component and jumper locations in the Cisco 4700-M and newer versions of the Cisco 4500-M.
Figure 9 : Cisco 4700-M and Newer Versions of the Cisco 4500-M Memory Component Locations
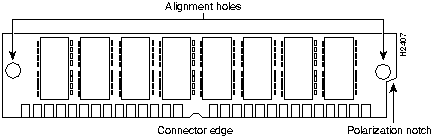
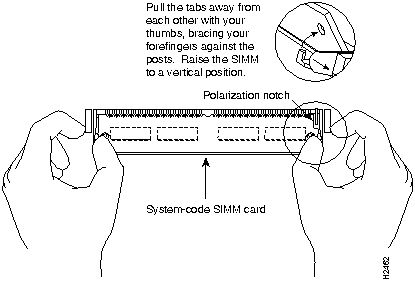
SIMMs are manufactured with a polarization notch to prevent them from being installed backward. Figure 10 shows the polarization notch and locations of the alignment holes on a main memory SIMM card. The main memory SIMM cards are installed with the connector edge down and the component side facing in, as shown in the upper right corner of Figure 8 and Figure 9.
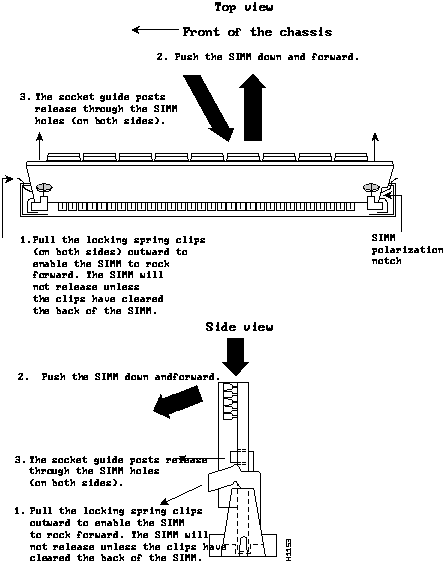
Take the following steps to remove main memory SIMMs:
Proceed to the next section, "Installing Main Memory SIMMs."
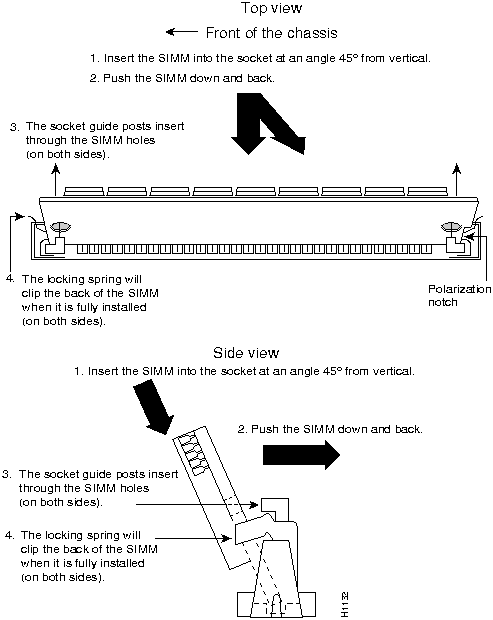
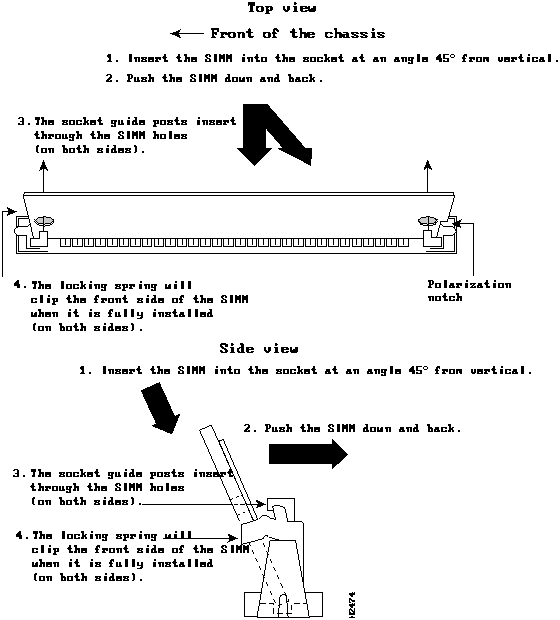
Take the following steps to install main memory SIMMs:
Figure 11 : Removing Main Memory SIMMs If you have completed all SIMM replacement procedures, proceed to the section "Replacing Network Processor Modules" on page 21.
Figure 12 : Installing Main Memory SIMMs
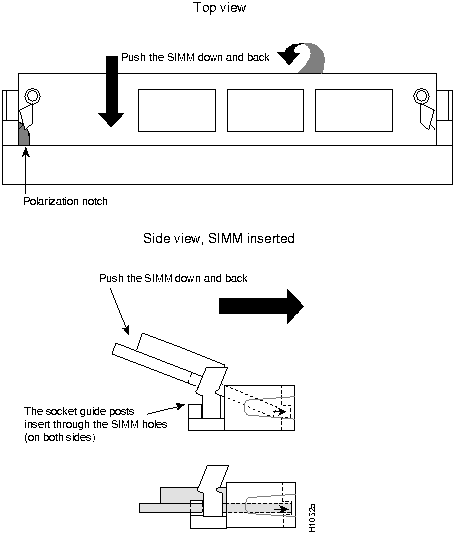
Take the following steps to replace the shared memory SIMMs:
Take the following steps to insert shared memory SIMMs:
Figure 13 : Inserting Shared Memory SIMMs If you have completed all SIMM replacement procedures, proceed to the section "Replacing Network Processor Modules" on page 21.
The boot helper image (Rxboot image) is stored in Flash memory on the Cisco 4500 and Cisco 4500-M. Take the following steps to replace the 4-MB SIMM with an 8 or 16-MB SIMM. (See Figure 14.)
Figure 14 : Removing the Boot Helper Flash Memory SIMM Proceed to the next section "Installing Boot Helper Flash Memory SIMMs."
You upgrade boot helper Flash memory by replacing the existing SIMM (labeled "System Flash Memory 0" in Figure 8 on page 11) or by adding a second SIMM to the empty socket (labeled "System Flash Memory 1" in Figure 8 on page 11).
Take the following steps to add Flash memory SIMMs and refer to Figure 8 for the SIMM locations.
Figure 15 : Inserting Flash Memory SIMMs If you have completed all memory upgrade procedures, proceed to the section "Replacing Network Processor Modules" on page 21.
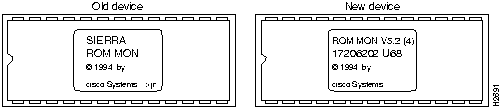
The ROM monitor is stored in an EPROM device on the Cisco 4500 and Cisco 4500-M. (See Figure 8 on page 11.) Two versions of the label of the ROM monitor EPROM are shown in Figure 16.
Figure 16 : Cisco 4500 and Cisco 4500-M ROM Monitor Memory Devices To upgrade the ROM monitor, replace the old EPROM labeled "SIERRA ROM MON" with the new EPROM labeled "ROM MON V5.2(4)."
Take the following steps to replace the ROM monitor EPROM.
Proceed to the next section, "Replacing Network Processor Modules."
Take the following steps to replace a network processor module:
Take the following steps to replace the component tray in the chassis shell:
Take the following steps to make the final connections to the router:
Warning After wiring the DC power supply, remove the tape from the circuit breaker switch handle and reinstate power by moving the handle of the circuit breaker to the ON position.
Figure 17 : DC-Input Power Supply Connections
Test your installation by rebooting the system. When you power up a system in which one or more of the boot ROMs was incorrectly inserted, the system will not boot into the ROM monitor or the operating system mode.
If you suspect that your boot ROMs were inserted incorrectly, reopen the chassis, locate the affected boot ROM and remove it, straighten its pins, reinsert the boot ROM, and try booting again.
This completes upgrading Cisco 4500, Cisco 4500-M, Cisco 4700, and Cisco 4700-M memory.
Cisco Connection Online (CCO), formerly Cisco Information Online (CIO), is Cisco Systems' primary, real-time support channel. Maintenance customers and partners can self-register on CCO to obtain additional content and services.
Available 24 hours a day, 7 days a week, CCO provides a wealth of standard and value-added services to Cisco's customers and business partners. CCO services include product information, software updates, release notes, technical tips, the Bug Navigator, configuration notes, brochures, descriptions of service offerings, and download access to public and authorized files.
CCO serves a wide variety of users through two interfaces that are updated and enhanced simultaneously---a character-based version and a multimedia version that resides on the World Wide Web (WWW). The character-based CCO supports Zmodem, Kermit, Xmodem, FTP, Internet e-mail, and fax download options, and is excellent for quick access to information over lower bandwidths. The WWW version of CCO provides richly formatted documents with photographs, figures, graphics, and video, as well as hyperlinks to related information.
You can access CCO in the following ways:
For a copy of CCO's Frequently Asked Questions (FAQ), contact
Copyright 1988-1996 © Cisco Systems Inc.
![]()
Safety Recommendations
Safety with Electricity
![]()
Preventing Electrostatic Discharge Damage
Required Tools
Accessing the Internal Components of the Router
![]()
![]()
![]()
Removing the Component Tray Procedure
Removing the Component Tray from a Chassis with a Safety Latch
![]()
![]()
Removing the Component Tray from a Chassis without a Safety Latch
![]()
![]()
Removing Network Processor Modules
![]()
![]()

Memory Replacement Procedures
![]()
Replacing Main Memory SIMMs
Removing Main Memory SIMMs
![]()
Installing Main Memory SIMMs
![]()
![]()
Removing and Replacing Shared Memory SIMMs
![]()
Inserting Shared Memory SIMMs
![]()
![]()
Removing the Cisco 4500 and Cisco 4500-M Boot Helper Flash Memory SIMMs
![]()
Installing Boot Helper Flash Memory SIMMs
![]()
![]()
Replacing the ROM Monitor EPROM Device
![]()
Replacing Network Processor Modules
![]()
Replacing the Component Tray
Replacing the Final Connections to the Router
![]()

Testing Your Installation
Cisco Connection Online
http://www.cisco.com.
cco.cisco.com.
ccohelp@cisco.com.
For additional information, contact
ccoteam@cisco.com.
tac@cisco.com.
To obtain general information about Cisco Systems, Cisco products, or upgrades, contact 800 553-6387, 408 526-7208, or
csrep@cisco.com.

![]()
![]()
![]()
![]()
![]()
![]()
![]()
![]()