|
|
Maintaining the AccessPro PC Card
This chapter explains how to maintain the AccessPro PC card and contains the following sections:
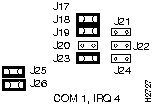
Because there is no external physical connector for the console port, you must direct the console port to a COMport on the PC. You do this by setting the COMport with jumpers J18 and J19 and then setting the IRQ using jumpers J20 and J23.
If you have additional cards or built-in interfaces on your PC motherboard that use internal COMports, the settings on your AccessPro card may need to be modified. Table 5-1 lists the jumper settings required to configure the PC COMport.
Table 5-1 : COMport Jumper Settings
| Port Selection | J18 | J19 | IRQ Level | J20 | J23 |
|---|---|---|---|---|---|
| COM 1 | In | In | IRQ 4 | Out | In |
| COM 2 | Out | In | IRQ 3 (default) | In | Out |
| COM 3 | In | Out | IRQ 4 | Out | In |
| COM 4 (default) | Out | Out | IRQ 3 | In | Out |
| IRQ selection disabled | Disabled | Out | Out |
Although the PC has four COMports, only two can be active at the same time. COMports 1 and 3 share IRQ 4 and COMports 2 and 4 share IRQ 3. The PC will malfunction if two COMports use the same IRQ simultaneously. The AccessPro card has been configured to use COM 2 and IRQ 3. Table 5-2 lists the COMports, their I/O addresses, and IRQ settings.
| COMport | I/O Address | IRQ |
|---|---|---|
| 1 | $3F8 to $3FF | 4 |
| 2 | $2F8 to $2FF | 3 |
| 3 | $3E8 to $3EF | 4 |
| 4 | $2E8 to $2EF | 3 |
Change the settings on your AccessPro card if you are installing it in a system in which you have previously installed a card that is using COM 4 and IRQ 3. In this case, you would set your AccessPro card to use COM 1 and IRQ 4. You would also need to use a PC bus mouse so that the mouse does not require one of the available IRQs.
Figure 5-1 illustrates the appropriate jumper settings for the card using COM 1.
Figure 5-1 : Jumper Setting for COM 1
The system code (software) is stored in Flash memory or programmable read-only memory (PROM) SIMMs. The 80-pin Flash memory and PROM SIMMs are provided in an ESD-protective bag within the shipping container. These SIMMs must be installed before you install your AccessPro card in the PC chassis.
Updates for your system code can be downloaded from a TFTP server or with a system-code SIMM replacement.
The following tools are required to change the system-code SIMMs in your AccessPro card:
Following is the procedure for upgrading the system-code Flash memory:
Figure 5-2 : Orientation for SIMM Installation
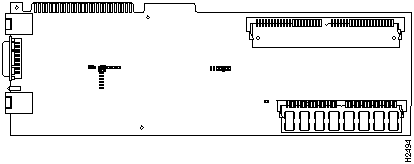
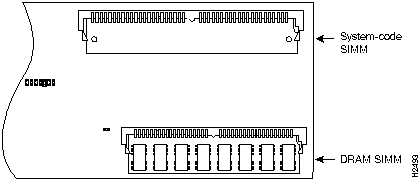
Figure 5-3 : Locating the SIMM Sockets
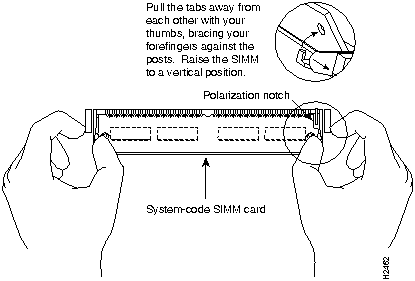
Figure 5-4 : Removing and Replacing the System-Code SIMMs
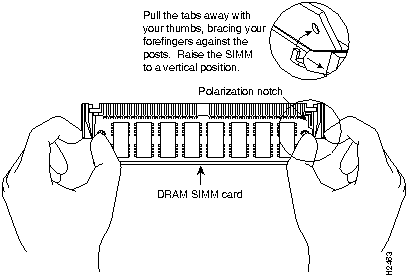
Changing the Primary-Memory DRAM SIMMs
Depending on the level of system features you have chosen for your AccessPro card (IP Routing, IP/IPX Routing, Desktop, or Enterprise), the card may be shipped with additional primary-memory DRAM SIMMs. The DRAM SIMMs are in an ESD-protective bag within the shipping container.
After booting up, your system will indicate in the system banner the amount of primary memory it has. The following example shows a system with 2 MB (2048 KB) of primary memory. (The system does not display shared memory.)
If you use very large routing tables or many protocols, you might need to expand primary memory. Expanded primary memory might be necessary with configurations in which the AccessPro card is set up as a connection device between large external networks and your internal network.
The feature set you have chosen with your AccessPro card may require more than the standard 2 MB of DRAM. The memory requirements for the feature sets are listed in Table 5-3.
Table 5-3 : Feature Set Memory Requirements
The following tools and equipment are required to install DRAM SIMMs in your AccessPro card:
Following is the procedure for installing DRAM SIMMs:
Figure 5-5 : Removing and Replacing DRAM SIMMs
If you lose your enable password, or can't remember it, you can recover it.
Systems running Cisco IOS Release 10.3(2) software or later use the enable secret password, which is encrypted, and therefore cannot be recovered. If you lose your enable secret password, you must configure a new one.
Following is the procedure for recovering a lost enable password and configuring a new enable secret password. Before beginning this procedure, you should have terminal emulation software running on your PC.
The password recovery procedure takes place in the following three steps:
Take the following steps to enter ROM monitor mode:
If you lost an enable secret password, follow the steps in the following section "Configuring a New Enable Secret Password." If you lost an enable password, follow the steps in the section "Recovering a Lost Enable Password" later in this chapter.
Configuring a New Enable Secret Password
Take the following steps to configure a new enable secret password:
Once you have configured the new enable secret password, save your configuration changes by following the steps in the section "Saving Configuration Changes" later in this chapter.
Recovering a Lost Enable Password
Take the following steps to recover a lost enable password:
Once you have recovered the enable password, save your configuration changes by following the steps in the next section, "Saving Configuration Changes."
Take the following steps to save the configuration to NVRAM:
Loading Software Images from a TFTP Server
This section describes how to configure and boot the AccessPro card from a TFTP server that is attached to the same LAN as the AccessPro card. This process is referred to as netbooting.
When the AccessPro card is properly configured, it will netboot files saved in the /tftpboot directory of the TFTP server and store the images in RAM for execution.
If your network consists of a single computer, multiple tasks will be required of that computer to configure and boot the AccessPro card. These tasks include the following:
Having both these functions installed and working properly on your PC before you install the AccessPro card will significantly reduce the time and effort required to begin using your card.
Once you have configured the AccessPro card according to the described in the chapter "Configuring the AccessPro PC Card," you can configure the card to load a system image from a TFTP server by performing the following steps:
The next time the AccessPro card is rebooted, it will boot from the specified image file on your TFTP server.
Troubleshooting the AccessPro Card
Your AccessPro card was intensively tested before it was shipped from the factory. Although it is unlikely that the card will exhibit any problems, if your system appears to have problems starting up, read the remainder of this chapter to try and identify the problem.
To solve problems in the AccessPro card, you need to isolate the problem to a specific source, if possible. By comparing what the AccessPro is actually doing to what it should be doing, you can greatly simplify troubleshooting.
When troubleshooting the AccessPro card, consider the subsystems of the card:
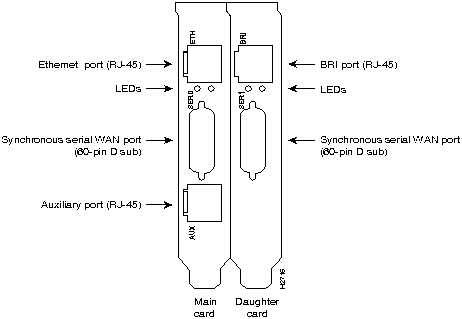
The AccessPro card and the daughter card each have two LEDs on the rear panel. The LED on the left (when viewed from the rear of the PC) of the main card indicates the activity of the LAN interface on the card. The LED on the right side of the main card indicates the functional condition of the card.
The LED on the left of the daughter card indicates the activity on the serial port of the daughter card. The LED on the right of the daughter card indicates the activity of the WAN (BRI) port. (see Figure 5-6.)
Figure 5-6 : LED Locations on the AccessPro Cards---All Models If the interface LED is not on when the interface is active and correctly connected, a problem might be indicated. Contact your system administrator. If an interface is extremely busy, its LED will be on all the time.
Troubleshooting Network Interfaces and Cables
The cables that connect the AccessPro card to your network must be securely fastened to provide a trouble-free connection. If you suspect a problem with the cables, check the following conditions and contact your system administrator.
Copyright 1988-1996 © Cisco Systems Inc.
![]()
![]()
System Bootstrap, Version (2.1), SOFTWARE
Copyright (c) 1986-1995 by Cisco Systems
2500 processor with 2048 Kbytes of main memory
>
Feature Set
Small Networks
Large Networks
IP Routing
2 MB
2--18 MB
IP Routing with IBM protocols
2 MB
2--18 MB
IP/IPX Routing
4 MB
4--18 MB
IP/IPX Routing with IBM protocols
4 MB
4--18 MB
Desktop
4 MB
6--18 MB
Desktop with IBM protocols
4 MB
2--18 MB
Enterprise
6 MB
6--18 MB
Enterprise
6 MB
6 to 18 MB
![]()
>
o/r 0x041
>
i
--- System Configuration Dialog ---
Press RETURN to get started!
Router(boot)>
Router(boot)#
Router(boot)#
conf mem
Router(boot)#
enable secret
password
Router(boot)#
^Z
Router(boot)#
show config
Router(boot)#
copy running-config startup-config
![]()
Router(boot)#
conf term
Enter configuration commands, one per line.
Edit with DELETE, CTRL/W, and CTRL/U; end with CTRL/Z
config-register 0x2102
Hostname#
configure terminal
Hostname#
boot system tftp
filename ip-address
Hostname#
config-register
value
Hostname#
copy running-config startup-config
![]()
![]()
![]()
![]()
![]()
![]()
![]()
![]()