|
|

This section describes procedures used to confirm that the hardware and software installation and configuration procedures were successful. The following procedures are discussed:
ping
Command
show system
Command
show config
Command
show port
Command
This section describes the LEDs used to confirm and troubleshoot operation of the Catalyst 2900 modules. The LEDs on the supervisor engine module indicate the system power and processor status; LEDs on the switching modules indicate the status of the individual switching module and their interfaces.
When the Catalyst 2900 is plugged in it runs a series of diagnostic tests. During this period, the status LED is orange. If the switch passes all the tests, the status LED is green. If any tests fail, the status LED turns red. The status LED will also be orange when it is explicitly disabled with the system software.
The LEDs on the supervisor engine module reflect how the system's various components are operating and are described in Table 7-1. For a description of the power supply shutdown conditions and threshold status levels, refer to the section "Environmental Monitoring" in the chapter "What Is the Catalyst 2900?."
The supervisor engine module LEDs are shown in Figure 7-1.
Figure 7-1 : Supervisor Engine Module LEDs
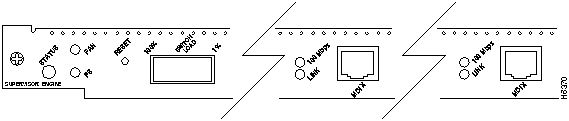
Table 7-1 : Supervisor Engine Module LEDs
| LED | Description |
|---|---|
| Status | The switch performs a series of self-tests and diagnostic tests.
If all the tests pass, the status LED is green. If any test fails, the status LED is red. During system boot or if the module is disabled, the LED is orange. |
| Fan | Indicates whether or not the fans are operational.
If the fans are operational, the fan LED is green. If the fans are not operational, the fan LED is red. |
| PS | If the power supply is operational, the PS LED is green.
If the power supply detects an anomaly, the PS LED is red. |
| 100 Mbps | Green---Indicates that the port is operating at 100 Mbps. |
| Link | Green---The port is operational.
Orange---The link has been disabled by software. Orange flashing---The link is bad and has been disabled. Off---No signal is detected. |
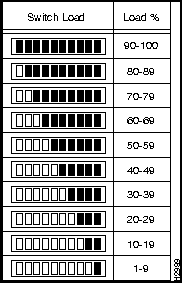
The switch load-meter LEDs provide a visual indication (as an approximate percentage) of the current traffic load over the backplane. (See Figure 7-2.)
The LEDs provide status information for the module and individual 10/100 Mbps Fast Ethernet interface connections. The LEDs are shown in Figure 7-3 and described in Table 7-3.
Figure 7-3 : 10/100 Mbps Fast Ethernet Switching Module LEDs

Table 7-2 : 10/100 Mbps Fast Ethernet Module LED Descriptions
| LED | Description |
|---|---|
| Status | The switch performs a series of self-tests and diagnostic tests.
If all the tests pass, the Status LED is green. If any test fails, the Status LED is red (or orange for a minor fault). During system boot or if the module is disabled, the LED is orange. During self-test diagnostics, the LED will be orange. If the module is disabled, the LED will be orange. |
| 100-Mbps | Green ---Indicates that the port is operating at 100-mbps. |
| Link (bottom LED) | Green ---Indicates the port is operational (signal detected).
Orange---Link disabled by software. Orange flashing---Port bad and disabled (hardware failure). Off---No signal detected. |
The LEDs on the faceplate of the Fast Ethernet switching module (100BaseFX 12 port), shown in Figure 7-4, are described in Table 7-3.

Table 7-3 : 100BaseFX LED Descriptions
| LED | Description |
|---|---|
| Status | The switch performs a series of self-tests and diagnostic tests.
If all the tests pass, the status LED is green. If any test fails, the status LED is red (or orange for a minor fault or if manually disabled). |
| Link | Green---the port is operational.
Orange---the link has been disabled by software. Orange flashing---the link is bad and has been disabled. Off---no signal is detected. |
Enter the ping command to send Internet Control Message Protocol (ICMP) echo request packets to another node on the network to confirm the connection to that node.
Syntax Description
| -s | Causes ping to send one datagram per second, printing one line of output for every response received. The ping command does not return any output when no response is received. |
| host | The IP address or IP alias of the host. |
| packet_size | (Optional) The number of bytes in a packet, from 1 to 2,000 bytes, with a default of 56 bytes. The actual packet size is eight bytes larger because the switch adds header information. |
| packet_count | (Optional) The number of packets to send. |
Usage Guidelines
Enter Ctrl-C to stop pinging.
Following are sample results of the ping command:
no answer
message appears in ten seconds.
Example
In the following example, a host with IP alias elvis is pinged a single time, then pinged once per second until Ctrl-C is entered to stop pinging:
Console> ping elvis
elvis is alive
Console> ping -s elvis
ping elvis: 56 data bytes
64 bytes from elvis: icmp_seq=0. time=11 ms
64 bytes from elvis: icmp_seq=1. time=8 ms
64 bytes from elvis: icmp_seq=2. time=8 ms
64 bytes from elvis: icmp_seq=3. time=7 ms
64 bytes from elvis: icmp_seq=4. time=11 ms
64 bytes from elvis: icmp_seq=5. time=7 ms
64 bytes from elvis: icmp_seq=6. time=7 ms
^C

----elvis PING Statistics----
7 packets transmitted, 7 packets received, 0% packet loss
round-trip (ms)  min/avg/max = 7/8/11
Console>
Enter the show system command to display the power supply, fan, temperature alarm, system, and modem status; the number of days, hours, minutes, and seconds since the last system restart; the baud rate; the MAC address range; and the system name, location, and contact.
Example
In the following example, the system status and other information is displayed:
Console> show system
PS-Status Fan-Status Temp-Alarm Sys-Status Uptime d,h:m:s
--------- ---------- ---------- ---------- --------------
ok        ok         off        ok         27,17:05:50

Modem    Baud  MAC-Address-Range
-------- ----- -------------------------------------
disabled  9600 00-06-3c-e4-0a-00 to 00-60-3e-e4-0d-ff

System Name              System Location          System Contact
------------------------ ------------------------ ----------------------
WBU-Catalyst-2900 5      Closet 202 1/F           Luis x5529
Console>
Using the show configuration Command
Enter the show config command to display the current system configuration:
Console> show config
begin
set password $1$FMFQ$HfZR5DUszVHIRhrz4h6V70
set enablepass $1$FMFQ$HfZR5DUszVHIRhrz4h6V70
set prompt Console>
!
#system
set system baud 9600
set system modem  disable
set system name  Catalyst 2900
set system location  Sunnyvale, CA
set system contact Bob Lewis
!
#snmp
set snmp rmon  enable
set snmp community read-only public
set snmp community read-write private
set snmp community read-write-all secret
set snmp trap  171.69.194.181 public
set snmp trap  disable
!

#vlan/trunk
clear trunk all
!
set vlan 1    1/1-2,2/1-24
!
#trunks
!
#MAC filters
clear filter all
!
#cam
set cam agingtime 0
!
#spantree
#vlan 1
set spantree enable         1
set spantree fwddelay 20    1
set spantree hello    2     1
set spantree maxage   20    1
set spantree priority 45    1
set spantree portpri  1/1  32
set spantree portcost 1/1  100
set spantree portpri  1/2  32
set spantree portcost 1/2  100
set spantree portpri  2/1  32
set spantree portcost 2/1  100
.
.
.
set spantree portpri  2/12 32
set spantree portcost 2/12 100
!
#vlan trunk/monitor
!
#ip
set interface sc0 192.122.174.220 255.255.255.0 192.122.174.255
set redirect enable
set route 0.0.0.0 192.122.174.102 1
set arp agingtime 1200
!
#cdp
set cdp 1/1  enable  60
set cdp 1/2  enable  60
set cdp 2/1  enable  60
set cdp 2/2  enable  60

set cdp 2/3  enable  60
.
.
.
set cdp 2/12 enable  60
!
#ipalias
set ipalias default 0.0.0.0
set ipalias cres 192.122.173.42
set ipalias calypso 171.69.194.181
!
#alias
!
#port monitoring
set monitor 1 1/1  both
set monitor disable
!
#module 1
set port enable    1/1
set port name      1/1
set port duplex    1/1 auto
set port speed     1/1 10
set port level     1/1 auto
set port enable    1/2
set port name      1/2
set port duplex    1/2 10
set port speed     1/2 100
set port level     1/2 auto
!
#module 2
set module enable  2
!
set port enable    2/1
set port name      2/1 auto
set port duplex    2/1 100
set port level     2/1 100
set port enable    2/2
set port name      2/2
set port duplex    2/2 10
set port level     2/2 auto
.
.
set port enable    2/12
set port name      2/12
set port duplex    2/12 10

set port level     2/12 10
!
end
Enter the show port command to display the current system configuration: Console> show port Port Name Status Vlan Level Duplex Speed Type ---- ----------- -------- -------- ------ ------ ------ ----------- 1/1 ready 1 normal half 100 100 BASE-TX 1/2 ready 1 normal half 100 100 BASE-TX 2/1 network ready 1 normal half 10 10 BASE-T 2/2 connect 1 normal half 10 10 BASE-T 2/3 connect 1 normal half 10 10 BASE-T 2/4 connect 1 normal half 10 10 BASE-T 2/5 connect 1 normal half 10 10 BASE-T 2/6 connect 1 normal half 10 10 BASE-T 2/7 connect 1 normal half 10 10 BASE-T 2/8 connect 1 normal half 10 10 BASE-T 2/9 connect 1 normal half 10 10 BASE-T 2/10 connect 1 normal half 10 10 BASE-T 2/11 connect 1 normal half 10 10 BASE-T 2/12 connect 1 normal half 10 10 BASE-T Port Align-Err FCS-Err Xmit-Err Rcv-Err ---- ---------- ---------- ---------- ---------- 1/1 0 0 0 0 1/2 0 0 0 0 2/1 0 0 0 0 2/2 0 0 0 0 2/3 0 0 0 0 2/4 0 0 0 0 2/5 0 0 0 0 2/6 0 0 0 0 2/7 0 0 0 0 2/8 0 0 0 0 2/9 0 0 0 0 2/10 0 0 0 0 2/11 0 0 0 0 2/12 0 0 0 0 Port Single-Col Multi-Coll Late-Coll Excess-Col Carri-Sens Giants ---- ---------- ---------- ---------- ---------- ---------- ---------- 1/1 0 0 0 0 0 0 1/2 0 0 0 0 0 0 2/1 0 0 0 0 0 0 2/2 0 0 0 0 0 0 2/3 0 0 0 0 0 0 2/4 0 0 0 0 0 0 2/5 0 0 0 0 0 0 2/6 0 0 0 0 0 0 2/7 0 0 0 0 0 0 2/8 0 0 0 0 0 0 2/9 0 0 0 0 0 0 2/10 0 0 0 0 0 0 2/11 0 0 0 0 0 0 2/12 0 0 0 0 0 0 Last-Time-Cleared -------------------------- Fri Apr 28 1995, 16:34:25 Console>Console> (enable) show port Port Name Status Vlan Level Duplex Speed Type ---- -------------------- ---------- ---------- ------ ------ ----- -------------- 1/1 Management Port notconnect 1 normal half 100 100 BASE-TX 1/2 InterSwitchLink connected trunk normal half 100 100 BASE-TX 2/1 Dennis connected 10 normal a-half a-10 10/100 BASE-TX 2/2 Luis notconnect 10 normal auto auto 10/100 BASE-TX 2/3 Iris notconnect 10 normal auto auto 10/100 BASE-TX 2/4 Nancy connected 10 normal a-half a-10 10/100 BASE-TX 2/5 Arthur notconnect 20 normal auto auto 10/100 BASE-TX 2/6 Ron notconnect 20 normal auto auto 10/100 BASE-TX 2/7 Connie disabled 20 normal auto auto 10/100 BASE-TX 2/8 Bill notconnect 20 normal auto auto 10/100 BASE-TX 2/9 notconnect 20 normal auto auto 10/100 BASE-TX 2/10 notconnect 20 normal auto auto 10/100 BASE-TX 2/11 notconnect 20 normal auto auto 10/100 BASE-TX 2/12 notconnect 20 normal full auto 10/100 BASE-TX Port Align-Err FCS-Err Xmit-Err Rcv-Err ---- ---------- ---------- ---------- ---------- 1/1 0 0 0 0 1/2 1 0 0 0 2/1 0 0 0 0 2/2 0 0 0 0 2/3 0 0 0 0 2/4 30 0 0 0 2/5 0 0 0 0 2/6 0 0 0 0 2/7 0 0 0 0 2/8 0 0 0 0 2/9 0 0 0 0 2/10 0 0 0 0 2/11 0 0 0 0 2/12 0 0 0 0 Port Single-Col Multi-Coll Late-Coll Excess-Col Carri-Sens Giants ---- ---------- ---------- ---------- ---------- ---------- ---------- 1/1 0 0 0 0 0 0 1/2 680 418 0 1 0 - 2/1 756 99 0 0 0 0 2/2 0 0 0 0 0 0 2/3 0 0 0 0 0 0 2/4 409 403 0 11 0 1256 2/5 0 0 0 0 0 0 2/6 0 0 0 0 0 0 2/7 0 0 0 0 0 0 2/8 0 0 0 0 0 0 2/9 0 0 0 0 0 0 2/10 0 0 0 0 0 0 2/11 0 0 0 0 0 0 2/12 0 0 0 0 0 0 Last-Time-Cleared -------------------------- Wed Dec 27 1995, 16:09:47 Console> (enable)
|
|
Copyright 1988-1996 © Cisco Systems Inc.