|
|

This chapter contains the system configuration changes to use after the initial installation of the LightStream 100 ATM switch. For command syntax, refer to the appendix "Command Reference."
To change the password, follow these steps:
To set the time and date, follow these steps:
This section provides procedures for setting and changing PVCs.
To set a unidirectional PVC, follow these steps:
If a PVC is incorrectly set or requires a change, first delete the PVC; then set another PVC. To change a PVC, follow these steps:
Setting Up a Soft PVC/PVP Connection
To shorten the time-consuming and error-prone task of end-to-end manual configuration of PVCs, the LightStream 100 ATM switch supports soft PVC/PVP. With soft PVC/PVP support, you can create a PVC across a multiswitch network by designating only the two endpoints of the connection. The software dynamically establishes a connection between the two endpoints, eliminating manual configuration of the switches between the two points. Without soft PVC/PVP support, every link in the path between the two ATM hosts must be manually configured as a PVC.
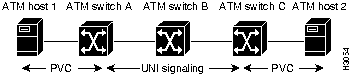
To illustrate how soft PVC/PVP dynamically establishes a connection between the two endpoints, Figure 5-1 shows a simple three-switch network that contains the following:
Figure 5-1 : Three-Switch Network
With soft PVC/PVP support, you need only configure the PVCs on the ATM hosts and assign a 20-byte ATM address to each border switch. Then enter the soft establish command on one of the border switches. Upon receiving the command, the signaling component in the LightStream 100 switch uses standard User-Network Interface (UNI) 3.x signaling and Interim Inter-Switch Signaling Protocol (IISP) to originate and route a call through the ATM network and dynamically establish a connection between ATM hosts.
A soft PVC/PVP connection can only be established between PVC-capable hosts (ATM hosts 1 and 2 in Figure 5-1). Additionally, the border switches (ATM switch A and C in Figure 5-1) must support soft PVC/PVP. However, soft PVC/PVP support is not necessary on intermediate switches (switch B in Figure 5-1), although the intermediate switches must support UNI 3.x signaling and IISP. Furthermore, a minimum of two ATM switches are required for a soft PVC/PVP connection: a source-border switch and target-border switch. You cannot establish a soft PVC/PVP connection between two ATM hosts connected to a single ATM switch.
A source-border switch initiates a soft PVC/PVP connection between two ATM hosts, and must be directly connected to a PVC-capable ATM host. In Figure 5-1, either switch A or C could be a source-border switch.
The target-border switch terminates the SVC portion of the soft PVC/PVP connection. Normally an SVC connection terminates at an ATM host, but for soft PVC/PVPs the SVC connection terminates at the target-border switch. The target-border switch must also be directly connected to a PVC-capable ATM host. In Figure 5-1, either switch A or C could be a target-border switch.
The type of switch, source-border or target-border, depends on which ATM switch you enter in the soft establish command to establish a soft PVC/PVP connection. For example, if you enter the soft establish command on ATM switch A in Figure 5-1, ATM switch A becomes the source-border switch and ATM switch C becomes the target-border switch.
End-to-end signaling between ATM hosts via LightStream 100 switch switches is still available. Even though the previous examples show a PVC-capable only host, you can use soft PVC/PVP to setup a virtual path (VP) between PVC connections and use standard UNI end-to-end signaling to set up virtual paths between PVCs. However, soft PVC/PVP support is only between ATM hosts with PVC connections. For example, you cannot use soft PVC/PVP to establish paths if one ATM host is PVC-capable only and the other ATM host is SVC-capable only.
To set up a soft PVC/PVP connection, first set up a PVC between the ATM hosts and border switches. (Refer to the documentation that accompanied your ATM host for instructions). Then follow these steps:
Setting a Multicast Connection
The LightStream 100 can perform multicasting through SVCs or PVCs. If PVCs are to be used, you must establish a multicast (point-to-multipoint) connection using the pvc establish command, and then pvc add command.
Use the pvc establish command to set the connection type to multicast; then, use the pvc add command to add the endpoint. Enter the same low parameters (line, VPI, and VCI) as those specified in the pvc establish command. The system accepts only multicast connections when the connection is added or when an endpoint is deleted.
When deleting the multicast connection, delete the endpoints one by one. (The deletion order need not be the same as the setup order.) Then delete the unidirectional, point-to-point connection.
To set a multicast PVC and to add two additional endpoints, follow these steps:
If a registered endpoint is set incorrectly or requires a change, first delete the endpoint; then add another endpoint.
To delete a multicast connection, first delete all registered endpoints; then delete the multicast PVC connection.
To delete or change an endpoint or to delete a multicast PVC connection, follow these steps:
To set up a SVC, follow these steps:
To change a registered SVC, first delete the SVC; then add a new one. To delete all registered SVCs, use the route flush command.
To delete one SVC route or an entire SVC routing table, follow these steps:
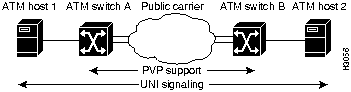
To enable the use of standards-based signaling over public carriers, the LightStream 100 switch supports switched virtual circuit (SVC) tunneling. SVC tunneling allows you to set up temporary SVCs over previously established permanent virtual paths (PVPs).
Figure 5-2 shows a simple network composed of two ATM hosts and two ATM switches.
One benefit of SVC tunneling is that you need only configure a PVP between the ATM switches connected to the public carrier. Signaling messages between the two ATM switches are then "tunneled" (exchanged) through the PVP over the ATM Forum-recommended virtual circuit five. The PVP appears as a point-to-point link to the two ATM switches. Routing of signaling messages between the two ATM switches over the public carrier is based on ATM Forum standard IISP. Without SVC tunneling, the complete path between the two ATM hosts must be configured as a PVC.
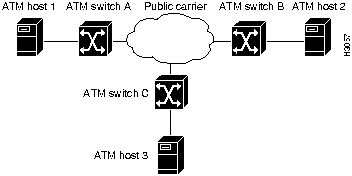
Another benefit of SVC tunneling is that only a single ATM switch port must be connected to the public carrier network. Through a single port, an ATM switch can communicate with multiple ATM switches (that support SVC tunneling) connected to the same public carrier, as shown in Figure 5-3.
Figure 5-3 : Multiple ATM Switches Connected to a Public Carrier
For example, in Figure 5-3, ATM switch A can communicate with ATM switch B and C simultaneously through a single port connected to the public carrier. For this communication to occur, the public carrier provides two PVPs: one PVP (VP1) between ATM switch A and B and another PVP (VP2) between ATM switch A and C.
In general, one PVP is required between two ATM switches connected to the public carrier. Messages are tunneled between the two ATM switches over the assigned PVP. Signaling messages are exchanged over VP 5, where VP is the PVP between the two ATM switches and 5 is the reserved VCI channel (on the VP) allocated by the ATM Forum for signaling.
The LightStream 100 switch supports a maximum of 64 virtual paths.
To set up SVC tunneling, follow these steps:
Configuring the LightStream 100 Switch for LAN Emulation
There are two components that must be configured so that the ATM switch can support LAN emulation. The ATM address prefix of the LightStream 100 and the ATM addresses of the LAN emulation configuration servers (LECS) must be entered in the LightStream 100.
Configuring the ATM Prefix of the LightStream 100 Switch
To set the ATM address prefix, complete the following steps:
Configuring the ATM Addresses of the LECSs
For LAN emulation to function accross multiple LightStream 100 switches, you need to enter the ATM address of each LAN emulation configuration server (LECS). LAN emulation clients (LECs) and LAN emulation servers (LESs) access the LightStream 100 switch to determine the ATM address of their LECS. The LEC and LES use the LECS to learn their operating parameters and the emulated LAN to which they belong. Enter the addresses of the LECSs accessed from the LightStream 100 switch. The LightStream 100 switch can store up to four LECS ATM addresses. Use the set configserver command to enter ATM addresses for the LECSs, as follows:
Copyright 1988-1996 © Cisco Systems Inc.
LS100#
set time 94-04-01 18:30:00
System Timer is set.
94-04-01 18:30:00
![]()
![]()
![]()
![]()
![]()
![]()
![]()
![]()