Warning: Hazardous voltages may exist in or near the power supply, so use extreme caution when working with the power supply. Remove rings, watches, and any other jewelry before working on equipment that is connected to power lines. Metal objects will heat up when connected to power and ground and can weld to a terminal or cause serious burns.
Follow these guidelines when working on equipment powered by electricity:
- Locate the emergency power-off switch for the room in which you are working, so if an electrical accident occurs, you can act quickly.
- Disconnect all power before doing the following:
- Installing or removing a chassis
- Working near power supplies
- Performing a software upgrade
- Before working on the system, turn off the power and unplug the power cord.
- Never assume that power has been disconnected from a circuit; always check.
- Do not work alone when potentially hazardous conditions exist.
- Carefully examine your work area for possible hazards, such as moist floors, ungrounded power extension cables, power surges, and missing safety grounds.
- If an electrical accident occurs, do the following:
- Use caution; do not become a victim yourself.
- Turn off power to the system.
- If possible, send another person to get medical aid. Otherwise, assess the victim's condition and then call for help.
- Determine if the person needs rescue breathing and/or external cardiac compressions; then take appropriate action.
Preventing Electrostatic Discharge Damage
When electronic printed circuit cards are improperly handled, electrostatic discharge (ESD) can damage equipment and impair electrical circuitry, and can result in complete or intermittent failures.
Always follow ESD prevention procedures when removing and replacing cards. Wear an ESD wrist strap, ensuring that it makes good skin contact. Connect the clip to an unpainted chassis frame surface to safely channel unwanted ESD voltages to ground. To properly guard against ESD damage and shocks, the wrist strap and cord must operate effectively.
Tools and Equipment
You need the following tools and equipment to install Flash EPROMs in the IGS/TR:
- ESD cord and wrist strap
- No. 1 Phillips screwdriver
- EPROM removal tool
- Eight Flash EPROMs
- Two Boot PROMs, labeled FW1 and FW2
Opening the Chassis
This section outlines the steps required to open the IGS/TR chassis. The following discussion assumes that you are looking at the IGS/TR from the front. Use Figure 1 as a guide while performing the cover and tray removal procedures.
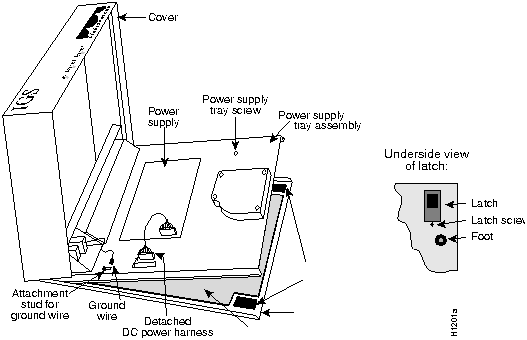
Figure 1 : Internal View of the IGS/TR
 Caution: Before opening the chassis, be sure you have discharged all static electricity from your body, as discussed in the section, "Preventing Electrostatic Discharge Damage." Ensure that the power cord has been disconnected.
Removing the Chassis Cover
To remove the IGS/TR cover, follow these steps.
Step 1: Turn off the unit and unplug it.
- Step 2: Remove all cables from the back of the IGS/TR (including the power cable) to ensure that the unit is not powered on and to ensure that the cover will not get stuck on the cables. Avoid damaging any cables in the process.
- Step 3: Turn the unit up so that the back of the chassis is resting on a surface, and the underside of the chassis is facing you, taking care not to damage the LAN or WAN connectors.
Step 4: Remove the latch screw behind the latch on the right underside of the chassis. The latch will not open until this screw is removed.
- Step 5: Put the unit back down with the LEDs facing you. Place your fingers inside the two front latches on the underside of the chassis and push the latches away from you until they snap open.
- Step 6: Lift the chassis cover from the front edge where the LEDs are located. The chassis cover will tilt up from the front toward the back. If you feel excessive resistance when opening the unit, one of the latches might still be closed. If this is so, try pushing back on the latches again.
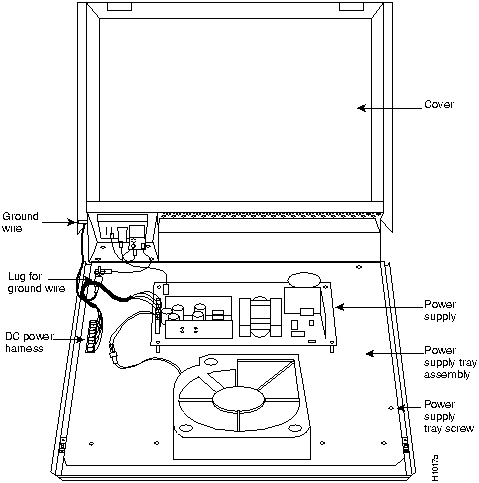
Figure 2 : IGS/TR Tray Assembly
- Step 7: Remove the ground wire (green with yellow stripes) connecting the hinge post on the cover with the main ground stud, as shown in Figure 2. The ground wire is attached to the main ground stud with a FASTON lug, so the wire can be slipped off easily.
- Step 8: Remove the chassis cover the rest of the way by pulling it up and forward so that the hinge posts come free from the notches in the bottom tray.
- Step 9: Set the cover aside.
Removing the Power Supply Tray
To remove the IGS/TR power supply tray assembly, follow these steps.
Step 1: Locate the DC power harness on the far left edge of the power supply tray assembly, as shown in Figure 2. Using the pull tab provided, detach the DC power harness from the system card under the power supply tray assembly.
 Caution: If you lift the power supply tray assembly without removing this harness, you might damage the cable that provides all the power to the system card.
- Step 2: Remove the power supply tray screw which is located near the right front top corner of the power supply tray assembly.
Note: The power supply tray screw that holds down the power supply tray assembly is not obvious. This screw must be removed before the power supply tray assembly can be removed.
- Step 3: Place your fingers underneath the front edge of the power supply tray assembly and pull the edge up. The latches holding the power supply tray assembly will release.
- Step 4: Slide the power supply tray assembly toward you, lift it off the bottom, and remove it. The system card is now exposed. You do not need to remove the system card from the bottom of the chassis.
- Step 5: Set the power supply tray assembly aside while you replace the EPROMs.
Removing the EPROMs
Once the system card is exposed, follow the procedures in this section to replace the EPROMs with Flash EPROMs, install boot PROMs, and make the appropriate jumper settings.
After removing the old EPROMs, keep them separate from the new ones to avoid mixing the two sets.
 Caution: The correct placement of the Flash EPROMs and boot PROMs is crucial. If improperly positioned, the EPROMs could be damaged when the system is powered on. Read through all of the instructions before proceeding. To prevent damage to the EPROMs from electrostatic discharge (when handling the system and its components), follow the ESD procedures described earlier. Also, be careful not to damage or scratch the printed circuit card under the EPROMs.
Figure 3 illustrates the IGS/TR card layout. The card is oriented with the front panel LEDs at the bottom of the illustration. Refer to this figure to locate the EPROMs on the system card.
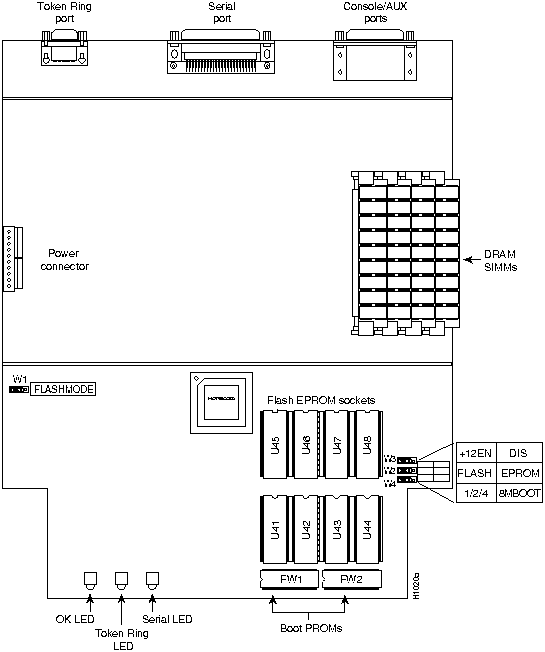
Figure 3 : IGS/TR Card Layout
Installing Flash Memory EPROMs and Boot PROMs
Before you begin, verify that all the Flash EPROMs you plan to install are manufactured by the same vendor source. For example, they should all be manufactured by Intel Corporation or all be manufactured by Advanced Micro Devices Corporation.
Step 1: Locate the EPROMs labeled U41--U48 at the front of the unit (see Figure 3). Note the orientation of the notches on the EPROMs to aid in inserting the new EPROMs. Do not rely on the EPROM labels for correct positioning.
- Step 2: Use an EPROM removal tool to gently remove EPROMs U41--U48. Set the EPROMs aside and keep them in case you need to use them again.
- Step 3: Insert the Flash EPROMs in the sockets U41--U48 in the order shown in Figure 3, being careful not to bend or crush any of the pins. To straighten out a bent pin, use needle-nosed pliers. Align the notch in the EPROM with the notch in the EPROM socket, ignoring the orientation of the label. Also, be sure to insert the Flash EPROMs using the same orientation as the EPROMs you are replacing.
Step 4: Insert the boot PROMs, labeled FW1 and FW2 in the empty sockets, as shown in Figure 3. Align the notches in the boot PROMs with the notches in the boot PROM sockets.
Setting EPROM Jumpers
When all the EPROMs have been inserted, select the proper jumper configurations.
Step 1: To enable Flash memory, move the jumpers at jumper locations W1, W2, W3, and W4 to the two left jumper pins on each (see Figure 4).
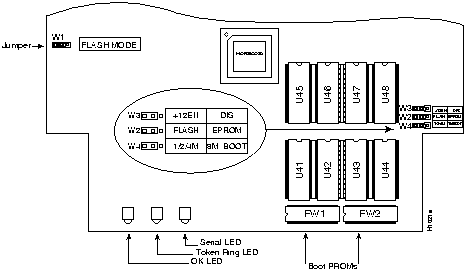
Figure 4 : Flash EPROM Jumper Settings for the IGS/TR
Figure 5 shows an expanded view of jumper W1 properly set for Flash, using the same orientation as Figure 4.

Figure 5 : Flash EPROM Jumper Setting for Jumper W1
Figure 6 shows an expanded view of jumpers W2, W3, and W4 set for Flash EPROM, using the same orientation as Figure 4. Note that the jumper ordering (first W3, then W2, then W4) is not intuitive.
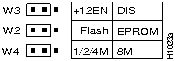
Figure 6 : Jumper Designations for IGS/TR EPROMs
Replacing the Cover and Tray
After you have replaced the EPROMs for your system, replace the cover and tray by following these steps:
Step 1: Replace the metal tray on the chassis (see Figure 1).
- Step 2: Replace the ground wire.
- Step 3: Replace the DC power harness.
- Step 4: Replace the chassis cover.
- Step 5: Replace the screw that holds the cover down.
- Step 6: Replace the latch screw.
- Step 7: Replace the chassis cables.
Note: The power cable is designed so that if it is installed backwards or offset, +5V is shorted to ground. This enables the protective circuitry on the power supply to protect the system card from reversed voltage. If this happens, you will hear a quiet clicking from the power supply, but you will not hear other noises, such as the fan, and no LEDs will light.
Checking the Installation
To test the installation, turn on the power. The OK LED on the front of the chassis should light, and your system will go through the bootup procedures. Refer to the Router Products Configuration and Reference or the Router Products Getting Started Guide for details.
If you turn on a system when one or more of the EPROMs is incorrectly inserted, the system will not boot properly. If this happens, do the following:
Step 1: Turn off the power
Step 2: Reopen the chassis to the system card.
Step 3: Locate the offending EPROM, straighten its pins, then reinsert it.
Step 4: Reassemble the chassis.
Step 5: Turn on the power to test it again.
- Step 6: When the system tests successfully, follow your software manual's instructions for rebooting the system and loading Flash memory.
Note: If you experience trouble during the installation or need additional upgrade or product information, contact your service representative or the Cisco Systems Technical Assistance Center (TAC) at 1-800-553-2447 or tac@cisco.com for assistance.
Copyright 1988-1996 © Cisco Systems Inc.
