|
|

Configuring Virtual Connections
This chapter describes how to configure a typical ATM network after autoconfiguration has established the default network connections. The network configuration modifications described in this chapter are used to optimize your ATM network operation.
This chapter uses the following virtual path (VP) and virtual channel (VC) terminology:
The characteristics of the VC are established when the VC is created and include the following:
These switching features can be turned off with interface configuration commands; autonomous switching must be explicitly enabled per interface.
When configuring virtual connections perform the following tasks:
When the switch is powered on, an SVC is dynamically established for each end node with which the switch communicates. Table 7-1 list the types of supported virtual connections.
Table 7-1 : Supported LightStream 1010 Virtual Connection Types
| Connection | Point-to-
Point |
Point-to-
Multipoint |
Transit | Terminate |
|---|---|---|---|---|
| Permanent virtual channel link (PVCL) | 3 | 3 | --- | --- |
| Permanent virtual path link (PVPL) | 3 | 3 | --- | --- |
| Permanent virtual channel connection (PVCC) | 3 | 3 | 3 | 3 |
| Permanent virtual path connection (PVPC) | 3 | 3 | 3 | --- |
| Soft permanent virtual channel connection (Soft PVCC) | 3 | --- | 3 | --- |
| Soft permanent virtual path connection (Soft PVPC) | 3 | --- | 3 | --- |
| Switched virtual channel connection (SVCC) | 3 | 3 | 3 | 3 |
| Switched virtual path connection (SVPC) | 3 | 3 | 3 | --- |
For an overview description of LightStream 1010 ATM switch configuration examples see the Light Stream 1010 ATM Switch User Guide publication. The LightStream 1010 ATM Switch Command Reference publication provides the complete syntax for every switch configuration command and describes the no form of each command.
Configure Permanent Virtual Channel Connections
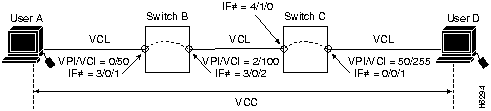
This section describes configuring LightStream 1010 virtual channel connections (VCCs). A VCC is established as a bidirectional facility to transfer ATM traffic between two ATM layer users. Figure 7-1 shows a VCC between ATM user A and user D.
Figure 7-1 : Virtual Channel Connection Example

Virtual Channel Connection Command Description
To configure a point-to-point VCC, use the following configuration command using the no form of this command to remove an entry:
| Task | Command |
|---|---|
| At the privileged EXEC prompt, enter configuration mode from the terminal. | configure1
[terminal] |
| Select the interface to be configured. | interface atm card/sub_card/port [.sub-inter #] |
| Configure the PVC. | atm pvc vpi vci [upc upc] [pd pd] [rx-cttr index] [tx-cttr index] interface atm card/subcard/port[.vpt #] vpi vci [upc upc] |
Parameter pd is not applicable to a virtual path.
Example
The following example configures the internal cross-connect PVC on Switch B between interface 3/0/1, VPI=0, VCI =50 and interface 3/0/2, VPI=2, VCI=100 (see Figure 7-1):
Switch-B(config)#interface atm 3/0/1
Switch-B(config-if)#atm pvc 0 50 interface atm 3/0/2 2 100
The following example configures the interswitch PVC link connection between Switch-B, interface 3/0/2, VPI=2, VCI =100 and Switch-C, interface 4/1/0, VPI=2, VCI =100:
Switch-B(config)#interface atm 3/0/2
Switch-B(config-if)#atm pvc 2 100 interface atm 4/1/0 2 100
The following example configures the internal cross-connect PVC on Switch-C between interface 4/1/0, VPI=2, VCI =100 and interface 0/0/1, VPI 50, VCI=255:
Switch-C(config)#interface atm 4/1/0
Switch-C(config-if)#atm pvc 2 100 interface atm 0/0/1 50 255
Each subsequent VC cross-connection and link must be configured until the VC is terminated to create the entire VCC.
Use the show vc Command to Display Virtual Channel Connections
To show the VC configuration use the following EXEC mode commands:
| Task | Command |
|---|---|
| Show the ATM interface configuration. | show atm vc card/sub_card/port |
| Show the PVC interface configuration. | show atm vc interface atm card/sub_card/port vpi vci |
Examples
The following example displays Switch-B PVC configuration on interface 3/0/1:
Switch-B#show atm vc interface atm 3/0/1
Interface    VPI     VCI     Type   X-Interface  X-VPI   X-VCI   Status
ATM3/0/1     0       50      PVC    ATM3/0/2     2       100     UP
Switch-B#
The following example displays Switch-B VC configuration on interface 3/0/1, VPI = 0, VCI = 50:
Switch-B#show atm vc interface atm 3/0/1 0 50
Interface: ATM3/0/1
VPI = 0  VCI = 50
Status: UP
Last-status-change-time: 15:44
Connection-type: PVC
Cast-type: point-to-point
Packet-discard-option: enabled
Usage-Parameter-Control (UPC): pass
Number of OAM-configured connections: 0
OAM-configuration: disabled
OAM-states:  Not-applicable
Cross-connect-interface: ATM3/0/2
Cross-connect-VPI = 2
Cross-connect-VCI = 100
Cross-connect-UPC: pass
Cross-connect OAM-configuration: disabled
Cross-connect OAM-state:  Not-applicable
Encapsulation: AAL5PNNI
Rx cells: 0, Tx cells: 0
Rx connection-traffic-table-index: 3
Rx service-category: VBR-RT (Realtime Variable Bit Rate)
Rx pcr-clp01: 424
Rx scr-clp01: 424
Rx tolerance: 50
Tx connection-traffic-table-index: 3
Tx service-category: VBR-RT (Realtime Variable Bit Rate)
Tx pcr-clp01: 424
Tx scr-clp01: 424
Tx tolerance: 50
Crc Errors:0, Sar Timeouts:0, OverSizedSDUs:0
Switch-B#
Configure Permanent Virtual Path Connections
This section describes configuring a permanent virtual path (PVP) connection. Figure 7-2 is an example of an LightStream 1010 switch with PVPs configured through the switch.
Figure 7-2 : Virtual Path Connection Example
To configure a permanent virtual path connection, use the following EXEC commands using the no form of this command to disable:
| Task | Command |
|---|---|
| At the privileged EXEC prompt, enter configuration mode from the terminal. | configure1
[terminal] |
| Select the physical interface to be configured. | interface atm card/sub_card/port |
| Configure interface PVP. | atm pvp vpi [cast-type type] [upc upc] [rx-cttr index] [tx-cttr index] interface card/sub_card/port |
Example
The following example configures the internal cross-connect PVP within Switch-B between interfaces 3/0/1, VPI=0 and interface 3/0/2, VPI=2:
Switch-B(config)#interface atm 3/0/1
Switch-B(config-if)#atm pvp 1 interface atm 3/0/2 2
Switch-B(config-if)#
The following example configures the inter-switch PVP link between Switch-B interface 3/0/2, VPI=2 and Switch-C, interface 4/1/0, VPI=2:
Switch-B(config)#interface atm 3/0/2
Switch-B(config-if)#atm pvp 2 interface atm 4/1/0 2
Switch-B(config-if)#
The following example configures the internal cross-connect PVP within Switch-C between interfaces 4/1/0, VPI=2 and interface 0/0/1, VPI=50:
Switch-C(config)#interface atm 4/1/0
Switch-C(config-if)#atm pvp 2 interface atm 0/0/1 50
Switch-C(config-if)#
Each subsequent PVP cross-connection and link must be configured until the VP is terminated to create the entire PVP.
Use show atm vp Command to Display Virtual Path Connection
To show the ATM interface configuration, use the following command:
| Task | Command |
|---|---|
| Show the ATM VP configuration. | show atm vp |
Example
The following example displays the PVP configuration of Switch-B:
Switch-B#show atm vp
Interface    VPI    Type  X-Interface     X-VPI     Status
ATM3/0/1     0      PVP   ATM3/0/2        2         UP
Switch-B#
Configure Point-To-Multipoint PVC Connection
This section describes configuring point-to-multipoint PVC connections.
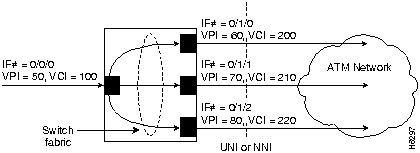
In Figure 7-3, cells entering the switch at the root point (on the left side at interface 0/0/0, VPI=50, VCI=100), are duplicated and switched to the leaf points (output interfaces), on the right side of the example.
Figure 7-3 : Point-to-Multipoint PVC Example
Point-To-Multipoint PVC Connection Command Description
This section describes the commands needed to configure the example in Figure 7-3.
To configure point-to-multipoint PVC connections use the following EXEC commands using the no form of this command to disable:
| Task | Command |
|---|---|
| At the privileged EXEC prompt, enter configuration mode from the terminal. | configure1
[terminal] |
| Select the interface to be configured. | interface atm card/sub_card/port [.vpt #] |
| Configure the PVC between ATM switch connections. | atm pvc vpi-A vci-A [cast-type p2mp-leaf p2mp-root p2p] [upc upc-A] [pd pd] [rx-cttr index] [tx-cttr index] interface atm card-B/subcard-B/port-B[.vpt #] vpi-B vci-B [cast-type type] [upc upc-B] |
To configure the point-to-multipoint PVC connections using the atm pvc command the root point is port-A and the leaf points are port-B.
Example
The following example configures the root point PVC on switch interface 0/0/0, VPI=50, VCI =100 to the leaf point interface 0/1/0, VPI=60, VCI=200 (see Figure 7-3):
Switch(config)#interface atm 0/0/0
Switch(config-if)#atm pvc 50 100 cast-type p2mp-root interface atm 0/1/0 60 200 cast-type p2mp-leaf
The following example configures the same root point PVC to the leaf point interface 0/1/1, VPI=70, VCI=210:
Switch(config-if)#atm pvc 50 100 cast-type p2mp-root interface atm 0/1/1 70 210 cast-type p2mp-leaf
The following example configures the same root point PVC to the leaf point interface 0/1/2, VPI=80, VCI=220:
Switch(config-if)#atm pvc 50 100 cast-type p2mp-root interface atm 0/1/2 80 220 cast-type p2mp-leaf
show atm vc Example to Display Point-To-Multipoint PVC Configuration
To show the point-to-multipoint PVC configuration use the following EXEC mode commands:
| Task | Command |
|---|---|
| Show the ATM interface configuration. | show atm vc card/sub_card/port |
| Show the PVC interface configuration. | show atm vc interface atm card/sub_card/port vpi vci |
Examples
The following example displays the point-to-multipoint PVC configuration on interface 3/0/1:
Switch#show atm vc interface atm 0/0/0
Interface    VPI     VCI     Type   X-Interface  X-VPI   X-VCI   Status
ATM0/0/0     50      100     PVC    ATM1/1/0     60      200     UP
ATM0/0/0     50      100     PVC    ATM1/1/1     70      210     UP
ATM0/0/0     50      100     PVC    ATM1/1/2     80      220     UP
Switch#
The following example displays the VC configuration on interface 3/0/1, VPI = 50, VCI = 100:
Switch#show atm vc interface atm 0/0/0 50 100
Interface: ATM3/0/1
VPI = 50  VCI = 100
Status: UP
Last-status-change-time: 15:44
Connection-type: PVC
Cast-type: point-to-multipoint
Packet-discard-option: enabled
Usage-Parameter-Control (UPC): pass
Number of OAM-configured connections: 0
OAM-configuration: disabled
OAM-states:  Not-applicable
Cross-connect-interface: ATM0/1/0
Cross-connect-VPI = 60
Cross-connect-VCI = 200
Cross-connect-UPC: pass
Cross-connect-interface: ATM0/1/1
Cross-connect-VPI = 70
Cross-connect-VCI = 210
Cross-connect-UPC: pass
Cross-connect-interface: ATM0/1/2
Cross-connect-VPI = 80
Cross-connect-VCI = 220
Cross-connect-UPC: pass
Encapsulation: AAL5PNNI
Rx cells: 0, Tx cells: 0
Rx connection-traffic-table-index: 3
Rx service-category: VBR-RT (Realtime Variable Bit Rate)
Rx pcr-clp01: 424
Rx scr-clp01: 424
Rx tolerance: 50
Tx connection-traffic-table-index: 3
Tx service-category: VBR-RT (Realtime Variable Bit Rate)
Tx pcr-clp01: 424
Tx scr-clp01: 424
Tx tolerance: 50
Switch#
Configure Point-To-Multipoint PVP Channel
This section describes configuring point-to-multipoint PVP connections.
Figure 7-4 provides an example of point-to-multipoint PVP connections.
Figure 7-4 : Point-to-Multipoint Permanent Virtual Path Example
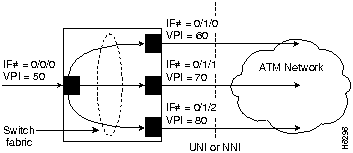
In Figure 7-4, cells entering the switch at the root point (the left side at interface 0/0/0), VPI=50, are duplicated and switched to the leaf points (output interfaces), on the right side of the example.
The following section describes the commands needed to configure this example.
Point-To-Multipoint PVP Command Description
To configure point-to-multipoint PVP connections, use the following EXEC commands using the no form of this command to disable:
| Task | Command |
|---|---|
| At the privileged EXEC prompt, enter configuration mode from the terminal. | configure1
[terminal] |
| Select the interface to be configured. | interface atm card-A/sub_card-A/port-A |
| Configure interface PVP. | atm pvp vpi-A [cast-type p2mp-leaf p2mp-root p2p] [upc upc-A] [rx-cttr index] [tx-cttr index] interface card-B/sub_card-B/port-B vpi-B [cast-type type] |
To configure the point-to-multipoint PVP connections using the atm pvp command the root point is Port A and the leaf points are Port B.
Examples
The following example configures the root point PVP on switch interface 0/0/0, VPI=50 to the leaf point interface 0/1/0, VPI=60 (see Figure 7-4):
Switch(config)#interface atm 0/0/0
Switch(config-if)#atm pvc 50 cast-type p2mp-root interface atm 0/1/0 60 cast-type
p2mp-leaf
The following example configures the same root point PVP to the leaf point interface 0/1/0, VPI=70:
Switch(config-if)#atm pvc 50 cast-type p2mp-root 0/1/0 70 cast-type p2mp-leaf
The following example configures the same root point PVP to the leaf point interface 0/1/2, VPI=80:
Switch(config-if)#atm pvc cast-type p2mp-root 50 0/1/2 80 p2mp-leaf
Use show atm vp Command to Display Point-To-Multipoint PVP Configuration
To show the ATM interface configuration use the following command:
| Task | Command |
|---|---|
| Show the ATM VP configuration. | show atm vp |
Example
The following example displays the PVP configuration of the point-to-multipoint PVP connections:
Switch#show atm vp
Interface    VPI    Type  X-Interface     X-VPI     Status
ATM0/0/0     50      PVP   ATM0/1/0       60         UP
                           ATM0/1/1       70         UP
                           ATM0/1/2       80         UP
Switch#
Configure Soft Permanent Virtual Channel (Soft PVC) Connections
This section describes configuring soft PVC connections. Soft PVC connections provide the following features:
Figure 7-5 is an illustration of the soft PVC connections used in the following examples:
Figure 7-5 : Soft Permanent Virtual Channel Connection Example
Soft Permanent Virtual Channel Command Description
To configure a soft PVC connection, use the following EXEC commands using the no form of this command to disable:
| Task | Command |
|---|---|
| Determine dstination ATM address. | show atm address |
| At the privileged EXEC prompt, enter configuration mode from the terminal. | configure1
[terminal] |
| Select the interface to be configured. | interface atm card/sub_card/port [.vpt #] |
| Configure soft PVC connection. | atm soft-vc src-vpi src-vci dest-address dest-vpi dest-vci [pd pd] [rx-cttr index] [slow-retry-interval seconds] [tx-cttr index] [upc drop pass tag] |
Example
The following example allows User A to determine the destination ATM address of the interface connected to User D:
Switch-C#show atm address


Switch Address(es):
  47.00918100000000603E5ADB01.00603E5ADB01.00 active

Soft VC Address(es):
  47.0091.8100.1111.1111.1111.1111.1111.1111.1111.00 ATM4/0/0

ILMI Switch Prefix(es):
  47.0091.8100.0000.0060.3e5a.db01

ILMI Configured Interface Prefix(es):

LECS Address(es):
Switch-C#
The following example configures a soft PVC on Switch-B between interface 0/0/0, source VPI = 0, source, VCI = 200, and Switch-C, destination ATM address = 47.0091.8100.00.0000.1111.1111.1111.1111.1111.1111.00, VPI = 0, VCI = 100 (see Figure 7-5):
Switch-B(config)#interface atm 0/0/0
Switch-B(config-if)#atm soft-vc 0 200 47.0091.8100.00.0000.1111.1111.1111.1111.1111.1111.00 00 100
To display the soft VC configuration at either end switch use the following EXEC mode commands:
| Task | Command |
|---|---|
| Show the ATM interface configuration. | show atm vc card/sub_card/port |
| Show the soft VC interface configuration. | show atm vc interface atm card/sub_card/port vpi vci |
Examples
The following example displays the soft VC configuration of Switch-B, on interface 0/0/0 out to the ATM network:
Switch-B#show atm vc interface atm 0/0/0
Interface    VPI     VCI     Type   X-Interface  X-VPI   X-VCI   Status
ATM0/0/0     0       200     softvc ATM2/0/0     50      135     UP
Switch-B#
The following example displays the soft VC configuration of Switch-C, on interface 4/0/0 out to the ATM network:
Switch-C#show atm vc interface atm 4/0/0
Interface    VPI     VCI     Type   X-Interface  X-VPI   X-VCI   Status
ATM4/0/0     0       100     softvc ATM0/1/0     75      250     UP
Switch-C#
Configure Soft Permanent Virtual Path (Soft PVP) Connections
This section describes configuring soft permanent virtual path (soft PVP) connections. Soft PVP connections provide the following features:
Figure 7-6 is an illustration of the soft PVP connections used in the section.
Figure 7-6 : Soft Permanent Virtual Path Connection Example

Soft Permanent Virtual Path Command Description
To configure a soft PVP connection, use the following EXEC commands using the no form of this command to disable:
| Task | Command |
|---|---|
| At the privileged EXEC prompt, enter configuration mode from the terminal. | configure1
[terminal] |
| Select the interface to be configured. | interface atm card/sub_card/port |
| Configure soft PVP connection. | atm soft-vp src-vpi dest-address dest-vpi [pd pd] [rx-cttr index] [slow-retry-interval seconds] [tx-cttr index] [upc drop pass tag] |
Example
The following example configures a soft PVP on Switch-B between interface 0/0/0, source VPI=75, and Switch-C, destination ATM address=47.0091.8100.00.0000.1111.1111.1111.1111.1111.1111.00, VPI=50 (Figure 7-6):
Switch-B(config)#interface atm 0/0/0
Switch-B(config-if)#atm soft-vp 75
47.0091.8100.00.0000.1111.1111.1111.1111.1111.1111.00 50
Use show atm vp Command to Display Virtual Path Connection
To show the ATM virtual path configuration use the following command:
| Task | Command |
|---|---|
| Show the ATM VP configuration. | show atm vp |
Example
The following example displays the soft VP configuration at switch B, on interface 0/0/0 out to the ATM network:
Switch-B#show atm vp
Interface    VPI    Type  X-Interface     X-VPI     Status
ATM0/0/0     75     SoftvpATM1/1/0        45        UP
Switch-B#
The following example displays the soft VP configuration at switch C, on interface 4/0/0 out to the ATM network:
Switch-C#show atm vp
Interface    VPI    Type  X-Interface     X-VPI     Status
ATM4/0/0     50     SoftvpATM3/1/3        60        UP
Switch-C#
Configure Terminating PVC Connections
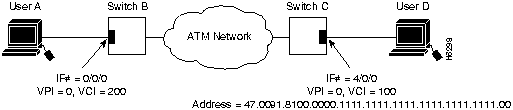
This section describes configuring terminating permanent virtual channel (PVC) connections. Terminating connections provide the network connection to the LightStream 1010 switch CPU for network management.
Figure 7-7 is an illustration of transit and terminating connections.
Figure 7-7 : Virtual Connection Types Example
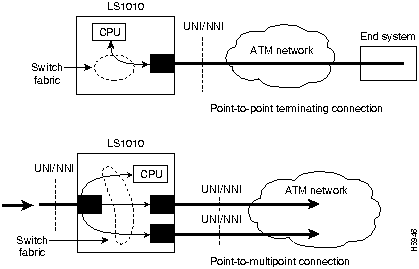
Point-to-point and point-to-multipoint are two type of terminating connections. Both terminating connections are configured using the same commands as transit connections (discussed in the previous sections). However, all switch terminating connections use interface 2/0/0 to connect to the switch CPU.
The following sections describe both point-to-point and point-to-multipoint configuration of PVC and PVP connections.
Terminate PVC Connection Command Description
To configure both point-to-point and point-to-multipoint terminating PVC connections, use the following EXEC commands using the no form of this command to disable.
| Task | Command |
|---|---|
| At the privileged EXEC prompt, enter configuration mode from the terminal. | configure1
[terminal] |
| Select the interface to be configured. | interface atm card-A/sub_card-A/port-A [.vpt #] |
| Configure the PVC between ATM switch connections. | atm pvc vpi-A vci-A [cast-type p2mp-leaf p2mp-root p2p] [upc upc-A] [pd pd] [rx-cttr index] [tx-cttr index] interface atm card-B/subcard-B/port-B[.vpt #] vpi-B vci-B [upc upc-B] [cast-type p2mp-leaf p2mp-root p2p] |
When configuring point-to-multipoint PVC connections using the atm pvc command, the root point is port A and the leaf points are port B.
Examples
The following example configures the internal cross-connect PVC between interface 3/0/1, VPI=1, VCI =50 and the terminating connection at the CPU interface 2/0/0, VPI=2, VCI=100:
Switch-B(config)#interface atm 3/0/1
Switch-B(config-if)#atm pvc 1 50 interface atm 2/0/0 2 100 encap aal-encap
The following example configures a point-to-multipoint connection from the root point PVC on switch interface 0/0/0, VPI=50, VCI =100 and the terminating connection at the leaf point switch CPU interface 2/0/0, VPI=60, VCI=200:
Switch(config)#interface atm 0/0/0
Switch(config-if)#atm pvc 50 100 interface atm 2/0/0 60 200 enacap aal-encap
Displaying the Terminating PVC Connections
To show the terminating PVC configuration, use the following EXEC mode commands:
| Task | Command |
|---|---|
| Show the ATM interface configuration. | show atm vc card/sub_card/port |
| Show the PVC interface configuration. | show atm vc interface atm card/sub_card/port vpi vci |
See the section "Use the show vc Command to Display Virtual Channel Connections" for examples of the show atm vc commands.
|
|
Copyright 1988-1996 © Cisco Systems Inc.