|
|

Optimizing the Load Across Trunks
Appendix A: Field Descriptions
Audience · Organization · Related Documentation · Notation
This guide tells you how to manage a network of LightStream 2020 enterprise ATM switches. It is a task-oriented guide that contains procedures for each task. Before describing the network operations tasks, this guide explains how the Simple Network Management Protocol (SNMP) provides the network management information you need to manage your LightStream network. It also tells you how you can manage your LightStream network from a third-party network management system (NMS).
Your network should be fully installed and configured before you attempt to operate it. Refer to the LightStream 2020 Installation and Troubleshooting Manual for installation instructions and to the LightStream 2020 Configuration Guide for configuration information.
The LightStream 2020 Administration Guide is intended for the manager or advanced user of the LightStream network. This guide provides detailed procedures to help you manage the LightStream network. You should be familiar with the information in the LightStream 2020 Operations Guide before attempting to use the procedures in this guide.
The "SNMP Commands" chapter of this guide was written for users who are familiar with standard SNMP commands. If you are not familiar with SNMP, you should not attempt to use the commands described in the "SNMP Commands" chapter.
Users of the LightStream document set are expected to have a general understanding of basic data communications concepts, some knowledge of UNIX, and a familiarity with the interfaces used by the devices connecting to their LightStream network.
It is also recommended that you have a working knowledge of TCP/IP networks. For more information about TCP/IP networks, refer to Internetworking with TCP/IP, Volume 1, Principals, Protocols, and Architecture by Douglas E. Comer, 1991, Prentice-Hall, Inc. (ISBN 0-13-468505-9).
This guide is organized as follows:
The following is a list of LightStream manuals and other material relevant to LightStream users.
Before attempting to install, configure, operate, or troubleshoot a network of LightStream switches, read the LightStream 2020 System Overview. This overview provides important background information about the LightStream product and the ATM technology on which the product is based. After reading the LightStream 2020 System Overview, refer to Table 1-1 to determine which manuals you should read next.
Table 1-1 : LightStream Reading Path
| If you want to: | Read the following manuals in the order listed below: |
|---|---|
| Install LightStream switches | LightStream 2020 Release Notes1
LightStream 2020 Site Planning and Cabling Guide LightStream 2020 Installation and Troubleshooting Manual |
| Configure LightStream switches | LightStream 2020 Release Notes1
LightStream 2020 Configuration Guide LightStream 2020 Online Help Screens |
| Set up or expand a LightStream network | LightStream 2020 Release Notes1
LightStream 2020 Administration Guide LightStream 2020 Online Help Screens |
| Operate a LightStream network | LightStream 2020 Release Notes1
LightStream 2020 Operations Guide LightStream 2020 Command and Attribute Reference Guide LightStream 2020 Command Line Interface (CLI) Reference Card LightStream 2020 Traps Reference Manual LightStream 2020 Online Help Screens |
| Manage or troubleshoot a LightStream network | LightStream 2020 Release Notes1
LightStream 2020 Operations Guide LightStream 2020 Administration Guide LightStream 2020 Command and Attribute Reference Guide LightStream 2020 Command Line Interface (CLI) Reference Card LightStream 2020 Traps Reference Manual LightStream 2020 Online Help Screens |
| Troubleshoot LightStream hardware | LightStream 2020 Release Notes1
LightStream 2020 Installation and Troubleshooting Manual LightStream 2020 Site Planning and Cabling Guide |
In this document, several conventions distinguish different types of graphics and text.

| Convention | Purpose | Example |
|---|---|---|
Bold screen literal
type
|
Represents user input. |
$
date
|
Screen literal
type
|
Represents system output |
Wed May 6 17:01:03 EDT 1994
|
| Boldface type | Denotes names of commands, command arguments, and switches. Command names are case sensitive; enter them exactly as they appear in the text. | Issue the clear command. |
| Italic type | Used for titles of documents and for emphasis. | LightStream 2020 Configuration Guide
File names are case sensitive. |
| Angle brackets < > | Indicate user-specified parameters or classes of user responses. When you see this notation in a syntax statement, make the substitution but do not type the angle brackets. | If you see:
set port <c.p> <state> you might type: set port 4.3 active |
| Square brackets [ ] | Indicate keys on the keyboard, or optional arguments or parameters for commands. You can omit optional arguments and parameters in any command. | Press [Return].
cli>
help [<topic>]
|
| Caret symbol ^ | When the caret symbol precedes a character, it refers to the control key. | ^X is the same as [Control] X |
| Curly braces { } | Indicate a choice of arguments or parameters for commands. Arguments or parameters are separated by a vertical line {|}, and you must select one. |
cli>
set cli traplevel {off|info|oper|trace|debug}
|
Where to Begin · Network Management Tasks · Management Tools · Network Management Scenarios
This chapter lists the management activities that you can perform on a network of LightStream" 2020 enterprise ATM switches and describes the tools that you can use to manage your network. It explains the different ways you can manage your LightStream network, depending on your hardware and software, and it also tells you how LightStream switches and the network management tools use the Simple Network Management Protocol (SNMP) to communicate.
Before you attempt to manage your network, each LightStream switch should be fully installed, powered on, and configured. Refer to the LightStream 2020 Installation and Troubleshooting Manual for installation information and to the LightStream 2020 Configuration Guide for configuration information. Complete the appropriate setup procedures described in the "Administrative Tasks" chapter of this guide. These procedures allow you to set up the system to run in secure mode and change the default SNMP community and trap delivery addresses. Depending on how you choose to set up your network, you may not need to perform all of the setup procedures.
You can perform a wide variety of network management tasks on your LightStream network. You will perform some every day and others only occasionally. This section lists the different types of network management tasks that you can perform.
You can use the following methods to manage a LightStream network:
The LightStream switch comes with the LightStream configurator---a user-friendly graphical interface that reduces configuration tasks to the simple click of a mouse button. As network administrator you will use the LightStream configurator (for the most part) to manage a network of LightStream 2020 enterprise ATM switches. See the LightStream 2020 Configuration Guide for further details. If the configurator is unavailable to you, you can use the CLI commands in this document to perform many management tasks.
LightStream technology provides graphical displays of individual LightStream switches, cards, and ports via the LightStream monitor. In most instances you will want to monitor the network with the LightStream monitor. See the LightStream 2020 Operations Guide for details. However, if the monitor is unavailable to you, you can use the CLI commands in this document to perform many monitoring tasks.
The CLI is a simple, line-based interface that runs on a LightStream switch or a Sun SPARCstation. You can access the CLI by connecting a terminal to a LightStream switch, by telnetting to the NP, or by running the CLI on a Sun SPARCstation.
If the LightStream monitor or configurator are unavailable to you and you use the CLI to perform management tasks, any changes you make to configuration attributes may cause the local configuration database to be out of synchronization with the global database.
Third-Party Network Management Tools
You can use any industry standard SNMP-compatible NMS to monitor a LightStream network. The NMS is connected to the LightStream switch via the Ethernet interface on the NP.
The following three systems can be used with the LightStream switch:
You cannot configure a LightStream network using a third-party NMS. LightStream switches and networks are configured with the LightStream configurator. For information on the LightStream configurator, refer to the LightStream 2020 Configuration Guide.
The LightStream documentation set does not provide instructions on how to use a third-party NMS. Refer to the product documentation for your third-party NMS for specific instructions.
As explained in this section, you can manage a LightStream network with its own management software or with an external SNMP-compatible third-party NMS. Regardless of which system you use, the management software communicates with the managed devices using SNMP.
You can manage your network in a number of different ways, depending on your hardware and software and whether you want traps to be interleaved with, or separated from, your general monitoring and control functions. Traps interleaved with your general monitoring and control functions may interfere with or delay your ability to enter or execute commands or to receive output from the general monitoring and control functions.
Before bringing your LightStream network online, consider how you will monitor and control the network.Table 2-1 lists the different options that are available. Use this table to locate information about the method you wish to use.
The scenarios described here are not mutually exclusive. As long as you have at least one Sun SPARCstation associated with your LightStream network for configuration purposes, you can perform routine monitoring and control tasks on any or all of the systems described in scenarios two through five.
The preferred method of network configuration, monitoring and control is with the LightStream configurator and the Light-Stream monitor running on a Sun SPARCstation as described in scenario 1 in Table 2-1. The user-friendly features of these programs reduce many tasks to the click of a mouse button. LightStream documentation and customer support provide only limited support for scenarios 3, 4, and 5.
Table 2-1 : Network Administration Scenarios
|
No. |
Hardware |
Software |
Interleave Traps? |
Reference |
|---|---|---|---|---|
| 1 | Sun SPARC-station | Configure, monitor, and control the network on a Sun SPARCstation using LightStream management software. If you cannot access the SPARCstation, you can use CLI on an NP to perform management tasks. (Optionally, other third-party SNMP-compatible network management software can be used.) The configurator, the monitor, and the CLI run and display on the SPARCstation running SunOS 4.1.x. HP OpenView is optional. This scenario is the preferred method for network management tasks. | Yes | "Scenario 1: Manage Network from Sun SPARCstation Using the Configurator, the Monitor, and the CLI" |
| 2 | VT100- compatible terminal | After configuring the network using the LightStream configurator on a Sun SPARCstation, monitor and control the network from the VT100 terminal. However, if you must add or move hardware or add ports or VCs, you must use the Sun SPARCstation to run the configurator. The CLI runs on a LightStream network processor (NP) and displays on the VT100. | Yes | "Scenario 2: Manage Network from VT100 Terminal Using the CLI" |
| 3 | Sun SPARC-station | After configuring the network using the LightStream configurator, monitor and control the network from the Sun SPARCstation using the CLI and a third-party NMS. The configurator, the CLI, and the third-party NMS trap monitoring tool run and display on the SPARCstation. | No | "Scenario 3: Manage Network from Sun SPARCstation Using the CLI and a Third-Party Trap Monitoring Tool" |
| 4 | Non-Sun workstation | After configuring the network using the LightStream configurator on a Sun SPARCstation, monitor and control the network from the non-Sun workstation using the CLI. However, if you must add or move hardware or add ports or VCs, you must use the Sun SPARCstation to run the configurator to complete these tasks. The CLI runs on a LightStream NP and displays on the workstation. | No | "Scenario 4: Manage Network from a Non-Sun Workstation Using the CLI Only" |
| 5 | Non-Sun workstation | After configuring the network using the LightStream configurator on a Sun SPARCstation, monitor and control the network from the non-Sun workstation using CLI and a third-party trap monitoring tool. However, if you must add or move hardware or add ports or VCs, you must access the Sun SPARCstation to run the configurator to complete these tasks. The CLI runs on a LightStream NP and displays on the workstation. The third-party NMS trap monitoring tool runs and displays on the workstation. | No | "Scenario 5: Manage Network from a Non-Sun Workstation Using the CLI and a Third-Party Trap Monitoring Tool" |
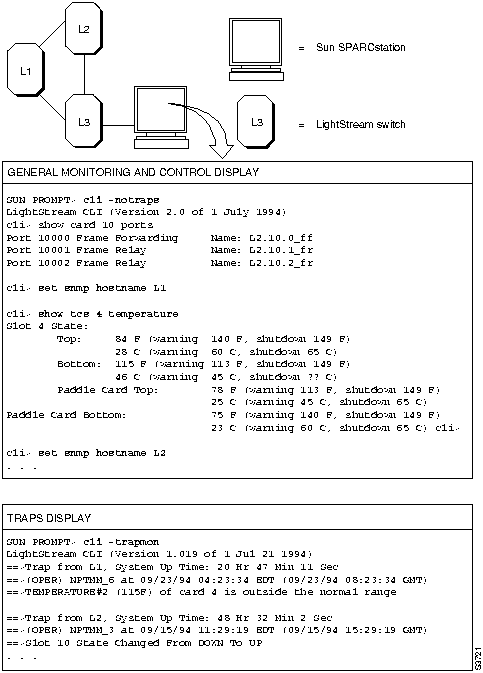
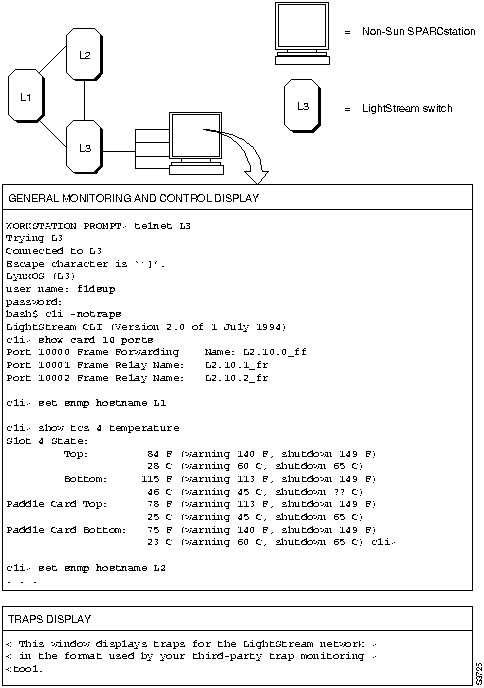
Scenario 1: Manage Network from Sun SPARCstation Using the Configurator, the Monitor, and the CLI
Figure 2-1 shows the hardware configuration for scenario 1 and information that might be displayed on the Sun SPARCstation. The two windows in the display show general monitoring and control information and traps.
In most instances you will perform management functions with the LightStream configurator and the LightStream monitor running on the SPARCstation. You can invoke the LightStream monitor through HP OpenView to see a graphical representation of LightStream switches, cards, and ports. (The HP OpenView product is not required to run the LightStream monitor.)
You can perform general monitoring and control functions on all LightStream switches in the network by running one instance of the CLI, with traps turned off, in one window of the SPARCstation. You can monitor any other LightStream switch in the network by setting the SNMP hostname to the appropriate switch. (To monitor each LightStream switch in a separate window, run one instance of the CLI with traps turned off for each switch. Each instance of the CLI runs in a separate window on the SPARCstation. This option is not illustrated in Figure 2-1).
You monitor traps for all LightStream switches in the network by running one instance of the CLI with the trap monitoring (trapmon) switch turned on in a window of the SPARCstation. Traps are displayed on the SPARCstation only if you have changed the default trap delivery address in each LightStream switch to the address of the SPARCstation.
General monitoring and control input and output are not interleaved with traps. One window on the workstation is dedicated to traps. One or more windows are dedicated to general monitoring and control.
Figure 2-1 : Example of scenario 1
Scenario 2: Manage Network from VT100 Terminal Using the CLI
Figure 2-2 shows the hardware configuration for scenario 2 and information that might be displayed on the VT100 terminal.
In most instances you will perform many management and monitoring functions with the LightStream configurator and the LightStream monitor running on a SPARCstation. If these tools are unavailable, you can use the CLI procedures described in this manual. However, any changes you make will cause the local database to be out of synchronization with the global database.
You perform general monitoring and control functions on the LightStream switch connected to the console (VT100 terminal) by running the CLI on the NP of that switch. You can monitor and control any other LightStream switch in the network by setting the SNMP hostname to the switch you want to monitor.
When you run the CLI to perform general monitoring and control functions on a particular LightStream switch, trap monitoring for that switch is provided as part of the general monitoring function (unless you have explicitly disabled the display of traps). Two copies of the traps generated on the switch connected to the console are displayed. (One copy is displayed by running the CLI; the other, by an automatic filtering mechanism that displays traps to a local console.) To prevent the duplicate display of traps, use the set chassis consoletraplevel command to turn off the filtering mechanism. To monitor traps of other switches in the network, change the default trap delivery addresses for each switch to the IP address of the NP from which the CLI is being run.
Traps are interleaved with general monitoring and control input and output on the VT100 terminal when you use this method.
Figure 2-2 : Example of scenario 2
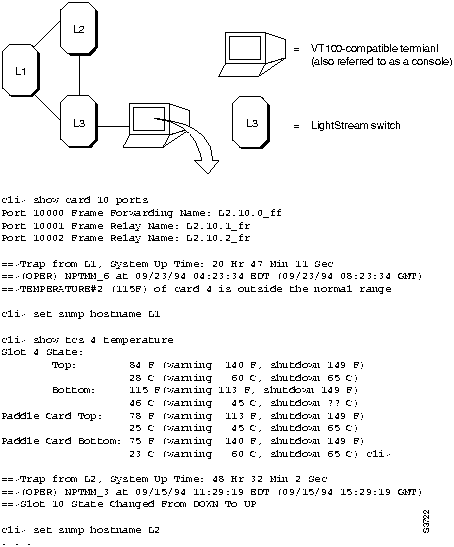
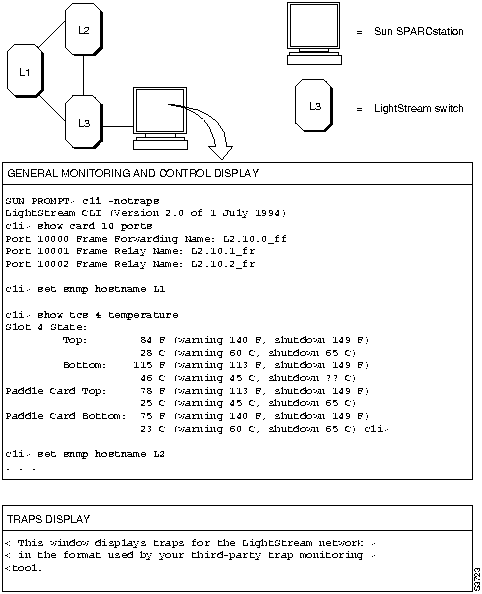
Figure 2-3 shows the hardware configuration for scenario 3 and information that might be displayed on the Sun SPARCstation. The two windows in the display show general monitoring and control information and traps.
In most instances you will many perform management and monitoring functions with the LightStream configurator and the Light-Stream monitor running on the SPARCstation. If these tools are unavailable, you can use the CLI procedures described in this manual. However, any changes you make will cause the local database to be out of synchronization with the global database.
You perform general monitoring and control functions on all LightStream switches in the network by running one instance of the CLI, with traps turned off, in one window of the Sun SPARCstation. You can monitor any other LightStream switch in the network by setting the SNMP hostname to the appropriate switch. (To monitor each LightStream switch in a separate window, run one instance of the CLI with traps turned off for each switch. Each instance of the CLI runs in a separate window on the SPARCstation. This option is not illustrated in Figure 2-3).
You monitor traps for all LightStream switches in the network by running the trap monitoring tool provided by the NMS to display traps in one window of the SPARCstation. Traps are displayed on the Sun SPARCstation only if you have changed the default trap delivery address in each LightStream switch to the address of the SPARCstation.
General monitoring and control input and output are not interleaved with traps. One window on the workstation is dedicated to traps (using the NMS trap monitoring tool). One or more windows are dedicated to general monitoring and control.
Figure 2-3 : Example of scenario 3
Scenario 4: Manage Network from a Non-Sun Workstation Using the CLI Only
Figure 2-4 shows the hardware configuration for scenario 4 and information that might be displayed on the non-Sun workstation. The two windows in the display show general monitoring and control information and traps.
After configuring your network with the LightStream configurator running on a Sun SPARCstation, you can monitor and control the network from the non-Sun workstation using CLI. You perform general monitoring and control functions on the LightStream switch connected to the non-Sun workstation by telnetting from the workstation to an NP on a LightStream switch and running one instance of the CLI, with traps turned off, on that NP. The CLI display appears in one window on the workstation. You can monitor any other LightStream switch in the network by setting the SNMP hostname to the appropriate switch. (To monitor each LightStream switch in a separate window, run one instance of the CLI, with traps turned off, on the NP of each switch and display it in a separate window on the workstation. This option is not illustrated in Figure 2-4).
You monitor traps for all LightStream switches in the network by telnetting from the workstation to an NP on a LightStream switch and running one instance of the CLI with the trap monitoring (trapmon) switch turned on for that NP. The trap display appears in one window on the workstation. Traps are displayed on the workstation only if you have changed the default trap delivery address in each LightStream switch to the address of the NP on which the trap monitoring tool is running.
General monitoring and control input and output are not interleaved with traps. One window on the workstation is dedicated to traps. One or more windows are dedicated to general monitoring and control.
Figure 2-4 : Example of scenario 4
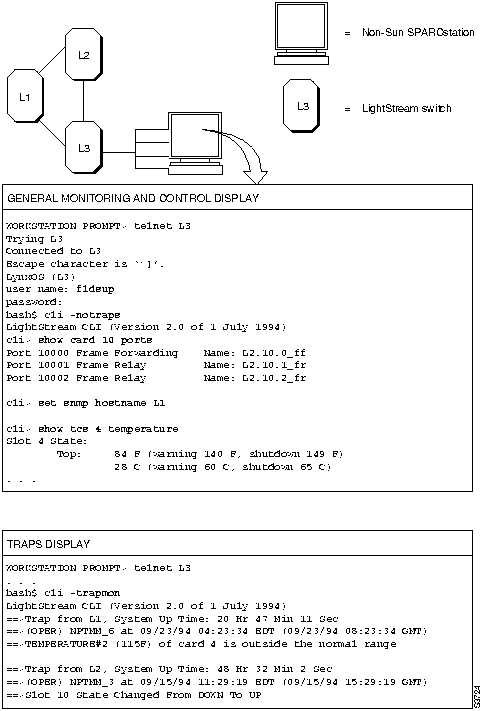
Figure 2-5 shows the hardware configuration for scenario 5 and information that might be displayed on the non-Sun workstation. The two windows in the display show general monitoring and control information and traps.
After configuring your network with the LightStream configurator on a Sun SPARCstation, you can monitor and control the network from the non-Sun workstation using the CLI and a third-party trap monitor. You perform general monitoring and control functions on the LightStream switch connected to the non-Sun workstation by telnetting from the workstation to an NP on a LightStream switch and running one instance of the CLI, with traps turned off, on that NP. The CLI display appears in one window on the workstation. You can monitor any other LightStream switch in the network by setting the SNMP hostname to the appropriate switch. (To monitor each LightStream switch in a separate window, run one instance of the CLI, with traps turned off, on the NP of each switch and display it in a separate window on the workstation. This option is not illustrated in Figure 2-5).
You monitor traps for all LightStream switches in the network by running the trap monitoring tool provided by the NMS to display traps in one window on the workstation. Traps are displayed on the non-Sun workstation only if you have changed the default trap delivery address in each LightStream switch to the address of the NP on which the CLI is running.
General monitoring and control input and output are not interleaved with traps. One window on the workstation is dedicated to traps (using the NMS trap monitoring tool). One or more windows are dedicated to general monitoring and control.
Figure 2-5 : Example of scenario 5
Set-up Procedures · Setting Configuration Attributes · Administrative Procedures · Handling Cell Line Card Interfaces · Handling FDDI Interfaces · Handling Ethernet Interfaces · Handling Spanning Tree Bridging · Handling Bridge Filters · Handling Virtual LAN Internetworking
This chapter describes set-up procedures that you should perform before your network becomes active. The set-up procedures include:
All of these set-up procedures may not be required for every network. Before you begin, review the procedures to determine which ones apply to your network.
This chapter also describes basic administrative procedures that you may need to perform and details on changing configuration attributes.
Basic Administrative Procedures
The basic administrative procedures include:
Changing Configuration Attribute Values with CLI Commands
The preferred method of setting attribute values in the local configuration database is by using the LightStream configurator on the network management station (NMS). (See the LightStream 2020 Configuration Guide for details.) If the configurator is unavailable, CLI commands may be used to change configuration attribute values. Normally, configuration changes made with CLI commands are made to run-time memory only. This is useful for testing purposes. However, the next time the node is reset, these volatile changes are overwritten.
CLI commands may also be used to change the local configuration database. CLI set commands write to the local configuration database as well as to run-time memory, if you enter the set config lock command first. In this case, your permanent changes are written to the configuration database. If the node is reset, your changes will take effect again.
The set config lock command also locks the master management agent (MMA) so that a CLI user connected from a different IP address cannot concurrently make configuration changes. If other users attempt to use CLI set commands while the MMA is locked, they see the error message:
SNMP error
The CLI issues a periodic reminder that the MMA is locked.
After completing your permanent changes, use the set config unlock command to unlock the MMA. This restores the default state (unlocked, no writes to database; other users have access). The lock is automatically removed after 2 minutes of inactivity or when the CLI session is closed.
These commands (set config lock and set config unlock) are equivalent to setting the mmaSetLock MIB object to 3 (locked) or to 1 (unlocked). A third value of the mmaSetLock object exists that cannot be set by the set config command. If you are testing configuration changes, but do not want to save them yet in the local configuration database, use the setsnmp mmaSetLock.0 2 command to lock the MMA without causing CLI sets to write to the local database.
For additional details about these commands, refer to the LightStream 2020 Command and Attribute Reference Guide.
After you complete the installation and startup of a LightStream switch, log in to either the fldsup or root user accounts on the switch and perform the set-up procedures described in this section. You need to perform only those set-up procedures that are required for your network.
Some of these procedures require that you restart the (MMA). Each procedure requiring a restart includes that step as part of its process. However, you can perform all of those procedures without restarting the MMA and restart the MMA only once, after you complete the last procedure.
This section tells you how to create a new user account. The LightStream switch provides an adduser script to simplify the task of adding a user to the system.
If you enter the new password correctly, the system changes the password and displays the bash# prompt.
A new account with the characteristics you specified is created. You can now log in to the new account and begin using it.
Changing the Default SNMP Community Names
Each LightStream switch has a file detailing each switch in the network that has read or read/write access to its MMA and the several levels of privileges for each of those switches. To monitor the network, you need only read access to an MMA; however, to make changes to the values in an MMA or to issue control commands, you need read/write privileges.
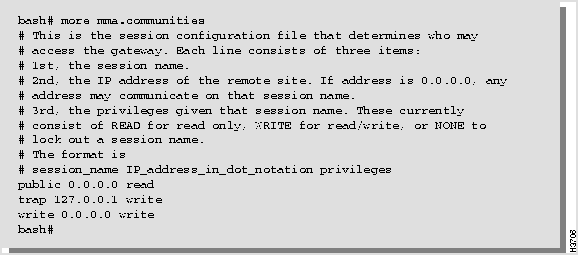
The software maps the SNMP community name and the IP address of each LightStream switch to a set of privileges. Each LightStream switch has a default file named /usr/app/base/config/mma.communities that contains details on the SNMP communities that have been defined for it. A sample of the file is shown in Figure 3-1. The lines preceded by the number sign (#) are informational comments. The last three lines contain the names of the SNMP communities (public, trap, and write).
Figure 3-1 : Sample mma.communities file
The line reading public 0.0.0.0 read indicates that a user issuing commands from any IP address (indicated by the notation 0.0.0.0) and who has set the SNMP community name to public has read access to the MMA on this switch. The line reading trap 127.0.0.1 write indicates that a user issuing commands from this local switch (indicated by the notation 127.0.0.1) and who has set the SNMP community name to trap has read/write access to the MMA on this switch. The line reading write 0.0.0.0 write indicates that a user issuing commands from any IP address (0.0.0.0) who has set the SNMP community name to write has read/write access to the MMA of this switch.
SNMP community names can be used to provide a level of security to each LightStream switch. It is recommended that you change the names of the trap and write SNMP communities. By changing the names of the read/write SNMP communities, you can restrict access to only the users who know your SNMP community names. As a convention, most SNMP devices have a community name of public with read only privileges. You should not change the name of the public SNMP community, but you can change its privileges, if necessary.
The SNMP communities are defined in the file /usr/app/base/config/mma.communities. The following procedure tells you how to edit that file.
Procedure to Change the Default SNMP Community Names
You can look at the edited mma.communities file by entering more mma.communities at the cli> prompt. The procedure outlined in the section "Changing the Default SNMP Community Names" describes how to change from one SNMP community to another.
Changing the Trap Delivery Address
When you start the CLI, the LightStream switch finds the addresses for trap delivery in the /usr/app/base/config/mma.trap_communities file. By default all LightStream switches send traps to their local network processor (NP). However, to have a single CLI or a third-party network management system (NMS) collecting all traps for the network, you must add its address to this file. This change should be made at startup time, because the LightStream switch must be restarted after the file is changed.
The procedure below tells you how to edit the file.
Each line in the /usr/app/base/config/mma.trap_communities file consists of the following three items:
SNMP normally uses UDP port 162 for traps. The following is a sample /usr/app/base/config/mma.trap_communities default file:
Procedure to Change the Trap Delivery Addresses
You can look at the edited mma.trap_communities file by typing more mma.trap_communities at the cli> prompt.
Changing the Default Terminal Type
Whenever you log in to the CLI, the default terminal type of each user account (oper, npadmin, fldsup, and root) is set to vt100. If you do not use a VT100 terminal, you may want to change the default terminal type in your .profile file, so that you need not change the terminal setting each time you log in. This procedure changes the default terminal type setting in the .profile file for each user account.
Procedure 1: Changing the Terminal Type from the bash Prompt
The new terminal type does not take effect until you restart the CLI. To make these changes effective immediately, exit from the CLI, then restart the CLI.
Procedure 2: Changing the Terminal Type from the CLI
The new terminal type does not take effect until you restart the CLI. To make these changes effective immediately, exit from the CLI, then restart the CLI.
As the network administrator, you must maintain the usr/etc/hosts file on each LightStream switch in your network. This file stores the names and addresses of all LightStream switches in your network. It is created at installation, but you must add an entry for each LightStream switch in your network.
If you are changing the target switch for a CLI command and you want to verify the IP address of that switch, you can display the /etc/hosts file to check the address.
Follow the procedure below to edit the usr/etc/hosts file.
Procedure to Edit the hosts File
A usr/etc/hosts file might look like this:
Setting Configuration Attributes
This section lists the attributes that you can configure with the LightStream configuration tool on a workstation, and shows the functionally equivalent CLI commands for configuring the attributes, if the configurator is not available to you. (See the LightStream 2020 Command and Attribute Reference Guide for more information on these attributes and commands.)
Configuration Attribute Storage Locations
Configuration information is stored in five locations:
The preferred method of setting attribute values in the local configuration database is by using the LightStream configurator. See the LightStream 2020 Configuration Guide for details.
After you make changes to the local configuration database with CLI commands, the local configuration database is out of synchronization with the global database. The global configuration database is located on the NMS on which the configuration tool is running. To copy local configuration changes to the global database, you must use the verify function in the configuration tool. This function retrieves the local settings and allows you to write them over the values in the global database. See the "Getting Started" chapter of the LightStream 2020 Configuration Guide.
Working with Temporary Configuration Changes
CLI changes in run-time memory may cause confusion. When the NP is restarted (for example, when the node is rebooted), or, for card or port attributes, when a card comes up, attribute values in run-time memory are reset in the following sequence:
Port Attributes Stored in EEPROM
Run-time values of the following port attributes are stored in EEPROM on the line card:
Normally, when you set the status of a card to inactive and then to active, changes made with CLI commands to run-time memory (but not to the database) are lost. However, changes to the above attributes are read back into run-time memory from EEPROM when the card comes up. A value read in from EEPROM remains in effect if the default value for that attribute was never changed in the local configuration database.
For example, if you use the CLI set port c.p characteristics command to specify the DCE bit rate for a port, this attribute is not configured in the local database because you have been using the default bit rate for this port, or perhaps you are configuring a new card with CLI commands. Because this was an experimental setting, you did not first use the set config lock command to write this change to the local database. The new run-time value of this attribute is stored in EEPROM on the line card. When the card is disabled and enabled (or the NP restarted), NP software reads EEPROM and writes the bit rate to run-time memory. It remains because nothing exists in the local database to overwrite it.
Node Attributes that Look Like Port Attributes
A similar confusion is due to thinking of certain node attributes mistakenly as edge card and port attributes. These are the attributes concerned with the following LAN-related functions:
These attribute values are stored in the NP's run-time memory and not on the card. Consequently, they are overwritten from the local configuration database only when the NP is restarted, typically when the node is rebooted. They are not overwritten when a card is disabled and re-enabled, nor even when the card is physically removed and reinstalled.
If you have used the CLI to specify custom filters and assign them to a port without using the set config lock command first to write them to the local database, the filter settings are retained in NP memory. When the edge card is disabled and re-enabled, the filter settings are not affected. You should use CLI commands or the configurator to delete them. They are also removed when you reboot the node or in some other way restart the NP.
Table 3-1 contains the attributes that can be changed with the CLI set and setsnmp commands.
Table 3-1 : CLI-configurable Attributes
This section describes how to use the CLI to change configuration attributes. Normally, these changes are made to run-time memory only. (If the node is reset, the changes are overwritten by the attribute settings in the configuration database.)
Changing the Network Configuration in Run-time Memory
You can make run-time changes to test network performance using different attribute settings. Once you find the appropriate settings, you can use the configurator to make permanent changes. You can also use temporary run-time configuration changes to solve network problems.
Procedure 1: Making Configuration Changes with the CLI.
The values are changed online.
This section tells you how to create a frame relay DLCI. Normally, this procedure changes the runtime environment but does not alter the DLCI information stored on hard disk.
This section tells you how to delete a particular DLCI. Deleting a DLCI brings down the connection for which the specified port is an endpoint. Normally, this procedure changes the runtime environment but does not delete the DLCI from the configuration information stored permanently on hard disk.
If you have deleted a particular DLCI, it should not appear on the DLCI list.
This section tells you how to create a ATM UNI VCI. Normally, this procedure changes the runtime environment but does not alter ATM UNI VCI information stored on hard disk.
Procedure to Create an ATM UNI VCI
This section tells you how to delete a particular ATM UNI VCI. Deleting an ATM UNI VCI brings down the connection for which this port is an endpoint. Normally, this procedure changes the runtime environment but does not delete the ATM UNI VCI from the configuration information stored permanently on hard disk.
Procedure to Delete an ATM UNI VCI
If you have deleted a particular VCI, it should not appear on the VCI list.
Setting or Changing Account Passwords
This section tells you how to set or change the password for any user accounts that are defined in your system. To change the passwords for all accounts use the passwd command from the LynxOS shell, as described below.
Procedure to Set or Change Passwords
If you enter the new password correctly, the system changes the password and displays the *cli> prompt.
If you enter an inappropriate password, one or more of the following messages may appear:
Inform authorized users of the changes you make.
Changing the Default Modem Password and the Modem Initialization String
This section tells you how to change the default modem password and the modem initialization string for the LightStream switch. The modem password and the modem initialization string are stored in EEPROM in the midplane. The default modem password is
and the default modem initialization string is
You may retain these default values. If you change them, the changes you make are permanent and remain in effect unless you change them again. Rebooting the system or restarting the CLI does not change the modem password or the modem initialization string.
If you change the modem password or the modem initialization string for one switch card slot, make the same change for the other. This is especially important for a two card system because the backup switch card will take over if the active switch card fails. It is also important for a single switch card system because you may want to add an additional switch card later or you may decide to move the single switch card to the other slot.
You must have a switch card in the switch card slot to change the modem password or the modem initialization string. Therefore, if you have only one switch card, move it from one switch card slot to the other as you effect the change for both slots.
Procedure to Change the Default Modem Password and the Modem Initialization String
The password and the modem initialization string are permanently changed. Inform all authorized users of the changes you make.
Different types of modems require different modem initialization strings. If you have different modems connected to each switch card, the init strings may be different. The passwords may or may not be different.
Inform authorized users of the changes you make.
Changing the Protected Mode and npadmin Password
This section tells you how to change the protected mode password. You can change this password from within protected mode only.
Procedure to Change the Protected Mode and npadmin Password
If you retype the new password correctly, the system changes the password and displays the *cli> prompt.
If you enter an inappropriate password, one or more of the following messages may appear:
Each SNMP manager (the CLI, for example) and each managed system (the MMA in a LightStream switch, for example) has a community name. The SNMP manager specifies a community name in each command it sends. The managed system validates the commands before executing them by comparing the community name in the command against its own community name.
Before you can set attributes or use CLI control commands, you must set the SNMP community to a community that has read/write access privileges. The read/write community provided with the system is named write. (A switch can have several SNMP community names with read/write privileges.) The read-only community provided with your system is named public.
To prevent unauthorized access to your system, you should set the SNMP community names that the LightStream switch uses to validate the commands before it executes them. (Procedures to change the read/write community name are described in the section "Changing the Default SNMP Community Names.") Follow the procedure below to set the SNMP community name that the CLI puts in commands.
Procedure to Set the SNMP Community Name
The community name is set to the SNMP community you specified.
The SNMP community reverts to the read-only community when you log out of the CLI. However, if you leave your terminal without logging out of the CLI, be sure to change the SNMP community back to the read-only community to prevent unauthorized access to your system.
The cli.groups file defines groups of traps. You can use this file as an argument for the commands described in the "Using LightStream Traps" chapter. If you do not create and maintain this file, you must manually enter each trap number used with those commands.
Follow the procedure below to create the cli.groups file.
Procedure to Create the cli.groups File
Figure 3-2 : Sample cli.groups file
This section tells you how to create CLI script files that can be executed from the CLI. You can write CLI script files to perform a variety of functions and reduce the number of commands required to perform repetitive tasks. The CLI script files are placed in the working directory. For example, if you write the CLI script file from the oper account, the CLI script files are placed in /usr/oper directory.
Procedure to Create CLI Script Files
Performing an Orderly Shutdown
This section tells you how to power down your switch to ensure that the flow of data through the switch terminates gracefully. Three procedures are provided: the first is for shutting down a switch with two NPs; the second is for shutting down a switch with one NP; the third is for returning a switch to service.
Procedure 1: Shutting Down a Switch with Two NPs
In a system with two NPs, you must reboot the backup NP before you reboot the active NP. (If you reboot the active NP first, the backup takes over and the system continues to operate.)
Procedure 2: Shutting Down a Switch with One NP
Procedure 3: Returning to Service
If you turned off the power, you can return the system to service by turning the power on again.
If you did not turn off the power, use the command shown below at the TCS hub to bring the system back to service. Replace slot# with the slot number of the NP card (1 or 2):
Note that you must issue the reset command to both NPs in a redundant system.
Handling Cell Line Card Interfaces
The LightStream switch supports the cell line card (CLC).
Use the CLI show command as described in this procedure to display information about the CLC.
Procedure to Display CLC Attributes
bash# adduser
Enter login name, must be < = 8 characters:
Enter user's full name:
Login Name:<login>

User ID:65536

Home Directory:/usr/<login>

Password Entry: <login>::<UID>:<GID>:<username>:/usr

 <login>:/bin/bash
Add the new user to the password database (Y/N)
Enter:Adding entry to the /etc/passwd database

Making /usr/<login> home directory

Changing password for <login>

Enter new password:
Retype new password:
bash# cd /usr/app/base/config
bash# mv mma.communities mma.communities.orig
bash# cp mma.communities.orig mma.communities
bash# vi mma.communities
ZZ
bash# ps -ax
bash# kill -hup <mma pid #>
cli> walk pidName
cli> set pid <mma pid #> adminstatus inactive
trap 127.0.0.1 162
bash# cd /usr/app/base/config
bash# mv mma.trap_communities mma.trap_communities.orig
bash# cp mma.trap_communities.orig mma.trap_communities
bash# vi mma.trap_communities
ZZ
bash# ps -ax
bash# kill -hup <mma pid #>
cli> walk pidName
cli> set pid <mma pid #> adminstatus inactive
bash# vi /usr/oper/.profile
TERM=vt100
TERM=<your default terminal type>
ZZ
/usr/npadmin/.profile
/usr/fldsup/.profile
/usr/root/.profile
cli> protected
Enter password:
*cli> shell "vi /usr/oper/.profile"
TERM=vt100
TERM=<your default terminal type>
ZZ
/usr/npadmin/.profile
/usr/fldsup/.profile
/usr/root/.profile
*cli>
shell bash
bash#
cd /usr/etc
bash# vi hosts
ZZ
bash# exit
*cli> exit
127.1.22.41 Light1
127.1.22.42 Light2
127.1.22.43 Light3
127.1.22.46 Light4
127.0.0.1 localhost
![]()
Line Card Attribute
Card Type
edge/trunk mode
LSC, MSC, CLC
cell payload scrambling
MSC, CLC
clocking (internal/external)
CLC
bitrate
LSC
DCE/DTE mode
LSC
cable length
MSC
C-bit Parity/Clear Channel
MSC
HEC/PLCP mode
MSC
Attribute Type
Attribute Name
CLI Command
System
Chassis ID
setsnmp chassisId.0 ID#
Chassis Name
set chassis name name
Chassis Type
setsnmp sysDescr.0
"
Node description
"
Contact
setsnmp sysContact.0
"
Contact information
"
Location
setsnmp sysLocation.0
"
Location information
"
IP Address
Active Management IP Address
set chassis activeip IPaddress
IP Address Default Router
set chassis defrouter IPaddress
NP Ethernet IP Address
set chassis ethernetaddr IPaddress
NP Ethernet IP Mask
set chassis ethernetmask mask
Secondary Management IP Address
set chassis secondaryip IPaddress
Switch Port Subnet Mask
set chassis netmask mask
Trap Level for Console Display
set chassis consoletraplevel
{oper|info|trace|debug}
SNMP Agent
Trap Filter
set cli traplevel {oper|info|trace|debug}
Trap Log Status
set chassis traplog {on|off}
Congestion Avoidance (CA)
Maximum Interval for Permit Level Reports
set chassis congestion
maxpermitinterval ms
Minimum Interval for CA Info Reports
set chassis congestion
minpermitinterval ms
Minimum Interval for Permit Level Reports
set chassis congestion
mincainfointerval ms
Master Management Agent (MMA)
MMA Data Collection Space
set chassis agent
MMA Trap Filter
set cli traplevel {oper|info|trace|debug}
MMA Trap Log Status
set chassis traplog {on|off}
Card
Max VCs for This Card
setsnmp cardMaxVCs.card# nnn
Administrative Status
set card {active|inactive|testing}
Card Name
setsnmp cardName.card# name
Card Type
setsnmp cardBoardType.card# type
(Common) Port
Port Name
setsnmp portInfoName.portID name
Port Status
set port c.p {active|inactive|testing}
LSC Port
DCE Bit Rate
set port c.p characteristics dce-bitrate Kbytes
DCE/DTE Type
set port c.p characteristics dce-dte-type
{dce|dte|dce-internal}
DTE Bit Rate
set port c.p characteristics dte-bitrate Kbytes
Err. Threshold
setsnmp frProvMiNetErrorThreshold.portID n
Full Enquiry Interval
setsnmp frProvMiUserFullEnquiryInterval.portID n
LMI Type
set port c.p lmiconfig
{none|frif|ansi_t1_617d|q933a}
Max Frame Size
setsnmp edgeMaxFrameSize.portID bytes
MaxSuppVCs
setsnmp frProvMiMaxSupportedVCs.portID n
MonEvents
setsnmp frProvMiNetMonitoredEvents.portID n
Net Interface Type
set port c.p netinterfacetype {uni|nni}
Net Req. Interval
setsnmp frProvMiNetRequestInterval.portID sec
Polling Interval
setsnmp frProvMiUserPollingInterval.portID sec
User Err. Threshold
setsnmp frProvMiUserErrorThreshold.portID n
T3 and E3 MSC Port
Cable Length
setsnmp ms1InfoAdminCableLength.portID n
DS3 Line Type (T3 only)
setsnmp dsx3LineType.portID {4|5|6|8}
(default = 5 if T3, 6 if E3/G.804, 8 if E3/Scrambling)
Cell Payload Scrambling
setsnmp ms1InfoAdminScramble.portID {1|2}
setsnmp clc1InfoAdminScramble.portID {1|2}
FDDI Port
Link Error Rate Alarm
Link Error Rate Cutoff
set port fddi port{master|slave}
Notify Timer
setsnmp fddimibSMTTNotify.fddimibSMTIndex
OC3 Port
Clocking Type
setsnmp clc1InfoAdminClock.portID
Cell Payload Scrambling
setsnmp clc1InfoAdminScramble.portID
Per-port Call Set-up and Bandwidth
Call Setup Backoff Adjustment
setsnmp edgeCallSetupBackoff.portID n
(default = 5)
Call Setup Retry Period
setsnmp edgeCallSetupRetry.portID sec
(default = 5)
Spanning Tree
Enable Spanning Tree Bridge
set port c.p stb enable
Forward Delay
set stb forwdelay t
Hello Time
set stb hellotimer t
Max Age
set stb maxage age
Priority
set stb priority pri
Path Cost
set port c.p stb pathcost n
Port Priority
set port c.p stb priority n
STB Enabled
set port c.p stb {enable|disable}
Custom Filter
B'cast Limit
set port c.p bcast-limit fps
Card
(The c in syntax of set port c.p commands)
Default Action
set port c.p bflt-def ID {block|forward}
Filter ID
(The ID in define bflt ID filter-exp)
Filter Test
define bflt ID filter-expr
Forward or Block
set port c.p bfltID{blockn|forwardn}
ID
set port c.p bfltID {blockn|forwardn|delete}
Port
(The p in syntax of set port c.p commands)
Priority
(The n in set port c.p bflt action n)
Static Route
MAC
set stb static MACaddr rcv {c.p|any} xmit c.p
Rcv Port
(The rcv argument in a set stb static command)
Xmit Ports
(The xmit argument in a set stb static command)
SNMP Options
Trap Address
set snmp hostname {name|IPaddress}
Trap Community Name
set snmp community name
PVC Source (Node A)1
A DLCI Number
(The dlci# in set port c.p dlci dlci# commands)
A Insured Rate
set port c.p dlci dlci# insured-rate bps
set port c.p frameforwarding insured-rate bps
set port c.p atm-vci vci# insured-rate cps
A Maximum Rate
set port c.p dlci dlci# max-rate bps
set port c.p frameforwarding max-rate bps
set port c.p atm-vci vci# max-rate cps
A Node
(Same as B Node, but while connected to other host)
A Port
(Same as B Port, but while connected to other host)
A VCI
(Same as B VCI, but while connected to other host)
PVC Destination (Node B)1
B DLCI Number
set port c.p dlci A-dlci# destdlci B-dlci#
B Insured Rate
set port c.p dlci dlci# insured-rate bps
set port c.p frameforwarding insured-rate bps
set port c.p atm-vci vci# insured-rate cps
B Maximum Rate
set port c.p dlci dlci# max-rate bps
set port c.p frameforwarding max-rate bps
set port c.p atm-vci vci# max-rate cps
B Node
set port c.p dlci dlci# destnode {S/N|IPaddr}
set port c.p frameforwarding destnode {S/N|IPaddr}
set port c.p atm-vci vci# destnode {S/N|IPaddr}
B Port
set port c.p dlci dlci# destport c.p
set port c.p frameforwarding destport c.p
set port c.p atm-vci vci# destport c.p
B VCI
set port c.p atm-vci vci# destvci destvci#
Per-port Call Set-up and Bandwidth
Destination Insured Burst Size
Same as Source Insured Burst Size, from destination host
Destination Maximum Burst Size
Same as Source Maximum Burst Size, from destination host
Source Insured Burst Size
set port c.p dlci dlci# insured-burst bps
set port c.p frameforwarding insured-burst bps
set port c.p atm-vci vci# insured-burst cps
Source Maximum Burst Size
set port c.p dlci dlci# max-burst bps
set port c.p frameforwarding max-burst bps
set port c.p atm-vci vci# max-burst cps
Principal Type of Service
set port c.p atm-vci bwtype
Transmit Priority
set port c.p atm-vci priority
User Data Per Cell
setsnmp edgeUserDataPerCell.portID bits
Secondary Scale
setsnmp edgeSecondaryScale.portID n
1 For PVC attributes, the CLI commands take the source node, port, and VCI number from the target host. You must set the PVC attributes from both ends and then activate the PVC using the set port active command.
cli> show snmp
*cli>
show snmp
Community: public
HostName: localhost
Authentication: off
cli>
cli> set port <port#> characteristics executechange
cli> show snmp
cli> set port <port#> dlci <dlci#> <destnode> activate
cli> set port 3.0 dlci 100 198.113.179.13 activate
cli> set port 3.0 dlci 100 5146 activate
cli> set port <port#> dlci <dlci#> <destport> activate
cli> set port 3.0 dlci 100 4.7 activate
cli> show port <port#> listdlci
cli> show snmp
cli> show port <port#> listdlci
cli> set port <port#> dlci <dlci #> delete
cli> show port <port#> listdlci
cli> show snmp
cli> set port <port#> atm-vci <atm-vci#> <destport> activate
cli> show port <port#> listvci
cli> show snmp
cli> show port <port#> listvci
cli> set port <port number> atm-vci delete
cli> show port <port#> listvci
cli> protected
Enter password:
*cli> shell "passwd <login>"
Changing password for <login>
Enter current password:
Enter new password:
Retype new password:
Please use a longer password.
Password unchanged.
Mismatch --- password unchanged.
atmhiway
AT&F&D2&C1&Q0S0=1S2=128S7=30S36=7S95=44
cli> protected
Enter password:
*cli> show snmp
*cli> set modem <slot #> password <password>
*cli> set modem <slot #> initstring <initstring>
*cli> show modem <slot #> all
cli> protected
Enter password:
*cli> password
Changing password for npadmin
Enter current password:
Enter new password:
Retype new password:
Please use a longer password.
Password unchanged.
Please use a less obvious password.
Passwords don't match, try again.
cli> set snmp community <community name>
cli> show snmp
cli> protected
Enter password:
*cli> shell bash
bash# cd /usr/app/base/config
bash# vi cli.groups
<group# name> <trap#> <trap#>
<group# name> <trap#> <trap#>

ZZ
bash# exit
*cli> exit
cli> protected
Enter password:
*cli> shell bash
bash# vi <file name>
show chassis general
show chassis cards
show card 1 ports
show card 2 ports
show card 3 ports
show card 4 ports
show card 5 ports
show card 6 ports
show card 7 ports
show card 8 ports
show card 9 ports
show card 10 ports
ZZ
bash# exit
*cli> exit
`.
to get a TCS hub prompt.
TCS hub<<A>> connect 2
bash# reboot -n
`.
to return to the TCS hub.
TCS hub<<A>> connect 1
bash# reboot -n
bash# reboot -n
TCS hub<<A>> reset <slot#>
cli> show snmp
cli> show port <port#> status