|
|

This chapter describes setup and recovery procedures that you may need to perform in the course of operating your LightStream 2020 multiservice ATM switch (LS2020 switch) in your network. These procedures are presented in this chapter in the following sections:
After completing the initial installation of LS2020 switch hardware and software, as described in the chapter entitled "Installing Network Management Software Applications," you may need to perform some or all of the setup procedures described in this chapter. Your network operating requirements determine which procedures you will need to perform. Hence, you should review these procedures to determine their applicability to your network.
Some setup procedures call for you to signal the master management agent (MMA) to re-read configuration data for the affected LS2020 switch. Note, however, that you can perform any or all of the procedures in this chapter without sending interim restart signals to the MMA. Thus, after completing the last of the setup procedures you intend to perform, you need only signal the MMA once to place all the setup procedures into effect.
Enabling/Disabling Secure Single-User Mode
The secure single-user mode is a feature that you can enable or disable at your discretion. The purpose of this feature is to prevent unauthorized superuser access to the NP of an LS2020 switch.
To enable or disable this feature, perform the following steps at the LS2020 console:
To restore multi-user mode after running in the secure single-user mode, you must first log out from the NP (by entering ^D, for example). After logging out, the following sequence occurs:
If you press and you will be asked if you want to
Enter n in response to this query.
Recovering from Loss of Password for Secure Single-User Mode
This section presents a recovery procedure to be used if a password is lost when you attempt to log in to the NP with the secure single-user mode enabled.
If the secure single-user mode is enabled and you do not have a password, you cannot gain superuser access to the NP from the console, nor can you gain root access to either NP in a redundant-NP system.
Nevertheless, assuming that your LS2020 chassis contains a floppy disk drive, you can still gain superuser access to the NP, or to the second NP in a redundant-NP system, by performing the following procedure:
This section describes how to create a new user account. The LS2020 switch provides an adduser script to simplify the task of adding a new user account to your system.
To create a new user account, perform the following steps:
As a result of this procedure, a new user account is created with the attributes you specified. You can then log in to the new user account and begin using it.
Changing Default SNMP Community Names
Each LS2020 switch has a file detailing the privileges for each switch in the network that has read or read/write access to its MMA. To monitor the network, you need to have only read access privileges to the MMA; however, to make changes to MMA values or to issue control commands, you need to have read/write access privileges to the MMA.
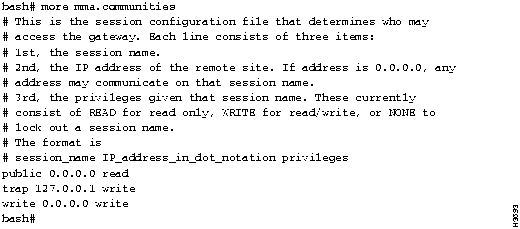
LS2020 software maps the SNMP community name and IP address of each LS2020 switch to a set of privileges. Each switch has a default file named /usr/app/base/config/mma.communities that contains details about the SNMP communities and access privileges defined for the switch. Figure 4-1 shows an example of such a file. The lines in this sample file preceded by the number sign (#) are informational comments; the last three lines of this file show the names of the defined SNMP communities (public, trap, and write).
Figure 4-1 : Sample mma.communities File
The line public 0.0.0.0 read indicates that a user issuing commands from any IP address (IP address 0.0.0.0) who has set the SNMP community name to public has read access privileges to the MMA for this switch.
The line trap 127.0.0.1 write indicates that a user issuing commands from this local switch (that is, IP address The line write 0.0.0.0 write indicates that a user issuing commands from any IP address (that is, IP address SNMP community names can be used to provide a level of security for each LS2020 switch in the network. For this reason, it is advisable to change the names of the trap and write SNMP communities to names of your choosing. By so doing, you can restrict access to your LS2020 switch to only those users who know your SNMP community name(s).
As a convention, most SNMP devices have a public community name with read-only access privileges. You should not change this name, but you can change its associated privileges, if necessary.
To change the default SNMP community name or the MMA read/write access privileges for your LS2020 switch, edit the file mma.communities according to the following procedure:
At the conclusion of this procedure, you have defined one or more new SNMP community names for one or more LS2020 switches to reflect your particular network operating requirements.
Changing Trap Delivery Addresses
When you start the CLI, the LS2020 switch finds the addresses for trap delivery in the /usr/app/base/config/mma.trap_communities file. By default, LS2020 switches send traps only to their local network processor (NP) card. However, by editing the mma.trap_communities file, you can cause traps to be sent to as many as 25 different destinations. Similarly, by editing this file, you can also cause traps for all LS2020 switches in the network to be sent to the same device.
For additional information about trap-handling mechanisms, refer to the LightStream 2020 Traps Reference Manual.
This section tells you how to edit the mma.trap_communities file. Before proceeding, however, note that each line in the mma.trap_communities file consists of three elements:
Figure 4-2 shows a sample mma.trap_communities file. The first entry in each line is the community name (trap); the second entry is an IP address (the default IP address, the NP IP address, the NMS IP address, or the IP address of a destination device); the third entry (162) identifies the UDP port number for delivering traps.
Figure 4-2 : Sample mma.trap_communities File
To change the trap delivery IP address(es) for an LS2020 switch, edit the file mma.trap_communities according to the following procedure:
At the conclusion of the above procedure, traps will be sent to the IP address(es) specified in the revised mma.trap_communities file.
Changing Default Terminal Type
Whenever you log in to the CLI, the default terminal type of each user account (oper, npadmin, fldsup, and root) is set to vt100. If you do not use a VT100 terminal, you may change the default terminal type in your .profile file to preclude having to change the vt100 setting at each log in. The procedures described in this section enable you to change the default terminal type in the .profile file for each LS2020 user account. You can change the default terminal type from either the bash# prompt or the CLI prompt, as described in the following sections.
Changing Default Terminal Type from Bash# Prompt
To change the default terminal type from the bash# prompt, perform the following steps:
The new terminal type does not take effect until you log in again.
Changing Default Terminal Type from CLI Prompt
To change the default terminal type from the CLI prompt, perform the following steps:
The new terminal type for the LS2020 switch does not take effect until you log out and log in again.
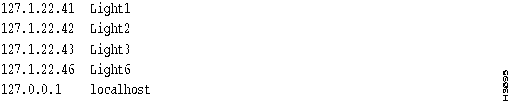
As the network administrator, you must maintain the /usr/etc/hosts file for each network processor (NP) in your network. This file, which serves as a repository for the names and IP addresses of all NPs in the network, is created at installation time, but you must ensure that an entry exists in this file for each NP in, or being added to, your network. Figure 4-3 shows typical content of a /usr/etc/hosts Figure 4-3 : Sample /usr/etc/hosts File
To edit the /usr/etc/hosts file, perform the following steps:
Editing of the /usr/etc/hosts
Copyright 1988-1996 © Cisco Systems Inc.
cp
), save and rename the /etc/starttab file, as shown below:
cp /etc/starttab /etc/starttab.unsecure
![]()
vi /etc/starttab
"#Name of single_user shell"
/bin/singleuser_login
/bin/bash
ZZ
.
y
,
Mount all filesystems (y/n) [
y
]
y
, the NP is activated, and the system runs the platform software in multi-user mode.
Return
or enter
n
in response to the
Mount all filesystems
prompt, the file system will not be mounted. In addition, the system will warn you that
"The minimum network management information has not been configured!"
"Create a minimal network management configuration? (y/n) [y] "
TCS HUB<<A>>
reset
<NP_slot>
TCS HUB<<A>>
conn
<NP_slot>
<NP_slot>
represents the NP to which you wish to gain access.
System will boot in 5 seconds: hit <RETURN> to interrupt
1 -- Boot ATM switch application
2 -- Begin full installation with boot from floppy disk
3 -- List contents of hard disk root directory
4 -- List contents of floppy disk root directory
5 -- Boot system single-user
6 -- Escape to full set of bootstrap options
Option>
2
single-user$
fsck /dev/sd0a
...(file system messages are displayed to the console)...
single-user$
fsck /dev/sd0b
...(file system messages are displayed to the console)...
single-user$
fsck /dev/sd0c
...(file system messages are displayed to the console)...
single-user$
fsck /dev/sd0d
...(file system messages are displayed to the console)...
single-user$
mount /dev/sd0a /mnt
single-user$
rm /mnt/etc/starttab
single-user$
cp /mnt/etc/starttab.unsecure /mnt/etc/starttab
![]()
following
command:
single-user$
`.
TCS HUB<<A>>
reset
<NP_slot>
TCS HUB<<A>>
conn
<NP_slot>
1 -- Boot ATM switch application
2 -- Begin full installation with boot from floppy disk
3 -- List contents of hard disk root directory
4 -- List contents of floppy disk root directory
5 -- Boot system single-user
6 -- Escape to full set of bootstrap options
Option>
2
single-user$
fsck /dev/sd0a
...(file system messages are displayed to the console)...
single-user$
fsck /dev/sd0b
...(file system messages are displayed to the console)...
single-user$
fsck /dev/sd0c
...(file system messages are displayed to the console)...
single-user$
fsck /dev/sd0d
...(file system messages are displayed to the console)...
single-user$
mount -a
single-user$
/bin/passwd
<id>
reboot -n
command. To reboot the multiuser LynxOS operating system, press
^D
, <CTRL-D>.
bash#
adduser
Enter login name, must be <= 8 characters:
Enter user's full name:
Login Name:  <login>

User ID:  <UID>

Home Directory:  /usr/<login>

Password Entry:   <login>::<UID>:<GID>:<username>:/usr/

<login>:  /bin/bash
<login>
is the login name of the user.
<UID>
is the user identification number.
<GID>
is the group identification number.
<username>
is the full name of the user.
Y
) to the following prompt:
Add the new user to the password database (Y/N)?
[Y]
Adding entry to the /etc/passwd database

Making /usr/<login> home directory

Changing password for <login>

Enter new password:
Retype new password:
bash#
127.0.0.1
) who has set the SNMP community name to trap has read/write access privileges to the MMA for this switch.
0.0.0.0
) who has set the SNMP community name to write has read/write access privileges to the MMA for this switch.
set snmp community
<community_name>
command at the CLI prompt.
bash#
cd /usr/app/base/config
file to a file renamed mma.communities.orig
to maintain the symbolic link between the two files, as shown below:
bash#
mv mma.communities mma.communities.orig
The mma.communities.orig
file now points to the
/usr/app/dist/base-x.x.x/config/mma.communities
file
where
base-x.x.x
is the current version of
LS2020 software.
bash# cp mma.communities.orig mma.communities
file.
bash#
vi mma.communities
ZZ
.
bash#
ps -ax
bash#
kill -hup <mma pid #>
<mma pid #>
is the PID number determined above for the MMA process in this LS2020 switch.
cli>
walk pidName
cli>
protected
Enter the protected mode password at the prompt:
Enter password:
The CLI protected mode prompt then appears (signified by
*cli>). Enter the following command to cause the MMA to re-read the
mma.communities
file:
*cli>
shell "kill -hup <mma pid #>"
*cli>
shell "more /usr/app/base/config/mma.communities"
*cli>
quit

bash#
cd /usr/app/base/config
file to a file renamed mma.trap_communities.orig
to maintain the symbolic link between the two files, as shown below:
bash#
mv mma.trap_communities mma.trap_communities.orig
The
file
mma.trap_communities.orig
now points to the file
/usr/app/dist/base-x.x.x/config/mma.trap_cummunities
where
base-x.x.x
is the current version of LS2020 software.
bash# cp mma.trap_communities.orig mma.trap_communities
file for your LS2020 switch.
bash#
vi mma.trap_communities
ZZ
bash#
ps -ax
bash#
kill -hup <mma pid #>
<mma pid #>
is the PID number determined above for the MMA process in the LS2020 switch.
cli>
walk pidName
cli>
protected
Enter the protected mode password at the prompt:
Enter password:
The CLI protected mode prompt then appears (signified by
*cli>), at which you enter the following command to cause the MMA to re-read the
mma.trap_communities
file:
*cli>
shell "kill -hup <mma pid #>"
*cli>
shell "more /usr/app/base/config/mma.trap_communities"
*cli>
quit
bash#
vi /usr/oper/.profile
TERM=vt100
TERM=<your default terminal type>
ZZ
/usr/npadmin/.profile

/usr/fldsup/.profile

/usr/root/.profile
file.
CLI
prompt:
cli>
protected
This action yields the "protected" mode of the CLI (signified by
*cli>), at which you enter the protected mode password:
*cli>
<password>
oper account by entering the following:
*cli>
shell "vi /usr/oper/.profile"
TERM=vt100
file.)
TERM=vt100
does not appear in the .profile file, add this line to the file in the following format:
TERM=<your default terminal type>
ZZ
/usr/npadmin/.profile

/usr/fldsup/.profile

/usr/root/.profile
file.
bash#
prompt, change to the /usr/etc
directory by entering the following command:
bash#
cd /usr/etc
file for editing with the vi editor:
bash#
vi hosts
hosts
file and exit the vi editor by entering
ZZ
.
This action returns you to the
bash#
prompt.
file is now complete.
![]()
file on each LS2020 network processor contains chassis-specific information that is entered automatically and modified each time the LS2020 switch is booted. Therefore, do not copy the /usr/etc/hosts file from one LS2020 switch or network processor to another such device in your network.
![]()
![]()
![]()
![]()
![]()
![]()
![]()
![]()