|
|

Before installing the system, verify that all ordered parts are present and in good condition. If anything is missing or damaged, report it to a StrataCom Order Administration.
Check the cabinet for the following inventory:
| _____ | [IGX 16/32] The unit has the correct number of card cages (1 or 2). |
|---|---|
| _____ | The unit has the correct power type (AC or DC) and the factory-installed Power Entry Back Cards (PE-BC), one per shelf. For DC-powered systems, DC PEMs are factory-installed in each PE-BC. For an AC system, check for the power supply tray and correct number of power supplies and cables. |
Make sure all purchased cards are present. Check the number and type of cards shipped against the number and type of card purchased.
| _____ | Correct number of NPMs | _____ | Correct number of AIT-T3s |
| _____ | Correct number of NTMs | _____ | Correct number of AIT-E3s |
| _____ | Correct number of BTMs | _____ | Correct number of BC-T1s |
| _____ | Correct number and types of CVMs | _____ | Correct number of BC-E1s |
| _____ | Correct number and types of FRMs | _____ | Correct number of BC-J1s |
| _____ | Correct number of FTMs | _____ | Correct number of BC-Y1s |
| _____ | Correct number of HDMs | _____ | Correct number of BC-SRs |
| _____ | Correct number of LDMs | _____ | Correct number of FRIs |
| _____ | Correct number of LDIs | _____ | Correct number of FPCs |
| _____ | Blank faceplates for unused back card slots | _____ | Correct number of SDIs |
| _____ | Correct number of ARMs | _____ | Correct number of ARIs |
An inventory list of the installed cards is shipped with the unit. The list includes each card's serial number, revision number, and slot number (serial and revision numbers are also found on the solder side of each card). Check for the presence of any other pieces on the shipping list. After verifying that the correct cards are present, tape a copy of the inventory list to the back of this manual.
The IGX 16/32 site must satisfy the following requirements.
To provide some protection against seismic activity, the feet and wheels of the IGX stand-alone cabinets can be removed to permit the cabinet to be bolted to a concrete floor or to a structural member in the floor.
In STRATM cabinets, provisions are available for seismic anchoring. Holes exist in the upper and lower corners for 3/8" or 1/2" bolts. Also, an optional stability plate can be purchased with the STRATM cabinet. The stability plate is bolted to the floor, then the STRATM cabinet is bolted to the stability plate. The "STRATM Seismic Anchoring" section contains instructions for installing the seismic stability plate.
The following paragraphs contain general safety information and information on T1 and CEPT (E1) safety requirements.
This section lists the requirements that relate to electrical power and grounding. These requirements cover installations at Central Office (CO) and Private Enterprise locations.
An AC power source must be available within 6 feet (1.8 m) of the system and very accessible. Before turning on the power, verify that the power supplied to the node comes from a dedicated branch circuit.
The receptacles that the IGX plug into must be of the grounding type. The grounding conductors that connect to the receptacles should connect to protective earth at the service equipment.
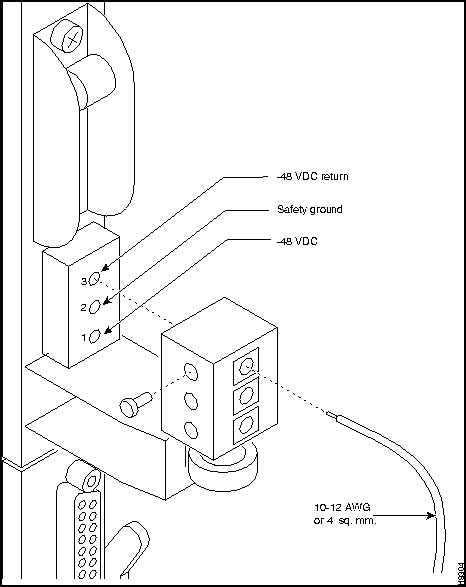
Only a --48 VDC supply that complies with the Safety Extra Low Voltage (SELV) requirements of EN 60950 can connect to the IGX DC input.
For DC supply connections, 10 to 12 AWG (or a metric equivalent of 4 sq. mm) should be used. Individual national codes for proper conductor sizing may apply. The conductors must be suitable for 25 Amps.
To maintain the full EMI and EMC integrity of this equipment, it must be bonded to an Integrated Ground Plane or an Isolated Ground Plane network. The purpose of this is to mitigate the damaging effects to equipment from Electrostatic Discharge and Lightning. Refer to the latest edition of ITU Recommendation K.27 or Bellcore GR-1089-CORE requirements to ensure that the correct Bonding and Grounding procedures are followed. As recommended in these documents, a frame bonding connection is provided on the StrataCom STRATM cabinet for rack-mounted systems and on the stand-alone cabinets.
Refer to the section "Making the Frame Bonding (Ground) Connection," for information on the locations of the frame bonding connections and how to make a connection.
Except for the AC power supply module, every module in a rack-mount system relies on the rack itself for grounding. Therefore, the rack must be properly connected to protective earth before operating the system.
A DC powered IGX system must have grounding conductors connected at two separate locations, as follows:
These requirements may be relevant to a private network connected to the public switched networks in some international service areas.
This section describes installing the STRATM cabinet with the optional stability plate for seismic anchoring. If the stability plate is not present, go to the next section. To set up the STRATM cabinet with the stability plate:
Figure 3-1 : Stability Plate Dimensions Figure 3-2 : STRATM Installation Over Stability Plate Installing an IGX requires the following tools and equipment:
Rack-mount systems come with the parts described in the assembly instructions. As the instructions for DC-powered systems explain, the user provides the DC-power cable.
Stand-Alone System Installation
StrataCom stand-alone systems come with all components installed in the cabinet. So, the installation steps consist of placing the unit at its operational location, unpacking it, and verifying the structural and power connection integrity before turning on the power. Note that a stand-alone cabinet is 19.9" wide. The adjustable levelers require a 5/8" wrench. If the system has an AC power source, go to the "AC Power Connections"section. If the system has a DC power source, go to the "DC Power Connections" section.
IGX 16 Rack Mount Installation
The rack-mount IGX 16 fits in a 19 inch (48.25 cm.) rack. The front of each assembly chassis has flanges that serve as the front mounting brackets. The assembly kit contains other brackets for different mounting setups. The following order of component installation is the most convenient and efficient. For some of these components, separation sections are named that contain detailed installation steps.
The miscellaneous parts kit for rack systems contains brackets for both a STRATM cabinet and a user-supplied rack. The kit includes mid-mount brackets for open racks.
The rear-mount brackets attach to the rear vertical rail in a STRATM cabinet. Each of these brackets has a horizontal flange upon which the back of each IGX component rests. The front of each assembly chassis has flanges that serve as the front mounting brackets.
To install the IGX in a rack:
Figure 3-3 : IGX 16 Rack Mounting Dimensions IGX 32 Rack Mount Installation
The IGX 32 is designed for mounting in a 19 inch (48.25 cm.) equipment rack. The following order of component installation is the most convenient and efficient. For some of these components, separation sections are named that contain detailed installation steps.
The miscellaneous parts kit contains brackets for rack-mounting in either a STRATM cabinet or a user-supplied rack. The kit includes mid-mount brackets for open racks. For a STRATM cabinet, the rear-mount brackets attach to the rear vertical rail. Each of these brackets has a horizontal flange upon which the back of an individual component rests. The front of each assembly chassis has flanges that serve as front mounting brackets.
Figure 3-4 : IGX 32 Rack Mounting Dimensions Figure 3-5 : IGX 32 Backplane Connector Cables Installing the AC Power Supply Assembly
If the IGX node is to be AC-powered, proceed with this section. In a rack-mount system, the AC Power Supply Assembly is shipped separately (as are all the other assemblies). The first assembly to install in a rack-mount system is the AC power supply assembly.
The AC power supply assembly consists of the following items:
Power supply installation or replacement requires the following tools:
Understanding the AC Power Supply Configuration
The setup for power supplies depends on the number of AC power inputs, the IGX model, and the number of cards in the system. The minimum configuration is one AC source and one supply. This minimum number applies to the IGX 16: with 12 or fewer cards, 1 supply is enough. Figure 3-6 illustrates the alphanumeric slot designations in a full tray. The paragraphs that follow refer to these designations.
Figure 3-6 : Power Supply Slot Designations Two types of redundancy exist in the AC power supply configuration. One redundancy is that of AC power inputs. A redundant AC power source from a building circuit that is separate from the other AC circuit provides backup if one AC circuit at the site fails. The other redundancy is that of the 875-Watt power supply modules. Redundancy of the 875-Watt supplies provides a backup if a supply fails.
In supporting the two types of redundancy, power supply arrangements differ, as follows:
Table 3-1 shows the required number of power supplies for the different IGX systems. In Table 3-1, the locations for primary (or minimal) power supplies are marked with an X. The primary supplies reflect redundancy of AC inputs and backup supplies. An O indicates a slot that must have a supply because the card cage contains more than 12 cards.
In Table 3-1, the System column lists the IGX model number coupled with the number of AC inputs and whether the single-AC input models have power supply redundancy. The table also shows the slot locations A through F and the part number of the kit that contains all the pieces for the item in the System column. Extra supplies for more than 12 cards (O) are not a part of a kit under Kit Part No. but have another part number. The part number of a supply ordered to fill extra power demands is IGX-AC-PS.
Table 3-1 : Locations of Primary and Additional Supplies
Note that, with all power supply configurations, locations for the power supplies begin at the lowest lettered slot on either side, and the occupied positions are contiguous. For example, in a dual AC system, insert a supply in A, B, D, and E.
AC Installation in a Rack-Mount Cabinet
The procedures in this section apply to both the IGX 16 and the IGX 32 in a rack. (For stand-alone systems, the power supplies are already installed.) To replace a power supply, follow the steps in the chapter titled "Repair and Replacement."
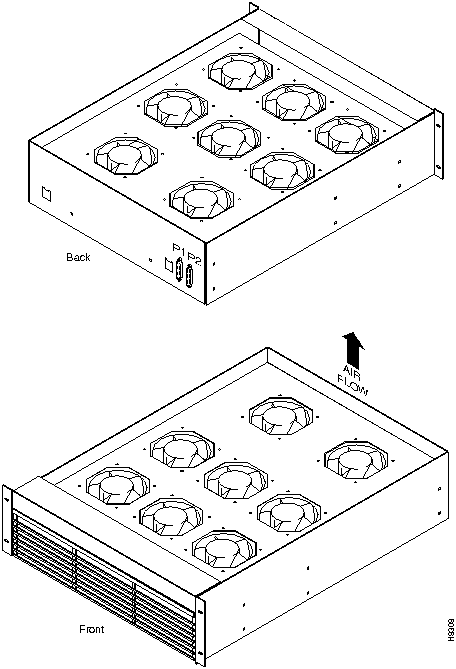
Figure 3-7 : Front of Rack Mount System Figure 3-8 : Power Supply (viewed from front and left) Figure 3-9 : Wire Diagrams for Different Power Configurations Figure 3-10 : AC Power Supply Shelf Back View Figure 3-11 : Inserting System Power Connector to E-Card, AC-Powered System This section describes how to install the main fan tray (Fan Tray 1) in an IGX 16 and 32 and the upper or booster fan tray (Fan Tray 2) in an IGX 32. Figure 3-12 shows the main fan tray. Figure 3-13 shows the locations of Fan Tray 1 and Fan Tray 2 in an IGX 32.
Figure 3-12 : Fan Tray Assembly Two cables exist for supplying power to the fans. The short fan power cable is used in both the IGX 16 and the IGX 32. The long "Y" cable is used in the IGX 32 only. See Figure 3-13. In an IGX 16, the short cable connects to connector "Fan 1" of the PE-BC.
In an IGX 32, the short cable goes from the "Fan 2" connector of the upper PE-BC to the power connectors on Fan Tray 2. One branch of the Y cable for Fan Tray 1 is significantly longer than the other branch. The longer branch connects to the "Fan 1" connector of the upper PE-BC. The shorter branch connects to the "Fan 1" connector of the lower PE-BC.
To install the cooling unit assembly:
Figure 3-13 : IGX 32 Back View Before installing the cards, a step is necessary to indicate to the SCM whether the system is an IGX 16 or an IGX 32. The step consists of either removing or leaving a jumper switch on the SCM. The switch is W6. It sits above component U7P (near the top of connector P2). To indicate an IGX 32, remove the jumper. To indicate an IGX 16, leave the jumper. Make a record of this step so that checking the card later is not necessary.
Y-cable redundancy is a supported feature for many card sets. It requires an extra set of cards and a Y-cable. A set of Y-redundancy commands are also used. For instructions on setting up Y-cable redundancy, refer to the setup section for the specific card set.
The locations of the cards depend on the hardware configuration. Except for the reserved slots, cards can reside in any slot on the appropriate side of the node. (However, StrataCom recommends that the optional ARM/ARI card set reside in slot 16.) The reserved slots are for the NPMs and SCM. The NPM can reside in front slots 1 and 2. The SCM must reside in back slot 1. Refer to Figure 3-14 for a front view of a shelf in an IGX 16 with 2 NPMs.
The NPM B versions require a minimum level of system software. Refer to the Release Note that comes with this manual to see if the software supports the NPM B version.
An IGX 32 can support a configuration of up to 16 trunk cards. This includes combined NTM and BTM card sets.
The locations for the NPMs and SCMs in an IGX 16 and an IGX 32 are as follows:
Figure 3-14 : IGX 16 Card Shelf, Front View Figure 3-15 shows back card shelves in an IGX 32.
Figure 3-15 : IGX 32 Back View Making Power and Ground Connections
This section contains information on making ground and power connections to the AC and DC powered IGX 16/32 nodes.
Making the Frame Bonding (Ground) Connection
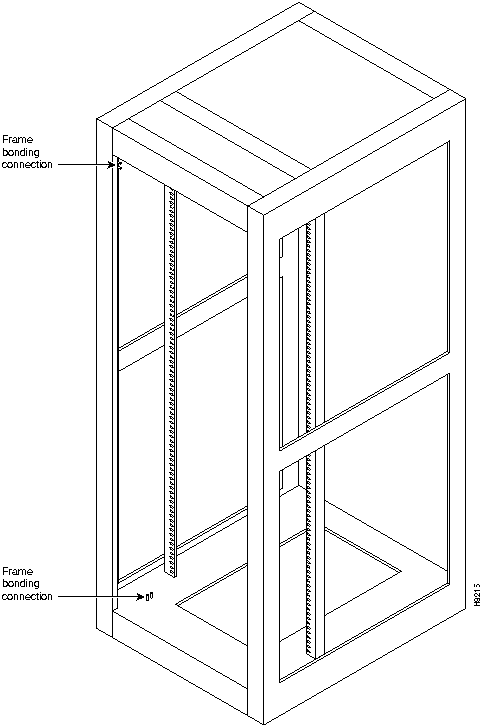
The STRATM cabinet designed by StrataCom comes with attached studs (with hardware for securing a ground conductor to the studs) at the top and bottom of the cabinet for securing the grounding conductors. These studs a 1/4" by 20 threads per inch. Figure 3-16 shows the STRATM cabinet with the ground attachment studs in the upper and lower parts of the cabinet.
A stand-alone cabinet has provisions for mounting grounding conductors on the chassis by screws. In the stand-alone cabinet, this provision is a pair of captive nuts (threaded holes) for the screws on the mounting rail of the chassis (1/4" by 20 threads per inch). Figure 3-17 shows the location of the captive nuts and screws in a stand-alone cabinet for securing in the ground attachments.
The attachment points in the STRATM and stand-alone cabinets are indicated by a ground symbol on the cabinet near the point of attachment.
StrataCom recommends that the stacking order for attaching a ground conductor to the frame is for "an external tooth starwasher" to be placed first onto the stud, followed by the connector terminating the grounding conductor closed-loop ring or two-hole compression fitting, followed by "another external toothed starwasher or lockwasher," and finally a nut.
Stand-alone Cabinet Connections
It is recommended that the stacking order for attaching a ground conductor to the frame is for "an external tooth starwasher" to be placed first onto the screw, followed by the connector terminating the grounding conductor closed-loop ring or two-hole compression fitting, followed by "another external toothed starwasher or lockwasher." This assembly is screwed into the captive nut in the mounting rail beneath the cover plate. See Figure 3-17.
Figure 3-16 : Frame Bonding Connection in STRATM Cabinet Figure 3-17 : Frame Bonding Connections in Stand-Alone Cabinet The shipment includes an eight-foot (3 m.) power cord for each AC power-feed. For a dual-feed system, make sure a separate branch circuit is available for each power cord, otherwise the purpose of having redundant power sources is defeated. To make AC power connections:
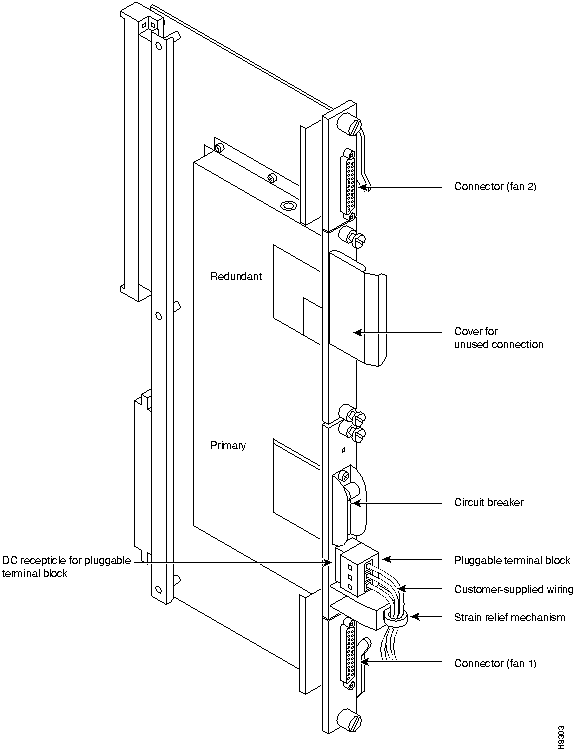
Figure 3-19 : Circuit Breakers This section explains how to attach power to the pre-installed PEMs in redundant and non-redundant configurations. Systems that use a DC power source have up to four possible configurations, as follows:
Wiring is connected from one or two --48 VDC power sources to one or two DC PEMs on each shelf. Refer to the following figures for the possible DC PEM arrangements:
Figure 3-20 : IGX 16 With Single DC Source Figure 3-21 : IGX 16 With Dual DC Sources Figure 3-22 : IIGX 32 With a Single DC Source Figure 3-23 : IGX 32 With Redundant DC Sources Installing DC power consists of attaching the three wires from the DC power source to a removable wiring block and plugging that block into the connector on the PEM. The PEM is plugged into the PE-BC. Figure 3-24 is a view of a PE-BC out of the card cage with the PEM wired up and plugged into the PE-BC. Figure 3-24 shows a PE-BC with one PEM in place and the other connection not used. An unused connection has a blank cover plate.
Figure 3-24 : PE-BC and DC PEM With Plug To make a DC power connection:
Figure 3-25 : Polarities at Pluggable Terminal Block Figure 3-26 : Pluggable Terminal Block This section describes how to make IGX signal connections.
The following trunk connections are supported:
The following service module connections are supported:
Making T1 or Y1 Trunk Connections
T1 trunk connections use the NTM front card and the BC-T1 back card. Japanese Y1 connections use the NTM front card and the BC-Y1 back card. The procedure for making Y1 connections is the same as for T1 connections described below.
Make the T1 connections as follows:
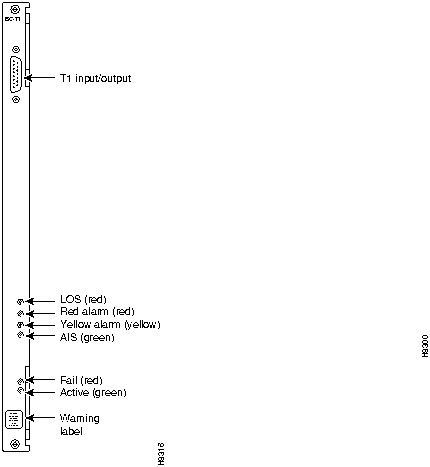
The T1 lines are attached to DB-15, Sub miniature, 15-pin connectors on the BC-T1 cards.
The back slot line numbers correspond to the back slot number in which the BC-T1 card resides. Record the back slot number of each line. These number are necessary for configuring the system after installation is complete.
Making E1 or Subrate Trunk Connections
E1 trunk connections use the NTM front card and the BC-E1 back card. Subrate E1 connections use the NTM front card and the BC-SR back card. The E1 Trunk Interface Card BC-E1 (Figure 3-28) contains the E1 trunk connector (G.703 Input/Output) that is located at the top of the back card. There are four 75 ohm BNCs on the BC-E1 faceplate.
Figure 3-28 : BC-E1 Faceplate Detail (Typical) Make the E1 connections as follows:
The back slot line numbers correspond to the back slot number in which the BC-E1 card resides. Record the back slot number of each line. These number are necessary for configuring the system after installation is complete.
Making T3/E3 Trunk Connections
AIT cables connect the BTM front card to a node at the back card.
The AIT back card has female BNC connectors for transmit and receive trunk connections. Use 75-ohm coax cable RG-59 B/U for short runs, AT&T 734A for longer runs. There are two per T3/E3 trunk (XMT and RCV). Cabling requirements appear in Appendix C. Figure 3-29 shows an AIT-T3 faceplate with connections and LED indicators.
Figure 3-29 : AIT-T3 Backcard Faceplate Making ATM Connections on a Circuit Line
The ALM (ATM Line Module) and UAI-1T3-BC (Universal ATM Interface T3 Back Card) set provide an interface for ATM traffic between user equipment and the node. This section reviews the characteristics and describes how to set up this feature. For a description of this circuit line card set, refer to the ALM description in the chapter titled "Hardware Description." The following characteristics apply to ALM:
After the ALM card has been activated, take the following steps:
After configuring the line with cnfpln, use dspplns to check configuration. The system prepends the letter "u" to the connection type to show that the connection is on an ALM. For example, "ucbr" is an ATM CBR connection on an ALM. During network operation, the dspplnutl command shows the amount of traffic and percent of utilization on the line.
Making Channelized Voice Data Connections
The CVM front card operates with either a BC-T1, BC-E1, or BC-J1 back card to provide channelized voice and data connections. Back card cabling is identical to that of trunk T1, E1 and J1 connections, respectively. Refer to "Making T1 or Y1 Trunk Connections" section and "Making E1 or Subrate Trunk Connections" section for details. For information on CVM support of Dynamic Circuit Switching (DNS), refer to the DNS Installation and Operation manuals.
The next section describes a specialized version of data transmission service called TDM Transport. It applies to older, non-StrataCom WANs.
This section describes how to plan for the Time Division Multiplexing Transport (TDM Transport) feature. Note that TDM Transport requires Rev. C firmware on all connected CVMs or CDPs that use this feature. Refer to the section "The TDM Transport Feature" in Chapter 1, for a description of Rev. C firmware features and limitations. Refer to the Command Reference for a description of the command parameters in related commands.
Before adding a bundled connection under TDM Transport, consider the following:
The Low-Speed Data Module (LDM) and High-Speed Data Module (HDM) front cards operate with a variety of data interface back cards to provide data connections. The LDM uses an LDI card for an interface. The HDM uses an SDI card.
The LDM front card uses the 4-port or 8-port version of the LDI back card for RS-232C/D (V.24) connections or with the LDI4/DDS back card for DDS (Digital Data Service) connections. The data connection ports are labeled PORT 1 through PORT 4 or PORT 1 through PORT 8. See Figure 3-30 for illustrations of these back cards. For instructions on configuring an LDI port for DTE or DCE mode, refer to the forthcoming section titled Configuring the Mode of an LDI Port.
The HDM front card works with an SDI back card. Four types of SDIs are available. These are the V.35, RS-449/422, RS-232D, and RS-232C (V.24)---X.21 requires RS-449 plus an adapter cable. Each type of SDI has four connection ports, which are labelled PORT 1 through PORT 4. An example SDI card appears in Figure 3-30.
Figure 3-30 : SDI, LDI and DDS Faceplates When attaching A data line to A SDI, LDI, or DDS port, use the shortest reasonable length of cable to connect each port.
The factory-set, default mode of an SDI port is DCE. (Although this is the default, verify it before starting up the system. See Step 1.) For the two modes, the occupied rows on the back card jumper connector are as follows:
To change the mode on a port to DTE, position the jumper card for that port as follows:
Figure 3-31 : Changing the Mode on an SDI Card Figure 3-32 : Positioning a DTE/DCE Block on an SDI Optional redundancy for HDM and LDM cards can be provided with a second front and back card set and a Y-cable connection on each port to the customer data equipment, as Figure 3-33 shows. (The arrangement for HDM and LDM card groups is the same.)
Figure 3-33 : HDM Data Port Redundancy Configuring the Mode of an LDI Port
Each port on an LDI card uses an adapter cable. For a list of LDI adapter cables, refer to Appendix C, "Cabling Summary." Each cable does the following:
See Figure 3-34 for an example. In Figure 3-34, the adapter cable makes the port a DCE port. Circuits on the card check identifying pins on the cables and configure the ports as DTE or DCE.
Figure 3-34 : Connecting a DTE or DCE Adapter Cable to an LDI Making Frame Relay Connections
Four types of frame relay interfaces are available:
The T1 line terminates on the FRI-T1 card to a DB15 sub miniature connector. The FRI card has a female connector. A BNC type connector is used for the unbalanced connection.
The FRI-E1 card provides for a 75-ohm unbalanced coax line termination or a balanced 120-ohm twisted pair termination. A DB15 connector is used for the balanced connection. The FRI card has a female connector.
The V.35 connection uses a standard 34-pin female MRAC type connector with a standard V.35 cable.
The FRI-X.21 has female DB15 sub-miniature connectors.
The cabling requirements for the different frame relay interfaces appear in Appendix C.
Optional redundancy on a frame relay port can be provided with a second FRM/FRI card set and a Y-cable connection on each port to the customer data equipment. The forthcoming section titled "Setting Up a Frame Relay Port", includes steps for setting up card redundancy. The card redundancy kit for this purpose contains a second FRM/FRI card set, four Y-cables to interconnect the two card sets to the customer connection, and a 200-ohm DCE/DTE jumper card for the installed FRI. In the case of either a V.35 or X.21 interface, the DCE/DTE daughter card on the FRI must be changed when a non-redundant card set is changed to a redundant card set. Only the model D of the V.35 or X.21 back cards use the daughter card.
Y-cable redundancy is not possible between inconsistent back card types, such as FRI T1/E1 to FRI V.35. The screen display for the dspyred command shows a back card conflict with a configured interface in reverse video. (Refer also to the descriptions of the upcln and upfrport commands in the Command Reference.) Inserting a front card that does not support the number of upped ports is flagged by displaying the front card in reverse video on the Y Cable Redundancy Screen.
After the hardware is installed, the node must be reconfigured to indicate that the slot is equipped with redundancy. Use the Add Y Redundancy (addyred) command to do this. Refer to the Command Reference for more information on the commands addyred, delyred, dspyred, and ptyred.
Installation of the FRI-X.21 or FRI-V.35 follows the same steps as other IGX back cards. It can be installed in any back slot except slot 1 (reserved for the SCM).
The four ports on the FRI-X.25 are equipped with female DB15 sub miniature connectors. The four ports on the FRI-V.35 are equipped with female, 34-pin MRAC connectors. Each port may be configured as a DCE or as a DTE by selecting the position of a jumper card mounted on the FRI.
The factory-set, default mode of an FRI port is DCE. (Although this is the default, verify it before starting up the system. See step 1, below.) For the two modes, the rows on the back card jumper connector that are occupied when the jumper card is in place are as follows:
If an interface mode need changing, reposition the jumper board for the port as follows:
Figure 3-35 : Positioning a DTE/DCE Block on a FRI-X.21 This section describes the steps for setting up a frame relay port after hardware installation and system startup. Setting up a frame relay port is done at the IGX control terminal or StrataView Plus workstation. For details on each command in this section, refer to the Command Reference.
When a port has multiple PVCs, optional bundling or grouping the connections is available. Bundling facilitates meshing. Grouping helps conserve system resources such as device codes and logical connections in networks, which need a high level of standardization.
Figure 3-36 : Frame Relay Port Redundancy The types of FastPAD interfaces are T1, E1, V.35, and X.21.
FastPAD connections use the FTM front card and an FPC back card. The back card versions are FPC T1, FPC E1, FPC V.35, and FPC X.21.
The T1 card has a DB15 for RX/TX. The E1 connections are the same except for additional BNC connectors for unbalanced connections and BNC connectors for RX/TX MONITOR.
A V.35 connection uses a standard 34-pin female MRAC-type connector with a standard V.35 cable. The FPC-X.21 has female DB15 sub miniature connectors.
The cabling requirements are the same as for the corresponding frame relay interface and are detailed in Appendix C.
Installation of the FTM/FPC card set follows the same steps as other card sets. The FPC plugs directly into the FTM card. The FTM and FPC can reside in any slot not reserved for the NPM and SCM, respectively.
Each of the four ports on the FPC V.35 and X.21 versions may be configured as a DCE or as a DTE by selecting the position of a jumper card on the FPC. These ports are factory-configured as DCE interfaces.
To change a port's interface configuration on the FPC V.35 or FPC X.21, reposition the jumper card for the port as follows:
Figure 3-37 : Positioning a DTE/DCE Block on a FPC-X.21 Making Alarm Relay Output Connections
To install an ARM card set, proceed as follows:
Also see the section "Initial Startup of the IGX," when the system is ready for power.
The steps that follow show how to set up an ARM card set after the physical installation is complete. This is done from the IGX control terminal or StrataView Plus workstation. For details on each command used, refer to the Command Reference.
![]()


![]()
![]()
![]()

![]()
![]()
![]()

![]()
![]()

![]()
System
A
B
C
D
E
F
Kit Part No.
IGX 16: 1 AC input, no power supply redundancy
X
O
IGX16-AC1-1
IGX 16: 1 AC input, with power supply redundancy
X
X
O
IGX16-AC2-1
IGX 16: 2 AC inputs
X
O
X
O
IGX16-AC2-2
IGX 32:1 AC input, no power supply redundancy
X
X
O
IGX32-AC2-1
IGX 32: 1 AC input, with power supply redundancy
X
X
X
O
IGX32-AC4-1
IGX 32: 2 AC inputs
X
X
O
X
X
O
IGX32-AC4-2

For a mid-mount rack only, attach the tray to the mounting brackets with the head of each mounting screw on the inside of the tray and each associated nut on the outside of the bracket.
![]()

![]()


![]()


![]()

![]()
![]()
![]()
![]()
![]()
![]()
![]()
Make sure the circuit breaker is in the OFF position.

![]()
![]()
![]()
This step is not required when using the DB15 connector or for back cards that use the plastic BNC connectors.


![]()
![]()
![]()
![]()
![]()
![]()
![]()
![]()
![]()
![]()
![]()
![]()