|
|

The CiscoWorks software is fully integrated with NetView for AIX, so you can access CiscoWorks applications directly from the NetView for AIX main window. The NetView for AIX software is based on the HP OpenView menu structure that is documented in the CiscoWorks User Guide, Software Release 2.0/2.1.
This chapter introduces you to some CiscoWorks applications and provides instructions on how to use them. It also contains an overview of how CiscoWorks functions with the NetView for AIX platform.
This chapter includes the following sections:
For a detailed CiscoWorks application information, refer to the CiscoWorks User Guide, Software Release 2.0/2.1.
Figure 1-1 shows the NetView for AIX main window.

Perform the following tasks before using the CiscoWorks application on NetView for AIX:
For more information, see the following section, "Running the Manage Objects Command on NetView for AIX." For detailed information, refer to the NetView User's Guide. If you have a network map or database from another platform you want to transfer, contact your IBM support representative for assistance.
Before performing the exercises in this chapter, you should be familiar with the NetView for AIX main window and know how to access the menu items from this window.
The following sections provide detailed information on some post-installation tasks. It also contains an overview of how CiscoWorks functions on the NetView for AIX network management platform.
The following topics are discussed:
This section briefly discusses how to start NetView for AIX in order to access CiscoWorks. You can use several different commands to start NetView for AIX. You must be running an X window manager, such as Motif to start NetView for AIX.
There are three ways to start NetView for AIX:
--Starts NetView for AIX without a network map. Removes the last network map without saving it.
If problems occur, your PATH environment variable might not include a path to NetView for AIX executables. To resolve this problem, try entering a fully qualified path, such as /usr/OV/bin/nv6000.
To load a network map file into the NetView for AIX main window, select File>Open/List Maps.
For more information on starting NetView for AIX or troubleshooting problems with startup, refer to the NetView for AIX User's Guide.
This section briefly outlines the steps you must complete in NetView for AIX before continuing with CiscoWorks tasks. For instructions on using specific CiscoWorks applications, refer to the appropriate sections in this guide.
In order to use the CiscoWorks applications that use the Sybase database, follow these steps:
Step 1 Start NetView for AIX (if not started already).
Refer to the section "Starting CiscoWorks on NetView for AIX" to learn how to start NetView for AIX.
Step 2 Access the Security Manager application to turn on authentication checking and provide user and group access privileges to CiscoWorks applications.
For more information, refer to Chapter 7, "Setting Up Domains and Securing Applications," in your CiscoWorks User Guide.
Step 3 Set up your NetView for AIX run-time database using the NetView for AIX Manage Objects command.
For information on the NetView for AIX Manage Objects command, refer to the section "Getting Started with CiscoWorks on NetView for AIX" or to the NetView for AIX documentation.
Step 4 Use Sync w/Sybase to synchronize devices in NetView for AIX with the CiscoWorks Sybase database.
If you are adding individual devices, use the CiscoWorks Device Management application, the AutoInstall Manager, the Change Symbol Type command, or the Sync w/Sybase application to add device data to the database. For information on the AutoInstall Manager, refer to Chapter 5, "Managing Cisco Device Configurations." For Sync w/Sybase and Device Management application information, refer to Chapter 6, "Device Management."
Step 5 Use the CiscoWorks applications to help you manage your network activity.
Table 1-1 lists some general network management tasks and associates the task with its responsible CiscoWorks software application. Use this table to determine which documentation set (CiscoWorks or NetView for AIX) to use if you have questions or need information. The NA indicates that this information is not applicable to the CiscoWorks software or manuals and to refer to the NetView for AIX manual set. The X indicates that this information may be covered briefly in the CiscoWorks manual set, but may be a platform-specific task so should be referenced in your platform documentation.
CiscoWorks is integrated with the NetView for AIX network management platform.
During installation and configuration, CiscoWorks adds customized router files with Cisco-specific device types, such as the Cisco AGS+, to the NetView for AIX /usr/OV/symbols directory. CiscoWorks also adds its applications to the NetView for AIX menu bar.
CiscoWorks uses the NetView for AIX grapher, xnmgraph, to present real-time or logged network data in graphical format. The xnmgraph application is used in the CiscoWorks Health Monitor and Real-Time Graphs applications to display data in graphical format. You can change the graph properties either with the pull-down menu on the graph window or using the X resources in
/usr/OV/appdefaults/xnm.
For more detailed information on xnmgraph, refer to your NetView for AIX documentation.
Most CiscoWorks applications require a database of network devices. They also require a network map that contains these network devices.
NetView for AIX automatically displays a default map, called IP Map, which displays all the IP devices connected to the NetView for AIX workstation. The Manage Objects command enables you to find the devices in the primary network to which your system is attached. Use the Manage Objects command to view your network and run-time database for NetView for AIX.
To run the Manage Objects command, perform the following steps:
Step 1 At the UNIX prompt, display NetView for AIX by entering the following command:
nv6000
The NetView for AIX main window appears. (See Figure 1-1.)
Step 2 Open the IP Internet default map.
Step 3 Click on a device symbol to select it.
Step 4 Select Options>Manage Objects.
The Manage Objects command begins to construct views of the network. When the Manage Objects command completes the process, you see a representation of the subnetwork that is connected to the selected device. The subnetworks appear in the form of lines connecting the selected device symbol to other device symbols.
Step 5 To save the database of devices that you created, select File>Save Map As.
To add devices to a network map after CiscoWorks installation, you can use any of the following applications: Device Management, AutoInstall Manager, or Sync w/Sybase. For more information on adding devices after a CiscoWorks installation, refer to the appropriate sections within the CiscoWorks User Guide.
For detailed information on how to run the Manage Objects command, refer to the NetView for AIX User's Guide.
Network devices that are discovered by the Manage Objects command may exist as generic devices. You must identify them as Cisco devices to take advantage of CiscoWorks functionality.
To use the Change Symbol Type command to change a device from its generic status to the status of a Cisco device, perform the following steps:
Step 1 In the NetView for AIX main window, use the mouse to point to the device then press the right mouse button or equivalent.
Step 2 Select Edit>Change Symbol Type.
The Change Symbol Type window appears, as shown in Figure 1-2.

Step 3 Select a symbol class that corresponds to the device you selected in the map. For example, if the selected device in your network map is a Cisco 7000, select Cisco Router because Cisco 7000 is a class of Cisco Router.
The Change Symbol Type window expands to show you the Symbol Subclasses for Class Cisco Router. All supported Cisco router classes appear in this panel in the Change Symbol Type window.
Step 4 Select a symbol subclass for the specified symbol. For example, if the selected device in your network map is a Cisco 7000, select the 7000 symbol.
Step 5 Repeat steps 1 through 4 to identify other devices in the network map.
Step 6 Confirm that the selected devices have the correct SNMP Community Strings by viewing the SNMP Configuration window. (From the NetView for AIX menu bar, select Options>SNMP Configuration.)
Two distinct databases are used in your work with CiscoWorks. The first is the Sybase relational database that is used by CiscoWorks applications to contain information about network devices, polling data, configuration details, and other data needed by each application. The second is the NetView for AIX run-time database that is used by NetView for AIX to store information about the network. By synchronizing the CiscoWorks Sybase database with the NetView for AIX database, you build a complete resource of information.
NetView for AIX maintains a run-time database of devices that you discover by using the Manage Objects command. In order to use CiscoWorks applications, you must include devices in the Sybase database. The Sync w/Sybase application performs the following functions to enable you to use CiscoWorks applications:
Use the Sync w/Sybase or Sync Selected applications to synchronize the database information. Both the Sync w/Sybase and Sync Selected applications appear in the Misc menu. Use Sync w/Sybase if you just initialized NetView for AIX and want to fully synchronize both databases. Use Sync Selected if you want to synchronize a specific device.
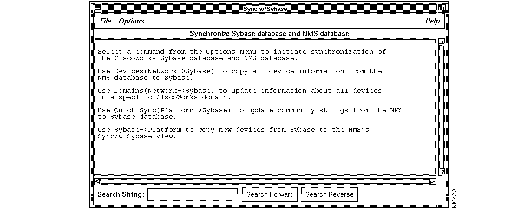
Depending on the number of database records and the information contained in each, database synchronization can be time-consuming. To adjust for synchronization time and to meet special needs, select one of the following commands from the Options menu of the Sync w/Sybase window: (See Figure 1-3.)
Use the Misc>Sync Selected option in the NetView for AIX menu to synchronize a specific device.
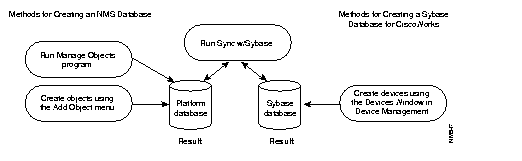
Figure 1-4 illustrates the relationship between the NetView for AIX database and the CiscoWorks database. Although you can directly add device names to either database, you must run the
Sync w/Sybase application to confirm that the information about a particular device is correct in both places.
For more detailed information about the database and the Sync w/Sybase and Sync Selected applications, refer to Chapter 6, "Device Management." For more information about the AutoInstall Manager application, refer to Chapter 5, "Managing Cisco Device Configurations."
After you finish creating a run-time database with network devices, follow these steps to run the Sync w/Sybase application:
Step 1 Select Misc>Sync w/Sybase.
The Sync w/Sybase window appears. (See Figure 1-5.)
The synchronization process takes from 3 minutes to over an hour, depending on the size of your network and the number of devices you are synchronizing.
You can stop the synchronization process at any time by selecting File>Exit. The devices that have been synchronized up to this time will be saved in the Sybase database.
Step 2 Select File>Exit to exit this window.
This section provides steps for viewing or using four key CiscoWorks applications:
In order to use these applications, you must have at least two network devices in the Sybase database. Use the Sync w/Sybase application to add network devices to the Sybase database. After completing the exercises in this chapter, you will have a general idea of how to use CiscoWorks applications. For a detailed explanation of all the CiscoWorks applications, refer to the appropriate sections in this guide.
When the Sybase database is synchronized with the NetView for AIX database, the device information in the Sybase database can be displayed with the Device Management application by accessing the Devices window.
After you synchronized the NetView for AIX database with Sybase, perform the following steps to display the names of devices present in the Sybase database:
Step 1 Select the Administer>CiscoWorks Devices>Device Mgmt application.
The Device Management window appears, as shown in Figure 1-6.
The Device Management window uses information stored in the database to display all the devices on the network, the interfaces of the device, and the names of contacts--people who are likely to have more information about a selected device.
You may use the Forms menu in the Device Management window to store administrative information such as contact personnel, location, vendor, and other information.

Step 2 Select a device name to display the interfaces and contacts associated with that device.
Step 3 To add, modify, or delete interfaces or contacts for a specified device, select a corresponding item from the Edit menu.
Step 4 To modify, add, or delete a device, click on the corresponding button.
Step 5 To search for a specific device or range of devices, select Search>Find.
Step 6 Select File>Exit to exit the Devices window and the database.
The Path Tool application enables you to display the routing path between a source device and a destination device.
To graphically display the path between two devices, perform the following steps:
Step 1 In the NetView for AIX main window, click on a source device and select Diagnose>Network Connectivity>Path Tool.
A window similar to that in Figure 1-7 appears. If you did not select a device on the network map before selecting the menu item, the information about the source device is not filled in.

Step 2 To select the destination device, click on Select beside the Path Destination field or enter the complete device name.
If you click on the button, the Device Selection window appears listing the devices in the NetView for AIX database. It is similar to the window shown in Figure 1-8.

Step 3 Click on the device that you want to specify as the destination and click on the OK button.
After the connection has been established, the device name appears in the Path Destination field in the Path Tool window.
Step 4 Click on OK to launch the Path Tool.
When the Path Tool is launched, a browser window (similar to the window shown in
Figure 1-9) appears, displaying the progress of the Path Tool as it traces each network hop from the source to the destination device.

After the connection is established, the Path Tool window appears (similar to the window shown in Figure 1-10), displaying the path between the source and the destination device you specified.

Step 5 Select File>Exit to close the window.
The Show Commands application provides a unique interface to the Cisco devices on your network. It enables you to display device data, such as the status of a device or traffic information.
To use the Show Commands application to obtain data from a device, perform the following steps:
Step 1 In the NetView for AIX main window, select a Cisco device.
Step 2 Click the right mouse button or equivalent to select Diagnose>Show Commands.
The Show Commands window (similar to that shown in Figure 1-11) appears.
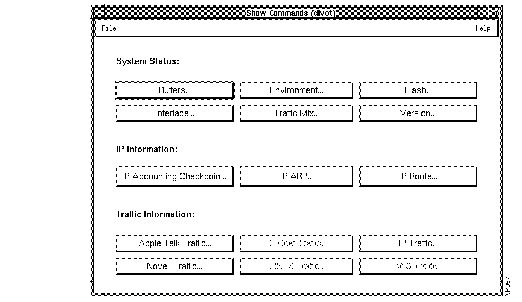
Step 3 Click on Interface to display the interfaces for the device.
The Show Interface window (similar to the window shown in Figure 1-12) appears.
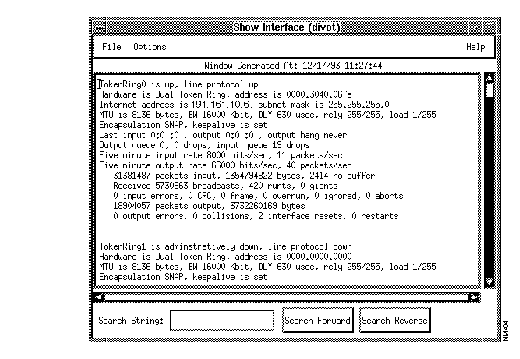
Step 4 Select File>Close to exit from the Show Interface window.
The Show Commands window redisplays.
Step 5 Select File>Exit to exit from the Show Commands application.
You can use CiscoWorks real-time graphs to observe real-time information by means of a two-dimensional graph. CiscoWorks enables you to graph data about the health of your device and interface, and traffic information.
To display a real-time graph with information on the buffer characteristics for a device, perform the following the steps:
Step 1 In the NetView for AIX main window, select a device.
Step 2 From the NetView for AIX menu bar, select Monitor>Real-Time Graphs.
The Real-Time Graphs window appears as shown in Figure 1-13.
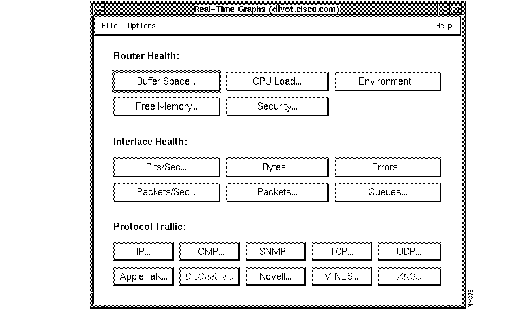
Step 3 In the Router Health section, click on Buffer Space to display the buffer characteristics for the device.
The Real-Time Graphs Free Memory window displays containing the buffer space information in the form of a graph. (See Figure 1-14.)

Step 4 Click on the box at the top left corner of the window to display a drop-down menu; then select Close to exit the window.
Step 5 Select File>Exit to exit from the Real-Time Graphs window.
Some processes in NetView for AIX affect how CiscoWorks runs, depending on the processes configuration in NetView for AIX. As you continue to work with NetView for AIX processes and CiscoWorks, consider the following conditions in which the two environments coexist:
To use NetView for AIX and CiscoWorks, you must set the following environment variables:
Normally, you should set these variables before invoking NetView for AIX. For information on setting environment variables, refer to the CiscoWorks Administration and Installation Guide on NetView for AIX.
CiscoWorks supports the Motif graphical user interface (GUI).
When accessing the network management windows, keep the following in mind:
Most primary windows contain the following common menu options:
Some application windows contain other menu options. For information on these options, along with full-menu descriptions of each application, refer to the specific application for window descriptions.
All primary windows contain a File menu. Figure 1-15 shows the opened File menu.
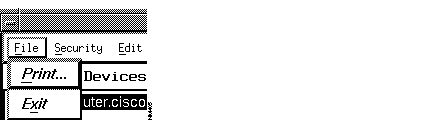
Each CiscoWorks primary window contains a Print command. There are two types of print options available in CiscoWorks applications. One option prints text displayed in a window using the lpr command. The other option prints a screen or window image using the NMS print utility. The CiscoWorks application you are in will determine the popup window that appears after you select the Print command.
When you use the network management platform print utility, you print the window on which the mouse pointer is resting. For example, when pointing to a menu bar (near the top of the window), your NMS print utility prints whatever is displayed on your monitor. When pointing to a browser, or text-displaying window inside a window, the print utility prints only the Browser window.
When you select Print on a window that accesses the lpr command, the Print Command window appears. (See Figure 1-16.) In NetView for AIX, a -d will appear in the Printer Name field.
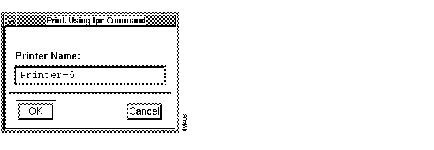
To print, enter the name of your printer, including any path designations, and click on OK. To close the window without printing, click on Cancel.
You can set up a default printer selection by setting the PRINTER environment variable before you start the NetView for AIX session. For example, in a C shell enter the following:
# setenv PRINTER printername
For the Korn Shell, enter the following:
# PRINTER=printername
# export PRINTER
To exit from a primary application window, select File>Exit.
Exit closes the active window. If you exit from a primary window, you return to the NetView for AIX main window. If you exit from a secondary window, the primary window remains displayed. If multiple primary windows are opened, only the one where you selected Exit is closed; all other windows remain open and active until you select Exit on each of those primary windows.
The Security menu, shown in Figure 1-17, appears in the windows of CiscoWorks applications that use authentication-checking, a feature that allows an administrator to grant different levels of access privileges to CiscoWorks applications. Depending on whether the application governs a process or database function, you can use the menu commands to access another domain, to log in as another user, or learn what user privileges you have for a given CiscoWorks application.
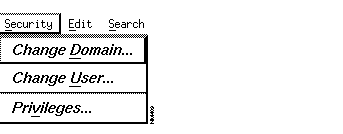
The Change Domain command allows you to display, change to, and operate in another domain. A domain represents a logical group of devices. A device is any network entity that contains an SNMP agent. (Devices generally include routers, bridges, and communication servers.)
The Change Domain command is used by applications that work with devices listed in the Sybase database. Applications that support the Change Domain command include Path Tool and Device Polling. Changing domains may alter your privileges to an application because privileges are granted according to your group/domain association. In most cases however, when you access another domain, you can expect changes in privileges to the applications that manage the devices in that domain.
The Change User command allows you to log in under another user name. Use this command when you need the privileges of another user in order to access applications (like Configuration Management) that would otherwise be unavailable to you.
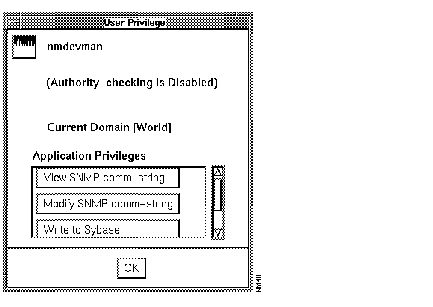
The Privileges command allows you to display your current privileges for the specified CiscoWorks application. When you select the Privileges command, the User Privilege window appears, listing your application-specific privileges. (See Figure 1-18.)
The Help menu provides options for viewing online help for the current application and its current version number. (See Figure 1-19.)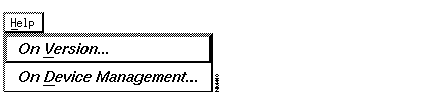
Use the Help on Version command from the Help menu to display the current version of the active CiscoWorks application. (See Figure 1-20.)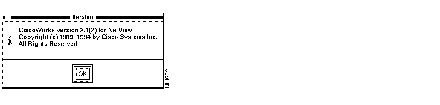
When you select On <application name>, a window similar to Figure 1-21 appears.
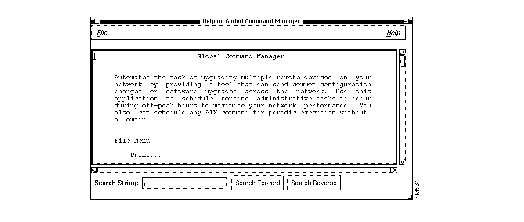
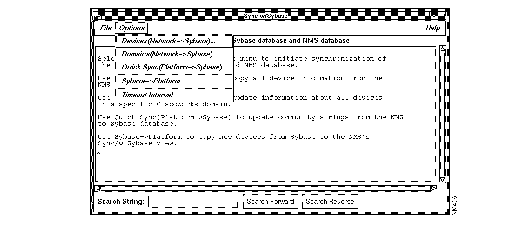
Enter characters in the search string field. Then use the Search Forward and Search Reverse buttons to find your search string in the displayed text.
The command buttons used in the Device Management application are described in this section. For more information on Device Management, refer to Chapter 6, "Device Management" in the CiscoWorks User Guide.
To view the command buttons, perform the following steps:
Step 1 Select Administer>CiscoWorks Devices>Device Mgmt.
The Device Management window appears. (See Figure 1-22.)
The following command buttons appear along the bottom of the window:
Step 2 Click on New to open the Device Information Window. (See Figure 1-23.) When you click on the New button, you see panes for Device Details and Inventory Details and Administrative Details.
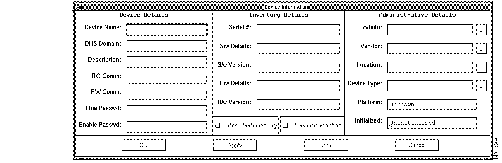
Step 3 When you finish entering data in the Device Information window, click on OK. The data is saved to the database and displayed in the Device Management window.
With the Device Information window open, you can change the data in any field you wish. If you like, you can copy and paste data directly among windows or the fields within windows.
Step 4 When you finish modifying data about a particular device, click on Apply to save the changes.
Step 5 Select Options>Initialize to get the device information.
If you use the Security Manager application to protect specified applications, all users must enter a valid username and password to access the protected CiscoWorks applications. For a detailed description of which CiscoWorks applications you can protect, refer to Chapter 7, "Setting Up Domains and Securing Applications," in the CiscoWorks User Guide.
Each CiscoWorks application has varying levels of access privileges. Each user is granted inherent privileges to certain applications (such as the ability to display devices) based solely on the user's group-domain association. The CiscoWorks administrator governing the Security Manager application can grant further levels of "application-specific" privileges (such as add or change database information) to selected groups.
With security enabled, if you previously used the CiscoWorks Login application to log into CiscoWorks, no user identification window appears. If you do not use the CiscoWorks Login application, each time you access any of the secured CiscoWorks applications, CiscoWorks prompts you for a username and password. This login controls access to the application.
If you use Security Manager to secure your CiscoWorks applications, you can use the Login and Logout applications from the Misc menu. For more information on logging in and out, refer to Chapter 7, "Setting up Domains and Securing Applications," in the CiscoWorks User Guide.
 | Time Saver By using the Login application, you need to log in only once. If you do not use Login, CiscoWorks will require user identification information (username and password) each time you attempt to start a secured application. |
|
|