|
|

Product Numbers: WS-C316T, WS-C316C
This document describes how to install the 100BaseTX/16 port expansion module into a
FastHub 300 Series base unit (FastHub 316T or FastHub 316C).
See the FastHub 300 Series Installation and Configuration Guide for detailed information on using the FastHub 300 Series hubs. Cisco documentation and additional literature are available in a CD-ROM package, which ships with your product. The Documentation CD-ROM, a member of the Cisco Connection Family, is updated monthly. Therefore, it might be more up to date than printed documentation. To order additional copies of the Documentation CD-ROM, contact your local sales representative or call customer service. The CD-ROM package is available as a single package or as an annual subscription. You can also access Cisco documentation on the World Wide Web at http://www.cisco.com, http://www-china.cisco.com, or http://www-europe.cisco.com.
Follow these steps to install the port expansion module.
 | Caution Port expansion modules might not seat properly in the backplane. When installing the port expansion module, ensure that the module is securely seated in the backplane. This might require a gentle push to ensure that the backplane connector is securely seated in the backplane. |
| Caution Handle the port expansion module by the board edges to prevent ESD damage. |
Step 1 Remove the port expansion module slot cover by loosening the thumbscrews on each side of the slot cover.
Step 2 Holding the port expansion module by its front panel, align the sides of the port expansion module with the card guides in the slot, as shown in Figure 1.
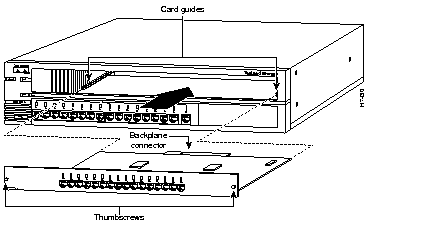
Step 3 Keep the port expansion module oriented horizontally and carefully slide it into the slot until the backplane connector is fully seated in the backplane.
Step 4 Gently push the front of the port expansion module to ensure that the backplane connector is securely seated in the backplane.
| Caution Ensure that the backplane connector is securely seated. |
Step 5 Tighten the thumbscrews on each side of the port expansion module.
Step 6 Use the front panel LEDs to verify port operation.
The expansion port LEDs should be in STAT mode (port status). In STAT mode, port LEDs indicate individual port status (see Table 1).
| Color | Port Status |
|---|---|
| Off | No link (link down). |
| Green | Link operational (with no activity). |
| Flashing green | Link operational (with activity). |
| Rapidly alternating green/amber | Faulty link1. |
| Alternating green/amber | FastHub reset in progress. |
| Solid amber | Port disabled (through in-band or out-of-band management). |
If there is a problem with port operation, reseat the module. If there is still a problem, refer to the FastHub 300 Series Installation and Configuration Guide for troubleshooting information.
For service and support for a product purchased from a reseller, contact the reseller. Resellers offer a wide variety of Cisco service and support programs, which are described in the section "Service and Support" in the information packet that shipped with your product.
For service and support for a product purchased directly from Cisco, use CCO.
CCO is Cisco Systems' primary, real-time support channel. SMARTnet customers and partners can self-register on CCO to obtain additional information and services.
Available 24 hours a day, 7 days a week, CCO provides a wealth of standard and value-added services to Cisco's customers and business partners. CCO services include product information, product documentation, software updates, release notes, technical tips, the Bug Navigator, configuration notes, brochures, descriptions of service offerings, and download access to public and authorized files.
CCO serves a wide variety of users through two interfaces that are updated and enhanced simultaneously: a character-based version and a multimedia version that resides on the World Wide Web (WWW). The character-based CCO supports Zmodem, Kermit, Xmodem, FTP, and Internet e-mail, and it is excellent for quick access to information over lower bandwidths. The WWW version of CCO provides richly formatted documents with photographs, figures, graphics, and video, as well as hyperlinks to related information.
You can access CCO in the following ways:
For a copy of CCO's Frequently Asked Questions (FAQ), contact cco-help@cisco.com. For additional information, contact cco-team@cisco.com.
Please use CCO to obtain general information about Cisco Systems, Cisco products, or upgrades. If CCO is not accessible, contact 800 553-6387, 408 526-7208, or cs-rep@cisco.com.
|
|