|
|

This chapter provides LAN Emulation (LANE) configuration requirements, procedures for installing and removing the Catalyst 2820 ATM modules from the Catalyst 2820 switch, and troubleshooting information. It also provides packing list information and instructions for wearing the electrostatic discharge (ESD) strap, which is included in the package.
Before you install an ATM module, ensure that the following items are included in the package:
If anything is missing, contact your Cisco Systems customer service representative.
Before you configure the LANE client, ensure that the device being connected to the ATM module has been configured as one of the following LANE servers.
After LANE servers are properly configured, you can get the information you need to connect the device to the Catalyst 2820 ATM module. Record the VLAN ID numbers and emulated LAN names that are configured in the LECS. You will need this information when you configure the ATM module LANE client.
For additional information about LANE, refer to the related Cisco publications listed in the preface.
For detailed information about configuring LANE servers, refer to your ATM device documentation.
Before you install the ATM module, wear the ESD strap that is included in the package to avoid possible electrostatic discharge. Follow the instructions on the ESD strap package to ensure that the strap is worn correctly.
The ATM module is hot-swappable and is installed or removed without turning off the Catalyst 2820 or interrupting its operation. After the ATM module is installed and the cables are connected, the module automatically runs a power-on self-test (POST) to verify that the ATM module is operational. This POST is specific to the ATM module. The Catalyst 2820 continues its normal operation.
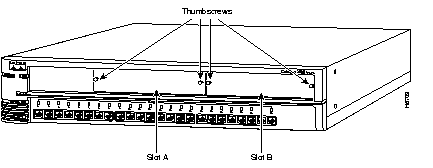
Before you install the ATM module, select an expansion slot on the front panel of the Catalyst 2820. Figure 2-1 shows a Catalyst 2820 with blank faceplates for expansion
slot A and expansion slot B. If you are replacing an existing module, refer to the "Removing the Module" section before you begin.
 | Warning Class 1 laser product. |
| Warning Avoid exposure to the laser beam. |
 | Caution When installing an ATM MM Fiber or ATM SM Fiber module in the Catalyst 2820, do not remove the rubber plugs from the fiber-optic connector on the module or the rubber caps from the fiber-optic connector on the cable until you are ready to connect the cable to the module. The plugs and caps protect the fiber-optic connectors from contamination and ambient light. |
To install the module in an expansion slot, follow these steps:
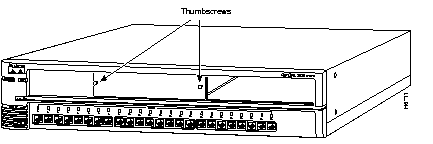
Step 1 Loosen the thumbscrews that secure the faceplate to the expansion slot.
Step 2 Remove the faceplate and store it for later use.
Figure 2-2 shows a Catalyst 2820 with an empty expansion slot.
Step 3 Align the sides of the module with the guide brackets along the inside of the chassis slot.
Step 4 Slide the ATM module into the expansion slot until it seats snugly into the connector on the switch backplane.
| Caution Do not force the ATM module into the expansion slot. Doing so might damage the module and the switch. |
Step 5 Tighten the thumbscrews on the front panel of the module.
The module is properly seated when the front panel is flush with the front panel of the switch.
This section explains how to connect cables to installed Catalyst 2820 modules. Both fiber-optic and UTP cable connections are discussed.
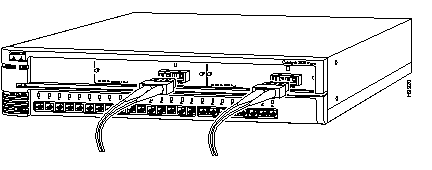
To connect a fiber-optic cable to the ATM 155 SM-MR or ATM 155 SM-LR module, do the following:
Step 1 Remove the rubber plugs from the connector on the cable and store the plugs for future use.
Step 2 Connect the cable to the connector on the ATM module, as shown in Figure 2-3.
Step 3 Connect the other end of the fiber-optic cable to the remote ATM device.
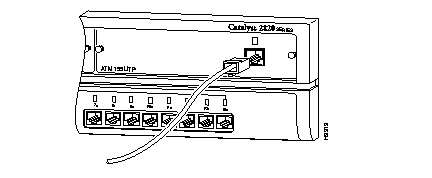
To connect a UTP Category 5 cable to the ATM 155 UTP module, do the following:
Step 1 Connect the cable to the RJ-45 connector on the ATM module, as shown in Figure 2-4.
Step 2 Connect the other end of the UTP cable to the remote ATM device.
After the ATM module is installed and the cables are connected, the module automatically runs a POST to verify that it is operational. If the ATM module fails the POST, the LED on the module changes from green to amber. For more information about what the LED displays indicate, refer to Table 1-1 and Table 1-3. Refer to the next section for troubleshooting procedures if the ATM module is not operational after it is installed.
When an ATM module is installed in a Catalyst 2820 switch that is powered on, the expansion slot LED on the switch and the LED on the ATM module are green, and the module POST starts automatically. If the ATM module passes the POST, the expansion slot LED remains green; if the module fails, the LED turns amber. The "Physical Description" section of the "Overview" chapter describes how to use the module LEDs to interpret the POST failures for the ATM module.
If the module LED does not come on, use Table 2-1 to determine the appropriate corrective action.
| Symptom | Possible Cause | Corrective Action |
|---|---|---|
| Module LED is off. | No cable connected. | Connect both ends of a cable to a device. |
| Device has no power. | Ensure that both devices have power. | |
| Wrong cable type. | Verify the cable type. The ATM 155 MM Fiber module typically uses an orange fiber-optic cable and the ATM 155 SM Fiber module typically uses a yellow fiber-optic cable; the ATM 155 UTP module uses Category 5 UTP cable. | |
| Bad cable. | Replace with known good cable. | |
| Switch expansion slot LED is off. | Module not installed properly. | Remove module and reinstall. |
For information about LED displays, see the "Overview" chapter.
To remove an ATM module from a Catalyst 2820 switch, follow these steps:
Step 1 Disconnect the cable from the connector on the ATM module.
| Caution Replace the rubber plugs in the fiber-optic connector on the module and the rubber caps on the fiber-optic connector on the cable. The plugs and caps protect the fiber-optic connectors from contamination and ambient light. |
Step 2 Loosen the thumbscrews that attach the ATM module to the front panel on the switch.
Step 3 Remove the module from the switch by grasping the thumbscrews and gently pulling the module out of the slot.
Step 4 If you are not installing another module, reinstall the blank faceplate over the open chassis slot to ensure proper airflow and cooling in the chassis.
Step 5 Tighten the faceplate thumbscrews.
|
|