|
|

This chapter introduces you to some CiscoWorks applications and provides instructions on how to use them. Perform the following tasks to use CiscoWorks:
Before performing the exercises in this chapter, you should be acquainted with the SunNet Manager (SNM) Console window and know how to access the menu items in the Console window.
Most CiscoWorks applications require a database of network devices. They also require a network map that shows these network devices.
SNM provides the Discover tool, which enables you to find the devices in the primary network to which your system is attached. The Discover tool it creates a view (map) of your network and a run-time database for SNM. If you did not install the SNM software in the /usr/snm directory, you need to set the environment variable for SNMHOME as described in the SunNet Manager 2.0 User's Guide.
Perform the following steps to run the Discover tool:
Step 1: At the UNIX prompt, invoke the SNM Console by entering the following command:
hostname% /usr/snm/bin/snm
The SNM Console window appears.
Step 2: Pull down the Tools menu and select Discover.
The SNM Discover Program window appears, prompting you to enter your super-user password.
Step 3: Enter your super-user password.
The Discover tool begins to construct views of the network. When the Discover tool completes the process, networks appear in the form of cloud glyphs and devices are displayed in the form of workstation icons.
Step 4: To save the database of devices that you have created, pull down the File menu and select Save.
For detailed information on how to run the Discover tool, refer to the SunNet Manager 2.0 User's Guide.
Network devices that are discovered by the Discover tool exist as generic devices. You need to identify Cisco devices so that they can take advantage of CiscoWorks functionality. Use the Change Type tool to change a device from a generic status to the status of a Cisco device.
Follow these steps to identify a device as a Cisco device. Make sure that the devices displayed in the SNM Console window include SNMP devices.
Step 1: In the SNM Console window, move your mouse on a device and select it.
The Glyph menu for the device appears. It is similar to Figure 5-1.
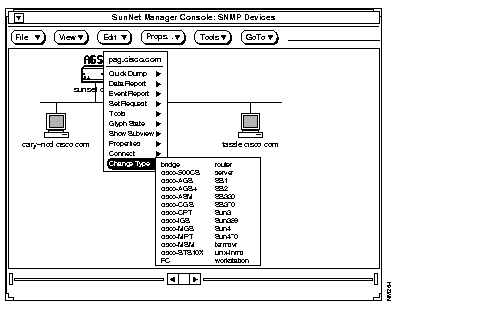
Step 2: Select the Tools menu and click on Change Type. Move the mouse to the right to display the drop-down menu.
The drop-down menu displays a list of device types from which you can choose the appropriate device type.
Step 3: Move the mouse to select the appropriate Cisco device type and release the button.
The device appears as a Cisco device.
Repeat steps 1 through 3 to identify other devices in the network map.
SNM maintains a run-time database of devices that you have discovered by using the Discover tool. In order to use CiscoWorks applications devices must be listed in the Sybase database. The Sync w/Sybase application performs the following functions to enable you to use CiscoWorks applications:
Once you have completed running the Discover tool and creating a run-time database with network devices, follow these steps to run the Sync w/Sybase application:
Step 1: From the Tools menu in the Console window, pull down to Sync w/Sybase.
A Confirmation window appears. See Figure 5-2.
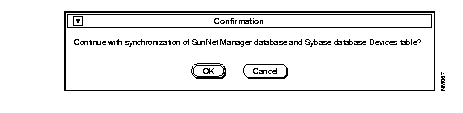
Step 2: Click on OK to continue with the synchronization of SNM's database and the Sybase database Devices table.
A Sync w/Sybase window appears. See Figure 5-3.
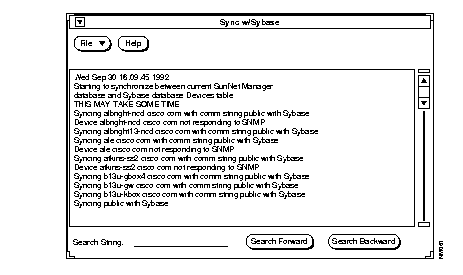
The synchronization process takes from three minutes to over an hour depending on the size of your network and the number of devices you are synchronizing.
You can stop the synchronization process at any time by selecting the File menu and pulling down to Quit. The devices that have been synchronized up to this time will be saved in the Sybase database.
Step 3: To quit this window, select File and pull down to Quit.
This section provides steps for viewing or using four different CiscoWorks applications:
In order to use these applications, you must have at least two network devices in the Sybase database. Make sure you used the Sync w/Sybase application to ensure that network devices are included in the Sybase database.
After completing the exercises in this chapter, you will have a general idea of how to use CiscoWorks applications. Refer to the CiscoWorks User Guide for a detailed explanation of all CiscoWorks applications.
When the SNM database is synchronized with the Sybase database, the device information in the Sybase database can be viewed by accessing the Devices window through the Device Management application.
After you synchronized the SNM database with Sybase, follow these steps to view the names of devices present in the Sybase database.
Step 1: Move the mouse over the Tools button in the Menu bar to display the Tools menu.
Step 2: Drag the mouse down to Device Management and release.
The Device Management window appears, as shown in Figure 5-4.
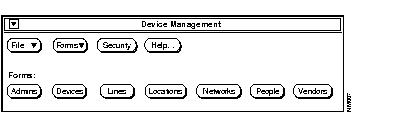
To display the Devices window, click on the Devices button. A window similar to Figure 5-5 appears.
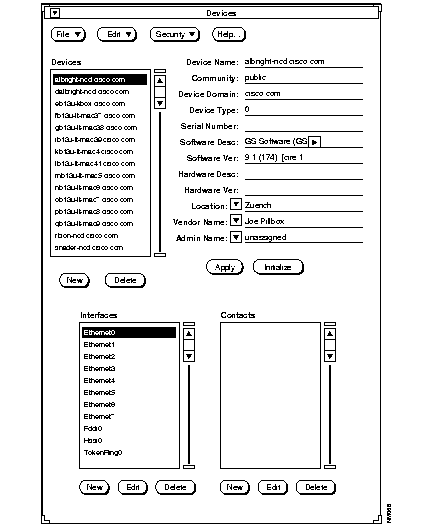
The Devices window displays a list of devices that are present in the database.
Step 3: To exit the Devices window, select Quit from the File menu.
Step 4: To exit the Database Interface window, select Quit from the File menu.
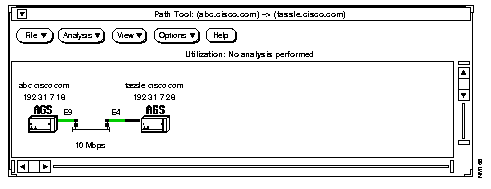
The Path Tool application enables you to display the routing path between a source device and a destination device. This utility enables you to check the efficiency of the paths between two IP addresses.
Follow these steps to graphically display the path between two devices:
Step 1: Move the mouse over an SNMP device in the SNM Console window.
Step 2: Click on the device to display the glyph's menu, drag the mouse to Tools, and display the Tools menu.
Step 3: Select Path Tool.
A window similar to Figure 5-6 appears. The information about the source device is filled in.
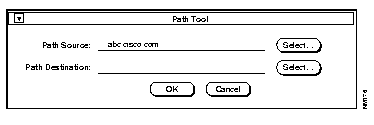
Step 4: To select the destination source device, click on the Select button beside the Path Destination field or enter the complete device name.
The Device Selection window appears, listing the devices in the Sybase database. It is similar to the window shown in Figure 5-7.
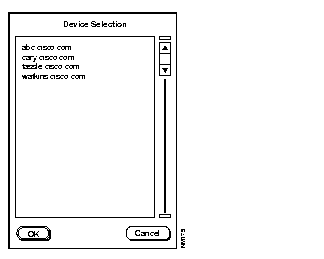
Step 5: Click on the device that you wish to specify as the destination device and click on the OK button.
After the connection has been established, the device name appears in the Path Destination field in the Path Tool window.
Step 6: Click on the OK button.
When the Path Tool is launched, a browser window appears, displaying the progress of the Path Tool as it makes each network hop to the destination device. It is similar to the window shown in Figure 5-8.
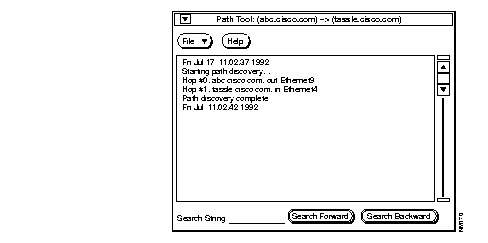
After the connection has been established, the Path Tool window appears, displaying the path between the source and the destination device you specified. It is similar to the window shown in Figure 5-9.
Step 7: To end the Path Tool process, select Quit from the File menu in the Path Tool window.
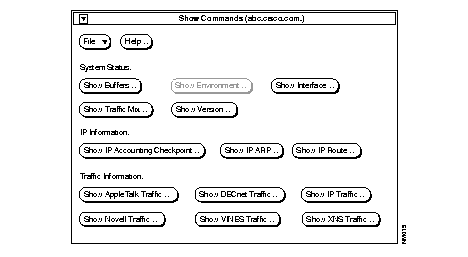
The Show Commands application provides a unique interface to the Cisco routers or communication servers on your network. It enables you to view device data such as the status of a device or traffic information.
Follow these steps to use the Show Commands application and obtain data from a device.
Step 1: Move the mouse over a Cisco device in the SNM Console window.
Step 2: Click on the device to display the menu, drag the mouse to Tools, and display the Tools menu.
Step 3: Select Show Commands.
The Show Commands window appears. It is similar to the window shown in Figure 5-10.
Step 4: To display the interfaces for the device, click on the Show Interface button.
The Show Interface window appears with information about the interfaces. It is similar to the window shown in
Figure 5-11.
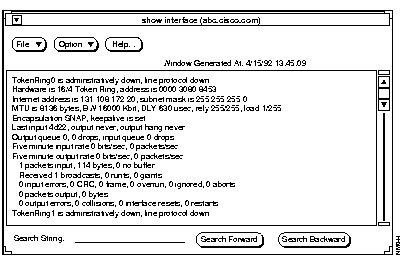
Step 5: To exit from the Show Interface window, select Quit from the File menu.
You can use SNM's real-time graphs to observe real-time information via a two or three-dimensional graph. CiscoWorks enables you to graph data about your device's health, interface, and traffic information.
Follow these steps to display a real-time graph with information on the buffer characteristics for a device.
Step 1: Move the mouse over an SNMP device in the SNM Console window.
Step 2: Click on the device to display the menu, drag the mouse to the Tools, and display the Tools menu.
Step 3: Select Real-Time Graphs.
The Real-Time Graphs primary window appears as shown in Figure 5-12.

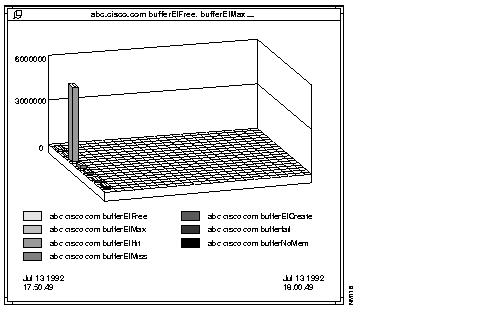
Step 4: In the Router Health section, click on the Buffer Space button to display the buffer characteristics for the device.
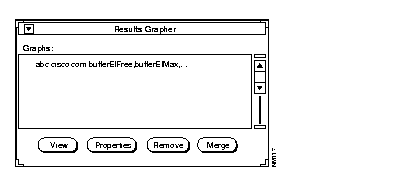
The Results Grapher window appears briefly, followed by the Real-Time Graphs Buffer Space window, which displays the buffer space information in the form of a graph. See Figure 5-13 and Figure 5-14.
Step 5: To exit the Real-Time Graphs buffer space window, click on the pushpin at the top left corner of the window.
Step 6: To exit the Results Grapher, select Quit from the menu bar.
CiscoWorks asks you if you wish to quit the Results Grapher.
Step 7: Click on the OK button to quit the Results Grapher.
Step 8: To exit from the Real-Time Graphs window, select Quit from the File menu.
|
|