|
|

Product Number: BOOT-2500=
This document explains how to replace the boot ROMs in the Cisco 2500 series and AccessPro PC card routers. The boot ROMs are the same for both the Cisco 2500 series and AccessPro PC card routers.
This document contains the following sections:
Before replacing the boot ROMs, read the electrostatic discharge (ESD) instructions in this section to prevent damage to the equipment. ESD is a discharge of stored static electricity that can damage equipment and impair electrical circuitry. It occurs when electronic components are improperly handled and can result in complete or intermittent failures.
Following are guidelines for preventing ESD damage:
 | Caution To avoid damaging the equipment, periodically check the resistance value of the antistatic strap. The measurement should be between 1 and 10 megohms (Mohms). |
To replace the boot ROMs, depending on the model you have, you must remove the cover or remove the AccessPro PC card to access the boot ROMs. Proceed with the appropriate section.
| If You Have a | Proceed With the Section | On Page |
|---|---|---|
| Cisco 2501-2516 or 2520-2523 | Removing the Chassis CoverCisco 25012516 and 25202523 | 2 |
| Cisco 2517-2519 | Removing the Front CoverCisco 25172519 Router/Hub | 5 |
| AccessPro PC card | Removing the AccessPro PC Card | 6 |
This section explains how to remove the chassis cover to access the boot ROMs in the Cisco 2501-2516 and 2520-2523 models.
The following tools are required to remove and replace the chassis cover:
To remove the chassis cover, follow these steps:
Step 1 Turn the power OFF.
Step 2 Disconnect all cables from the rear panel of the router.
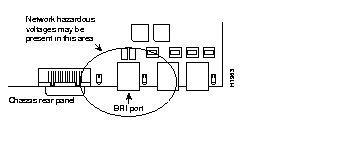
 | Warning This warning applies to all models that include a BRI port. Network hazardous voltages are accessible in the basic rate interface (BRI) cable. If you detach the BRI cable, detach the end away from the router first to avoid possible electric shock. Network hazardous voltages are also accessible on the system card in the area of the BRI port (RJ-45 connector), even when the power is OFF. (See Figure 1.) |
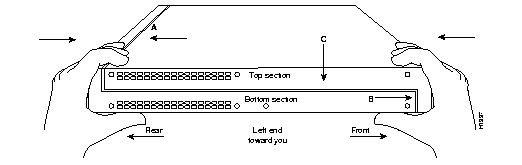
Step 3 Turn the router upside down so that the top of the chassis is resting on a stable surface and the front of the chassis is toward you. (See Figure 2, Part A.)
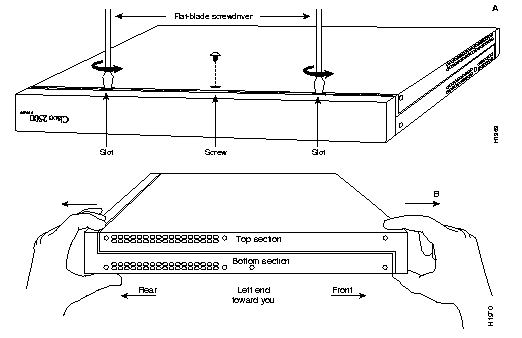
Step 4 Remove the single screw on the bottom of the chassis at the side closest to you. (See Figure 2, Part A.) Note that the chassis consists of two sections: top and bottom. (See Figure 2, Part B.)
Step 5 If required, insert a medium flat-blade screwdriver into the slots shown in Figure 2, Part A, and gently rotate the blade so that the top and bottom sections separate slightly.
Step 6 Holding the chassis with both hands, position it as shown in Figure 2, Part B.
Step 7 Pull the top section away from the bottom section. (See Figure 2, Part B.) The fit is very snug, so it may be necessary to pry the chassis sections apart at one end and then the other until they separate.
Step 8 When the top cover is off, set it aside.
| Warning To prevent shock hazard and injury, do not touch the power supply or fan assemblies. |
Step 9 Proceed to the section "Replacing the Boot ROMsAll Models" on page 7.
The Cisco 2517-2519 are different from the other Cisco 2500 series models. To access the boot ROMs in Cisco 2517-2519 router/hubs, follow these steps to remove the front cover:
Step 1 Turn the power OFF.
Step 2 Disconnect any cables attached to the hub port card, management card, or router card.
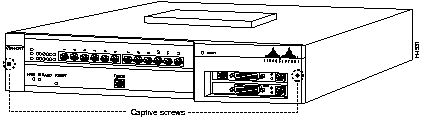
Step 3 Loosen the two captive screws that secure the plastic cover to the front of the chassis. (See Figure 3.)
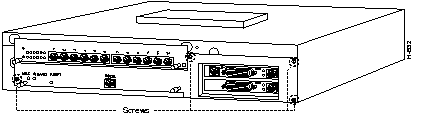
Step 4 Remove the four screws that secure the management card tray to the chassis. (See Figure 4.)
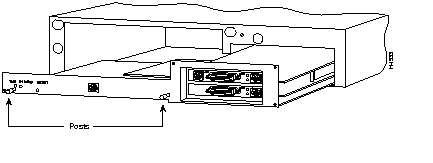
Step 5 Grasp the posts on the management card tray and gently pull it out of the chassis. (See Figure 5.)
Step 6 Proceed to the section "Replacing the Boot ROMsAll Models" on page 7.
To remove the AccessPro PC card, follow these steps:
Step 1 Turn the PC power OFF.
Step 2 Disconnect all cables from the AccessPro PC card.
Step 3 Attach an ESD-preventive wrist strap and make certain the PC chassis is properly grounded.
Step 4 Remove the cover from your PC, following the instructions provided by the PC manufacturer.
Step 5 Locate the AccessPro PC card in its Industry Standard Architecture (ISA)-bus slot. Remove the screw that secures the card bracket to the PC chassis. If a daughter card is installed, remove the screw that secures the daughter card bracket to the PC chassis.
Step 6 Place the AccessPro PC card on a nonconductive surface.
Step 7 Proceed with the next section, "Replacing the Boot ROMsAll Models."
The procedure for replacing the boot ROMs is the same for all Cisco 2500 series and AccessPro PC card routers. To replace the boot ROM software with a new software image, you must remove the existing boot ROMs and replace them with new boot ROMs.
The following tools and equipment are required to replace the boot ROMs:
To replace the boot ROMs, follow these steps:
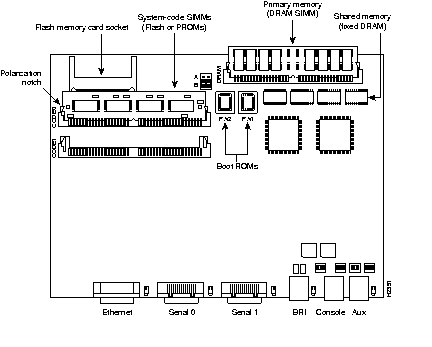
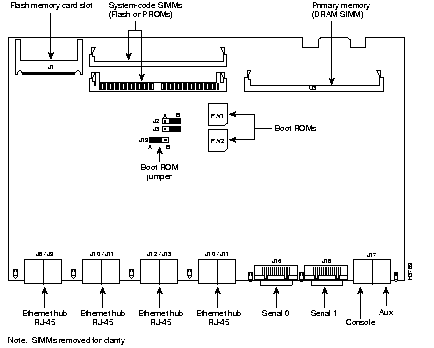
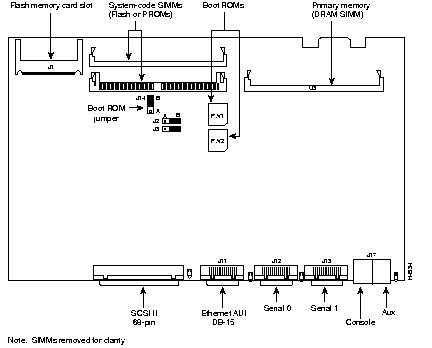
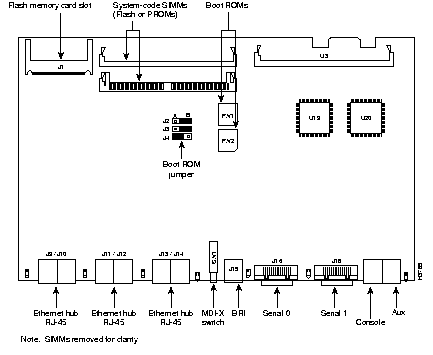
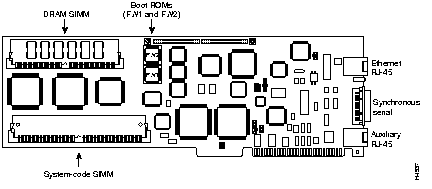
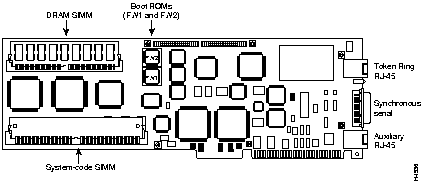
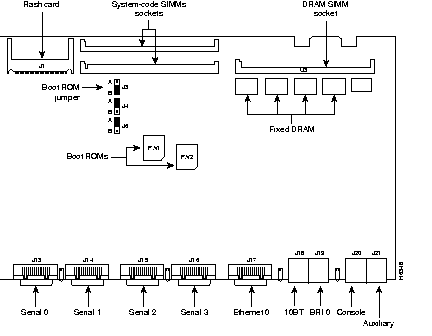
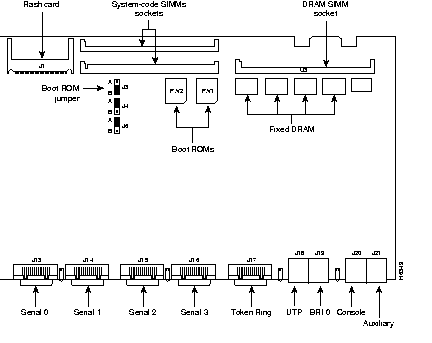
Step 1 Locate your router model number in Table 1 and see the corresponding figure for the location of the boot ROMs (labeled FW1 and FW2) on the system card. (If you have a Cisco 2517, 2518, or 2519 router/hub, the boot ROMs are located on the router card.) Then proceed to Step 2 on page 17.
| Caution The correct placement of the boot ROMs is crucial. If the ROMs are installed in the wrong sockets they could be damaged when the system is powered ON. To prevent damage to the ROMs from ESD (when handling the system and its components), follow the ESD procedures described earlier in the section "Preventing Electrostatic Discharge Damage." Also, be careful not to damage or scratch the printed circuit card under the ROMs. |
| Model | Related Figure | Page |
|---|---|---|
| Cisco 2501 | Figure 6 | 8 |
| Cisco 2502 | Figure 6 | 8 |
| Cisco 2503 | Figure 6 | 8 |
| Cisco 2504 | Figure 6 | 8 |
| Cisco 2505 | Figure 7 | 9 |
| Cisco 2507 | Figure 7 | 9 |
| Cisco 2509 | Figure 8 | 10 |
| Cisco 2510 | Figure 9 | 11 |
| Cisco 2511 | Figure 8 | 10 |
| Cisco 2512 | Figure 9 | 11 |
| Cisco 2513 | Figure 10 | 12 |
| Cisco 2514 | Figure 11 | 13 |
| Cisco 2515 | Figure 12 | 14 |
| Cisco 2516 | Figure 13 | 15 |
| Cisco 25171 | Figure 15 | 16 |
| Cisco25181 | Figure 14 | 15 |
| Cisco 25191 | Figure 15 | 16 |
| Cisco 2520 | Figure 16 | 16 |
| Cisco 2521 | Figure 17 | 17 |
| Cisco 2522 | Figure 16 | 16 |
| Cisco 2523 | Figure 17 | 17 |
| AP-EC/AP-EBC | Figure 14 | 15 |
| AP-RC/AP-RBC | Figure 15 | 16 |
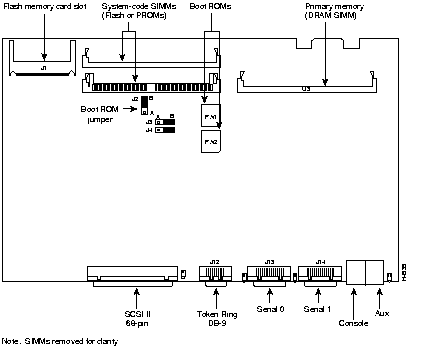
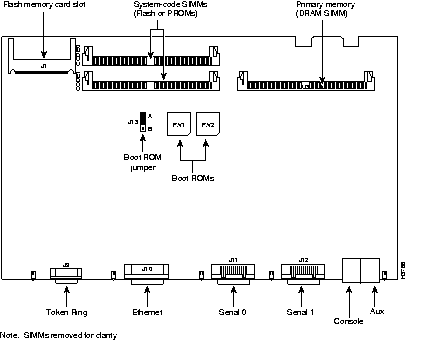
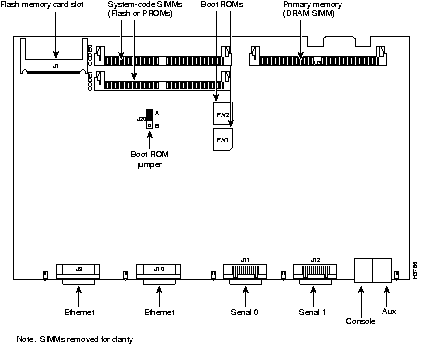
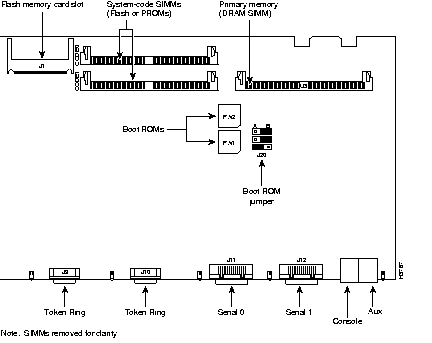
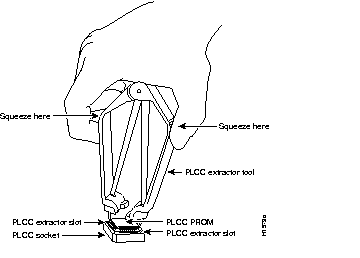
Step 2 Using a PLCC extraction tool, gently remove the boot ROMs (see Figure 18) and set them aside on a nonconductive surface.
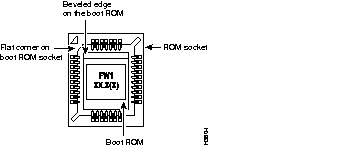
Step 3 Insert the new boot ROMs in their respective sockets so that the beveled edge of the ROM chip is on the same side as the flat corner on the ROM socket (see Figure 19), being careful not to bend or crush any of the bottom pins. If you inadvertently bend a pin, use needle-nose pliers to straighten it.
| Caution Boot ROMs should be installed with the printed label side up. Installing boot ROMs with the label side down will result in damage to the ROM. |
Step 4 If your system is set to boot from Flash ROMs, you'll need to change the boot ROM jumper setting so that the router will boot from the mask ROMs. (The position of the boot ROM jumper determines if the router will boot from Flash ROMs or mask ROMs.) Table 2 lists the boot ROM jumper numbers, if any, and the figures that show their locations.
| Model | Boot ROM Jumper Location | Boot ROM Jumper Setting | Related Figure | Page |
|---|---|---|---|---|
| Cisco 2501 | - | - | Figure 6 | 8 |
| Cisco 2502 | - | - | Figure 6 | 8 |
| Cisco 2503 | - | - | Figure 6 | 8 |
| Cisco 2504 | - | - | Figure 6 | 8 |
| Cisco 2505 | J19 | A | Figure 7 | 9 |
| Cisco 2507 | J19 | A | Figure 7 | 9 |
| Cisco 2509 | J14 | B | Figure 8 | 10 |
| Cisco 2510 | J2 | B | Figure 9 | 11 |
| Cisco 2511 | J14 | B | Figure 8 | 10 |
| Cisco 2512 | J2 | B | Figure 9 | 11 |
| Cisco 2513 | J13 | A | Figure 10 | 12 |
| Cisco 2514 | J20 | A | Figure 11 | 13 |
| Cisco 2515 | J20 | A | Figure 12 | 14 |
| Cisco 2516 | J4 | A | Figure 13 | 15 |
| Cisco 25171 | - | - | Figure 15 | 16 |
| Cisco25181 | - | - | Figure 14 | 15 |
| Cisco 25191 | - | - | Figure 15 | 16 |
| Cisco 2520 | J3 | B | Figure 16 | 16 |
| Cisco 2521 | J3 | B | Figure 17 | 17 |
| Cisco 2522 | J3 | B | Figure 16 | 16 |
| Cisco 2523 | J3 | B | Figure 17 | 17 |
| AP-EC/AP-EBC | - | - | Figure 14 | 15 |
| AP-RC/AP-RBC | - | - | Figure 15 | 16 |
After replacing the boot ROM and resetting the boot ROM jumper (if necessary), replace the cover or AccessPro PC card following the instructions in the appropriate section.
| If You Have a | Proceed With the Section | On Page |
|---|---|---|
| Cisco 2501-2516 or 2520-2522 | Replacing the Chassis CoverCisco 25012516 or 25202523 | 20 |
| Cisco 2517-2519 | Replacing the Front CoverCisco 25172519 Router/Hubs | 21 |
| AccessPro PC card | Replacing the AccessPro PC Card | 21 |
This section explains how to replace the chassis cover on the Cisco 2501-2516 or 2520-2522 models.
Take the following steps to replace the chassis cover:
Step 1 Position the two chassis sections as shown in Figure 20.
Step 2 Press the two chassis sections together, as shown in Figure 20, and ensure the following:
| Caution To fit the two sections together it may be necessary to work them together at one end and then the other until the two sections fit together snugly. Make sure you do not bend the edges of the chassis because damage may occur. |
Step 3 When the two sections fit together snugly, turn the chassis so that the bottom is facing up, with the front panel toward you.
Step 4 Replace the cover screw and tighten it to no more than 8 or 9 inch-pounds of torque.
Step 5 Reinstall the chassis on the wall, in the rack, on a desk, or on a table.
Step 6 Reconnect all cables and turn the power ON.
The Cisco 2517-2519 chassis are different from the other Cisco 2500 series models. To replace the front cover on the Cisco 2517-2519 router/hubs, follow these steps:
Step 1 Gently push the management card tray along the card guides into the management card tray. (See Figure 5.)
Step 2 Replace the four screws that secure the management card tray to the chassis. (See Figure 4.)
Step 3 Replace the two captive screws that secure the plastic cover to the front of the chassis. (See Figure 3.)
Step 4 Reconnect all cables and turn the power ON.
To replace the AccessPro PC card, follow these steps:
Step 1 Insert the AccessPro PC card into its ISA slot on the PC motherboard. Carefully align the edge connector on the ISA slot, and use a rocking motion to seat the card in the proper position. Secure the card in the ISA slot with the bracket screw.
Step 2 Replace the cover of the PC, following the directions provided by the PC manufacturer.
Step 3 Reconnect all cables and turn the power ON.
|
|