|
|

This chapter guides you through the installation of the Cisco AS5300 access server and includes the following sections:
 | Warning Only trained and qualified personnel should be allowed to install or replace this equipment. |
| Warning This equipment is intended to be grounded. Ensure that the host is connected to earth ground during normal use. |
| Warning Incorrect connection of this or connected equipment to the general purpose outlet could result in a hazardous situation. |
The following items are included with the access server:
You might need the following equipment, which is not included:
You can set the chassis on a desktop or install it in a rack. Use the procedure in this section that best meets the needs of your network:
| Warning When installing the unit, the ground connection must always be made first and disconnected last. |
The location of the chassis is extremely important for proper operation. Equipment placed too close together, inadequate ventilation, and inaccessible panels can cause malfunctions and shutdowns, and can make maintenance difficult. The following information will help you to plan the location of the chassis:
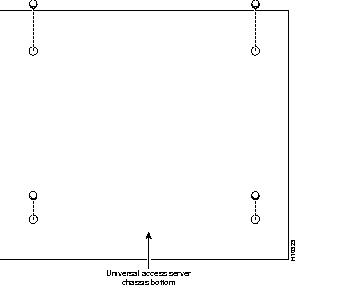
Attach the rubber feet as shown in Figure 3-1. Rubber feet are included in the accessory kit that shipped with your access server.
You can mount the chassis in a 19-, 23-, or 24-inch equipment rack. The following information will help you plan your equipment rack configuration:
| Warning Before working on a chassis or working near power supplies, unplug the power cord on AC units; disconnect the power at the circuit breaker on DC units. |
You need the following tools and equipment to rack-mount the chassis:
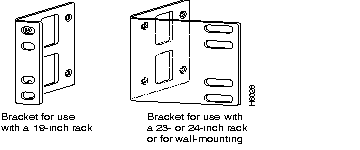
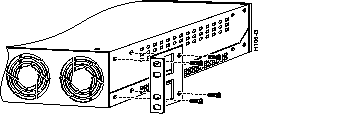
To install the chassis in a rack, attach the brackets in one of the following ways:
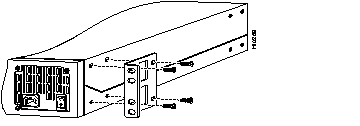
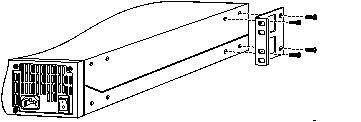
After the brackets are secured to the chassis, you can rack-mount it. Using the screws you provide, attach the chassis to the rack as shown in Figure 3-6.

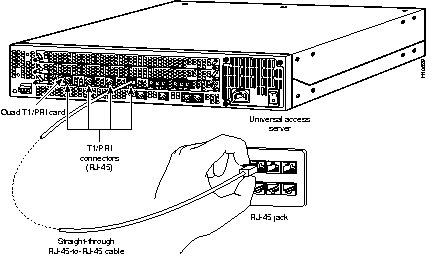
This section describes how to connect the access server to your network. The cables required to connect the access server to a network are not provided. For ordering information, contact customer service or see the appendix "Cabling Specifications for the Universal Access Server" for cable and port pinouts.
| Warning Do not work on the system or connect or disconnect cables during periods of lightning activity. |
 | Caution If the access server is configured with fewer than three feature cards, make sure that a blank slot cover is installed over each open slot to ensure proper airflow. |
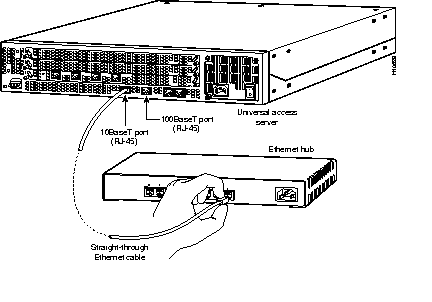
You can connect the access server to an Ethernet network by using a straight-through RJ-45-to-RJ-45 Ethernet cable to connect the Ethernet 10BaseT or 10/100BaseT port to an Ethernet hub. (See Figure 3-7.)
You can connect the access to a WAN in the following ways:
| Warning Before opening the chassis, disconnect the telephone-network cables to avoid contact with telephone-network voltages. |
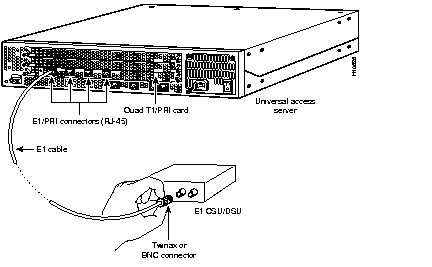
A 10-position rotary switch (labeled IMP SEL) allows you to chose the number of ports that are terminated as 75-ohm unbalanced lines. The LED labeled 120 at each port indicates the input impedance of that port. If the LED is on, it indicates the impedance of the port is set to 120 ohms. If the LED is off, it indicates the impedance of the port is set to 75 ohms.
If you are connecting to a port with 75-ohm input impedance, use an RJ-45-to-75-ohm coaxial cable adapter and plug it into a port with the 120 LED off.
| Warning This equipment is to be installed and maintained by service personnel only as defined by AS/NZS 3260 Clause 1.2.14.3 Service Personnel. |
| Warning The telecommunications lines must be disconnected 1) before unplugging the main power connector and/or 2) while the housing is open. |
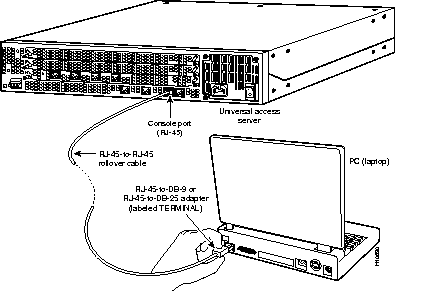
Use the console terminal for local administrative access to the access server. You can only connect a terminal to the console port. You can use the auxiliary port to connect a terminal or a modem for remote access to the access server.
To connect a terminal (an ASCII terminal or a PC running terminal emulation software) to the console port on the access server:
Step 1 Connect the terminal using an RJ-45 rollover cable and an RJ-45-to-DB-25 or RJ-45-to-DB-9 adapter. The adapters provided are labeled TERMINAL. Other types of adapters are not included. (See Figure 3-10.)
For additional information on rollover cable pinouts, see the appendix "Cabling Specifications for the Universal Access Server."
Step 2 Configure your terminal or PC terminal emulation software for 9600 baud, 8 data bits, no parity, and 2 stop bits.
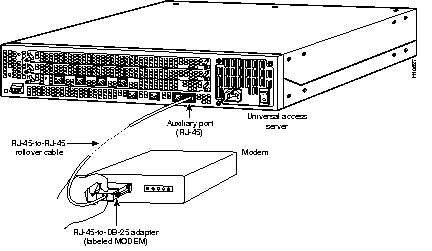
To connect a modem to the auxiliary port, follow these steps:
Step 1 Connect a modem to the auxiliary port on the access server using an RJ-45 rollover cable with an RJ-45-to-DB-25 adapter. The adapter provided is labeled MODEM. (See Figure 3-11.)
Step 2 Make sure that your modem and the auxiliary port on the access server are configured for the same transmission speed (38400 baud is typical) and hardware flow control with Data Carrier Detect (DCD) and Data Terminal Ready (DTR) operations.
Do not connect to the three-pin alarm port. The alarm port is disabled. It is a future enhancement that is not supported by current versions of the system software or the feature cards.
The access server is available with either an AC or DC power supply. You can also order a power supply as spare if you decide later that you need a different type of power supply or the power supply fails.
Take these steps:
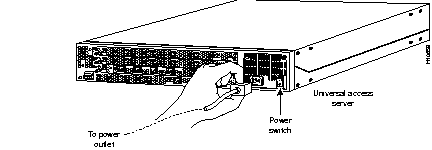
Step 1 Connect one end of the power cord to the power connector on the rear panel of the access server. (See Figure 3-12.)
Step 2 Connect the other end of the power cord to the power outlet.
| Warning The plug-socket combination must be accessible at all times because it serves as the main disconnecting device. |
Step 3 Power ON the access server.
The internal power supply fan should power on.
If you ordered the access server with a DC power supply, follow the procedure in this section to wire the terminal block.
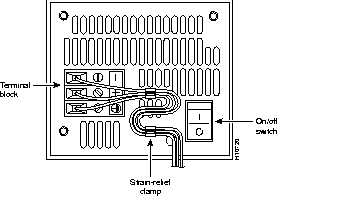
Refer to Figure 3-13 and follow these steps to wire the terminal block:
Step 1 Note the orientation of the DC power supply. The power supply cord should have three wires: +48 VDC, -48 VDC, and a safety ground (green wire).
| Caution In a DC power supply installation do not connect the -48 VDC return to chassis ground at the Cisco AS5300. A single-point ground is recommended at the power distribution rack. |
Step 2 Strip off a quarter of an inch (1/4 inch [0.625 cm]) of insulation on the safety ground, +48 VDC, and -48 VDC input wires.
Step 3 Install the safety ground (green wire) into the terminal block ground connector and tighten the locking screw. Ensure that no bare wire is exposed.
| Caution Do not overtorque the terminal block contact screws. The recommended torque is 8.2 ± 0.4 inch-lb. |
Step 4 Insert the +48 VDC wire into the terminal block positive connector (+) and tighten the locking screw. Ensure that no bare wire is exposed.
Step 5 Insert the -48 VDC wire into the terminal block negative connector (-) and tighten the locking screw. Ensure that no bare wire is exposed.
Step 6 Secure the power supply cord to the cable strain-relief clamps on the DC power supply with cable ties.
| Warning After wiring the DC power supply, remove the tape from the circuit breaker switch handle and reinstate power by moving the handle of the circuit breaker to the ON position. |
Step 7 Power ON the access server.
The internal power supply fan should power on.
When you power ON the access server for the first time, messages will begin to appear on your console screen. Proceed to the Cisco AS5300 Universal Access Server Software Configuration Guide for configuration instructions. The remainder of this document includes reference material for replacing spare parts, troubleshooting, and creating your own cables.
|
|