|
|

This chapter contains information about using the CiscoSecure Access Control Server (ACS) group profile feature and TACACS+ and RADIUS attributes to implement Authentication and Authorization services of network users through the CiscoSecure ACS.
This chapter covers the following topics:
The group profile feature of the CiscoSecure ACS enables you to define a common set of Authentication, Authorization, and Accounting requirements for a large number of users.
You can assign a group profile a set of TACACS+ or RADIUS attribute values. These attribute values assigned to the group also apply to any user who is member or who is added as a member of that group.
To configure the CiscoSecure ACS to manage large numbers and various types of users with complex AAA requirements, Cisco recommends that you use the Advanced features of the CiscoSecure Administratior to create and configure group profiles. The group profile should contain all attributes that are not specific to the user. This usually means all attributes except for the password. Then you can use the Add a User page of the CiscoSecure Administrator to quickly create simple user profiles with password attributes and assign these user profiles to the appropriate group profile.
The features and attribute values defined for a particular group then apply to, or are inherited by, its member users.
Cisco recommends that you assign individual users basic authentication attribute values, those attribues that define username, password, password type, and web privilege. You can assign basic athentication attribute values to your users transparently, through the Edit a User or Add a User menus in the CiscoSecure ACS Administrator.
Cisco recommends that you define Qualification-, Authorization-, and Accounting-related attributes at the group level.
Figure 5-1 illustrates the way these attributes are assigned to groups and users.

In this example, the group profile named "Dial-In Users" is assigned the attribute-value pairs Frame-Protocol=PPP and Service-Type=Framed.
Conflicts between attribute values assigned to group profiles and member user profiles are resolved differently for TACACS+ and RADIUS attributes:
CiscoSecure ACS enables access to users not specified (unknown) in the CiscoSecure database. This is commonly referred to as a default profile, the DEFAULT profile, or the unknown_user profile. The unknown_user profile can support unknown users requesting authentication via both the TACACS+ and RADIUS protocol.
The Default Profile is not stored in the database like other user profiles. Instead, this profile is stored in a text file at the following path under the directory where CiscoSecure was installed:
config/DefaultProfile
Immediately after installation, the unknown_user profile is the default profile. The contents of the DefaultProfile look like this:
# This is an example of a default profile
unknown_user = {
        password = system
        service = shell {
                cmd = show {
                        permit "users"
                }
        }
}
The effect that this unknown_user profile has on unknown users dialing into the network varies depending on how the NAS is configured. For example, the preceding profile is not configured for RADIUS and therefore does not allow any access to unknown users who are communicating with CiscoSecure via RADIUS.
For TACACS+ the default unknown_user profile authenticates any users who are configured in the UNIX authentication system on which the access control server is running.
The concept of the Default Profile is useful if you already have a large number of users defined in another authentication system, such as the UNIX /etc/passwd and /etc/shadow files or a Security Dynamics, Inc. ACE Server.
The unknown_user profile enables you to grant users specified in these other authentication systems immediate access to the network without having to re-specify them in CiscoSecure database. For example, the following default profile might be used to authorize a shell on the NAS via RADIUS for users who are configured in an ACE Server but not yet specified in the CiscoSecure database:
unknown_user = {
	radius = Cisco {
		check_items = {
			2 = sdi
}
reply_attributes = {
			6 = 6
		}
	}
}
Additionally, the unknown_user profile can be used to grant guest access to the network for unknown users. The following unknown_user profile might be used to allow guests to login without a password via TACACS+:
unknown_user = {
	password = no_password
	service = shell {
	}
}
If there is no unknown_user profile declared, then users not declared in the CiscoSecure database cannot be authenticated or authorized to use any service.
To achieve inheritance, the CiscoSecure ACS software first searches the specified group or user. If it does not find the attribute in question, it searches the DefaultProfile file for the unknown_user.
To explicitly define an attribute for a user profile or group profile, you must assign a value to it using an attribute-value pair. An attribute-value pair is a pair of strings of the form attribute=value, for example:
set timeout=180
If a specific declaration of an attribute value is omitted for a group profile and its member user profile level, the following defaults apply:
If the undeclared attribute value is TACACS+, the following additional conditions apply:
Circular declarations are not supported, and only a single default declaration is allowed.
If there is no default declaration, the following conditions apply:
For TACACS+, restrictions are also permitted, allowing you to create "everything except" configurations. Additionally, because populations of groups and users often change, you can assign start and end dates to the restrictions. When a group or user profile has expired or is not yet valid, the CiscoSecure ACS acts as though their declarations are absent.
Finally, users specified as unknown_user (those not specifically listed) are managed separately, allowing you to administer identical services and functions for all users.
The CiscoSecure ACS allows you to define both required and optional attributes.
For TACACS+, you can override the availability of inherited service values by prefixing the keyword prohibit or permit to the service specification. Although default permissions exist, you can explicitly prohibit or enable particular services using the prohibit or permit keywords. The permit keyword allows specified services; the prohibit keyword disallows specified services. Using these keywords together, you can construct "everything except" configurations. For example, the following configuration allows access from all services except X.25:
default service = permit
prohibit service = x25
One technique you can use to ensure the security of your network is to qualify users when they attempt to log on or request a service. For example, you might know that your organization intends to employ several new people beginning on a particular date. Depending on your needs, you can immediately add these new users to the CiscoSecure ACS and specify that they cannot log on until a specified date.
Qualification attributes can be associated with users, groups, and services. If a qualification attribute is found, then its condition must be matched or the operation in progress will fail. The following defined qualification conditions are supported:
allow "NAS-NAME" "Port" "Remote-Address"
refuse "NAS-NAME" "Port" "Remote-Address"
Authentication attributes involve two main values: password and privilege.
Authentication attributes are designed to control access to the network and restrict usage of the environment once users are logged on. The most important authentication attributes are described, along with their permutations, in the following section.
The network environment includes access lists, IP address assignment pools, AppleTalk zone lists, specific route entries, and so forth. Some of the available authentication attributes include:
If you set these attributes, their values are returned to the NAS on successful completion of an authentication exchange. These attributes allow system-wide controls to be administered from a central server.
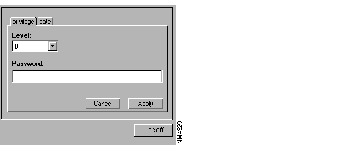
To configure this web access for an individual user, open the CiscoSecure Administrator Add a User or Edit a User page for a user and set privilege web level to User.
For TACACS+, the CiscoSecure Access Control Server supports 15 privilege levels, which are numbered 0 to 14 . The most privileged user, root, is a level 14 user; user EXEC is a level 1 user; and level 0 might be reserved for a guest who is only allowed to connect and disconnect. Privilege levels offer a range of access from guest users to system administrators who are responsible for the network. For TACACS+ the Privilege=Web attribute enables you to assign both password and privilege level for access to the CiscoSecure Web interface.
Once you specify privilege levels, you are ready to assign a privilege level. Select it from the options menu.

After applying Privilege = Web and clicking its icon in the upper Profile window, you are presented with new options in the lower window that allow you to specify a privilege level for the given user, as well as the corresponding password, as shown in Figure 5-3. You can also specify when the options will be enabled by clicking the Date tab and entering values in the From and To fields.
As you determine privilege levels for your users, note the two possible categories of user:
Both the password and privilege keywords allow an extensible range of authentication methods, and you can install additional authentication methods by reconfiguring the CiscoSecure ACS. In addition, authentication methods for PAP, CHAP, and ARAP can use the CiscoSecure ACS.
CiscoSecure ACS software includes the following password support:
You can also configure support for the following recognized authentication methods:
You can configure password and privilege attributes to expire. For example, the DES-encrypted password shown in Figure 5-4 is valid from March 1, 1997 until October 31, 1997.

With TACACS+, you can also configure a warning period to alert a user of an impending expiration date whenever the user is authenticated. To do this, you need to modify the CSU.cfg file (a control that essentially controls the configuration parameters) variable "config_warning_period." For example, to configure a ten-day warning period, edit the CSU.cfg file to include this variable:
NUMBER config_warning_period = 10;
If the RADIUS sub-profile has a password, the server will use that password. If it does not, the RADIUS server will supply one according to the rules specified in Table 5-1.
| Network Access Server Sends Attribute | Use the RADIUS Password |
|---|---|
| 2 User password | One-time password (OTP), file (UNIX, shadow, or file), PAP. |
| 3 CHAP password | CHAP (Note that users cannot enter the CHAP password in a profile). |
| 181 Ascend ARA password | ARAP (Note that ARAP applies only to Ascend routers, not to Cisco IOS software.) |
CiscoSecure ACS supports the password expiration attribute (Ascend attribute 21) compatible with Ascend RADIUS servers. The RADIUS server checks the RADIUS sub-profile first. If it finds an expired password, it stops checking. If the password was chosen from the RADIUS profile section, the time limit for the chosen password entry is applied. See the section "Password Behavior by RADIUS Servers" to find which password is applied.
Users can change their own CLEAR, CHAP, or PAP passwords if they have the appropriate privilege levels.
To enable users to change their own passwords, you must enable Privilege = Web and assign a privilege level in their user profiles. Additionally, you must provide the users with the URL of the web-based interface for CiscoSecure Access Control Server.
When users change their own passwords, they must supply as few as 6 and as many as 13 characters. Of those characters, at least one number and one letter are required.
To assign a new minimum privilege level for changing your own password through the NAS via TACACS+, add or modify the following statement in the CSU.cfg file:
number config_priv_level_for_own_chpass=1;
Restart the access control server. (See Table B-1, "Variables in Software Control Files" in the appendix "CiscoSecure Access Control Server File Formats and Syntax.")
CiscoSecure ACS software checks passwords when they are changed to make sure that easily guessed or deciphered passwords are not used.
Users can change their own login passwords during a VTY or Telnet session if they are using the TACACS+ protocol. Follow these steps:
Step 1 Connect to the NAS.
Step 2 Enter your username at the NAS prompt.
Step 3 Press Return at the prompt requesting you to enter a password.
Step 4 Enter yes at the prompt asking if you want to change your password.
Step 5 Enter your existing password at the prompt.
Step 6 Enter your new password at the prompt.
Step 7 Enter your new password a second time to verify that it is correct.
The password retries variable specifies the number of invalid password attempts a user can make before being faulted. The password retries variable is configured per NAS and is located in the 'config_nas_config' configuration section of the CiscoSecure ACS control file, CSU.cfg. (For more information, see the section "Cancelling a User's Account After a Specified Number of Failed Attempts.")
If the retry-count is set to 1, then the NULL password is counted as the one password entry attempt and you will be disconnected. In addition, the config_priv_level_for_own_CHPASS variable in the control file should be set to 1. This number is the privilege level at which a user can change his or her own password. When someone logs into a router, that user's default level is 1, so if this variable is not set to 1, the user will not be able to change his or her password.
To change a password if you are using RADIUS, use the web-based interface. See the section "Password Behavior by RADIUS Servers" for more information.
With RADIUS, passwords can contain a maximum of 16 characters, which do not need to be alphanumeric.
The S/Key one-time password system from Bellcore provides secure authentication over networks that are subject to eavesdropping. S/Key prevents the user's secret password from ever crossing the network during authentication. Since it is easy to integrate, many security-sensitive networks use S/Key as their password security system.
The S/Key system involves three main pieces: the client, the host, and a password calculator. The client is responsible for providing the login shell to the user. It does not contain any persistent storage for password information. The host is responsible for processing the user's login request. It stores the current one-time password as well as the login sequence number in a file. It is also responsible for providing the client with a seed value. The password calculator is a one-way hashing function. This is defined as a function that loses information each time it is applied. The network protocol between the client and the host is completely independent of the scheme.
Specifying privilege using S/Key involves a single line. In the following example, S/Key is used as the authentication method for attempts to enable services at level 3. For TACACS+, the privilege keyword specifies the password that users must provide in order to use services of a specified security level, as follows:
privilege = des "sefjKaLm7zybE" 3
The quoted string specifies the password that allows this user to enable and use any service that requires a level 3 authorization. The password specified by the privilege keyword means that users must enter this password when they use the enable command. In some cases, you might want to specify a logon password that is different from the privilege or enable password. Using different passwords for different security levels is an additional security measure to prevent unauthorized access to mission-critical information.
You can also use inheritance to restrict access to the privilege-level password by making it an attribute of a group and restrict the number of users who can use the privilege password, even if it is widely known. (See the section "Inheritance" earlier in this chapter.)
set priv-lvl=5
Take the following steps to prepare to install and use S/Key:
Step 1 Use the CiscoSecure ACS web-based interface to establish an S/Key user. See Figure 5-6 in the section "S/Key Example."
Step 2 Start the CiscoSecure ACS by entering the startup command:
# /etc/rc2.d/S80CiscoSecure
Step 3 Instruct the S/Key users to run the keyinit program (detailed in the next step) on the CiscoSecure ACS. Alternatively, you can run the keyinit program for each S/Key user (detailed later in this step).
The keyinit program initializes the S/Key system for that user.
If you want S/Key users to run keyinit, first confirm that all S/Key users have UNIX accounts on the system from which they are running keyinit and the CiscoSecure ACS daemon. In addition, you should inform the S/Key users about the following points prior to running keyinit:
As an option to having users initialize their own S/Keys, you can initialize their S/Keys for them. As an administrator logged in as root, you can initialize S/Key passwords for established users by entering the following command:
# keyinit username
In the next step, each S/Key user will run the keyinit program to initialize the S/Key system for that user.
Step 4 Have the CiscoSecure ACS users who will use S/Key enter the keyinit command at the UNIX prompt, as in the following examples for the user Sue:
keyinit
UNIX password>
secret password>
When the keyinit program asks Sue for a secret password, she can supply any mix of 10 or more alphanumeric characters.
secret password>
Now Sue can use S/Key with the CiscoSecure ACS software.
S/Key also accounts for previous iterations of keyinit, providing assurance for the user that someone has not altered the system. As a result, the next time that Sue enters the keyinit command, she will see a display similar to the following:
keyinit
UNIX password>
secret password>
secret password>
Next login password: SKI INCA HONE NEE MESS LEAF
For more on S/Key, including an example, refer to the chapter "Token Server Support."
You can establish global default settings for the name of the NAS and port of the caller, as well as set them up for individual services, commands, and protocols. System Administrators can also set time-of-day and day-of-week restrictions, allowing them to control access to highly contended or expensive resources during periods of demand. For example, if you are using the TACACS+ protocol, you can use a declaration that allows the Telnet command to be used at any time on weekends and outside normal office hours.
The CiscoSecure ACS software also allows for multiple declarations of the same service, protocol, or command. Because each declaration can include different attributes and qualifications, administrators can place restrictions on users that take effect only at certain times or under certain conditions.
See the appendix "Converting an Existing AA Database to a CiscoSecure ACS 2.1 Database" for more information.
This section provides a list of service attributes and the corresponding protocol values. It also provides an example of how to set a service attribute.
The authorization attribute-value pairs presented here are primarily for reference and to complement the accounting attribute-value pairs shown in the previous section "TACACS+ Authentication Attributes."
The CiscoSecure ACS supports all four service attributes available to dial-in users:
After the NAS has authorized the user for a specified service, the CiscoSecure ACS returns a list of attribute-value pairs appropriate for that service to the NAS. For each service, several attribute-value pairs are generally available depending on the configurability of the service.
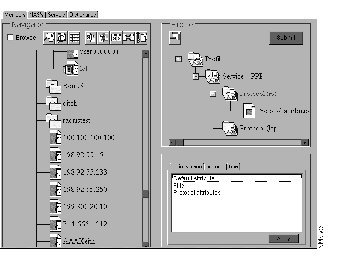
To view the available attribute pairs, use the CiscoSecure ACS Administrator to toggle between the Profile window and Options menu to specify attributes. For example, to view the attribute-value pairs for PPP, you would perform the following steps while in the CiscoSecure ACS Administrator and operating with administrator privileges:
Step 1 For a specified user, select Service - PPP from the Options menu and click Apply.
Step 2 While Service - PPP is selected under Profile, select Protocol and click Apply.
Step 3 Cascade the Service - PPP icon under Profile to view the Protocol icon.
Step 4 From the upper portion of the Profile window, click the Protocol icon.
Step 5 From the lower portion of the Profile window, click the Protocol tab. You see the available protocols, which are described in the following section.
cmd=telnet
set acl=2
set inacl=2
set outacl=4
set addr=1.2.3.4
set timeout=60
set autocmd="telnet gem.com"
set noescape=true
set nohangup=true
set priv-lvl=15
set zonelist=5
ip address-pool local
ip local pool moo 1.0.0.1 1.0.0.10
ip local pool baz 2.0.0.1 2.0.0.20
service=ppp protocol=ip {set route = "<dst_addr> <mask> [ <gateway> ]"}
set callback-rotary=34
set callback-dialstring=408-555-1212
set callback-line = 1
set nocallback-verify=1
With the RADIUS protocol, authentication and authorization are not separate. See the appendix "RADIUS Attribute-Value Pairs and Dictionary Management" for more information on authorization attributes for RADIUS.
|
|