|
|

This chapter contains the instructions for managing the CiscoSecure Access Control Server (ACS). Most management of the CiscoSecure ACS is done through the web-based interface.
The CiscoSecure Administrator interface accommodates two modes of administration:
This chapter covers the following topics:
This section describes the basic steps to log in to the CiscoSecure Administrator GUI interface and how to change the superuser password.
To manage the CiscoSecure ACS using the web-based interface, you need a web browser that supports Java and JavaScript. The web-based interface operates on any hardware platform that supports the web browsers listed in the readme.txt file and release notes.
To access and log in to the CiscoSecure Administrator:
Step 1 From any workstation with a web connection to the ACS, open your web browser.
Step 2 Enter one of the following URLs for the CiscoSecure Administrator web site:
http://your_server/cs
https://your_server/cs
The CiscoSecure ACS Logon page displays.
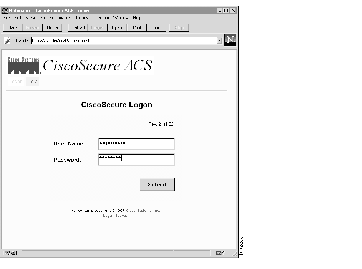
Step 3 Enter your user name and password and click Submit.
After you log in, the CiscoSecure ACS main page appears, displaying the main menu options along the top.
The CiscoSecure ACS Main menu page will only appear if the user provides a name and password that have an administrator privilege level. If the user provides a name and password that has only user level privileges, then a different screen appears. For more on this, refer to "User-Level Functions" later in this chapter.
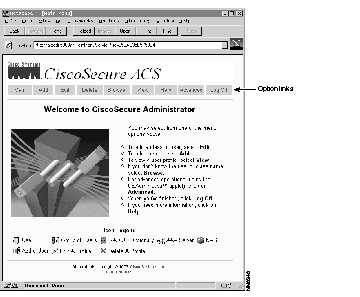
Several options appear at the top of the page:
| Button | Description |
| Main | Return to the Main menu |
| Add | Add users to existing database |
| Edit | Edit privileges, passwords, access, and other parameters for a specified user |
| Delete | Delete users from existing database |
| Browse | Provide a means to browse a group or user hierarchy |
| View | Enable the administrator to view the profile of a specified user |
| Help | Access instructions for a specified aspect of CiscoSecure ACS |
| Advanced | Takes the user to the CiscoSecure Administrator Java-based advanced configuration program |
| Log Off | Log off CiscoSecure |
The default administrator of the CiscoSecure ACS is "superuser," and the default password is "changeme." As a security measure, Cisco recommends that you change the password for superuser as quickly as possible after installing the CiscoSecure ACS.
Step 1 In the CiscoSecure Administrator page, click Edit.
Step 2 In the Edit a User page, enter superuser in the User Name to Edit field.
Step 3 Click Edit.
Step 4 Enter your new password string in the Password field.
Valid characters for passwords are:
Step 5 Verify your entry by entering the new password again in the Confirm field and clicking Save.
CiscoSecure displays a confirmation of the password change.
The operations described in this section are carried out through the CiscoSecure ACS web pages. They are the quickest and most frequently executed of CiscoSecure operations. These operations include:
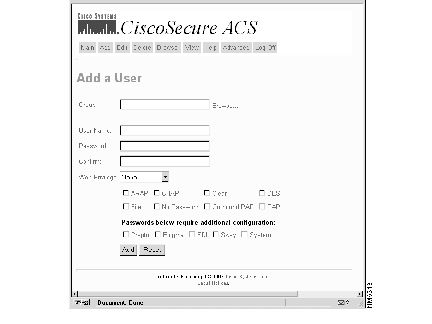
To add a user to the CiscoSecure ACS database, use the Add a User web page. The Add a User web page enables you to quickly set up a user profile with basic password information.
Step 1 Click Add at the top of any CiscoSecure ACS web page. The Add a User page appears.

Step 2 Enter the Group this user will be a member of.
If you need to search the database for the correct group, click Browse... to the right of the field. The Browse screen will appear. For more on using the Browse function, refer to the section "Browsing Groups and Users" later in this chapter. Enter the new user's name in the User Name field.
Step 3 Enter the name of the new user in the User Name field.
Step 4 Enter a password for this user in the Password field. An asterisk will appear in place of each letter.
Step 5 Retype the password in the Confirm field.
The Password and Confirm entries must agree. If the entry in the Password field does not agree with the entry in the Confirm field, you will be prompted to retype.
Step 6 Click any of the three check boxes to indicate the type of authentication methods to use with the specified password:
Step 7 Specify the level of ACS administration this user can exercise using the Web Privilege radio button. There are three options:
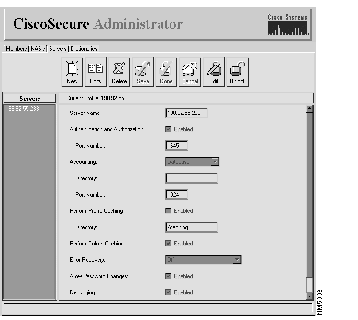
Step 8 Click More to access more Authentication options for this user. The Add a User page changes, see Figure 4-4.
The additional fields in this version of the Add a User page include several new authentication methods:
Each of these encryption types require custom configurations. For more information on S/Key, CRYPTOCard, Enigma, and SDI, refer to appendix "CiscoSecure ACS Database Structure."
Step 9 Select one or more of the check boxes if one or more of the additional password types is required.
Step 10 When you have finished, click one of the following:
Use the Edit a User web page to modify the configuration of an existing user profile:
Step 1 Click Edit at the top of any page in the CiscoSecure ACS interface. The initial Edit a User page appears.
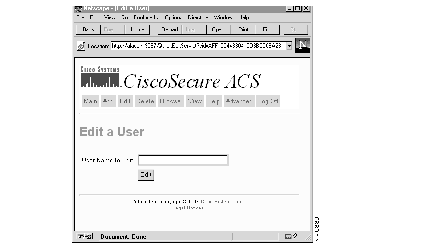
Step 2 In the User Name to Edit field, enter the name of the user whose password and privilege you want to edit.
If you don't know the name of the user you want to edit, click Browse at the top of the menu to access the edit menu. See the section "Browsing Groups and Users" later in this chapter for details.
Step 3 When the name you need appears in the User Name to Edit field, click Edit.
The full Edit a User page appears.
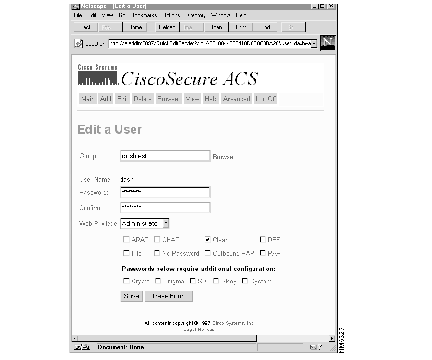
Step 4 Specify the Group this user will be a member of, if required. If the specified user is a member of another group, this reassigns the user.
If you need to search the database for the correct group, click Browse... to the right of the field. The Browse screen will appear. For more on using the Browse function, refer to the section "Browsing Groups and Users" later in this chapter.
Step 5 Enter a password for this user in the Password field. An asterisk will appear for each letter you type.
Step 6 Retype the password in the Confirm field.
The Password and Confirm entries must agree. If the entry in the Password field does not agree with the entry in the Confirm field, you will be prompted to retype.
Step 7 If required, select one or more of these check box options:
Step 8 If required, select/deselect one or more of these check box options:
Each of these encryption types require custom configurations. For more information on S/Key, CRYPTOCard, Enigma, and SDI, refer to the chapter "Token Server Support."
For more on customizing these formats, refer to the section "Advanced CiscoSecure Administrator Operations" later in this chapter.
Step 9 When you have finished, click one of the following:
If you select Save, a confirmation of the edit appears.
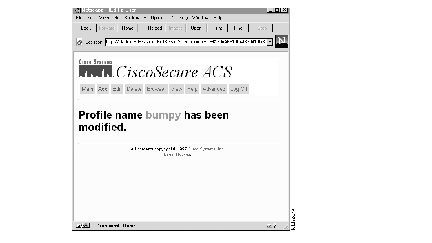
Step 10 Continue to edit users as required or click Main to return to the Main menu.
Use the Delete a User button to delete a user from the CiscoSecure database:
Step 1 Click the Delete button at the top of any page in the CiscoSecure ACS web interface.The Delete a User page appears.

Step 2 Enter the name of the current user whose profile you want to delete in the User Name field.
If you don't know the name of the user you want to delete, click Browse at the top of the menu and delete the user through that option. For more on the Browse option, refer to the section "Browsing Groups and Users" later in this chapter.
Step 3 When the name you need appears in the User Name field, click Submit.
If you clicked Submit, a message like this appears indicating that the name has been deleted:
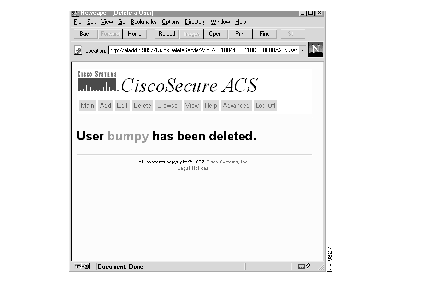
Step 4 Continue to delete users as required.
Step 5 When you are finished, click the Main button to return to the Main menu.
The Browse option can be used to review the CiscoSecure ACS database for both users and groups. Through this option, you can:
To access a user or group directly, use the View option. See the next section "Viewing Groups and Users" for more information.
To browse the CiscoSecure database:
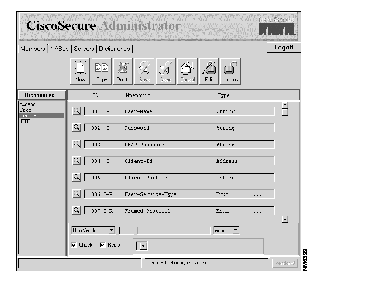
Step 1 Click Browse at the top of any page in the CiscoSecure ACS web interface. The Browse page appears.
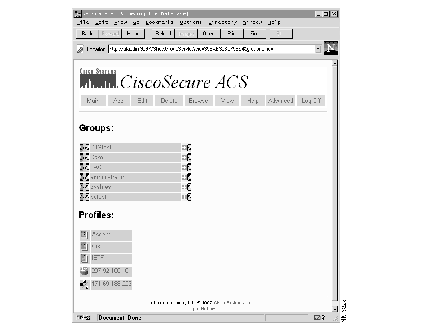
This screen consists of two sections:
In addition to names, each section contains several icons. The names to the right of these icons serve as links to other menu options within the program.
| Icon: | Means: |
 | A group. Click this symbol to access the Profile and member information for the specified group. |
 | A user. Click this symbol to access the Profile information for the specified user. |
 | Add a user to the specified group. This is another way to access the Add a User screen. |
 | This represents one of the RADIUS dictionaries stored in the database. These include: IETF, Cisco, and Ascend. The HTML-based GUI is not designed to edit these dictionaries. |

| This represents a NAS. All values to the right of this indicate the NAS configuration. The HTML-based GUI is not designed to edit this information. |

| This represents a AAA server (one type of which is a CiscoSecure ACS). All values to the right of this indicate the AAA configuration. The HTML-based GUI is not designed to edit this information. |
 | Edit the specified user. This is another way to access the Edit a User screen. |
 | Delete the specified user. This is another way to access the Delete a User screen. |
Step 2 To view the profile for a specific group or user, click the group/user name. Alternatively, click on the icon to the left of the name. The group or user profile for the selected item appears.
For more on deciphering the meaning of the terms and statistics appearing in the profiles, refer to the next section "Viewing Groups and Users."
Step 3 Click the icons indicated above to add users to a specific group, edit a specific user profile, or delete a user from the database.
(a) To add a user to a specified group, click on the 
icon. The Add a User screen appears. Refer to the section "Creating a Quick User Profile" earlier in this chapter for details.
(b) To edit a specific user, click the 
icon to the right of that user's name. The Edit a User screen appears with the user's information displayed. Refer to the section "Quick Editing a User Profile" earlier in this chapter for details.
(c) To delete a specific user, click the 
icon to the right of the user's name. The Delete a User screen appears. Refer to the section "Deleting a User Profile" earlier in this chapter for details.
Step 4 Review data and perform operations as required. To return to the Main menu, click Main.
Use the View option to see the profile for a selected user or group. Depending on the complexity of the values assigned to a particular user or group, the profile can contain many different attributes, each of which is defined in this section.
To view a selected profile:
Step 1 Select View. A screen appears prompting you specify the group or the user whose profile data you want to view.

Step 2 Select one of the following:
Step 3 Enter the user or group name in the Name field.
If you can't remember the name, click Browse to look through the entire database.
Step 4 Click Submit Query. A page appears displaying profile information for the specified group or user.
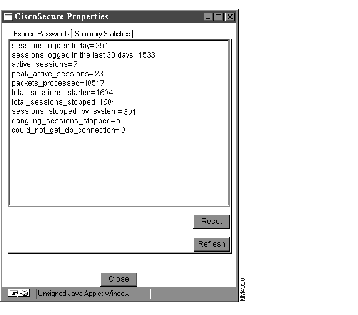
This provides a profile of the selected user or group. While the example profile above is relatively simple, the profile can contain a great deal of information on the attributes and values assigned to the selected user or group.
To learn more about an attribute, click on the attribute word. Each attribute word is linked to its definition.
Step 5 When you are finished inspecting the profile, select View to see another profile, or click another button to access another function.
The profile seen on the View screen can contain information on any number of attributes assigned to a selected user or group. Attributes are derived from several internetworking protocols, including TACACS+ and RADIUS.
Attributes are normally arranged by rows with greater levels of detail arranged in columns from left to right of each row. So, for example, the Password attribute usually follows the rows identifying the profile_id, profile_cycle, and group name. In the password row, there are number of columns which from right to left define: the attribute name, the password type, the password value, the beginning and ending dates when this password is effective.
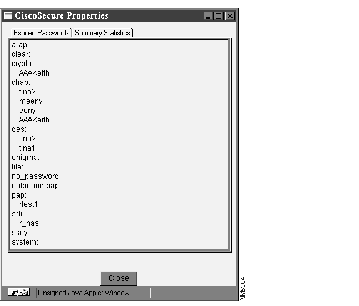
In many case the profile won't be more complicated than the profile shown in Figure 4-12. There are occasions, however, when profiles can be far more complex, particularly when a large number of authentication and response attributes have been assigned for a particular user or group. In such cases, the profile may look more like the following example.
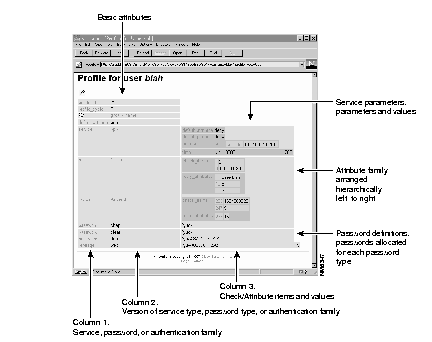
As Figure 4-13 shows, a great deal of diverse information can be contained in a profile. This includes:
The CiscoSecure Administrator advanced configuration program enables you to carry out more advanced and specialized operations: creating user groups and direct assignment of TACACS+ and RADIUS attributes to customize user and group session parameters in more detail than is possible in the CiscoSecure ACS web interface mode.
You can start the CiscoSecure Administrator advanced configuration program from any of the CiscoSecure Quick Administration pages.
Step 1 In the Options bar of the any page in the CiscoSecure ACS web interface, click Advanced and then click the To Continue option.
The CiscoSecure Administrator advanced configuration program may require a few minutes to load.
Depending on the protocol support you enabled when you installed CiscoSecure ACS, you will see a window with either one or four tabbed pages:

Use the CiscoSecure Administrator advanced configuration program to create and configure group profiles. Cisco recommends creating group profiles to configure detailed authentication, authorization, and accounting requirements for large numbers of similar users. Once the group profile is defined, you can use the CiscoSecure ACS Add a User page to quickly add simple user profiles to the group profile. The advanced requirements you configured for the group will apply to each member user.
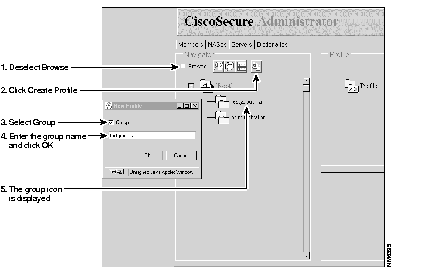
To create a group profile:
Step 1 In the CiscoSecure Administrator advanced configuration program, locate and deselect the Browse check box in the Navigator pane of the tabbed Members page. This displays the Create New Profile icon.
Step 2 In the Navigator pane, locate and click the [Root] folder icon.
Step 3 Click the Create New Profile icon to display the New Profile dialog box.
Step 4 Select the Group check box, enter the name of the group you want to create, and click OK. The new group appears in the tree.
Step 5 After you create the group profile, assign specific TACACS+ or RADIUS attributes to configure specific authentication, authorization and accounting properties, as follows:
You can also use the CiscoSecure Administrator advanced configuration mode to create and configure a user profile. You might do this to customize the user profile's authorization and accounting related attributes in more detail than is possible through the Quick User Add page.
To create a user profile:
Step 1 In the CiscoSecure Administrator advanced configuration program, locate and deselect the Browse check box in the Navigator pane of the tabbed Members page. This displays the Create New Profile icon.
Step 2 In the Navigator pane, do one of the following:
Step 3 Click Create New Profile icon to display the New Profile dialog box.
Step 4 Make sure the Group check box is deselected.
Step 5 Enter the name of the user you want to create and click OK. The new user appears in the tree.
Step 6 After you create the user profile, assign specific TACACS+ or RADIUS attributes to configure specific authentication, authorization and accounting properties as follows:
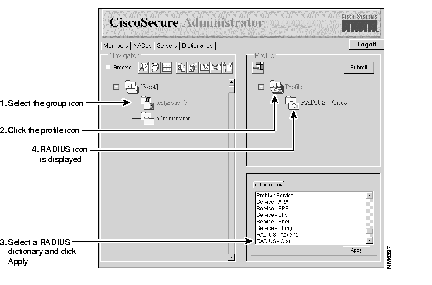
To assign specific TACACS+ services and attributes to a newly created group profile:
Step 1 In the CiscoSecure Administrator advanced configuration program, click the icon for the newly created group in the tree that is displayed in the Navigator pane of the tabbed Members page.
Step 2 If necessary, in the Attribute window, click the Profile icon to expand it.
A list or dialog box that contains attributes applicable to the selected profile or service appears in the window at the bottom right of the screen. The information in this window changes depending on what you have selected in the Attribute window.
Step 3 Click the service or protocol that you want to add and click Apply.
The service is added to the profile.
Step 4 Enter or select the necessary text in the Attribute window. Valid entries are explained in the next chapter "Applying TACACS+ and RADIUS Attributes."
Step 5 Repeat Step 1 through Step 4 for each additional service or protocol to add.
Step 6 When you have finished making all your changes, click Submit.
Refer to the following section, "Common TACACS+ Attributes," for a listing of most frequently used TACACS+ protocols and services.
If necessary, use Table 4-4 as a guide when assigning a user or group profile TACACS+ attributes.
| Attribute | Definition | Value |
|---|---|---|
| service | Indicates that this is an authorization request for starting a primary service. | slip, ppp, arap, shell |
| protocol | Network protocol that is a subset of the service. This attribute must be specified when the service is PPP to indicate that a protocol is being brought up as a secondary service. | lcp, ip, ipx, atalk, vines, unknown |
| cmd | Indicates the command name for a shell command that is to be run. | NULL = shell itself |
| cmd-arg | Indicates an argument for the shell command that is to be run. Multiple cmd-arg attributes can be specified and are order dependent. | |
| acl (access control list) | ASCII number representing a connection access list. Used only when service = shell and cmd = NULL. | |
| inacl | ASCII number for an interface input access list. | |
| outacl | ASCII number for an interface output access list. | |
| zonelist | Numeric zonelist value. Applicable to AppleTalk only. | |
| addr | Network address. | |
| addr-pool | Name of an address pool from which the NAS should assign an address. | |
| routing | Specifies whether routing information is to be propagated to, and accepted from this interface. | Boolean value |
| route | Indicates a route that is to be applied to this interface. Values must be of the form:
dst_address mask routing_addr
If routing_addr is missing, the current interface will be used. | |
| timeout | Sets a value, in minutes, after which a session is terminated. Does not work for PPP. A value of zero indicates no timeout. This is NOT available on Cisco IOS Release 11.0, but is available on Cisco IOS Release 11.1 and 11.2. Used for ARAP. | 0 - nn where
0 = no timeout |
| idletime | Sets a value, in minutes, after which an idle session is terminated. Does not work for PPP. A value of zero indicates no timeout. This is NOT available on IOS version 11.0, but is available on IOS versions 11.1 and 11.2. | 0 - nn where
0 = no timeout |
| autocmd | Auto-command to run. Used only when service = shell and cmd = NULL | |
| noescape | Prevents user from using an escape character. Used only when service=shell and cmd=NULL. | Boolean |
| nohangup | Do no disconnect after an automatic command. Used only when service=shell and cmd=NULL. | Boolean |
| priv_lvl | Privilege level to be assigned. | 1 - 15 |
| callback-dialstring | Number the NAS will call back. | NULL = dialstring |
| callback-line | Line the NAS uses to call back the user. | |
| callback-rotary | Rotary number to use for a callback. | |
| nocallback-verify | Indicates a connection doesn't require authentication after callback. | 1 |
To assign specific RADIUS attributes to the newly created group profile:
Step 1 Assign a RADIUS dictionary to the group profile:
(a) On the Members page of the CiscoSecure Administrator advanced configuration program, click the group icon then click the Profile icon in the Profiles pane to display the Options menu in the Attributes pane.
(b) In the Options menu, click the name of the RADIUS dictionary you want the group or user to use; for example, RADIUS - Cisco. Then click Apply.
Step 2 Add the required Check Items and Reply Attributes to the RADIUS profile:
(a) In the Profile window, click the RADIUS - dictionaryname folder icon. (You might need to click the profile's + symbol to expand the RADIUS folder.) The Check Items and Reply Attributes options appear in the Attribute Group window.
(b) To use one or more of these attributes, click the attribute(s) you want to use, then click Apply. You can add more than one attribute at a time.
(c) Click the + symbol for the RADIUS - dictionaryname to expand the folder.
Step 3 Specify values for added Check Items and Reply Attributes:
(a) Click Check Items and/or Reply Attributes. A list of applicable Check Items and Reply Attributes values appears in the lower right window. Click the + symbol to expand the folder.
(b) Click the values you want to assign, then click Apply. For more information on the values, see the appendix "RADIUS Attribute-Value Pairs and Dictionary Management."
(c) When you have finished making changes, click Submit.
| Caution For the RADIUS protocol, inheritance is additive as opposed to hierarchical inheritance, like TACACS+. For example, if you assign the same reply attributes to both the user and group profiles, authorization will fail because the NAS will be sent twice the number of atttributes and will not be able to make sense of the reply attributes. Be careful not to assign the same check item or reply attribute to both the group and user profiles. |
Step 4 To use one or more of these attributes, click the attribute(s) you want to use, then click Apply. You can add more than one attribute at a time.
For more information on specific RADIUS attributes see the next section, "RADIUS Attributes Used in User Profiles."
The following table lists the RADIUS attributes that are most commonly used in user profiles. This list is not an exhaustive list of the attributes supported by all vendors such as Ascend, Cisco, and Livingston and does not include any accounting attributes. This table only attempts to list the standard RADIUS attributes that are meaningful for use in a user profile. The table gives a description of each attribute and an explanation of how the attribute might be used in a user profile. Wherever applicable, special information is provided on Cisco's support for the attribute in current versions of Cisco IOS software.
 | Caution Care should be taken when using any attributes besides User-Password as Check Items in a user profile. Unless all Check Items match the information that is sent by the NAS exactly, Authentication will fail. |
Use the Copy a Profile button to add a group or user whose profile is a duplicate of an existing username or group profile:
Step 1 In the CiscoSecure Administrator advanced configuration program, click the group or user to be copied.
Step 2 Click Copy a Profile.

Step 3 When prompted, enter the new group name or username.
Step 4 Click OK.
Step 5 The new group name or username appears in the tree.
If you installed the CiscoSecure ACS to support TACACS+ or both TACACS+ and RADIUS protocols, you either specified a single NAS as a TACACS+-enabled client or you allowed any NAS with a matching secret TACACS+ key to act as a client.
If you want to enable a multiple number of NASes as TACACS+ clients, but restrict these clients only to those NASes you specify, you need to edit the CSU.cfg file on the CiscoSecure ACS as follows:
Step 1 Exit the CiscoSecure Administrator web interface, and log in to the SPARCstation running the CiscoSecure ACS.
Step 2 Using a text editor, edit the CSU.cfg file to identify the location where the network access server name is stored:
vi $BASEDIR/CSU/CSU.cfg
Step 3 Find the line the statement "NAS config_nas_config."
If you have accepted the default installation, you should see a line that looks like the following example:
Step 4 Replace NAS_NAME with the name of your NAS.
Step 5 Restart the CiscoSecure ACS.
You must have an individual statement for each NAS that you specify by name. The following example shows you the syntax and information that needs to be in the CSU.cfg file for each specified NAS:
NAS config_nas_config = {
  {
    "NAS_NAME",                        /* NAS name can go here */
    "SECRET",             /* NAS/CiscoSecure secret key */
    "",                        /* message_catalogue_filename */
    1,                         /* username retries */
    2,                         /* password retries */
    1                          /* trusted NAS for SENDPASS */
  },
{
    "NAME_OF_YOUR_NAS",                        /* NAS name can go here */
    "SECRET123",             /* NAS/CiscoSecure secret key */
    "",                        /* message_catalogue_filename */
    1,                         /* username retries */
    2,                         /* password retries */
    1                          /* trusted NAS for SENDPASS */
  },
{
    "ANY_OTHER_NAS_NAME",                        /* NAS name can go here */
    "SECRET456",             /* NAS/CiscoSecure secret key */
    "",                        /* message_catalogue_filename */
    1,                         /* username retries */
    2,                         /* password retries */
    1                          /* trusted NAS for SENDPASS */
  }
};
If your CiscoSecure ACS was installed to support the RADIUS protocol or both the RADIUS and TACACS+ protocols, the CiscoSecure Administrator advanced configuration program provides a special tabbed NAS's page for adding NASes as RADIUS-enabled clients to the CiscoSecure ACS.
To display, add, copy, delete, edit, or unlock the NASes configured as RADIUS-enabled clients, follow these steps:
Step 1 In the CiscoSecure Administrator advanced configuration program, click the CiscoSecure NAS's tab.
Step 2 (Optional) To update the list of NASes, click the NAS's button at the top of the list of available NASes. The Administrator window will reload from the database and get the current list of available NASes. This is useful when more than one person is making changes to NAS profiles.
Step 3 Click the IP address in the left column to display NAS profile information. See Figure 4-20.
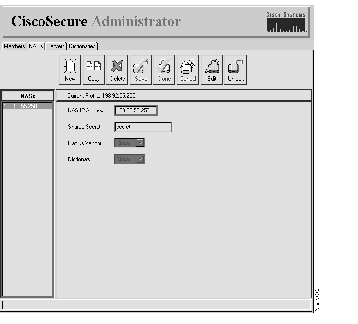
The following information displays:
To add a NAS to the list of CiscoSecure ACS clients:
Step 1 In the NAS's page of the CiscoSecure Administrator advanced configuration program, click New. You will be prompted to enter the IP address of the new NAS.
Step 2 Enter the IP address of the new NAS in the NAS IP Address field.
Step 3 If necessary, log in to the NAS and input the appropriate NAS configuration commands as described in the section "Changing Information for a NAS RADIUS-Enabled Client."
 | Time Saver To create a NAS profile with characteristics similar to one already created, just click the IP address of the similar NAS, then click Copy. You can then modify individual characteristics of the new NAS by clicking Edit. |
To change the information for a NAS RADIUS-enabled NAS client, follow these steps:
Step 1 In the NAS's page of the CiscoSecure Administrator advanced configuration program, click the name of the NAS for which you want to change information.
Step 2 Click Edit.
Step 3 Click the field you want to change. The following information can be changed:
Step 4 Type or select the new information.
Step 5 When you have finished, click one of the following:
To delete a NAS:
Step 1 In the NASes page of the CiscoSecure Administrator advanced configuration program, click the name of the NAS you want to delete.
Step 2 Click Delete. The name of the NAS will be removed from the list.
If your access control server is RADIUS-enabled, the Servers tab enables you to carry out simple configuration of other CiscoSecure ACSes installed on the network. To configure another ACS on the network, you create a profile for that ACS and edit its parameters.
To display, add, copy, delete, edit, or unlock the available CiscoSecure ACS profiles:
Step 1 In the CiscoSecure Administrator advanced configuration program, click the Servers tab.
Step 2 (Optional) To update the list of access control servers, click Servers at the top of the list of available servers. The Administrator window will reload the current list of available access control server profiles from the database. This is useful when more than one person can make changes to the access control server profiles.
Step 3 Click a server's IP address in the left window. The CiscoSecure ACS displays information about the server. See Figure 4-21.
The following fields and information displays:
To add an access control server profile to the list:
Step 1 In the Servers page of the CiscoSecure Administrator advanced configuration program, click New. You will be prompted to enter the IP address of the new server.
Step 2 Enter the IP address for the access server in the Server Name field.
Step 3 If necessary, change the configuration as described in the next section "Changing ACS Profile Information."
 | Time Saver To create a server profile with characteristics similar to those of an existing server profile, just click the IP address of the existing server profile, then click Copy. You can then modify individual characteristics, if necessary, by clicking Edit. |
To change information for a server:
Step 1 In the Servers page of the CiscoSecure Administrator advanced configuration program, click Edit.
Step 2 Click the field for the information you want to change for your server.
Step 3 Type or select the new information. Some of the information cannot be changed. The information you can change depends on your system and desired operation of the ACS. For an explanation of the fields on this screen, refer to the previous section.
Step 4 When you have finished, click one of the following:
To delete an access control server profile:
Step 1 In the Servers page of the CiscoSecure Administrator advanced configuration program, click the IP address of the server profile you want to delete.
Step 2 Click Delete. The IP address of the server profile will be removed from the list.
Three RADIUS dictionaries are installed when you select the RADIUS protocol during installation: Cisco, Ascend, and IETF.
To display the RADIUS dictionaries:
Step 1 In the CiscoSecure Administrator advanced configuration program, click CiscoSecure Dictionaries tab.
Step 2 (Optional) To update the list of dictionaries, click Dictionaries at the top of the list of available dictionaries. The Administrator window will reload from the database and get the current list of available dictionaries. This is useful when more than one person can make changes to the dictionary profiles.
Step 3 Click the name of the dictionary for which you want to display information.
The dictionary attributes display.
For each attribute, a summary line is displayed containing the following information:
| Attribute | Type | Format |
|---|---|---|
| string | Displayable ASCII | Length cannot exceed 253 characters |
| ipaddr | 4 octets | Octets must be in network byte order |
| integer | 32 bit value | Big endian order (high byte first) |
| date | 32 bit value | Big endian order; seconds since 00:00:00 GMT, January 1, 1970 |
| abinary | ASCII character set | Length cannot exceed 254 characters |
| enum | 32-bit value | Subset of integers |
Step 4 To view the detailed information for a specific attribute, click that attribute's magnifying glass icon.
When you click the attribute's magnifying glass, its detailed information appears in an attribute editor frame at the bottom of the page. The detailed information includes:
To add a dictionary to the list:
Step 1 In the Dictionaries page of the CiscoSecure Administrator advanced configuration program, click New.
Step 2 Enter the name of the dictionary to add.
Step 3 If necessary, change the configuration as described in the next section "Changing RADIUS Dictionary Information."
 | Time Saver To create a dictionary with characteristics similar to one already created, just click the name of the similar dictionary, then click Copy. You can then modify individual characteristics of the new dictionary by clicking Edit. |
Take the following steps to change the information for a dictionary:
 | Caution Use caution when editing dictionaries. Changes to a dictionary will affect all users who are using that dictionary. Only experienced RADIUS system administrators should attempt to edit dictionaries. |
Step 1 In the Dictionaries page of the CiscoSecure Administrator advanced configuration program, click the name of the dictionary for which you want to change information.
Step 2 Click Edit. The magnifying glass view icons become pencil edit icons.

Step 3 If you want to change the vendor ID for the entire dictionary, click vendor= in the lower right corner, enter a new ID number in the Enter Vendor ID dialog box, and click OK.
Step 4 If you want to change the detailed information for a specific attribute, click that attribute's pencil icon.
You can then edit that attribute's detailed information fields in the attribute edit frame at the bottom of the page:
(a) Click the pencil icon to edit the values or the paper icon to add a new value.
(b) Click the checkmark icon to apply changes, the broken pencil icon to cancel changes, or the X icon to delete a value.
For details on the fields see the section "Managing RADIUS Dictionaries" earlier in this chapter.
Step 5 When you have finished, click one of the following:
For more information on the Dictionaries window, see the appendix "RADIUS Attribute-Value Pairs and Dictionary Management."
To delete a dictionary:
Step 1 In the Dictionaries page of the CiscoSecure Administrator advanced configuration program, click the name of the dictionary you want to delete.
Step 2 Click Delete. The name of the dictionary will be removed from the list.
Use the Find a Group or User button to find a group or user profile:
Step 1 In the Members page of the CiscoSecure Administrator advanced configuration program, click Find a Group or User.
Step 2 Enter the name of the group or user to search for in the Group or User Name field.
The profile of the group or user you selected is placed in a temporary folder that appears at the top of the list of users. Use this folder as a "shortcut" to the groups or users to work with during this session.
Step 3 Repeat Step 2 as many times as necessary for the groups or users to work with during this session.
To display a group or user profile in text format, from the Members window, click Display a Profile.
Information will display that is similar to that shown in Figure 4-26.
The information displayed is the same information as that shown in the Profile window, but it is shown in CiscoSecure ACS 1.0 format. This information is normally used for debugging only.
To display a summary of the system's statistics, click Display System Summary and Expired Passwords. You can also click this button to display users with expired passwords by password type.
The CiscoSecure Properties window opens. To view the system summary, click the Summary Statistics tab. See Figure 4-28.
To view expired passwords, click the Expired Passwords tab. See Figure 4-29.
To prevent unauthorized users from accessing the CiscoSecure ACS by using equipment that generates passwords randomly, you can assign a value to max_failed_logins. The default value for max_failed_logins for all users and groups is set in the control file, CSU.cfg. See the chapter "Applying TACACS+ and RADIUS Attributes" for more information.
When the count exceeds the global number, the administrator must reset the server current-failed-logins attribute for the individual. The AAA Server will increment the counter by one for each failed login attempt. If the current count for a user is below the global number and the user logs in successfully, the counter is reset to zero.
Use the Move a Profile button to move a group or user to a different or new group. This is useful, for example, to change an employee from one department to another.
To move a profile:
Step 1 Click the group or user to be moved.
Step 2 Click Move a Profile.

Step 3 Enter the name of the destination group. The group name or user icon moves from its current group to the new one.
Use the Unlock a Profile button to unlock a record that became locked inadvertently. When a profile is locked, a keyhole icon displays next to the group's folder icon. Profiles are locked when they are being updated; however, it is possible to have a locked record that is not in use, such as when the computer is rebooted while updating a profile.
To unlock a profile:
Step 1 Click the locked profile.
Step 2 Click Unlock a Profile. The keyhole icon disappears.

To delete a profile attribute from a group or user profile:
Step 1 Click the icon for the applicable group or user in the tree that is displayed in the Navigator (left) window.
Step 2 In the Profile window, click whatever services or attributes you require to expand the directory structure until the attribute you want to delete can be seen.
Step 3 Click the applicable attribute.
Step 4 Click the Delete a Profile Attribute (minus sign) icon at the top of the Profile window.

Step 5 Repeat Step 1 through Step 4 for each additional attribute to delete.
Step 6 When you have finished making changes, click Submit.
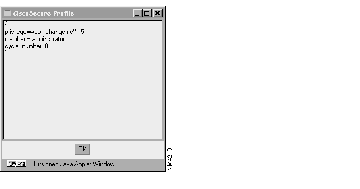
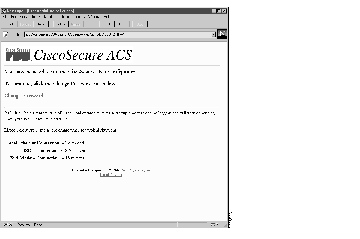
For those users who enter a user name and password that only has a user privilege level, this screen appears:
There is only one function an ordinary user can perform in CiscoSecure: changing a password. To change a password:
Step 1 Click Change Password.
A new screen appears.
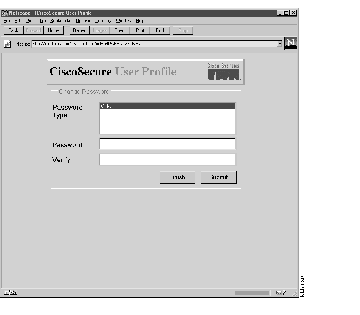
Step 2 Enter a new password in the Password field.
Step 3 Verify this new password by entering the same password in the Verify field.
Step 4 Click Submit. The new password is stored in the database.
Step 5 Click Finish to exit this screen.
To exit the web-based interface, click Logoff.
|
|
