|
|

This chapter contains instructions on installing the CiscoSecure Access Control Server (ACS) software and setting up an initial configuration an user account to test authentication. The topics covered in this chapter include:
After completing and verifying installation and initial configuration of your CiscoSecure ACS software in this chapter, you can expand and customize your access control system following directions in the chapters "Managing User Authentication and Authorization" and "Applying TACACS+ and RADIUS Attributes."
To achieve the fastest installation and configuration of the CiscsoSecure ACS, Cisco recommends the following steps:
After installing and verifying your initial configuration, you can expand and customize your access control system following directions in the chapters "Managing User Authentication and Authorization" and "Applying TACACS+ and RADIUS Attributes."
Take the following steps to run the CiscoSecure ACS installer:
Step 1 At the SPARCstation where you want to install the CiscoSecure ACS, log in as root.
Step 2 At the SPARCstation where you are installing the CiscoSecure ACS, start the installation program by doing one of the following:
pkgadd -d /cdrom/csu212
pkgadd -d /tmp CSCEacs
After a few moments, the installer displays the first of a series of installation prompts.
yes, q to quit)?
Using the pre-installation information that you recorded in Table 2-1 "Installation Information," answer the following prompts:
| Installation Prompt | Action |
|---|---|
| Is this a complete new install (Y/N)? |
|
|
Enter the directory name to install CiscoSecure into. | Enter the directory where you want the CiscoSecure ACS files to be installed. Make sure the partition contains sufficient disk space (500 MB for the first 10,000 users and 256 KB for each additional 1000 users). |
| Choose a network protocol to support:
1. TACACS+ only 2. RADIUS only 3. Both
| Specify the protocol or protocols to be used between the NAS and the ACS for carrying out AAA operations. |
| Enter the AAA Server License Key. |
See "Obtaining a Software License Key" in the chapter "Preparing to Install the CiscoSecure ACS Software" for details.
|
| (If TACACS+ or Both)
Enter the TACACS+ NAS name you will be using. | If you specified TACACS+ or Both as the network protocol,
|
| (If TACACS+ or Both)
Enter the TACACS+ NAS secret key.
| If you specified TACACS+ or Both as the network protocol, enter a secret key. Note this key. You will need to specify this key when configuring NASes to use the CiscoSecure ACS.
|
| Select token card(s) or none:
1. CryptoCard 2. Secure Computing 3. Security Dynamics, Inc. |
Note: Selecting Security Dynamics Inc. requires that the SDI client software be properly installed before the ACS is started. |
| If Secure Computing, IP Address of the Secure Computing Server. | If supporting Secure Computing token cards, enter the IP address of the Safe Word server. |
| Choose a Database:
1. Sybase SQLAnywhere 2, Oracle Enterprise 3. Sybase Enterprise | Enter 1, 2, or 3 to indicate the database type to use for the CiscoSecure database.
SQLAnywhere is the default choice and is supplied with CiscoSecure. Oracle Enterprise support or Sybase Enterprise support require that those products already be installed and accessible on your network. |
| If SQLAnywhere, the directory of where you want the database files to be created. | If you selected SQLAnywhere database support, enter the directory path where you want the SQLAnywhere database files to be stored. |
| If Sybase or Oracle, the username and password to the DB account that has been assigned table space for the CiscoSecure data. | If you selected Sybase Enterprise or Oracle Enterprise database support, enter the username and password needed to access the database account that will hold the CiscoSecure ACS data. |
| If Oracle, the path to the $ORACLE_HOME directory, where Oracle is installed. | If you selected Oracle Enterprise database support, enter the path to where Oracle 7.3.2 is installed. If the Oracle database is on another machine, you require Oracle SQL*Net installed on the ACS. |
| If Oracle, the TNS Service name of the Oracle Server. | If you selected Oracle Enterprise database support, enter the TNS service name. |
| If Sybase, the name of the Sybase SQL Server. | If you selected Sybase Enterprise database support, enter the Sybase SQL server name. |
| If Sybase, the name of the database to use for CiscoSecure. | If you selected Sybase Enterprise database support, enter the name of the database assigned to CiscoSecure. |
| If Sybase, the path to the $SYBASE directory, where Sybase is installed. | If you selected Sybase Enterprise database support, enter the path to the directory where Sybase Enterprise is installed. |
| If not a New Install, Do you want to drop and re-init existing Database Tables (Y/N)? | If this is not a new installation of CiscoSecure, enter Y or N to indicate whether you want to remove any existing database and initialize a new one. |
| Enter the IP addresses of the CiscoSecure DB server, like these examples:
1.171.68.188.242 2.10.3.1.0 | The default value is the primary IP address of the server on which you are installing the CiscoSecure ACS.
For single server installation, use the default; otherwise enter the address of the first ACS. |
| Enter an available TCP/IP port to be reserved for the CiscoSecure database server process. | This is the TCP/IP port reserved for running the ACS database process. The default port is 9900.
Unless you know that port 9900 is used by another process, you should accept the default. |
| Enter a unique name for the CiscoSecure DB server process. | This names the CiscoSecure ACS process.
|
|
Do you want to modify any selections below? Modify any values [y,n,q]: | The installation program displays a summary of your settings and asks you to confirm them.
|
If you enter n for the last prompt, the installation process begins and output similar to the following displays:
y
As the installation commences, the names of the files will display as the files are copied to their destination directories. Then the following information displays:
Step 4 To start the CiscoSecure ACS immediately, enter:
/etc/rc2.d/S80CiscoSecure
Note the following points:
/etc/rc2.d/S80CiscoSecure.
/etc/rc0.d/K80CiscoSecure.
After you have installed the CiscoSecure ACS on the SPARCstation, go to the section of this user guide that best suits your needs:
If you are installing CiscoSecure ACS for the first time, and have no user or group profiles already configured, your next step, after installing and starting the ACS software, is to set up an initial test user profile and configure your NAS to support this profile. The procedures to carry this out vary according to whether you are assigning TACACS+ protocol attributes or RADIUS protocol attributes to the user profile.
In this section, you will run the CiscoSecure Administrator and configure a NAS to set up and support an initial test user profile with TACACS+ protocol attributes.
For testing purposes, locate the CiscoSecureACS, the host NAS, and a login workstation on the same Ethernet segment.

Using the CiscoSecure Administrator, you will create an initial test user profile. Using TACACS+ protocol attributes, you will name the profile "Simple," assign it a clear text password, "Cisco" and enable Telnet login by enabling all commands and attributes associated with shell service.
Step 1 From a Windows 95 or Windows NT workstation start your Netscape Navigator or Microsoft Internet Explorer web browser and enter the following URL address.
http://your_server_name/cs
where your_server_name is the name of the ACS that you specified during installation.
Step 2 When the CiscoSecure Logon window appears, enter the following default values for username and password and click Submit:
superuser
changeme
Step 3 In the CiscoSecure ACS Main window, click Advanced and then click To Continue.
The Advanced Configurator program may require several minutes to load.
Step 4 Create and name a test user profile (to be used for authentication):
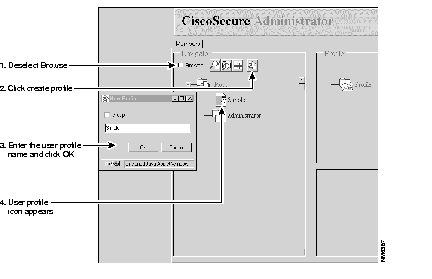
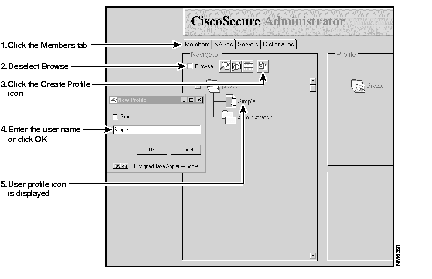
(a) When the advanced CiscoSecure Administrator window appears, locate and deselect the Browse option in the Navigator pane. This displays the Create New Profile icon.
(b) In the Navigator pane, locate and click the root folder icon.
(c) Click Create New Profile to display the New Profile dialog box and enter Simple. This names the user profile "Simple."
(d) Click OK. The simple user profile icon appears on the tree underneath the Root icon.
Step 5 Specify clear text password transmission and shell service for the user profile.
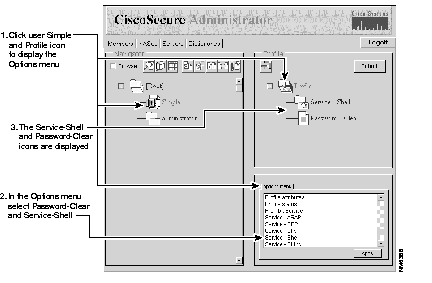
(a) Click the Simple profile icon in the Navigator pane and click Profile in the Profile pane. This displays the "Simple" profile's Options menu in the lower right corner Attributes pane.
(b) In the Options menu, select Password-clear and Service-shell then click Apply. The Password-clear and Service-shell attribute icons appear under the Profile icon in the Profile pane.
Step 6 Assign a password to the user profile (to be used for authentication):
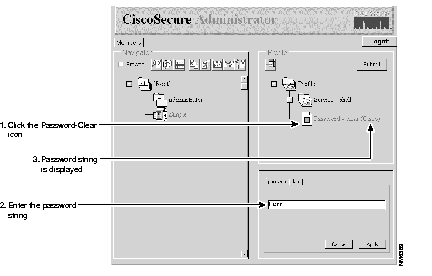
(a) Click the Password-clear attribute icon to display the Password tab in the lower right corner pane.
(b) Enter Cisco in the password field and click Apply. This makes "Cisco" the password for the user "Simple."
Step 7 Click Submit.
Step 8 Click Logoff to exit and terminate the CiscoSecure Administrator session. Your web browser may require several minutes to terminate.
From a network workstation, log in to the host NAS. Bring up the configuration window and input the following configuration commands:
aaa new-model aaa authentication login default tacacs+ enable aaa authentication login no_tacacs line aaa authorization exec tacacs+ if-authenticated enable password cisco ! tacacs-server hostacs_ip_addresstacacs-server keysecret-key! line con 0 login authentication no_tacacs password cisco
where:
acs_ip_address is the IP address of the CiscoSecure ACS.
secret_key is the secret TACACS+ NAS key that you entered for the NAS during the CiscoSecure ACS installation.
In this section, you will run the CiscoSecure Administrator and configure a NAS to set up an initial test user profile with RADIUS protocol attributes.
For testing purposes, locate the CiscoSecure ACS, the host NAS, and a login workstation on the same Ethernet segment.
Using the CiscoSecure Administrator, you will create an initial test user profile. Using RADIUS protocol attributes, you will name the profile "Simple," assign it a clear text password, "Cisco," and enable Telnet login.
Step 1 From a Windows 95 or Windows NT workstation start your Netscape Navigator or Microsoft Internet Explorer web browser, enter the following URL:
http://your_server_name/cs
where your_server_name is the name of the ACS that you specified during installation.
Step 2 When the CiscoSecure Logon window appears, enter the following default values for username and password and click Submit.
superuser
changeme
Step 3 In the CiscoSecure ACS Main window, click Advanced then click To Continue.
The Advanced Configurator program may require a few minutes to load.
Step 4 Specify the host NAS, its shared secret key, and supported version of RADIUS protocol:
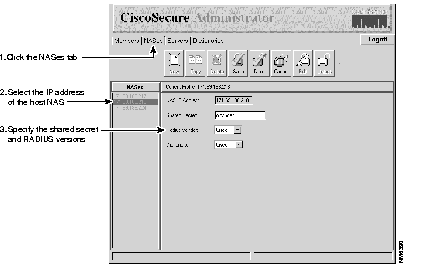
(a) When the advanced CiscoSecure Administrator window appears, locate and click the NAS page tab.
(b) Click New, enter the IP address of the host NAS, and click OK. The IP address appears in the NAS list in the Navigator pane.
(c) Select the host NAS IP address, then click Edit.
(d) Click on the Shared Secret window, type in a secret key for the NAS, note the key for later reference.
(e) Make sure the "RADIUS Vendor" states "Cisco" to indicate that you are using a NAS that supports Cisco RADIUS.
(f) Verify that the "Dictionary" drop-down box states "Cisco" as well.
(g) Click Done.
Step 5 Create a test user profile:
(a) Click the Members tab.
(b) Deselect the Browse check box in the Navigator pane. This displays the Create New Profile icon (Figure 3-7).
(c) In the Navigator pane, locate and click the "Root" folder icon.
(d) Click Create New Profile to display the New Profile dialog box.
(e) Enter Simple. This names the user profile "Simple."
(f) Click OK. The Simple user profile icon appears on the tree underneath the "Root" folder icon.
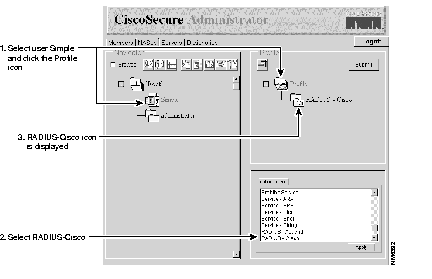
Step 6 Specify the RADIUS-Cisco dictionary for this user profile:
(a) Click the Simple profile icon in the Navigator pane and click the Profile icon in the Profile pane. This displays the "Simple" profile's Options menu in the lower right Attributes pane.
(b) In the Options menu, select RADIUS-Cisco and click Apply. The RADIUS-Cisco attribute icon appears under the Profile icon in the Profile pane.
Step 7 Specify RADIUS-Cisco Check Item and Reply attributes:
(a) Click the RADIUS-Cisco attribute icon in the Profile pane. This displays the RADIUS-Cisco Options menu in the Attributes pane.
(b) Select Reply Attributes and Check Items in the Options menu and click Apply.
Step 8 Click the plus/minus symbol by the RADIUS-Cisco icon to display the Reply Attributes and Check Items icons in the Profile pane.
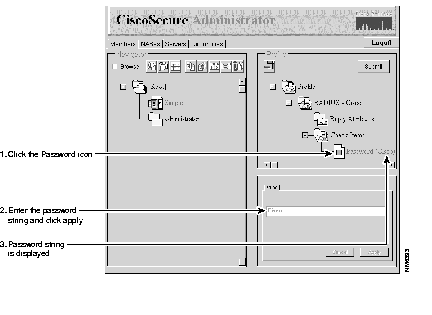
Step 9 Specify the password:
(a) Select the Check Items icon to display its options in the Attributes pane.
(b) Select 2=Password, string and click Apply.
(c) Click the plus/minus sign by the Check Items icon to display the check item attribute icons.
(d) Select the Password icon in the Profile pane to display the String dialog box in the lower-right pane.
(e) Enter Cisco in the String dialog box and click Apply. This sets the password to "Cisco" for the user "Simple."
Step 10 Specify the Reply Attributes values:
(a) Select the Reply Attributes icon to display its options in the Attributes pane.
(b) Select 6=User-Service-Type, enumeration in the Options menu and click Apply.
(c) Click the plus/minus sign by the Reply Attributes icon to display the Reply Attribute icons.
(d) Select the User-Service_Type icon in the Profile pane to display the Enumeration dialog box in the lower-right pane.
(e) Select 6=Shell-User from the Enumeration dialog box and click Apply. This will authorize a command shell on the NAS.
Step 11 Click Submit.
From a network workstation, log in to the host NAS. Bring up the configuration window and enter the following configuration commands:
aaa new-model aaa authentication login default radius enable aaa authentication login no_radius local aaa authorization exec radius if-authenticated enable password cisco ! username root password cisco ! radius-server hostacs_ip_addressradius-server keysecret_key! line con 0 login authentication no_radius
where:
In this last section, you will verify your test user's login and authorization:
Step 1 Open a Telnet window on your PC or SPARCstation using the Start/Run command.
Step 2 Telnet to the IP address of the NAS.
Step 3 Enter the username Simple and the password Cisco at the appropriate prompts.
Step 4 If the NAS lets you in, then this username and password have been properly set up and authorized.
|
|