|
|

The agent is also connected to an SNMP manager application through a TCP/IP Ethernet connection. Because it is connected to the SNMP manager using TCP/IP, you will need to acquire an IP address, subnet mask, and default gateway from your system administrator prior to installing the Cisco 90 Series DSL Management Agent.
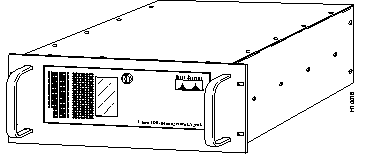
The Cisco 90 Series DSL Management Agent is installed as a 19 in. rack-mounted system (see Figure 2-1).
Follow these guidelines to ensure general safety:
 | Warning Before working on a system that has an on/off switch, turn OFF the power and unplug the power cord. |
| Warning Do not touch the power supply when the power cord is connected. For systems with a power switch, line voltages are present within the power supply even when the power switch is off and the power cord is connected. For systems without a power switch, line voltages are present within the power supply when the power cord is connected. |
| Warning Read the installation instructions before you connect the system to its power source. |
| Warning This product relies on the building's installation for short-circuit (overcurrent) protection. Ensure that a fuse or circuit breaker no larger than 120 VAC, 15A U.S. (240 VAC, 10A international) is used on the phase conductors (all current-carrying conductors). |
| Warning The device is designed to work with TN power systems. |
| Warning This equipment is intended to be grounded. Ensure that the host is connected to earth ground during normal use. |
| Warning Ultimate disposal of this product should be handled according to all national laws and regulations. |
| Warning Before working on equipment that is connected to power lines, remove jewelry (including rings, necklaces, and watches). Metal objects will heat up when connected to power and ground and can cause serious burns or can weld the metal object to the terminals. |
| Warning The plug-socket combination must be accessible at all times because it serves as the main disconnecting device. |
Each Cisco 90 Series system needs a Cisco 90 Series DSL Management Agent to allow it to be managed by an SNMP manager application. Except in very large installations, or where a redundant agent is desired, a single agent can manage all the D4 channel banks.
This section describes how to install the Cisco 90 Series DSL Management Agent. You will need an IBM-compatible external keyboard and monitor (not included) to install the Cisco 90 Series DSL Management Agent. The Cisco 90 Series DSL Management Agent provides a graphical user interface for configuration.
The following equipment is required (but not supplied) for the installation of the Cisco 90 Series DSL Management Agent:
If this is not convenient, the agent can be located remotely and connected to the nearest Frame Relay switch using a DDS or Fractional T1 circuit. This may be attractive from a security perspective because it may allow the agent-to-manager SNMP traffic to be on the same LAN segment and separated by a firewall from other traffic.
Examples of these two choices are shown in Figure 2-2.
The optional backup Cisco 90 Series DSL Management Agent can be co-located with the main Cisco 90 Series DSL Management Agent or connected to a different Frame Relay switch in the network.

Install the Cisco 90 Series DSL Management Agent as follows:
Step 1 Unpack the Cisco 90 Series DSL Management Agent and place it where you want it to be located.
Step 2 Connect the keyboard cable (attached to your keyboard) to the keyboard connector (DIN plug) on the rear panel of the Cisco 90 Series DSL Management Agent. The agent uses a PS/2 keyboard connector. An adapter is provided that will allow you to use an older model keyboard.
Step 3 Connect the video cable from your computer monitor to the video port on the video adapter card in the rear panel of the Cisco 90 Series DSL Management Agent.
Step 4 Optionally, connect a PS/2 mouse to the PS/2 mouse port (9-pin DIN plug) on the rear panel of the Cisco 90 Series DSL Management Agent.
Step 5 Connect the Cisco 90 Series DSL Management Agent's WAN port (an EIA-530 interface using a male DB-25 connector) to the Frame Relay switch or to a
CSU/DSU using the V.35-to-EIA-530 adapter cable supplied.
A standard EIA-530 cable (not supplied) can be used if an EIA-530 connection is desired at the Frame Relay switch or CSU/DSU.
The Cisco 90 Series DSL Management Agent is configured as a data terminal equipment (DTE), so the Frame Relay switch or CSU/DSU must be configured as a data communications equipment (DCE).
The Cisco 90 Series DSL Management Agent expects to receive both transmit and receive clock from the DCE, so the Frame Relay switch or CSU/DSU must also be configured to source transmit clock (sometimes called external transmit clock). The port speed can range from 64 to 2048 kbps. In general, allow at least 4 kbps for each digroup to be managed.
The Frame Relay switch protocol should be configured to be the Frame Relay UNI (user to network interface) specification and running T1.617 Annex D local management protocol. The switch is set to be the network side and the agent is set to be the user side of the Annex D link (the agent polls the switch).
Step 6 Connect the Cisco 90 Series DSL Management Agent's 10-BaseT LAN port (an RJ-45 connector) to the local-area network with access to the SNMP manager.
Step 7 Unlock the Cisco 90 Series DSL Management Agent front panel
(see Figure 2-3).
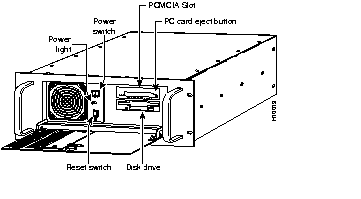
Step 8 Insert the PCMCIA Flash card containing the Cisco 90 Series DSL Management Agent software into the PCMCIA card slot on the front panel.
Step 9 Connect the power cord to the Cisco 90 Series DSL Management Agent and plug it into a 110 VAC source.
| Warning The plug-socket combination must be accessible at all times because it serves as the main disconnecting device. |
Step 10 Turn ON the power switch.
As the Cisco 90 Series DSL Management Agent boots, the system displays the graphical user interface. When the user interface is displayed, you are ready to configure the Cisco 90 Series DSL Management Agent.
If the graphical user interface does not start, verify that the PCMCIA Flash memory card is firmly seated in the slot and the red and green LEDs on the WAN interface card are both on.
Step 11 Verify that the red and green LEDs on the WAN interface card are both on.
If the green LED is not on, it indicates a bad connection on either the receive data or the receive clock on the EIA-530/V.35 signal from the Frame Relay switch.
If the red LED is not on, it indicates a bad connection or misconfiguration on the transmit clock from the Frame Relay switch. Check the cable and the Frame Relay switch port configuration.
Step 12 From the management station of the Frame Relay switch, verify that Annex-D is alive and functional on the link to the agent.
|
|