The installation process in this section requires that you have familiarity and experience installing network hardware. For detailed hardware installation instructions, refer to the Catalyst 5000 Series Installation Guide and the Catalyst 5000 Series Module Installation Guide.

| Caution Electrostatic discharge (ESD) can damage equipment and impair electrical circuitry. Always ensure that the chassis is electrically connected to earth ground. Wear an ESD-preventive wrist or ankle strap connected to the chassis when handling modules or coming into contact with internal components.
|
To install your Catalyst 5000 series switch, perform the following steps:
- Prepare for Installation
- Rack-Mount the Switch
- Connect the Switch to the Network
- Connect the Power
- Start the System
When you have installed and started the system, refer to the "Quick Software Configuration" section of this guide to configure the switch.
This section applies to all Catalyst 5000 series switch models.
- Check the packing slip to ensure that all the proper components are present.
- Set up the site:
- Wire for AC or DC power if necessary.
- Prepare equipment racks.
- Ensure the environment is within specification.
- Prepare network connections.
- Obtain the following equipment:
- ESD grounding strap and antistatic mat.
- Numbers 1 and 2 Phillips screwdrivers and 3/16-inch flat blade screwdriver.
- Tape measure and level.
- Ensure your safety when installing the Catalyst 5000 series switch:
- Lift the chassis safely.
- Cooperate with the natural laws of electricity.
- Ensure that the power service at your site is suitable for the chassis you are connecting.
- Take steps to prevent ESD damage to electronic components:
- Use an ESD-preventive wrist or ankle strap when handling modules or coming into contact with internal components (see Figure 1).
- Handle modules by the edges only.
- Place modules on an antistatic surface or in a static shielding bag when not installed.
Figure 1: Connecting an ESD Wrist Strap to the Catalyst 5000 Series Switches
This section describes how to rack-mount the Catalyst 5000 series switches.
- Attach the L Brackets.
- Remove the Modules (if necessary).
- Install the Chassis in the Rack.
- Reinstall the Modules and Power Supplies (if necessary).
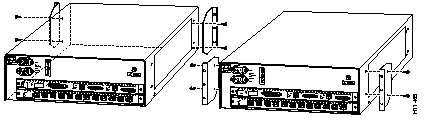
Attach the left and right L brackets to the chassis using the four M4 Phillips pan-head screws provided in the rack-mount kit. (See Figure 2.)
Figure 2: Attach the L Brackets
If the switch is too heavy to lift into position in the equipment rack, remove the modules from the chassis.
For information on removing the modules from the chassis, see Appendix A, "Removing and Installing Modules and Power Supplies."
- Lift the chassis into position in the equipment rack.
- Align the mounting holes in the L brackets with the mounting holes in the rack.
- Secure the chassis using six (three per side) 12-24 screws through the elongated holes in the L bracket and into the threaded holes in the mounting post. (See Figure 3.)
- Use a tape measure and level to ensure that the chassis is installed straight and level.
Figure 3: Install the Chassis in the Rack

Reinstall the modules (if you removed them to install the switch in the equipment rack).
For information on installing the modules in the chassis, see Appendix A, "Removing and Installing Modules and Power Supplies."
- Attach the L Brackets.
- Remove the Modules and Power Supplies (if necessary).
- Install the Chassis in the Rack.
- Reinstall the Modules and Power Supplies (if necessary).
- Remove the six screws from either the front or rear of the switch side cover panels, depending on which end of the chassis will be at the front of the rack.
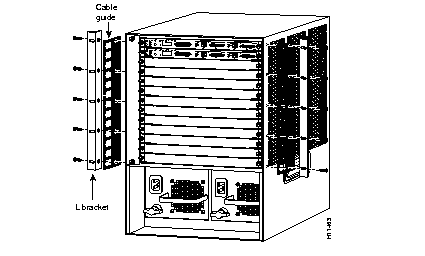
- Attach the L brackets to the left and right sides of the chassis using the six M4 Phillips countersunk-head screws provided in the rack-mount kit. (See Figure 4.)
- Attach the cable guide, if desired, using the six cover panel screws removed in Step 1. Attach the cable guide to the right side of the switch to prevent the cables from obscuring module LEDs. (See Figure 4.)
Figure 4: Attach the L Brackets and Cable Guide
If the switch is too heavy to lift into position in the equipment rack, remove the modules and power supplies from the chassis.
For information on removing the modules and power supplies from the chassis, see Appendix A, "Removing and Installing Modules and Power Supplies."
Three people are required to install the switch in an open rack.
- Ensure that all modules and power supplies are securely installed.
- Position a person on each side of the chassis. Lift the chassis in unison and position the chassis in the rack.
- Align the mounting holes in the L brackets with the mounting holes in the rack.
- Have a third person install the 10-32 x 3/4 inch slotted binder-head mounting screws through the elongated holes in the L brackets and into the threaded holes in the mounting post. (See Figure 5.)
- Use a tape measure and level to ensure the chassis is installed straight and level.
Figure 5: Install the Chassis in the Rack

Reinstall the modules and power supplies (if you removed them to install the switch in the equipment rack).
For information on installing the modules and power supplies in the chassis, see Appendix A, "Removing and Installing Modules and Power Supplies."
- Install the Shelf Brackets.
- Attach the L Brackets.
- Remove the Modules and Power Supplies (if necessary).
- Install the Chassis in the Rack.
- Reinstall the Modules and Power Supplies (if necessary).
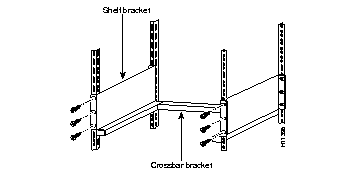
Install the Shelf Brackets
- Position the shelf brackets in the rack and secure them using six (three per side) 12-24 or 10-32 screws. (The shelf brackets support the chassis in the rack, so no shelf is required.) (See Figure 6.)
- Attach the crossbar bracket to the back of the shelf brackets using two M3 screws. (See Figure 6.)
Figure 6: Install the Shelf Brackets and Crossbar Bracket
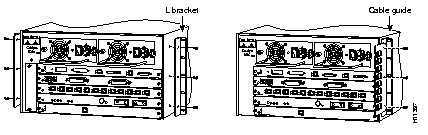
Attach the L Brackets
- Attach the L brackets to the chassis using the ten M4 Phillips countersunk-head screws provided in the rack-mount kit. (See Figure 7.)
- Attach the cable guide, if needed, using the screws provided in the cable management kit. (See Figure 7.)
Figure 7: Attach the L Brackets and Cable Guide
If the switch is too heavy to lift into position in the equipment rack, remove the modules and power supplies from the chassis.
For information on removing the modules and power supplies from the chassis, see Appendix A, "Removing and Installing Modules and Power Supplies."
Three people are required to install the switch in an open rack.
- Ensure that all modules and power supplies are securely installed.
- Position a person on each side of the chassis. Lift and position the chassis on the shelf brackets.
- Align the mounting holes in the L brackets with the mounting holes in the rack.
- Secure the chassis to the rack using ten 12-24 or 10-32 screws through the elongated holes in the L bracket and into the threaded holes in the mounting post. (See Figure 8.)
- Use a tape measure and level to ensure the chassis is installed straight and level.
Figure 8: Install the Chassis in the Rack
Reinstall the modules and power supplies if you removed them to install the switch in the equipment rack.
For information on installing the modules and power supplies in the chassis, see Appendix A, "Removing and Installing Modules and Power Supplies."
This section applies to all Catalyst 5000 series switch models.
- Connect the Supervisor Engine to the Network.
- Connect the Modules to the Network.
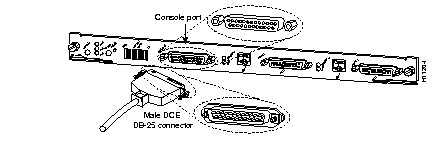
- Connect the supervisor engine console port by performing one of the following:
- Connect the Supervisor Engine Uplink Ports.
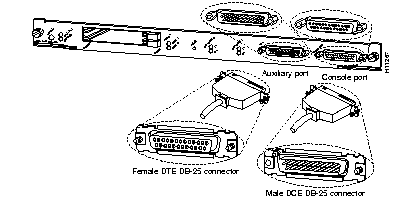
The console port on the Supervisor Engine I and II accepts a male EIA/TIA-232 (RS-232) DB-25 DCE connector. (See Figure 9.)
Figure 9: Connecting to the Supervisor Engine I and II Console Port
Use the appropriate cable and connector combination to connect the console port to a terminal, modem, or network management workstation:
- Use a straight-through cable with a male DB-25 DTE connector (Figure 10) on the network end to connect to a DTE device.
- Use a null-modem cable with a female DB-25 DCE connector (Figure 11) on the network end to connect to a remote DCE device.
Figure 10: Male DTE Network Cable Connector

Figure 11: Female DCE Network Cable Connector

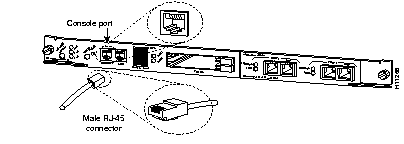
The console port on the Supervisor Engine III accepts a male RJ-45 connector. (See Figure 12.) When connecting a terminal to the Supervisor Engine III console port, use an RJ-45-to-RJ-45 straight-through cable with an RJ-45-to-DB-25 or RJ-45-to-DB-9 adapter.
Figure 12: Connecting to the Supervisor Engine III Console Port
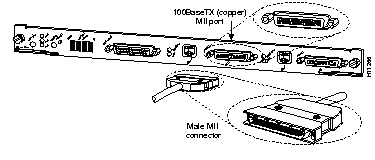
Connect the supervisor engine Fast Ethernet uplink ports using the appropriate connector for the interface type (100BaseTX [copper] or 100BaseFX [fiber-optic]).
For 100BaseTX (copper) uplinks:
Supervisor engine 100BaseTX (copper) uplink ports accept RJ-45 (Figure 13) or media independent interface (MII) (Figure 14) cable connectors.
Figure 13: Connecting to the Supervisor 100BaseTX RJ-45 Uplinks
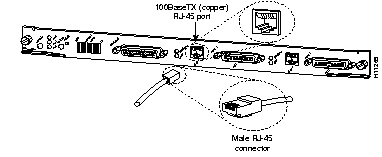
Figure 14: Connecting to the Supervisor 100BaseTX MII Uplinks
For 100BaseFX (fiber-optic) uplinks:
Supervisor engine 100BaseFX (fiber-optic) uplink ports accept SC-type single-mode or multimode, half- or full-duplex fiber-optic connectors. (See Figure 15.)
Figure 15: Connecting to the Supervisor 100BaseFX SC-Type Uplinks

To attach and secure your network cable connectors to the modules, refer to the following sections:
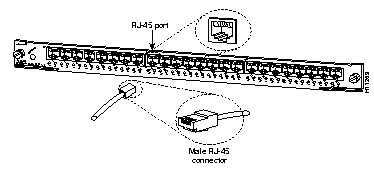
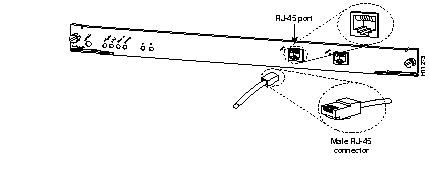
The following modules accept male RJ-45 connectors (see Figure 16):
- 24-port 10BaseT Ethernet Switching Module (WS-X5013)
- 12-port 10/100BaseTX Fast Ethernet Switching Modules (WS-X5213 and WS-X5213A)
- 12-port 10/100BaseTX Fast EtherChannel Switching Module (WS-X5203)
- 24-port 10/100BaseTX Workgroup Fast Ethernet Switching Module (WS-X5224)
- 12-port 100BaseTX Fast Ethernet Switching Module (WS-X5113)
- 24-port 100BaseTX Group Switching Fast Ethernet Module (WS-X5223)
Figure 16: Connecting to Ethernet/Fast Ethernet RJ-45 Ports
The following modules accept male RJ-21 Telco connectors (see Figure 17):
- 24-port 10BaseT Ethernet Switching Module (WS-X5010)
- 48-port 10BaseT Ethernet Switching Module (WS-X5012)
- 48-port 10BaseT Group Switching Ethernet Module (WS-X5020)
Figure 17: Connecting to Ethernet RJ-21 Telco Ports

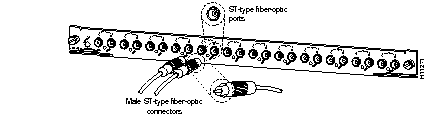
The 12-port 10BaseFL Ethernet Switching Module (WS-X5011) accepts male straight-tip (ST) fiber-optic connectors. (See Figure 18.)
Figure 18: Connecting to the 12-Port 10BaseFL Ethernet Switching Module
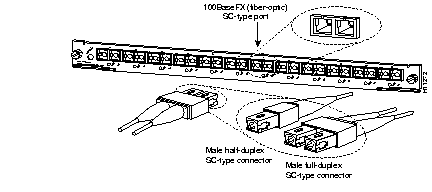
The following modules accept single-mode or multimode, half- or full-duplex, SC-type fiber-optic connectors (see Figure 19):
- 12-port 100BaseFX Fast Ethernet Switching Module (WS-X5111)
- 12-port 100BaseFX Fast EtherChannel Switching Module (WS-X5201)
- 12-port 100BaseFX Fast Ethernet Switching Module SMF/MMF (WS-X5114)
Figure 19: Connecting to Fast Ethernet SC-Type Fiber-Optic Ports
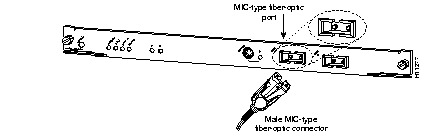
The FDDI Multimode Fiber Module (WS-X5101) accepts male media interface connector (MIC)-type fiber-optic connectors. (See Figure 20.)
Figure 20: Connecting to the FDDI MMF Module MIC-Type Ports
The FDDI Single Mode Fiber Module (WS-X5104) accepts male ST-type fiber-optic connectors. (See Figure 21.)
Figure 21: Connecting to the FDDI SMF Module ST-Type Ports
Use a six-pin, mini-DIN connector to connect to the optical bypass connection on the FDDI modules. (See Figure 22.)
Figure 22: FDDI Module Optical Bypass Switch Connection

The CDDI module (WS-X5103) accepts male RJ-45 connectors. (See Figure 23.)
Figure 23: Connecting to the CDDI Module RJ-45 Ports
The following ATM modules accept male single-mode or multimode, full-duplex, SC-type fiber-optic connectors (see Figure 24):
- ATM LAN Emulation Single PHY Single-Mode Fiber Module (WS-X5154)
- ATM LAN Emulation Single PHY Multimode Fiber Module (WS-X5155)
- ATM LAN Emulation Dual PHY Single-Mode Fiber Module (WS-X5157)
- ATM LAN Emulation Dual PHY Multimode Fiber Module (WS-X5158)
Figure 24: Connecting to ATM Module SC-Type Ports
The following ATM modules accept male RJ-45 connectors (Figure 25) on Category 5 UTP cables:
- ATM LAN Emulation Single PHY UTP Module (WS-X5153)
- ATM LAN Emulation Dual PHY UTP Module (WS-X5156)
- ATM Dual PHY DS3 Module (WS-X5166)
Figure 25: Connecting to ATM Module RJ-45 Ports

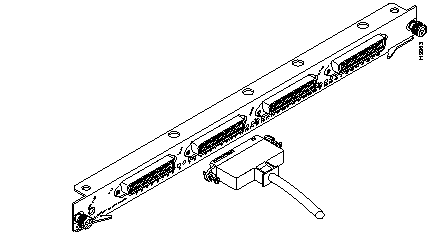
Use a straight-through EIA/TIA-232 cable with a male DCE DB-25 connector to attach a terminal to the console port on the Route Switch Module (RSM) (WS-X5302). (See Figure 26.)
Use a EIA/TIA-232 cable with a female DTE DB-25 connector to connect a modem or other DCE device (such as a CSU/DSU or router) to the auxiliary port on the RSM. (See Figure 26.)
Figure 26: Connecting the Route Switch Module Console and Auxiliary Ports
For information on connecting the LightStream 1010 ATM Switch Processor (ASP) module, refer to the LightStream 1010 ATM Switch ASP Installation Guide.
The procedures outlined in this section require that you understand power safety and have experience installing and connecting power supplies. For complete power supply installation procedures, refer to the Catalyst 5000 Series Installation Guide.

| Warning Before you work on any equipment, be aware of the hazards involved with electrical circuitry and be familiar with standard practices for preventing accidents.
|
- Verify that all modules are installed correctly and that all interface cable connections are secure.
- Attach each power cable to a grounded outlet. Make sure that the source power is within range. If two power supplies are present, make sure that the second power cable is connected to a different line than the first (if possible).
Note Do
not connect the AC power cables to the power supplies until you are ready to boot the switch.
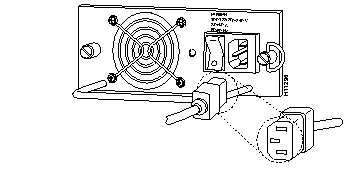
- Connect an AC power cable to each power supply. (See Figure 27.)
Figure 27: Catalyst 5002 Power Cord Connections
To connect the power on the Catalyst 5000/5505 switch, do one of the following:
Note For information on installing the power supplies in the Catalyst 5000/5505, refer to
Appendix A, "
Removing and Installing Modules and Power Supplies."

This procedure applies to the Catalyst 5000 and Catalyst 5505 switches.
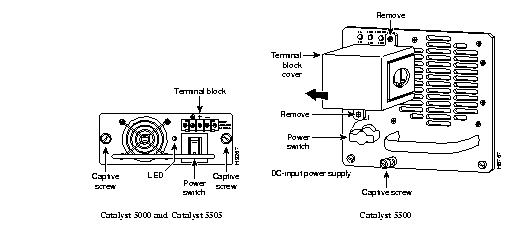
| Caution The Catalyst 5505 requires power supply WS-C5008B. The Catalyst 5000 can use either WS-C5008A or WS-C5008B. Do not use power supply WS-C5008A in the Catalyst 5505 chassis.
|
To connect the AC power on the Catalyst 5000/5505 switches, perform these steps:
- Verify the following:
- All modules are installed correctly.
- All interface cable connections are secure.
- Each power supply is properly installed in its bay.
- The power switch on each power supply is OFF (0).
- Connect an AC power cable to each power supply. (See Figure 28.)
- Attach each power cable to a grounded outlet. Make sure that the source power is within range. If two power supplies are present, make sure that the second power cable is connected to a different line than the first (if possible).
Figure 28: Catalyst 5000/5500 AC Power Supply Connection
This procedure applies only to the Catalyst 5000 switch.

| Warning Before performing the following procedure, ensure that power is removed from the DC circuit.
|
To connect the DC power on the Catalyst 5000, perform these steps:
- Verify the following:
- All modules are installed correctly.
- All interface cable connections are secure.
- Each power supply is properly installed in its bay.
- Power is off to the DC-input circuit.
- The power switch on each power supply is OFF (0).
- For each power supply, remove the terminal block cover by pressing in the plastic levers on each side of the terminal block.
- Attach the appropriate lugs to the DC-input wires. (Suggested lugs are AMP 322985 or 52941; suggested DC-input wires are 10-AWG copper conductors.)

| Warning Wire the DC power supply using the appropriate lugs at the wiring end. The proper wiring sequence is ground to ground, positive to positive (line to L), and negative to negative (neutral to N). Note that the ground wire should always be connected first and disconnected last.
|
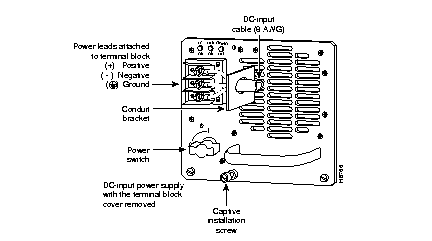
- Wire the DC-input power supply to the terminal block (see Figure 29):
- Ground wire to the ground connector
- -48V wire to the "-" connector
- -48V return to the "+" connector
Figure 29: Catalyst 5000 -48 VDC Power Supply
- After ensuring that all wire connections are secure, reinstall the terminal block cover.
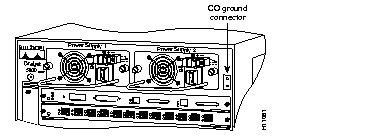
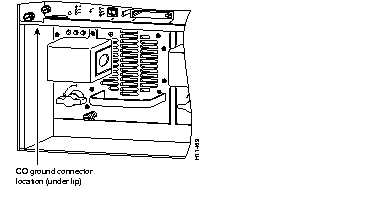
- Use the following guidelines to connect the switch to the central office (CO) ground through the CO ground connector. (See Figure 30.)
- On a new installation, remove the adhesive strip covering the CO ground connector.
- Use a ground wire lug that is 0.320 of an inch (0.813 cm) or less.
- Use a 10- to 12-AWG, copper conductor, ground wire.
- Restore power to the DC circuit by turning the circuit breaker ON (|).
Figure 30: Catalyst 5000 CO Ground Connector Location
To connect the power on the Catalyst 5500 switch, do one of the following:
Note For information on installing the power supplies in the Catalyst 5500, refer to Appendix A, "Removing and Installing Modules and Power Supplies."
To connect the AC power on the Catalyst 5500 switch, perform these steps:
- Verify the following:
- All modules are installed correctly.
- All interface cable connections are secure.
- Each power supply is properly installed in its bay.
- The power switch on each power supply is OFF (0).
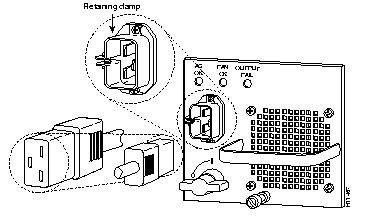
- Connect an AC power supply cable to each power supply (see Figure 31). Tighten the metal retaining clamp to secure the cord to each power supply connection.
Figure 31: Catalyst 5500 AC Power Supply
Note Each AC power supply operates at 120 VAC and requires a dedicated 120A service and 20A plug and receptacle.
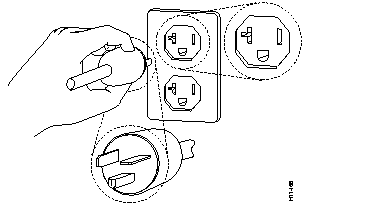
- Attach each power cable to a grounded outlet. (See Figure 32.) Make sure the source power is within range. If two power supplies are present, make sure the second power cable is connected to a different line than the first (if possible).
Figure 32: Catalyst 5500 AC Power Source Connection

| Warning Before performing the following procedure, ensure that power is removed from the DC circuit.
|
To connect the DC power on the Catalyst 5500 switch, perform these steps:
- Verify the following:
- All modules are installed correctly.
- All interface cable connections are secure.
- Each power supply is properly installed in its bay.
- Power is off to the DC-input circuit.
- The power switch on each power supply is OFF (0).
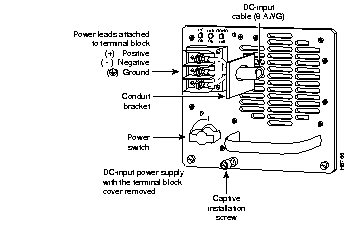
- On each power supply, remove the two screws securing the terminal block cover and slide the cover straight off the terminal block.

| Warning Wire the DC power supply using the appropriate lugs at the wiring end. The proper wiring sequence is ground to ground, positive to positive (line to L), and negative to negative (neutral to N). Note that the ground wire should always be connected first and disconnected last.
|
- Wire the DC-input power supply to the terminal block (see Figure 33):
- Ground wire to the ground connector
- -48V wire to the "-" connector
- -48V return to the "+" connector
Figure 33: Catalyst 5500 DC Power Supply
- After ensuring that all wire connections are secure, replace the terminal block cover.
- Use the following guidelines to connect the switch to the central office (CO) ground through the CO ground connector. (See Figure 34.)
- On a new installation, remove the adhesive strip covering the CO ground connector.
- Use a copper ground-wire lug, and attach it to the switch.
- Use an 8-AWG ground wire.
- With the power switch OFF (0), reconnect the power cable at the power source.
- Restore power to the DC circuit by turning the circuit breaker ON (|).
Figure 34: Catalyst 5500 CO Ground Connector Location
This section applies to all Catalyst 5000 series switch models.
- Verify the following before you start the system:
- All modules are installed correctly.
- All interface cable connections are secure.
- Each power supply is properly installed in its bay.
- The power switch on each power supply is OFF (0) (Catalyst 5002: power cords are not connected to the power supplies).
- The connector at the power source is installed in a grounded outlet.
- The source power is within the range labeled on the back of the switch.
- If two power supplies are present, the second cord is connected to a different line than the first.
- A terminal is connected to the supervisor module console port and the console terminal is on.
- Supply power to the switch:
- (Catalyst 5002 only) Attach a power cord connected to a grounded power source to each power supply.
- (All others) Turn the power supplies to the ON (|) position.
- During the boot process:
- (All but 5002) The LEDs on the power supplies should be green.
- The PS1 and PS2 LEDs on the supervisor engine should be green.
- The fan LED on the supervisor engine should be green and you should hear the system fans operating.
- The System Status LED on the supervisor engine should be green after the boot is complete (it will flash red, orange, and green during startup).
- Supervisor engine interface LEDs and module LEDs (such as the Link LEDs) might blink or stay lit continuously during the boot process. Many module LEDs do not come on until you configure the interfaces. Wait until the system boot is complete before attempting to verify the switching module LED indications.
- The console screen displays a script and system banner.
- When the boot process is complete, the supervisor engine begins to initialize the switching modules. Messages appear on the console as the modules come online.
- Press Return at the Enter Password prompt to access the console command line.