|
|

This chapter describes how to prepare for installing and configuring CiscoWorks, and provides worksheets to help you gather the necessary information.
Before you install the CiscoWorks network management software, confirm that your computer system meets the related hardware and software-version requirements. In addition, you should note any special requirements about how you want CiscoWorks installed. For example, CiscoWorks prompts you during installation to supply information such as where you want CiscoWorks installed and whether you are performing a new installation or an upgrade.
 | Time Saver If you do not have any special requirements, you can just press the Return key during the installation to accept a default selection. |
To gather all the information you need to install CiscoWorks, first complete the CiscoWorks Installation Worksheet later in this section. You can then refer to the worksheet, if necessary, as you proceed with the installation.
This section provides an overview of the recommended tasks to perform before installing and configuring CiscoWorks.
Follow these steps to prepare for installing and configuring CiscoWorks for the first time or for upgrading from from an earlier version of CiscoWorks. After you complete the following steps, you are ready to install and configure CiscoWorks on your system.
Verify that HP OpenView is installed on your system by starting the HP Openview Console with the sample database file created during installation. Test the HP Openview installation by starting a request to an agent on your local machine. Using the HP OpenView menu option Monitor>MIB Values>Browse MIB:SNMP, you can ensure that the agent is responding.
Before you install CiscoWorks on your system, make sure that your system meets the hardware and software requirements described in the following sections.
CiscoWorks requires the following hardware:
Operating System | Free Hard Disk Space | RAM | Swap Space | Free Root Partition Needed for CiscoWorks |
|---|---|---|---|---|
| Solaris 1.x (SunOS 4.1.2 or 4.1.3) | 500 MB (minimum)
1,000 MB (recommended) | 64 MB | 110 MB (minimum)
128 MB (recommended) | 5 MB
|
The memory and swap space requirements of CiscoWorks ultimately depend on such factors as which applications you want to run, the number of applications you want to run concurrently, and the number of network devices that you want to manage with CiscoWorks. As a result, you may need to increase the swap space beyond the general minimum requirements, depending on your particular network management needs.
On Sun workstations, CiscoWorks requires the following software:
Several CiscoWorks applications have specific Cisco Systems software requirements. For more information, refer to the CiscoWorks User Guide. The Configuration Management application, for example, requires Cisco Systems Software Release 8.2 or later.
The following sample configuration represents the system requirements used by a network manager who ran six common CiscoWorks applications on HP OpenView in order to manage five network devices. Table 2-2 lists the swap space requirements of this sample network:
| CiscoWorks Network Management Components | Swap Space Usage |
|---|---|
| CiscoWorks daemons (collective processes that perform the specific functions of CiscoWorks) | 15,704 KB |
| Sybase database | 2682 KB |
| HP OpenView | 9000 KB |
| Sun operating system | 30,720 KB |
| Configuration Snap-In Manager | 26,969 KB |
| Process Manager | 3588 KB |
| Configuration Management | 7893 KB |
| Device Management | 5082 KB |
| Global Command Manager | 7121 KB |
| Sync w/Sybase | 7168 KB |
| Total amount of swap space usage | 10,8975 KB or 106.42 megabytes (MB) |
The collective swap space used by the CiscoWorks daemons (15704 KB) in Table 2-2 reflects what is used by the four significant CiscoWorks daemons as they manage five devices. As more devices are added, the swap space requirements increase as shown in Table 2-3.
| CiscoWorks Daemons that Use Significant Swap Space | Swap Space Usage | Swap Space Required for Each Additional Device |
|---|---|---|
| nmlogd | 676 KB | No adjustments |
| nmpolld | 8192 KB | 500 KB |
| nmeventd | 2536 KB | No adjustments |
| Total | 11404 KB or 11.1 megabytes (MB) | 500 KB of swap space for each new device managed by CiscoWorks |
Depending on the router you are using, the Software Manager application requires a specific Cisco Systems Software Release according to the following table (Table 2-4):
| Cisco Router Type | Router System Software Requirement |
|---|---|
| Cisco 3000 | Software Release 9.1(7.5) or later, or 9.1(8) or later |
| Cisco AGS+ | Software Release 9.1(7.5) or later, or 9.1(8) or later |
| Cisco 4000 | Software Release 9.14(3.4) or later, or 9.14(4) or later |
| Cisco 7000 | Software Release 9.17(5.2) or later, or 9.17(6) or later |
| All Cisco routers (collection of Cisco 3000, Cisco 4000, Cisco 7000, or AGS+ routers) | Software Release 9.21(0.26) or later; 9.21(1) or later; or 9.1(8) or later |
| Cisco 7000 routers on which you want to perform microcode upgrades | Software Release 9.17(5.2) or later; 9.17(6) or later; 9.21(0.32) or later; or 9.21(1) or later |
Before you install and configure CiscoWorks, use the CiscoWorks Installation Worksheet and Configuration Worksheet to identify installation requirements and gather the information required for running the installation and configuration scripts.
When properly filled out, the CiscoWorks Installation Worksheet provides the information you must enter when running the installation scripts, before you physically install CiscoWorks. After you install CiscoWorks, you are ready to configure it. The CiscoWorks Configuration Worksheet enables you to gather the information you need to run the script that configures CiscoWorks.
Complete both worksheets and refer to them when installing and configuring your CiscoWorks software.
The CiscoWorks Installation Worksheet and descriptions follow.
This section explains each question on the Installation Worksheet. This information is required for the installation of CiscoWorks. To obtain and verify system information for some items in the worksheet, you will need to be logged in as a superuser. For information on how to log in as a superuser, refer to the section "Becoming a Superuser."
Your workstation must be running SunOS Version 4.1.2 or 4.1.3 before you can install CiscoWorks. To determine what version of SunOS you are using, enter the following command at the UNIX prompt:
hostname% uname -r
The SunOS version number displays on your monitor:
4.1.2
On your worksheet, indicate whether your system meets this requirement.
You must install HP OpenView Windows Version 3.3 on your workstation.
On your worksheet, indicate whether your system meets this requirement. If you check no, you need to install HP OpenView Windows Version 3.3.
You must install HP OpenView 3.3 on your workstation before you can install CiscoWorks. To find out whether HP OpenView is already installed on your system, enter the following command:
hostname% /usr/OV/bin/ovlicense
If HP OpenView is properly installed, you should see output that verifies that the OpenView license is valid. On your worksheet, indicate whether your system meets this requirement. If you check "no," you need to upgrade to HP OpenView 3.3.
CiscoWorks requires 500 MB of disk space (1,000 MB recommended) in a single disk partition on your system. If the disk partitions on your system are full, with inadequate disk space available for CiscoWorks, create a disk partition, a file system, or both for CiscoWorks software.
On your worksheet, indicate whether your system meets this requirement. If you check "no," you need to increase the disk partition. If you are not sure whether your system meets this requirement, refer to the next section, "Calculating Disk Space Requirements."
Although the required disk space is displayed during installation, Cisco Systems recommends that you calculate the space ahead of time to ensure its availability. You need to allocate 45 MB of disk space for the CiscoWorks installation.
If you are upgrading from an earlier version of CiscoWorks, add the amount of disk space used in the current $SYBASE/data directory, roughly 10 MB, to the 45 MB disk space requirement.
To estimate the disk space required for an upgrade, perform the following steps:
Step 1 Enter the following command:
This command reports the total number of kilobytes used by the $SYBASE/data directory.
Step 2 Divide the number of kilobytes in the $SYBASE/data directory by 1000.
This calculation gives you the approximate number of megabytes used in the $SYBASE/data directory.
Step 3 Add 45 MB to the number of megabytes calculated in step 2.
This is the disk space you will need to perform your upgrade.
Remember, if you are upgrading from a previous version of CiscoWorks, the process requires at least 10 MB of free space in the database.
To find out how much disk space is available on your system, enter the following command:
hostname% df
The amount of disk space available in each file system is displayed. Select a file system that has sufficient disk space available for installing CiscoWorks. For detailed information on how to manage disk partitions and file systems, refer to the Workstation and Network Administration publication.
The following overview summarizes the steps involved in creating a file system. For more information, refer to the Workstation and Network Administration publication or the manual pages on mkfs, fsck, mkdir, fstab, and mount. If you are unfamiliar with repartitioning disks or creating file systems, contact a knowledgeable system administrator.
Step 1 Create an empty file system on the disk partition you plan to use.
Step 2 Verify the integrity of the empty file system.
Step 3 Create a mount point directory.
Step 4 Configure the file system table and edit the /etc/fstab file.
Step 5 Mount the new file system.
CiscoWorks requires a minimum of 64 MB of RAM. To find out how much RAM is available on your system, make sure you are logged in as a superuser. Then enter the following command at the UNIX prompt:
hostname# dmesg | grep avail
The entry "avail mem" indicates the amount of RAM memory available on your system.
On your worksheet, indicate whether your system has at least 64 MB of RAM. If you check "No," you need to install more memory.
CiscoWorks requires a minimum of 110 MB (128 MB recommended) of swap space on your system. To find out how much swap space is available on your system, make sure you are logged in as a superuser. (Refer to "Becoming a Superuser.") Then use the following command at the UNIX prompt:
hostname# pstat -s
The output that displays on your monitor indicates the amount of swap space available on your system.
On your worksheet, indicate whether your system has at least 110 MB. If you check "No," you need to add more swap space. If the swap space on your system is less than 110 MB, expand the swap space by following the instructions in the Workstation & Network Administration publication.
After CiscoWorks is installed and configured, you can use several applications (Configuration Management, Configuration Management batch program, AutoInstall Manager, Software Library Manager, Device Software Manager, Configuration Snap-In Manager, and Sync w/Sybase) with the Trivial File Transfer Protocol (TFTP). With TFTP and CiscoWorks, you can transfer configuration files and software images between your system and other devices on your network that use the Simple Network Management Protocol (SNMP).
In order for TFTP to operate, you must follow the instructions in the section "Setting Up TFTP." You can perform this task either before or after CiscoWorks installation and configuration.
On your worksheet, indicate whether you want TFTP enabled on your system.
You can install CiscoWorks from a local or remote CD-ROM drive.
On your worksheet, indicate which method you will use.
If you are planning to install CiscoWorks from a CD-ROM drive attached to a remote system, find out whether you have a login account as a superuser (in other words, root) on that system. If you do not have superuser access to the remote system, contact the system administrator of the remote system to obtain a login account with superuser access to that system.
If you are installing CiscoWorks from a remote CD-ROM drive, obtain the complete host name of the remote system and make sure that this host name is listed in the /etc/hosts file on your system.
On your worksheet indicate whether you have superuser access, and enter the host name of the remote system.
The .rhosts file enables users to log into another user account on a remote system. If you plan to install CiscoWorks from a remote CD-ROM drive, the .rhosts file on that system must contain the host name of your local system and your username specified as a superuser. To verify the local host name and that your username is specified as superuser, access the .rhosts file by using a text editor such as vi or textedit.
For more information on the .rhosts file, refer to the SunOS Network Environment publication.
On your worksheet, indicate whether your host name is in the .rhosts file and your username is specified as a superuser.
The installation script requires you to specify the device name of the CD-ROM drive. You can either obtain the device name from your UNIX system administrator or display the contents of the /dev directory on your system by following these steps:
Step 1 Change to the /dev directory:
cd /dev
Step 2 Verify that you are in the /dev directory by entering the following command:
pwd
The directory path displays.
Step 3 List the devices available to your system to find out whether you have a device name similar to sr by entering the following command. (CD-ROM drives usually have device names similar to sr0, sr1, sr2, and so on.)
ls | more
A list of available devices displays on your monitor.
Step 4 To display the remainder of the list of devices, press the space bar.
If you cannot identify an appropriate device name for your CD-ROM drive, contact your UNIX system administrator for help in obtaining device information.
Check the appropriate box on your worksheet and, if applicable, specify the name of the device.
If you are installing CiscoWorks for the first time, check "new" on your worksheet.
If you are upgrading from an early version of CiscoWorks 2.1 to a later version of CiscoWorks 2.1, with both versions on a Sun workstation, check "upgrade." If you are upgrading, you must fill out the "Additional Upgrade Information" section at the end of the worksheet.
 | Caution With CiscoWorks 2.0 or later, a user can only belong to one group; therefore when upgrading, only the existing one-user-to-one-group associations will be preserved. After upgrading, you need to redefine all other user/group associations. |
You must specify the directory where you want the CiscoWorks software to be installed. If the directory does not already exist on your system, the installation script creates the directory and installs the software in that directory. The default directory path name is /usr/nms.
On your worksheet, indicate where the CiscoWorks software will be installed. If applicable, specify the the directory path name you plan to use.
If you are performing a new installation only, the installation script allows you to specify the disk partition on which you want to install Sybase and the corresponding transaction log, or to accept the default $NMSROOT. Depending on your needs, you can even share the Sybase installation across several disk partitions. In addition to choosing a location, you can specify the size of your database and transaction log.
Because the size of your particular database can vary, the installation program prompts you for how much space you want to allocate for Sybase and for the corresponding transaction log. For Sybase, specify a size that is at least 6 MB; or you can accept the default size of 50 MB. For the transaction log, specify a size that is at least 4 MB; or you can accept the default size of 10 MB.
After you specify a size and location for the disk partition, the installation script automatically checks to make sure you have the specified disk space before installing the database. If you do not have the disk space you requested, CiscoWorks automatically prompts you to select other partitions.
All workstations contain a kernel. In order for the Sybase Version 4.9.1 software to work on your system, you must modify the kernel. The kernel is built from a configuration file in either of the following directories:
/usr/share/ARCH/conf
/usr/sys/ARCH/conf
where ARCH can be sun4c, sun4m, or sun4n.
Most systems use a generic kernel that is stored in a configuration file called GENERIC. If the kernel was customized for your system, it might be stored in a customized configuration file with a different name. If you choose to allow the installation script to build the new kernel, it uses your current system configuration.
When you are logged in as superuser, you can also modify the kernel manually by following these steps:
Step 1 Back up your existing configuration file by entering the following command:
cp /vmunix /vmunix.bak
Step 2 Change directories by entering one of the following commands:
cd /usr/share/ARCH/conf
hostname# cd /usr/sys/ARCH/conf
Step 3 Copy the base kernel configuration file (usually called GENERIC) to filename by entering the following command, where filename is the name of the kernel configuration file:
cp GENERIC filename
Step 4 Add the following lines anywhere in the /usr/sys/ARCH/conf/<filename> file or /usr/share/ARCH/conf/<filename> file (if these lines already exist, you will need to modify them, not add them):
Step 5 Enter the following command:
filename
This command executes the configuration process and builds a directory called ../filename. You then return to the UNIX prompt.
Step 6 At the UNIX prompt, enter the following command:
# cd ../filename
# make
This command creates a file called vmunix or vmunix_small.
Step 7 Copy the vmunix or vmunix_small file, created in the previous step, by entering one of the following commands:
cp ./vmunix /vmunix
hostname# cp ./vmunix_small /vmunix
Step 8 Restart your system. The modified kernel is now loaded and ready for use with Sybase.
Step 9 For more information on modifying the kernel, refer to your Sun Workstation and Network Administration publication.
If you allow the installation script to modify the kernel configuration file, the script automatically saves the old kernel configuration file and names it as vmunix.syb_inst. You can remove this file or save it as a backup, as your needs determine.
On your worksheet, indicate the name of the kernel configuration file. If you want the installation script to modify the existing kernel, check GENERIC. If you want the installation script to modify a customized configuration file on your system, specify the name of this file.
CiscoWorks provides support for Terminal Access Controller Access System (TACACS). TACACS is an authentication protocol that requires users to supply a username and password in order to access Cisco devices.
When prompted by the installation script, you must indicate whether your workstation will be set up as a TACACS server. On your worksheet, indicate whether your system is to be set up as a TACACS server.
If you set up your network system as a TACACS server, the TACACS daemon startup facility will be automatically added to the /etc/rc.local file. During installation, if you respond Y[es] to set up a TACACS server, you are then asked whether you want the TACACS daemon to start automatically when you restart the system. If you answer no, the TACACS daemon will still be added to your etc/rc.local or but will be commented out. On your worksheet, indicate whether you want this functionality.
If you elect to set up a TACACS server, you need to supply a username when prompted by the installation script. The username you supply here is the one that is provided when a user attempts to remotely log in to manage Cisco devices.
If you elect to set up a TACACS server, you need to supply a TACACS password. On your worksheet, indicate the password for the specified TACACS username.
The TACACS extended account, named $enable$, is used to access routers that use the extended TACACS mode. For more information on the $enable$ account, see the CiscoWorks User Guide. On your worksheet, indicate whether you want your system to run in extended TACACS mode.
If you answered "Y" to accept an extended TACACS mode, you are then prompted to supply the password for the special TACACS $enable$ account. On your worksheet indicate the password that should be used for the extended TACACS user account.
This section explains items in the worksheet that are applicable only if you are upgrading from an early version of CiscoWorks 2.1 to the final version of CiscoWorks 2.1
Specify the directory of your existing CiscoWorks software. The installation script installs the new CiscoWorks software in the directory you specify here.
On your worksheet, check /usr/nms to accept the default, or specify a path name for another directory.
During installation, the installation script accesses the existing Sybase database on your system. In order to access the existing Sybase database, the script prompts you to enter the Sybase password.
On your worksheet, specify the Sybase password (sa and nmsuper).
The CiscoWorks installation script installs a new version of Sybase, which requires 45 megabytes of disk space. The database should have 10 megabytes of free space before running the upgrade.
On your worksheet, indicate whether your system meets this requirement. If you check "No," you need to add more disk space.
| Caution Remember to back up your Sybase database prior to upgrading to ensure your data has been saved. |
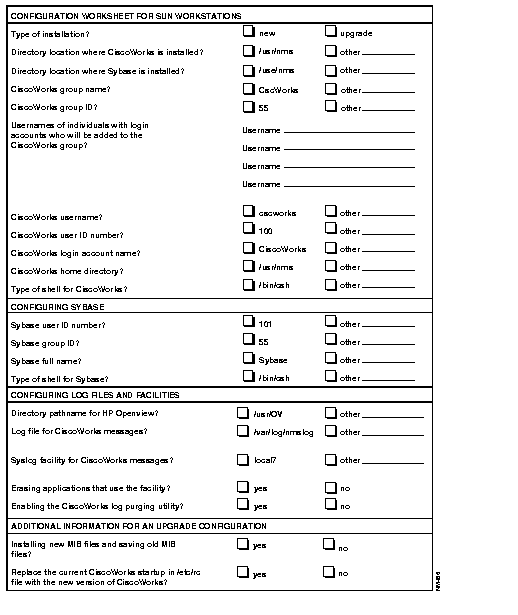
The CiscoWorks Configuration Worksheet and descriptions follow.
This section explains each question on the Configuration Worksheet. This information is required for the configuration of CiscoWorks. For detailed information on the /etc/passwd and /etc/group files, usernames, user IDs, group names, and group IDs, refer to the publications for the operating system you are using.
On your worksheet, indicate whether the CiscoWorks installation is a new installation or an upgrade. If you are performing an upgrade, you may want to complete the last section of the worksheet that requires additional information on configuring the upgrade.
On your worksheet, indicate /usr/nms or another directory path.
On your worksheet, indicate /usr/nms or another directory path to record where the Sybase database is installed.
In order for CiscoWorks users to access and use CiscoWorks, they must belong to a CiscoWorks group that is specified in the /etc/group file on your system. The configuration script prompts you to supply the group name you want to use for CiscoWorks users. The default name for the group is CscWorks.
During CiscoWorks configuration, you can add new users directly to the CscWorks group. The configuration script presents you with an interactive screen display that allows you to add new users directly to the CscWorks group. As a result, you can add new users to the CscWorks group during the configuration process without editing the /etc/group file. However, to add a new user after performing the CiscoWorks configuration, you need to edit the /etc/group file.
If you are upgrading from a presales version of CiscoWorks 2.1, you can use the CiscoWorks group name that you used for the previous version of CiscoWorks.
On your worksheet, check "CscWorks" to accept the default, or specify a unique name for the CiscoWorks group.
The CiscoWorks group, which is created and added to the /etc/group file by the configuration script, must be assigned a unique number. The configuration script proposes a default group ID number. If you specify a different group ID number for the CiscoWorks group, make sure that no other group specified in the /etc/group file uses it.
On your worksheet, check "55" to accept the default, or specify a unique group ID number for CiscoWorks.
In order to specify usernames while running the installation script and allow users to access and use CiscoWorks, the following prerequisites apply:
If you need to create user login accounts, refer to the instructions in Sun System & Network Administration publication.
On your worksheet, enter the usernames for users who have valid login accounts on your system and need to access CiscoWorks. If you are upgrading from a previous version of CiscoWorks, the configuration script displays the usernames of existing CiscoWorks users. You can either accept them and or add new usernames. To remove names, use a standard UNIX system administration utility.
In order for the CiscoWorks software to work on your system, you must specify a CiscoWorks login account and username when prompted by the configuration script. Cisco recommends that you use the default username cscworks. The configuration script adds the CiscoWorks login account and username to the /etc/passwd file. In addition, the username is added to the CiscoWorks group in the etc/group file.
On your worksheet, indicate that you accept the default username or specify a unique name for the CiscoWorks login account.
Users with valid login accounts and usernames on your system have unique user ID numbers that are specified in the /etc/passwd file. The CiscoWorks login account, which is created and added to the /etc/passwd file by the configuration script, requires a unique user ID number. The configuration script proposes a default user ID number (100). To specify a different user ID number for the CiscoWorks login account, make sure that no other user login account uses it.
On your worksheet, check 100 to accept the default number, or specify a unique user ID number for the CiscoWorks username.
The configuration script proposes a default full name (CiscoWorks).
On your worksheet, check CiscoWorks to accept the default name, or specify a different full name for the CiscoWorks login account name.
The configuration script installs the CiscoWorks software in a directory on your system. The default directory is /usr/nms.
On your worksheet, check /usr/nms to accept the default name, or specify a different subdirectory for the Sybase software.
As a user, you interact with the UNIX operating system by means of a shell. Two standard shells used on UNIX systems are the C shell and the Bourne shell. The C shell (/bin/csh) is the default shell you will use for Sybase-related tasks that are performed at the UNIX prompt.
On your worksheet, check /bin/csh to accept the default name, or specify a different subdirectory for the Sybase software, and if applicable, specify a shell of your choice.
The CiscoWorks software includes Sybase Version 4.9.1 software. In order for the Sybase software to work on your system, you must specify a Sybase login account and username. During database configuration, the script prompts you to supply the username for Sybase. Cisco recommends that you use the default username sybase. The script then adds the sybase login account and username to the /etc/passwd file. In addition, the username is added to the CiscoWorks group in the /etc/group file.
On your worksheet, check sybase to accept the default username, or specify a unique name for the Sybase login account.
Users with valid login accounts and usernames on your system have unique user ID numbers that are specified in the /etc/passwd file. The Sybase login account, which is created and added to the
/etc/passwd file by the configuration script, must be assigned with a unique user ID number. The script proposes a default user ID number (101). If you specify a different user ID number for the sybase login account, make sure that no other user login account uses it.
On your worksheet, check 101 to accept the default user ID, or specify a unique user ID number for the Sybase username.
The Sybase group, which is created and added to /etc/group file by the ncsconfigure script, must be assigned a unique number. The configuration script proposes a default group ID number (55).
On your worksheet, check 55 to accept the default group ID number, or specify one that is not already in use by a group in the /etc/group file.
A full name must be specified for the Sybase login account.
On your worksheet, check Sybase to accept the default Sybase full name, or specify a different full name for the Sybase login account.
As a user, you will interact with the UNIX operating system by means of a shell. Two standard shells used on UNIX systems are the C shell and the Bourne shell. The C shell (/bin/csh) is the default shell you will use for Sybase-related tasks that are performed at the UNIX prompt.
On your worksheet, check /bin/csh to accept the default shell, or specify a shell of your choice.
The CiscoWorks software must identify the directory where HP OpenView software was installed on your system. Unless you installed the HP OpenView software in a different directory, the HP OpenView software is generally installed in the default directory /usr/OV.
Verify the directory where the HP OpenView software is installed on your system. If it is installed in the /usr/OV directory, check /usr/OV on your worksheet. Otherwise, specify the directory where the HP OpenView software was installed.
The CiscoWorks Log Manager application uses a centralized log file, /var/log/nmslog, which gets messages from the UNIX syslogd process. If you want these messages to be logged to a different file, you can specify a different filename.
On your worksheet, check /var/log/nmslog to accept the default log file, or specify a different filename where the messages can be logged.
The CiscoWorks Log Manager application uses a centralized log file that gets messages from the UNIX syslogd process. The default facility is local7.
If you want to log both CiscoWorks messages and Cisco device messages and view them through the Log Manager application, use the default facility local7. Cisco routers use the local7 facility. If you specify a facility in the range of local0 through local6, only CiscoWorks messages are logged.
Information about the facility you choose will be stored in the $NMSROOT/etc/nms.rc file. At a later time, you can change the facility you use by modifying the rc.local file and either setting the NMSSYSLOG environment variable or editing the nms.rc file. For instructions on performing these tasks, refer to the CiscoWorks User Guide.
On your worksheet, check local7 to accept the default facility, or specify a facility of your choice.
The configuration script asks you whether it can erase any other applications that are using this facility. If you answer no, the CiscoWorks log utility might not be able to use the Syslog facility to do the following:
On your worksheet, indicate whether you want the script to erase applications using the facility.
CiscoWorks contains a centralized log file called nmslog. This log file can be automatically purged and backed up every day. As a result, the log purging utility is started automatically by the UNIX cron daemon. (A daemon is a UNIX process that repeatedly runs in the background, independent of any user's workstation or terminal.)
On your worksheet, indicate whether you want the nmslog file to be purged and backed up automatically.
If you are upgrading from an existing version of CiscoWorks, the configuration script prompts you for additional information. Enter this information in the section "Additional Information for an Upgrade Configuration," at the end of the worksheet.
The CiscoWorks software contains new MIB files. Upon installation, any MIB files that already existed on your system are automatically backed up in a file called mibs.bak in the $NMSROOT/etc directory under the appropriate CiscoWorks directory.
Check the box on the worksheet to indicate that you want to save your old MIB files.
You can specify whether you want the CiscoWorks daemons and the Sybase dataserver to be started automatically whenever the system is rebooted. If you allow them to be started automatically, the startup commands are added to the file named /etc/rc.local . Otherwise, you need to perform this task manually.
On your worksheet, indicate whether you want the CiscoWorks daemons and Sybase dataserver to be started automatically.
To perform the tasks associated with installing and configuring CiscoWorks, you must log into your system as a superuser (root). Being a superuser allows you to perform functions restricted from normal users.
| **before**If you are a relatively inexperienced UNIX user, limit your activities as a superuser to the tasks described in this publication. As a superuser, you can adversely affect your operating environment if you are unaware of the effects of the commands you use.@@before@@ | Caution **after**If you are a relatively inexperienced UNIX user, limit your activities as a superuser to the tasks described in this publication. As a superuser, you can adversely affect your operating environment if you are unaware of the effects of the commands you use.@@after@@ |
To become a superuser, you must know the root password. In the following examples, the root password is rootpassword.
If you are not logged in, enter the following commands to log in as a superuser:
login:rootPassword: <rootpassword> hostname#
The UNIX prompt is usually represented by a # sign, indicating that you are logged in as a superuser.
If you are already logged in, but not as root, enter the following commands to change your login to root:
hostname%suPassword:<rootpassword>hostname#
The UNIX prompt changes to a # sign, indicating that you are logged in as a superuser.
The upgrade option only applies to existing versions of CiscoWorks 2.1. If you have an existing version of CiscoWorks 2.1 only, you can upgrade to a later version of 2.1 by following the procedures outlined in this section.
CiscoWorks accesses the Sybase database, so you must close all database files and shut down your database before starting the backup process. If you do not perform these steps before you perform your backup, the integrity of your backup cannot be ensured.
To shut down the database, perform the following steps:
Step 1 Log into your system as a superuser.
Step 2 Depending on where you installed Sybase, enter one of the following at your UNIX prompt.
If Sybase is installed in $NMSROOT, enter
setenv SYBASE $NMSROOT/sybase
If you specified a different directory for Sybase, enter
setenv SYBASE Sybase_directory
Step 3 Execute the isql binary by entering the following:
$SYBASE/bin/isql -Usa -P password
If you have changed the password for the Sybase sa account, enter that password. If you have not changed the password, do not supply a password.
After starting isql, the prompt 1> displays.
Step 4 Enter the shutdown command as follows:
shutdown
go
The database shuts down, and the UNIX prompt displays. Continue to the next section for instructions on backing up your CiscoWorks data.
Back up your entire CiscoWorks system, including the $NMSROOT directory, current database and map files, as well as any additional Sybase data files. For information on making backups of UNIX files, refer to the UNIX manual pages on tar(1) or cpio(1).
| Caution To prevent any possible data loss, back up your system and database before installing CiscoWorks. |
After you shut down the Sybase database and back up your existing CiscoWorks software, follow the instructions in the Sun documentation to upgrade your version of SunOS to Version 4.1.2 or 4.1.3. After you install SunOS Version 4.1.2 or later, follow the instructions in your HP OpenView documentation to install HP OpenView.
The Trivial File Transfer Protocol (TFTP) enables you to transfer files between your system and other devices on your network that use the Simple Network Management Protocol (SNMP). You can use TFTP with several CiscoWorks applications (Configuration Management, Configuration Management Batch Program, AutoInstall, Software Library Manager, Device Software Manager, and Configuration Snap-In Manager, to transfer files.
You must verify that the TFTP daemon is enabled, the TFTP environment variable is set correctly, and a TFTP boot directory exists. Instructions for these tasks follow.
You can verify that TFTP daemon is enabled by completing the following steps:
Step 1 Log in as a superuser.
Step 2 Using a text editor such as vi , edit the /etc/inetd.conf file.
Step 3 Look in the file /etc/inetd.conf for the line that invokes tftpd. If the line begins with a pound sign [#], remove the sign with your text editor. Depending on your system, the line that invokes the TFTP daemon may look similar to the following:
#tftp dgram udp wait root /user/etc/in.tftpd in.tftpd -s /tftpboot
Step 4 Save the changes to the edited file and exit your text editor.
Step 5 At the UNIX prompt, enter the following command to display the process identification number for the inetd configuration.
The system response is similar to the following:
119 ? S 0:05 inetd
The first number in the output is the process ID of the inetd configuration.
Step 6 To enable your system to read the edited /etc/inetd.conf file, enter the following command:
kill -HUP 119
Step 7 Verify that TFTP is enabled by entering the following:
netstat -a | grep tftp
The output should be similar to the following:
udp 0 0 *.tftp *.*
If there is no output, TFTP is not enabled.
For additional information on TFTP, refer to the UNIX manual pages on the tftp and tftpd commands.
TFTPTYPE is an environment variable used by the ncsconfigure script to indicate which type of TFTP is being used. The Sun TFTP daemon requires that a file that is being transferred must first exist as a "dummy" file on the system. Other implementations require that the file does not exist on the system.
TFTPTYPE can take the value OVERWRITE (the file must exist and is overwritten) or NOOVERWRITE (the file cannot be overwritten; it must not exist). If you are using the standard Sun TFTP daemon, no action is required to set the TFTPTYPE variable. Otherwise, you must set TFTPTYPE accordingly.
To save and store configuration files that are loaded to a device when using CiscoWorks applicatons supported by TFTP, use the /tftpboot directory (on Sun workstations).
Creating and using the TFTP boot directory on your system is optional. The TFTP boot directory is accessible by all users. To protect the security of your system and limit access to it, you can choose not to set up this directory on your system. However, without a TFTP boot directory, you will be unable to use the following CiscoWorks applications: AutoInstall Manager, Configuration Management, and the Device Software Manager.
| Time Saver If you upgraded from an earlier version of CiscoWorks, the TFTP boot directory might already exist on your system. In that case, you need not perform these steps. |
To create the TFTP boot directory, perform the following steps:
Step 1 If the TFTP boot directory does not exist, enter the following command to create it:
Step 2 The /tftpboot directory must have the appropriate permissions. Modify the permissions with the following command:
chmod 777 /tftpboot
As a result, all users accessing the TFTP boot directory will have read, write, and execute permissions.
After completing the worksheets and other preparations required to install CiscoWorks, proceed to Chapter 3, "Installing and Configuring CiscoWorks" for instructions on installing and configuring the CiscoWorks software. If you want to learn about customizing your system, read the following section on "Modifying Your .Xdefaults File."
Some operations of CiscoWorks and HP OpenView Windows are determined by X Windows. As such, you can customize the way you work with CiscoWorks on HP OpenView by modifying your .Xdefaults file. For example, you can change the colors that HP OpenView Windows displays by changing your X Windows environment (Refer to your HP OpenView Windows User's Guide). Or, you can specify certain ways in which CiscoWorks runs in your X Windows environment.
This section provides information on the following topics:
All of the X resources used by CiscoWorks applications are customizable, including colors and fonts. By overwriting the default resources used in CiscoWorks, you can customize the colors and fonts to meet your needs. To use your own colors and fonts for CiscoWorks, perform one of the following procedures:
Defining the look of your text editor window requires that you add the following command to the .Xdefaults file, substituting the appropriate options:
Step 1 Confirm that X Windows is running. You can always start an X window by entering the x11start command at the UNIX prompt.
Step 2 Using your text editor, open your .Xdefaults file. The .Xdefaults file is usually stored in your home directory. For example, if you are using vi as your text editor, enter the following command:
vi $HOME/.Xdefaults
Step 3 Add the following command:
* EditorFormat:command string %s
Step 4 Similarly, to specify the emacs editor in /usr/local/bin, add the following line to the .Xdefaults file:
* EditorFormat:/usr/local/bin/emacs %s
Enabling boot file generation is a matter of editing the .Xdefaults file to specify the "on" state. To specify the "on" state, perform the following steps:
Step 1 Confirm that the X Window is running. You can always start an X window by entering the x11start command at the UNIX prompt.
Step 2 Using your text editor, open your .Xdefaults file. The .Xdefaults file is usually stored in your home directory. For example, if you are using vi as your text editor, enter the following command:
vi $HOME/.Xdefaults
Step 3 Add the following line to the .Xdefaults file in your home directory:
*Bootfile:on
Your CiscoWorks Log Manager redraws, or refreshes, its window according to a default interval of 900 seconds. You can customize the frequency of this process by modifying the .Xdefaults file. To change the refresh interval of the Log Manager window, perform the following steps:
Step 1 Confirm that the X Window is running. You can always start an X window by entering the x11start command at the UNIX prompt.
Step 2 Using your text editor, open your .Xdefaults file. The .Xdefaults file is usually stored in your home directory. For example, if you are using vi as your text editor, enter the following command:
vi $HOME/.Xdefaults
Step 3 Add the following line to your .Xdefaults file
XCiscoworks*refreshInterval:new interval in seconds
For example, if you want to reset the refresh interval to 450 seconds, enter the following line to your .Xdefaults file:
XCiscoWorks*refreshInterval:450
When working with CiscoWorks applications, you may notice that the window sizes may vary from application to application. The layout of the window and the size of its text and graphics is preset to be large enough to contain all the elements that define the window. However, you can resize the window without obscuring the text.
To reset the default CiscoWorks window size, perform the following steps:
Step 1 Confirm that X Windows is running. You can always start an X window by entering the x11start command at the UNIX prompt.
Step 2 Use a text editor such as vi to open the $HOME/XCiscoWorks file.
Step 3 Add the following line to your $HOME/XCiscoWorks file:
"XCiscoWorks*geometry: 500x400+0+0"
Step 4 Enter the following command:
xrdb -merge < ~/XCiscoWorks
|
|