|
|
This document describes new features, caveats, and modifications for SwitchProbe Release 4.1 firmware.
For detailed information about all SwitchProbe devices, refer to the SwitchProbe Installation and Configuration Guide.
Cisco documentation and additional literature are available in a CD-ROM package, which ships with your product. The Documentation CD-ROM, a member of the Cisco Connection Family, is updated monthly. Therefore, it might be more up to date than printed documentation. To order additional copies of the Documentation CD-ROM, contact your local sales representative or call customer service. The CD-ROM package is available as a single package or as an annual subscription. You can also access Cisco documentation on the World Wide Web at http://www.cisco.com, http://www-china.cisco.com, or http://www-europe.cisco.com.
If you are reading Cisco product documentation on the World Wide Web, you can submit comments electronically. Click Feedback in the toolbar, select Documentation, and click Enter the feedback form. After you complete the form, click Submit to send it to Cisco. We appreciate your comments.
This document includes the following sections:
This section describes the interface numbering conventions for each of the probes.
There are two probe types; Small Chassis series and Large Chassis Series. The small series has a maximum of three interfaces and a simple numbering convention. The Large Chassis series, however, can come in several configurations and the interface numbering convention varies from one probe to another.
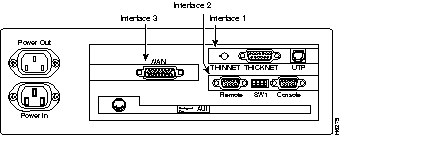
As described in the SwitchProbe Installation and Configuration Guide, there are two interfaces that ship with all SwitchProbe models.
In addition to the standard interfaces described above, a second LAN or a WAN interface might be present. The additional interface is always designated as Interface 3. Figure 1 shows the physical interface locations on the small chassis models.
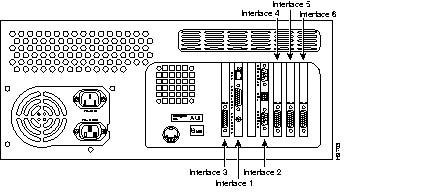
The large chassis SwitchProbes are available in several different configurations with different combinations of interface types. The standard LAN management (numbered 1) and remote interfaces (numbered 2) are always present, but are installed in different chassis locations depending on the probe model. The following sections present the installation standards and numbering conventions for interfaces on the different types of Large Chassis series probes.
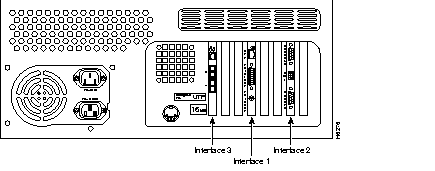
The interface cards for the FDDI or CDDI probes are installed as follows:
Figure 2 shows the FDDI rear panel with the interface cards installed.
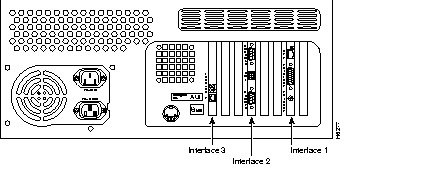
The interface cards for the Fast Ethernet probes are installed as follows:
Figure 3 shows the Fast Ethernet Half-Duplex SwitchProbe with the interface cards installed.
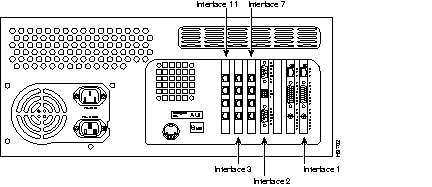
The interface cards for the Multiport 10BaseT Ethernet probes are installed as follows:
Figure 4 shows the Multiport Ethernet SwitchProbe with multiple interface cards installed.
The interface cards for the Multiport WAN probes are installed as follows:
Figure 5 shows the Multiport WAN with multiple WAN interface cards installed.
Cisco Systems recommends using TrafficDirector Release 5.1 with SwitchProbe Release 4.1 firmware. If you use an earlier release of TrafficDirector with the new firmware, you can monitor and use only generic domains (including the Remote Monitoring [RMON] domain).
The following new probe model and software agent is available with Release 4.1 firmware:
The following new features are available for all SwitchProbe devices:
The following new features, in addition to the new features listed in the previous section "New Features for Small and Large Chassis SwitchProbe Devices," are available for large chassis SwitchProbe devices:
All Fast Ethernet and FDDI agents include a FASTMIB option that allows you to configure the probe to improve RMON1 statistics tracking at the first sign of dropped packets. When the FASTMIB option is enabled, and a probe starts dropping packets, it will place greater emphasis on tracking RMON1 statistics instead of RMON2 statistics. As a result, the probe can continue tracking Media Access Control (MAC)-layer statistics during times of extremely heavy utilization.When the FASTMIB option is disabled, and a probe starts dropping packets, it will not place greater emphasis on RMON1 statistics. The FASTMIB option is enabled by default.
Take these steps to change the FASTMIB option:
Step 1 Access the Agent Configuration Utility.
Step 2 Select menu option [11] Enter Command Line Mode.
Step 3 Enter the get agent_options fastmib command to check the current status of the FASTMIB option.
Step 4 Do one of the following:
On Fast Ethernet probes, you can choose to include or exclude dribble errors as part of the CRC/align error count. When the discard_dribbles option is enabled, the agent does not include dribble errors as part of the CRC/align error count. When disabled, the agent includes dribble errors as part of the CRC/align error count. The discard_dribbles option is disabled by default.
Take these steps to change the discard_dribbles option:
Step 1 Access the Agent Configuration Utility.
Step 2 Select menu option [8] Select Interface and select the Fast Ethernet interface.
Step 3 Select menu option [11] Enter Command Line Mode.
Step 4 Enter the get if_options discard_dribbles command to check the current status of the discard_dribbles option.
Step 5 Do one of the following:
On Fast Ethernet half-duplex transmit probes, you can configure the Fast Ethernet interface speed to 10 or 100 Mbps. The default speed is 100 Mbps.
Take these steps to change the speed of the Fast Ethernet interface:
Access the Agent Configuration Utility.
 | Caution Be sure to select the interface, as described in the next step, before changing the speed of the Fast Ethernet interface. If you mistakenly change the speed of the management interface, you might lose communication with the probe and you will have to reconfigure it from a direct console connection. |
Step 2 Select menu option [8] Select Interface and select the Fast Ethernet interface.
Step 3 Select menu option [11] Enter Command Line Mode.
Step 4 Enter the get speed command to check the current speed of the Fast Ethernet interface.
Step 5 Enter the set speed new_speed command, where new_speed is 10 or 100 (Mbps).
Take these steps to upgrade the firmware in Flash memory on the HSSI adapter in T3 WAN probes:
Step 1 Retrieve the image file from Cisco Systems and store it in the /tftpboot directory of your Trivial File Transfer Protocol (TFTP) server.
Step 2 Access the Agent Configuration Utility.
Step 3 Select menu option [8] Select Interface and select the HSSI interface (3).
Step 4 Select menu option [11] Enter Command-line mode.
Step 5 Enter the do tftp nshssi.hex command, where nshssi.hex is the image filename.
Cisco Systems recommends the following configurations for best performance:
The following caveats are known in SwitchProbe Release 4.1 firmware:
The following caveats are resolved in SwitchProbe Release 4.1 firmware:
Cisco Connection Online (CCO) is Cisco Systems' primary, real-time support channel. Maintenance customers and partners can self-register on CCO to obtain additional information and services.
Available 24 hours a day, 7 days a week, CCO provides a wealth of standard and value-added services to Cisco's customers and business partners. CCO services include product information, product documentation, software updates, release notes, technical tips, the Bug Navigator, configuration notes, brochures, descriptions of service offerings, and download access to public and authorized files.
CCO serves a wide variety of users through two interfaces that are updated and enhanced simultaneously: a character-based version and a multimedia version that resides on the World Wide Web (WWW). The character-based CCO supports Zmodem, Kermit, Xmodem, FTP, and Internet e-mail, and it is excellent for quick access to information over lower bandwidths. The WWW version of CCO provides richly formatted documents with photographs, figures, graphics, and video, as well as hyperlinks to related information.
You can access CCO in the following ways:
For a copy of CCO's Frequently Asked Questions (FAQ), contact cco-help@cisco.com. For additional information, contact cco-team@cisco.com.
|
|