This chapter describes procedures to start the Cisco 3800 system, configure interfaces, and set parameters. It contains the following sections:
Starting Your System for the First Time
When you have successfully installed your Cisco 3800 series system, take the following steps to start it:
Step 1 Connect a diagnostic and maintenance terminal to the Combo card's RJ-45 SRV port.
Note You can use any PC or intelligent terminal emulation device. Make sure the attached terminal has a line speed of 9600 bps, 8 databits, no parity, and one stop bit.
Step 2 Set the power switch of the Cisco 3800 system to the ON position, starting the system for the first time. Each time you start the system, it performs a sequence of diagnostic routines. The green status LED flashes to indicate the following:
- Self-diagnostics are starting up, verifying the basic operation of CPU, memory, and interfaces
- System bootstrap software (boot image) is executed
- RAM is initialized
- Valid Cisco IOS image in RAM is located
- Valid configuration file in Flash memory is located
As the system starts, a series of self-diagnostic routines executes and the Combo card's main status LED displays as follows:
- Amber steady--System test sequence in process. Once software has control of the Combo card, the power-on self-test diagnostic bootup sequence begins.
- Red steady--System failure. Power-on self-test diagnostics have failed.
- Green steady--System OK. Power-on self-test diagnostics have passed.
Note If diagnostics do not pass, contact customer service.
Step 3 See the following section, "ROM Monitor," if your terminal boots with the following prompt:
Step 4 If diagnostics pass and your system boots the Cisco IOS software successfully, the following screen displays:
Restricted Rights Legend
Use, duplication, or disclosure by the Government is
subject to restrictions as set forth in subparagraph
(c) of the Commercial Computer Software - Restricted
Rights clause at FAR sec. 52.227-19 and subparagraph
(c) (1) (ii) of the Rights in Technical Data and Computer
Software clause at DFARS sec. 252.227-7013.
Cisco Systems, Inc.
170 West Tasman Drive
San Jose, California 95134-1706
Cisco Internetwork Operating System Software
IOS (tm) 3800 Software (C3800-J-M), Version 11.2(7)P, SHARED PLATFORM, RELEASE SOFTWARE (fc1)
Copyright (c) 1986-1997 by Cisco Systems, Inc.
Compiled Mon 23-Jun-97 19:14 by ccai
Image text-base: 0x04005000, data-base: 0x0479B1FC
Cisco 3800 (68360) processor (revision C) with 14336K/2048K bytes of memory.
Processor board ID 00337334
Channelized E1, Version 1.0.
Bridging software.
SuperLAT software copyright 1990 by Meridian Technology Corp).
X.25 software, Version 2.0, NET2, BFE and GOSIP compliant.
TN3270 Emulation software.
1 Ethernet/IEEE 802.3 interface(s)
3 Serial network interface(s)
1 Channelized E1/PRI port(s)
128K bytes of non-volatile configuration memory.
ATA flash device
Press RETURN to get started!
Step 5 Press Return to access the System Configuration Dialog.
--- System Configuration Dialog ---
At any point you may enter a question mark '?' for help.
Use ctrl-c to abort configuration dialog at any prompt.
Default settings are in square brackets '[]'
Would you like to enter the initial configuration dialog? [yes]:
Step 6 Enter y and press Return to proceed.
Now you are ready to set up your system's ports and trunks. Proceed to the section "Configuring Ports."
Note ROM monitor mode is for testing only. If you have questions about ROM monitor mode and its use, contact customer service.
Your system may boot in ROM monitor mode, characterized by the following prompt:
rommon 1 >
Exit ROM monitor mode to configure your system by following these steps:
Step 1 At the ROM monitor prompt, enter the following command:
A series of boot-up messages display the length of time remaining for your system to start.
Step 2 Wait 20 minutes or so as the system starts. You should now have Cisco IOS software loaded.
Step 3 If you are brought back to the ROM monitor prompt instead of the Cisco IOS software prompt, your system has been specifically configured to boot the ROM monitor software. You must reconfigure your system to boot the software image loaded in Flash memory by entering the command to configure a register:
Step 4 You now see a script that changes the configuration. This script displays the current configuration summary:
Configuration Summary
enabled are:
console baud: 9600
boot: the ROM Monitor
Step 5 At the prompt, indicate that you want to change the configuration:
Do you wish to change the configuration? y/n: y
Step 6 At the prompt, indicate that you want to disable diagnostics mode:
enable "diagnostic mode"? y/n [y]: n
Step 7 Press Return to select the default responses until you are asked whether you would like to change the boot characteristics, then respond yes:
change the boot characteristics? y/n [n]: y
enter to boot:
0 = ROM monitor
1 = the boot helper image
2-15 = boot system
Step 8 Enter the number 2, indicating that the Cisco IOS software image should boot:
The configuration summary displays the changes you have made.
Step 9 Enter the boot command again and wait for the system to bring you to the Cisco IOS prompt.
When you define your network's configuration scheme, refer to Figure 2-1, which illustrates which device types attach to which ports.
Figure 2-1: System Software Ports and Connections
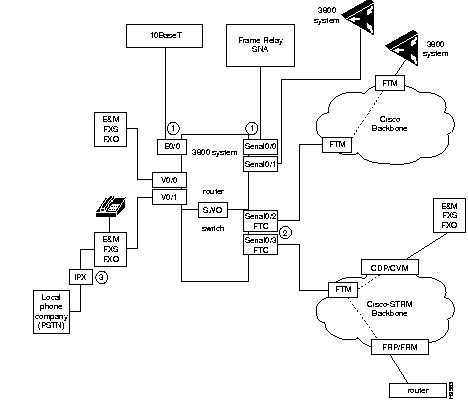
Note All port definitions require a slot and a port number. For example, the port
serial 0/0 is the first serial port in the first slot. In the three-slot chassis, slots are numbered from bottom to top.
Now you are ready to set up your system's ports and trunks by entering the initial configuration dialog. The tasks for configuration are:
Step 1 Press Return or enter yes at the initial configuration dialog prompt. The system responds:
First, would you like to see the current interface summary? [yes]:
Step 2 Press Return or enter yes. The system responds with a list of known ports:
Any interface listed with OK? value "NO" does not have a valid configuration
Interface IP-Address OK? Method Status Protocol
Ethernet0/0 unassigned NO not set up down
Serial0/1 unassigned NO not set down down
Serial0/2 unassigned NO not set down down
Serial0/3 unassigned NO not set down down
Switch0 unassigned NO not set down down
Note (1) If the Ethernet daughter card is installed, Serial0/0 does not display. (2) Switch0 is a virtual port connecting WAN switching functionality to Cisco IOS routing functionality. (3) Voice ports do not display here. Using the show command to display them. See the section "Set Individual Characteristics for a Voice Port" later in this chapter.
Step 3 Set global parameters and configure your serial and Ethernet ports. If one of the Cisco IOS software interfaces you expect to see does not display in the list of known ports, shut down your Cisco 3800 series system and double-check connections and backplane seating.
Set Up Global Parameters
To set up global parameters, which include host name, password, SNMP management, and IP information, follow these steps:
Step 1 Configure the global parameters. A typical configuration follows:
Configuring global parameters:
Enter host name [Switch]: Europa
The enable secret is a one-way cryptographic secret used instead of the enable password when it exists.
Enter enable secret: pail
The enable password is used when there is no enable secret and when using older software and some boot images.
Step 2 As prompted, enter an enable password and press Return.
Enter enable password: toy
 | Caution For maximum security, be sure the enable and enable secret passwords are different. If you enter the same password for both, the system accepts your entry, but warns you to enter a different password. |
Step 3 In response to the following prompt, enter a virtual terminal password:
Enter virtual terminal password: vterm1
Step 4 Press Return. The following message displays:
Configure SNMP Network Management? [yes]: no
Step 5 Enter no to refuse the Simple Network Management Protocol. You will configure SNMP later. You can use your own pre-configured SNMP dialog.
Step 6 In the following example, the system is configured for AppleTalk, IP and IPX. Configure the appropriate protocols for your device:
Configure Vines? [no]:
Configure LAT? [no]:
Configure AppleTalk? [no]: yes
Multizone networks? [no]: yes
Configure DECnet? [no]:
Configure IP? [yes]:
Configure IGRP routing? [yes]:
Your IGRP autonomous system number [1]: 15
Configure CLNS? [no]:
Configure IPX? [no]: yes
Configure XNS? [no]:
Configure Apollo? [no]:
Proceed to the next section to set up Ethernet interfaces to LANs.
Set Up Ethernet Interfaces to LANs
Ethernet interfaces allow you to connect to LANs. To configure the Ethernet interface parameters, you need to know your network addresses. Take the following steps to set up your Ethernet interface configuration:
Step 1 Press Return or enter y to configure an Ethernet interface:
Configuring interface Ethernet0/0:
Is this interface in use? [yes]: y
Note When you specify an Ethernet interface, identify its host Combo card's slot number and the number of the Ethernet interface. For example, interface ethernet 0/0 is the first Ethernet interface on the Combo card installed in the first slot.
Step 2 Determine which protocols you want to support on the Ethernet interface and enter the appropriate responses. The following example configures for AppleTalk, IP, and IPX:
Configuring IP on this interface? [yes]:
IP address for this interface: 172.16.72.1
Number of bits in subnet field [0]: 0
Class B network is 172.16.0.0, 8 subnet bits; mask is 255.255.255.0
Configuring AppleTalk on this interface? [no]: yes
Extended AppleTalk network? [no]: yes
AppleTalk starting cable range [0]: 3
AppleTalk ending cable range [1]: 3
AppleTalk zone name [myzone]:
AppleTalk additional zone name: otherzone
AppleTalk additional zone name:
Configuring IPX on this interface? [no]: yes
IPX network number [1]: B001
Step 3 To configure additional Ethernet interfaces, repeat this procedure.
Step 4 To display the interfaces you have configured, enter the show interface command:
Europa# show interface-e0/0
Step 5 When you press Return, you see the current configuration:
Ethernet0/0 is up, line protocol is up
Hardware is QUICC Ethernet, address is 0800.3e01.0249 (bia 0800.3e01.0249)
Internet address is 172.16.72.1
MTU 1500 bytes, BW 10000 Kbit, DLY 1000 usec, rely 255/255, load 1/255
Encapsulation ARPA, loopback not set, keepalive set (10 sec)
ARP type: ARPA, ARP Timeout 04:00:00
Last input 00:00:00, output 00:00:00, output hang never
Last clearing of "show interface" counters never
Queueing strategy: fifo
Output queue 0/40, 0 drops; input queue 0/75, 0 drops
5 minute input rate 0 bits/sec, 0 packets/sec
5 minute output rate 0 bits/sec, 0 packets/sec
28816 packets input, 12153458 bytes, 0 no buffer
Received 28783 broadcasts, 0 runts, 0 giants
0 input errors, 0 CRC, 0 frame, 0 overrun, 0 ignored, 0 abort
0 input packets with dribble condition detected
1237 packets output, 146472 bytes, 0 underruns
0 output errors, 101 collisions, 2 interface resets
0 babbles, 0 late collision, 49 deferred
0 lost carrier, 0 no carrier
0 output buffer failures, 0 output buffers swapped out
Proceed to the next section to set up serial interfaces to WANs.
Set Up Serial Interfaces to WANs
Serial interfaces allow you to connect to WAN). Follow these steps to configure your serial interfaces:
Step 1 Press Return or enter yes to configure the first serial interface:
Configuring interface Serial0/0:
Is this interface in use? [yes]:
Step 2 Determine which protocols you want to support on the serial interface and respond as appropriate. In the following example, the system is being configured for AppleTalk, IP, and IPX:
Note Port Serial0/0 does not display if the T1/Ethernet daughter card is installed.
Configuring IP on this interface? [yes]:
IP address for this interface: 172.16.73.1
Number of bits in subnet field [0]: 0
Class B network is 172.16.0.0, 0 subnet bits; mask is 255.255.255.0
Configuring AppleTalk on this interface? [no]: yes
Extended AppleTalk network? [yes]:
AppleTalk starting cable range [2]: 4
AppleTalk ending cable range [3]: 4
AppleTalk zone name [myzone]:
AppleTalk additional zone name: ZZ serial
AppleTalk additional zone name:
Configuring IPX on this interface? [no]: yes
IPX network number [1]: B002
Step 3 Configure additional serial interfaces, as follows:
Configuring IP on this interface? [yes]:
IP address for this interface: 172.16.74.2
Number of bits in subnet field [0]: 0
Class B network is 172.16.0.0, 0 subnet bits; mask is 255.255.255.0
Configuring AppleTalk on this interface? [no]: yes
Extended AppleTalk network? [yes]:
AppleTalk starting cable range [2]: 5
AppleTalk ending cable range [3]: 5
AppleTalk zone name [myzone]:
AppleTalk additional zone name: ZZ serial
AppleTalk additional zone name:
Configuring IPX on this interface? [no]: yes
IPX network number [1]: B003
Step 4 The configuration you entered displays and you are asked if you want to use it. Enter yes to save the configuration in the startup file:
Use this configuration? [yes/no]: yes
Building configuration...
Use the enabled mode 'configure' command to modify this configuration.
Press RETURN to get started!
Step 5 Refer to the section "Cisco IOS Software Basics" in the chapter "About the Cisco 3800 and Cisco IOS Software" for more information about Cisco IOS software.
Step 6 To display the interface you have configured, use the show interfaces command:
Step 7 Press Return to display a list of existing interfaces and their configurations:
Ethernet0/0 is up, line protocol is up
Hardware is QUICC Ethernet, address is 0800.3e01.0250 (bia 0800.3e01.0250)
Internet address is 192.168.9.120/24
MTU 1500 bytes, BW 10000 Kbit, DLY 1000 usec, rely 255/255, load 1/255
Encapsulation ARPA, loopback not set, keepalive set (10 sec)
ARP type: ARPA, ARP Timeout 04:00:00
Last input 00:00:00, output 00:00:03, output hang never
Last clearing of "show interface" counters never
Queueing strategy: fifo
Output queue 0/40, 0 drops; input queue 0/75, 0 drops
5 minute input rate 1000 bits/sec, 0 packets/sec
5 minute output rate 0 bits/sec, 0 packets/sec
9555 packets input, 2463186 bytes, 0 no buffer
Received 9555 broadcasts, 0 runts, 1 giants, 0 throttles
1 input errors, 0 CRC, 0 frame, 0 overrun, 0 ignored, 0 abort
0 input packets with dribble condition detected
600 packets output, 58463 bytes, 0 underruns
0 output errors, 24 collisions, 1 interface resets
0 babbles, 0 late collision, 12 deferred
0 lost carrier, 0 no carrier
0 output buffer failures, 0 output buffers swapped out
Serial0/1 is administratively down, line protocol is down
Hardware is QUICC Serial
MTU 1500 bytes, BW 1544 Kbit, DLY 20000 usec, rely 255/255, load 1/255
Encapsulation HDLC, loopback not set, keepalive set (10 sec)
Last input never, output never, output hang never
Last clearing of "show interface" counters never
Input queue: 0/75/0 (size/max/drops); Total output drops: 0
Queueing strategy: weighted fair
Output queue: 0/64/0 (size/threshold/drops)
Conversations 0/0 (active/max active)
Reserved Conversations 0/0 (allocated/max allocated)
5 minute input rate 0 bits/sec, 0 packets/sec
5 minute output rate 0 bits/sec, 0 packets/sec
0 packets input, 0 bytes, 0 no buffer
Received 0 broadcasts, 0 runts, 0 giants, 0 throttles
0 input errors, 0 CRC, 0 frame, 0 overrun, 0 ignored, 0 abort
0 packets output, 0 bytes, 0 underruns
0 output errors, 0 collisions, 13 interface resets
0 output buffer failures, 0 output buffers swapped out
0 carrier transitions
DCD=down DSR=down DTR=down RTS=down CTS=down
Serial0/2 is administratively down, line protocol is down
Hardware is QUICC Serial
MTU 1500 bytes, BW 1544 Kbit, DLY 20000 usec, rely 255/255, load 1/255
Encapsulation HDLC, loopback not set, keepalive set (10 sec)
Last input never, output never, output hang never
Last clearing of "show interface" counters never
Input queue: 0/75/0 (size/max/drops); Total output drops: 0
Queueing strategy: weighted fair
Output queue: 0/64/0 (size/threshold/drops)
Conversations 0/0 (active/max active)
Reserved Conversations 0/0 (allocated/max allocated)
5 minute input rate 0 bits/sec, 0 packets/sec
5 minute output rate 0 bits/sec, 0 packets/sec
0 packets input, 0 bytes, 0 no buffer
Received 0 broadcasts, 0 runts, 0 giants, 0 throttles
0 input errors, 0 CRC, 0 frame, 0 overrun, 0 ignored, 0 abort
0 packets output, 0 bytes, 0 underruns
0 output errors, 0 collisions, 13 interface resets
0 output buffer failures, 0 output buffers swapped out
0 carrier transitions
DCD=down DSR=down DTR=down RTS=down CTS=down
Serial0/3 is administratively down, line protocol is down
Hardware is QUICC Serial
MTU 1500 bytes, BW 1544 Kbit, DLY 20000 usec, rely 255/255, load 1/255
Encapsulation HDLC, loopback not set, keepalive set (10 sec)
Last input never, output never, output hang never
Last clearing of "show interface" counters never
Input queue: 0/75/0 (size/max/drops); Total output drops: 0
Queueing strategy: weighted fair
Output queue: 0/64/0 (size/threshold/drops)
Conversations 0/0 (active/max active)
Reserved Conversations 0/0 (allocated/max allocated)
5 minute input rate 0 bits/sec, 0 packets/sec
5 minute output rate 0 bits/sec, 0 packets/sec
0 packets input, 0 bytes, 0 no buffer
Received 0 broadcasts, 0 runts, 0 giants, 0 throttles
0 input errors, 0 CRC, 0 frame, 0 overrun, 0 ignored, 0 abort
0 packets output, 0 bytes, 0 underruns
0 output errors, 0 collisions, 13 interface resets
0 output buffer failures, 0 output buffers swapped out
0 carrier transitions
DCD=down DSR=down DTR=down RTS=down CTS=down
Switch0 is up, line protocol is up
Hardware is Virtual Frame Relay Switch
MTU 8192 bytes, BW 1544 Kbit, DLY 20000 usec, rely 255/255, load 1/255
Encapsulation FRAME-RELAY, loopback not set, keepalive set (10 sec)
LMI enq sent 0, LMI stat recvd 0, LMI upd recvd 0, DTE LMI up
LMI enq recvd 0, LMI stat sent 0, LMI upd sent 0
LMI DLCI 1023 LMI type is CISCO frame relay DTE
FR SVC disabled, LAPF state down
Broadcast queue 0/64, broadcasts sent/dropped 0/0, interface broadcasts 0
Last input never, output never, output hang never
Last clearing of "show interface" counters never
Input queue: 15/75/0 (size/max/drops); Total output drops: 1
Queueing strategy: weighted fair
Output queue: 0/64/0 (size/threshold/drops)
Conversations 0/1 (active/max active)
Reserved Conversations 0/0 (allocated/max allocated)
5 minute input rate 0 bits/sec, 0 packets/sec
5 minute output rate 0 bits/sec, 0 packets/sec
0 packets input, 0 bytes, 0 no buffer
Received 0 broadcasts, 0 runts, 0 giants, 0 throttles
0 input errors, 0 CRC, 0 frame, 0 overrun, 0 ignored, 0 abort
1 packets output, 22 bytes, 0 underruns
0 output errors, 0 collisions, 1 interface resets
0 output buffer failures, 0 output buffers swapped out
0 carrier transitions
E1 0/0 is down.
Applique type is Channelized E1 - balanced
Transmitter is sending remote alarm.
Receiver has loss of signal.
Framing is CRC4, Line Code is HDB3, Clock Source is Line.
Data in current interval (0 seconds elapsed):
0 Line Code Violations, 0 Path Code Violations
0 Slip Secs, 0 Fr Loss Secs, 0 Line Err Secs, 0 Degraded Mins
0 Errored Secs, 0 Bursty Err Secs, 0 Severely Err Secs, 0 Unavail Secs
T1/E1 Interface A Configuration
E1 - 75 ohm
Mode: No HDLC framing
Interframe time fill: Flags
Framing format (line type): CRC-4 multiframe
Line coding: HDB3
Transmit clock source: Loop
In-band loop up code: Not sending, remote end not looped
In-band loop down code: Not sending
Clocking configuration
Source Status Divisor Current Times
Primary T1/E1 Bad 0xFF No 0
Fallback Internal Good 0x00 No 0
Interface A:
Framing errors = 0
Code violations = 0
CRC errors = 0
Errored blocks = 0
Interrupt counters for interface A:
ISR0 ISR1 ISR2 ISR3
----------------------------------------------------------------------------
RME 0 CASE 0 FAR 1 ES 1
RFS 0 RDO 0 LFA 1 SEC 5094
ISF 0 ALLS 0 MFAR 1 XSLP 0
RMB 0 XDU 0 LMFA 0 LLBSC 0
RSC 0 XMB 0 AIS 0 SLN 0
CRC6 0 XLSC 0 LOS 1 SLP 0
RPF 0 XPR 0 RAR 1 AIS16 0
RA 0 API 0
Control Register Settings for interface A:
mode=E0 ah1=FD rah2=FF ral1=FF ral2=00 ipc=80
ccr1=08 ccr3=00 pre=00 rtr1=00 rtr2=00 rtr3=00 rtr4=00
ttr1=00 ttr2=00 ttr3=00 ttr4=00
imr0=D9 imr1=F9 imr2=00 imr3=00 imr4=00
fmr0=F0 fmr1=4A fmr2=92 loop=00 xsw_fmr4=9F xsp_fmr5=0C
xc0=00 xc1=3E rc0=05 rc1=C0 xpm0=9C xpm1=03 xpm2=00
tswm=00 tst1=00 idle=54 xsa4_xdl1=00 xsa5_xdl2=00 xsa6_xdl3=00
xsa7_ccb1=00 xsa8_ccb2=00 ccb3=00
icb1=00 icb2=00 icb3=00 icb4=00
lim0=00 lim1=80 pcd=05 pcr=00 dec=00
Status Register Values for interface A:
frs0=A2 frs1=08 rsw_frs2=40 rsp_frs3=04
rsa4_rdl1=00, rsa5_rdl2=00
rsa6_rdl3=00 rsa7=00 rsa8=00 tsr0=72 tsr1=00
sis=58 rsis=02 gis=00 vstr=00
Voice 0/0 channel Unconfigured, signaling Idle
Hardware is DSP, impedence is 600 Ohms
Input gain: 0/-.- dbm (configured/actual)
Output gain: 0/-.- dbm (configured/actual)
Signaling protocol is FXS transparent
Coder in use: 16K LDCELP
Enabled: echo cancel, non-linear processing
Disabled: noise, VAD, SVC
Dial type is DTMF Call progress tones: NorthAmerica
Last clearing of "show voice" counters never
Active transfers: 0, inactive transfers 0
Offhooks: 0 Onhooks: 0 Seizures 0
Response duration 0/0 (min/max)
Response wait 0/0 (min/max)
Number of digits 0/0/0 (tone/pulse/bad pulse)
Active usage 0
Telephony packets 0/0/0 (voice/signaling/dropped)
Network packets 0/0/0 (voice/signaling/dropped)
Packets 0/0 (missing/replayed)
Average playout delay 0
Step 8 Check to make sure your specified settings are completed accurately.
You are now ready to set up voice ports.
You must properly configure DIP switches SW1, SW2, and SW3 on the Combo card as described in the chapter "Installing Cisco 3800 Cards" in the publication Cisco 3800 Series Hardware Installation for line impedance, 2/4 wire E&M, E&M type configuration, FXS ground start/loop start, and/or FXO ground start/loop start before you set the characteristics as described in this section.
Depending on your DIP switch configuration, Cisco IOS software prompts you to set different characteristics. This example has both voice ports set as E&M.
The individual characteristics that can be set up for a voice port are as follows:
Voice ports do not display in the show interface listing described for serial and Ethernet ports. Take the following steps to display and configure voice ports:
Step 1 Display the currently defined voice port states using the show command:
Step 2 When you press Return, the current settings of the voice ports are displayed--for example, as follows:
Voice0/0 is up, line protocol is up
Hardware is DSP, impedance is 600 Ohms
Input gain: -65.22/-69.66 dbM (configured/actual)
Output gain: -65.22/-69.66 dbM (configured/actual)
Signaling protocol is E&M wink-start, loopback not set
Enabled: VAD, noise generation, echo cancel, non-linear processing
Disabled: SVC
Dial type is DTMF. Call progress tones: North America
Last clearing of "show voice" counters never
Active transfers: 0, inactive transfers 3
Offhooks 1, onhooks 0, seizures 1
Response duration 10/5 (min/max)
Response wait 3/1 (min/max)
Number of digits 300/50/0 (tone/pulse/bad pulse)
Active usage 100
Telephony packets 25099/57584/848 (voice/signaling/dropped)
Network packets 578984/23594/4675 (voice/signaling/dropped)
Voice0/1 is up, line protocol is up
Hardware is DSP, impedance is 600 Ohms
Input gain: -65.22/-69.66 dbM (configured/actual)
Output gain: -65.22/-69.66 dbM (configured/actual)
Signaling protocol is E&M wink-start, loopback not set
Enabled: VAD, noise generation, echo cancel, non-linear processing
Disabled: SVC
Dial type is DTMF. Call progress tones: North America
Last clearing of "show voice" counters never
Active transfers: 0, inactive transfers 3
Offhooks 1, onhooks 0, seizures 1
Response duration 10/5 (min/max)
Response wait 3/1 (min/max)
Number of digits 300/50/0 (tone/pulse/bad pulse)
Active usage 100
Telephony packets 25099/57584/848 (voice/signaling/dropped)
Network packets 578984/23594/4675 (voice/signaling/dropped)
Note Values will differ as Cisco IOS software polls your voice ports and network status in real time.
Step 3 To change a voice port's attributes--for example, to enable pulse dialing instead of DTMF--enter configuration mode:
Step 4 Press Return. Note how the prompt changes to indicate configuration mode:
Enter configuration commands, one per line. End with CNTL/Z.
Europa(config)#
Step 5 Specify that you want to configure a specific voice port by putting a slash between slot and port number (port and slot numbering begins with 0):
Europa(config)# voice-port 0/0
Step 6 When you press Return, note how the prompt changes to indicate that you are configuring a voice port:
Step 7 Although default settings are in place and will generally work without you changing anything, you can modify the following characteristics:
- cptone--Call progress tones can be set from the North America default to U.K., Germany, France, Japan, Australia, Brazil, or China.
- default--Sets all your voice port attributes back to default settings.
- dial-type--Can be set from the DTMF default to pulse or other.
- echo-cancel--Echo cancellation is enabled by default.
- em--Configures E&M type signalling. This attribute is configurable only if DIP switches are set to E&M.
- exit--Exits voice port configuration mode.
- gain--The input or output-gain can be set from the 0 dB default to a value in the accepted range of -14 to 6 dB.
- gen-noise--Fills in gaps of silence with background noise.
- vad--Uses voice activity detect to transmit only voice when necessary; otherwise, always transmit.
- echo cancel--Uses the integrated echo canceller.
- non-linear processing--Used for echo cancellation.
- svc--If your VDM DIP switches are set up as a switched virtual circuit, used to accept SVC connections.
- shutdown--Shuts down the port function or brings it back up.
- timing--Sets the line's digit, inter-digit, pulse, pulse inter-digit, clear-wait, wink-wait, wink-duration, delay start, and delay duration timing.
Step 8 Specify the attribute of the selected voice port you want to configure by entering the appropriate syntax. Depending on whether your interface type is FXS, FXO (connecting two Cisco 3800 systems) or E&M (a Cisco 3800 connected to an IGX or IPX switch), configurable parameters will change.
Step 9 If your system is set up as a switched virtual circuit, set the SVC parameter for the voice port as follows:
Europa (config-voice)# svc dial-peer voice dial-peer-tag
dial-peer-tag is the numeric identifier for this peer. Choose a value between 1 and 10,000.
This gives your voice port dial tone. You won't need this for a direct connection between two Cisco 3800 systems.
Note If you set SVC when you don't need it, you will continually encounter an error.
Step 1 Associate your voice port with a dial peer by entering the following syntax at the global configuration mode prompt:
Europa (config)# dial-peer voice tag pots
tag is a local value only between 1 and 10,000.
Step 2 Press Return and, at the conf-dial prompt, select the specific voice port:
Europa (conf-dial)# port slot/port
Step 3 Press Return. You can now set the following attributes of the dial peer using the specified syntax:
- acceptable quality of service--The minimum acceptable quality of service for calls using this destination address:
Europa (conf-dial)# accept-qos
{ best effort | controlled load | controlled delay | predicted delay | guaranteed delay }
- requested quality of service--The requested quality of service for calls using this destination address:
Europa (conf-dial)# request-qos
{ best effort | controlled load | controlled delay | predicted delay | guaranteed delay }
- coder--The preferred voice encoding algorithm for this peer:
Europa (conf-dial)# coder
{ adpcm32k | adpcm24k | ldcelp16k | csacelp8k }
- dial prefix--The dial prefix to automatically attach to outbound calls on this interface. The string can include commas to indicate a pause and plus signs (+) to indicate substituting in the destination pattern, as well as a string of dial digits:
Europa (conf-dial)# dial prefix
dial_string
- fax rate--Enable or disable the fax relay for this peer:
Europa (conf-dial-peer)# fax-relay
rate-value
or
Europa (conf-dial-peer)# fax-relay disabled
Step 4 Assign the dial peer to a hunt group. This is a reference number between 1 and 1000 for a hunt group:
Europa (conf-dial-peer)# group value
Step 5 Assign a destination pattern, the E.164 number or prefix to associate with this dial peer. All peers in the same peer group ID must use the same destination pattern:
Europa (conf-dial)# dest-pat E.164_number_or_prefix
Note You should already have established a destination pattern scheme. When you have established it, you should record it.
You have now set up the voice port and voice peer. The following sections provided detailed command line information for configuring other parameters.
Set the selected voice interface's input or output gain to alternate from its 0 dB default setting using the following syntax:
gain in gain-level
gain out gain-level
gain-level is measured in decibels, from -14 to +6.
Set the selected interface's dial type to alternate from its DTMF default setting using the following syntax:
dial-type { pulse | dtmf }
pulse--Pulse dialing. Dial digits are transmitted using a series of pulses.
dtmf--Dual tone multifrequency dialing, also known as touch-tone.
Set the Voice Compression Encoding Algorithm
Configure the interface with the appropriate voice compression encoding algorithm using the following syntax:
coder { adpcm32k | adpcm24k | ldcelp16k | csacelp8k }
Note The actual encoder being used for a call may be different as a result of call negotiations.
adpcm32k--ITU G.726 standard, 32k rate
adpcm24k--ITU G.726 standard, 24k rate
ldcelp16k--ITU G.728 standard, 16k rate (default)
csacelp8k--ITU G.729 standard, 8k rate
Configure the fax transmit rate with the following syntax. All choices are bit rates, except for voice, which uses the currently configured voice rate:
fax-rate { voice | r2400 | r4800 | r7200 | r9600 | r14400 }
You can require a voice interface to connect to a variety of voice products with different timing to detect digits--for example, pulses and winks--using the following syntax:
timing { digit | inter-digit | pulse | pulse-inter-digit | clear-wait | wink-wait | wink-duration | delay-start | delay-duration } amount_of_time
digit--DTMF digit duration in milliseconds (50-500, default 100).
inter-digit--DTMF interdigit duration in milliseconds (50-500, default 100).
pulse--Pulse dialing rate in pulses per second (pps) (10-20, default 20).
pulse-inter-digit--Pulse dialing interdigit timing in microseconds (100-1000, default 500).
clear-wait--Time of inactive seizure signal to declare a call cleared (200-2000, default 500).
wink-wait--Maximum wink wait duration for wink start signaling (10-100, default 50).
wink-duration--Maximum wink duration for wink start signaling (10-100, default 50).
delay-start--Timing of the generation of a delay start signal from detection of incoming seizure (10-100, default 50).
delay-duration--Maximum delay signal duration for delay dial signaling (10-100, default 50).
amount_of_time--The value in seconds.
Set Speed Dial with Number Expansion
Set a translation between an abbreviated speed dial number and a full E.164 (telephone) number:
[ no ] number-expansion dialed_number translation
dialed_number--A simple regular expression uses digits, periods (.) to indicate placeholders, and asterisks (*) to indicate wildcards.
translation--An E.164 number or prefix is used to translate the dialed number. If this translation is a prefix, it will be prepended to all nonspecified digits in the dialed number pattern. For example, for the number expansion 7.... +1408527, and the dialed number is 74321, the resulting translation would be +14085274321.
Note You can use the
clear voice-port { number } command to reset all voice interface parameters to default values.
Set Voice PVCs for Switched Voice
Use the following global configuration command to set up a voice PVC:
connect { v0 | v1 } dst-addr switch-group { active | passive }
A maximum of 100 connections can be made using the connect command. For example:
connect s0/1 dlci 100 s0/3 conn 52
Two examples of setting up a voice PVC for switched voice are as follows:
- To set up a PVC between two voice ports on the same Cisco 3800 system:
connect voice 10 voice 11
- To set up a PVC between a voice port and a connection ID on an FTC trunk:
connect voice 10 s0/3 connection-id 24
Note Use even connection ID numbers when setting up voice PVCs. Using an odd connection ID number results in the error message INVALID_DEST_VC.
Set Up FTC Trunks to the Backbone or Switch
The FTC trunk connects the Cisco 3800 to the FTC or FTM card on the IGX or IPX switch, or it connects two Cisco 3800 systems back to back. The FTC trunk also offers additional functionality for IGX or IPX systems that don't support Cisco 3800 access devices. Limited functionality on a public Frame Relay network is also offered.
Before you begin to set up an FTC trunk, you need the following information:
- Connection IDs (1-252)--Specify which of 252 possible virtual circuits on the FTC trunk are being used. Connection IDs matching at each end of the FTC trunk connect together and are used at both the Cisco 3800 and the IGX or IPX switch ends of the connection.
- Type of device--At the remote end, either an IGX or IPX switch or another.
- Physical port--To use as the FTC trunk.
- Physical media type--Specify the media type.
There are two ways to set up an FTC trunk from a Cisco 3800 system:
- To an IGX or IPX FTC or FTM card through a Frame Relay cloud
- Back to back. to another Cisco 3800
Methodologies for both types of configurations vary.
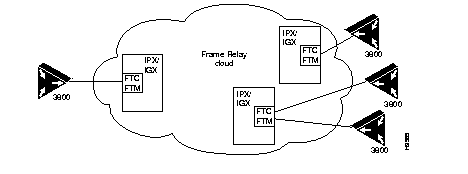
Cisco 3800 to an IGX or IPX FTC or FTM Card through a Frame Relay Cloud
Figure 2-2 illustrates a connection from a Cisco 3800 to an IGX or IPX FTC or FTM card through a Frame Relay cloud.
Figure 2-2: Connection through a Frame Relay Cloud
When connecting a Cisco 3800 to an FTC or FTM card, make sure the following are set:
- encapsulation ftc-trunk.
- media-type.
- ftc-trunk management-protocol normal.
- ftc-trunk management-dlci some_dlci_16-991 (must match the dlci in the IGX or IPX addad command).
- clock-rate rate. If an external clock is used, set no clock rate.
- bandwidth rate_in_kbps (not needed if clock-rate is used).
- keepalive or no keepalive. Set keepalive if LMI is running; set no keepalive if LMI is not running.
Note Although it is not required, you may also want to set ftc-trunk voice dlci, ftc-trunk frame-relay-dlci, ftc-trunk retry-count, and ftc-trunk transmit-timeout.
Back-to-Back Configuration
Figure 2-3: Connection Back to Back

When connecting a Cisco 3800 to another Cisco 3800, make sure the following are set:
- encapsulation ftc-trunk.
- media trunk.
- ftc-trunk management-protocol (normal at one end, inverted at the other).
- ftc-trunk-management-dlci some_dlci_16-991 (must match at both ends).
- clock rate rate. If an external clock is set, set no clock rate.
- bandwidth rate_in_kbps (not needed if clock rate is used).
- keepalive or no keepalive as required, whether or not LMI is running.
Note Although not required, you may also want to set ftc-trunk voice-dlci, ftc-trunk frame-relay-dlci, ftc-trunk transmit-timeout, and ftc-trunk retry-count.
Set FTC Encapsulation
To set a serial port as an FTC trunk, in interface configuration mode, enter the following command:
encapsulation ftc-trunk
Set FTC Management Protocol to Normal
Setting the FTC management protocol to normal sets up the trunk to run a standard FTC trunk protocol.
- If your FTC trunk connects to the FTC or FTM card on an IPX or IGX switch, set management protocol to normal.
- If your IGX or IPX switch or your FTC or FTM card does not support access devices such as the Cisco 3800, refer to information in the Cisco IOS configuration guide and command reference publications on using management-protocol legacy.
- If your FTC trunk connects to another Cisco 3800, either directly or through a Public Network, set one end to Normal and the other end to Inverted with the following syntax:
ftc-trunk management-protocol { normal | inverted }
Select FTC Management DLCIs
The management DLCI specifies the DLCI to be used to carry the management protocol frames. In addition, if Frame Relay DLCI and voice DLCI parameters are not set, management DLCI will also be used for those types of traffic.
Set the back-to-back FTC trunk's Management DLCI as follows:
- If your FTC trunk connects to another Cisco 3800 directly, on a wire or leased line, select any valid DLCI in the range of 16 to 991; you must select the same DLCI at both ends.
- If your FTC trunk connects to another FTC trunk through a public Frame Relay network, select a DLCI that has been provisioned by your service provider.
- If your FTC trunk connects to the FTC or FTM card in an IGX or IPX switch, then DLCI 991 is commonly used. If you are connected through a public Frame Relay network, select a DLCI that has been provisioned by your service provider. Use the command addad on the IGX or IPX switch to specify the management DLCI. The management DLCI set on the IGX or IPX side need not be unique to the scheme on the Cisco 3800 side.
Use the following syntax:
ftc-trunk management-dlci dlci
dlci can be a value in the range of 16-991.
Set Clock Rate
To set the back-to-back FTC trunk's clock rate, follow these guidelines:
- If your Cisco 3800 is to provide clocking, set the trunk's clock rate.
- If your Cisco 3800 is connected to another Cisco 3800, the clock rate should be set to no clock rate at one end and to the line speed at the other end.
- If your Cisco 3800 is connected to a public network or FTC or FTM card, a CSU, DSU, or other equipment, set the clock rate to no clock rate, indicating that the trunk will accept clocking from the network, CSU, DSU, or other equipment.
- If the Cisco 3800 is connected to the FTC or FTM card, the FTC or FTM card will usually provide clocking, so set the clock rate to no clock rate.
The following clock rates are displayed when you invoke the command clock rate:
robot1 (config-if)# clock rate
speed (bits per second)
1200     256000
2400     384000
4800     500000
9600     512000
14400    600000
19200    700000
28800    768000
32000    800000
38400    1000000
56000    1200000
57600    1300000
64000    1400000
72000    1600000
115200   1800000
125000   2000000
128000   3000000
148000   4000000
250000
<300-8000000> Choose clock rate from list above
Select the clock rate you want, as follows:
robot1 (config-if)# clock rate speed
Speed is set in bits per second. To set no clock rate, enter the following:
robot1 (config-if)# no clock rate
Bandwidth
To set the back-to-back FTC trunk's bandwidth, follow these guidelines:
- If the clock rate is set to no clock rate, the software needs to be notified of the FTC trunk's bandwidth. This is accomplished with the bandwidth command.
- Clock rate is measured in bits per second (bps) and bandwidth is measured in kilobits per second (kbps). Express a 64000 bps trunk's bandwidth as 64.
To set bandwidth, enter the following command:
robot1 (config-if)# bandwidth speed
speed is set in kilobits per second.
Note Use the
bandwidth command to properly manage traffic only when the clockrate is set to
no clockrate.
Example FTC trunk setup
Step 1 Specify a serial interface that has an encapsulation of ftc-trunk--for example, as follows:
Europa# config term
Europa(conf)# interface serial 0/0
Europa(conf-if)# encap ftc-trunk
Note When you specify a serial interface, identify its host Combo card's slot number and serial interface number. For example, interface serial 0/0 is the first serial interface port on the Combo card installed in the first slot.
Step 2 Specify the media type:
Europa(conf-if)# media-type (V35.....)
Step 3 Specify which FTC trunk DLCI will carry management traffic using the following command:
Europa(conf-if)# ftc-trunk management-dlci dlci-number
dlci-number is a DLCI with a value ranging from 16 to 1007.
Step 4 Specify which FTC trunk DLCI will carry voice traffic using the following syntax:
Europa(conf-if)# ftc-trunk voice-dlci dlci-number
dlci-number is a DLCI with a value ranging from 16 to 1007.
Step 5 Specify which FTC trunk DLCI will carry Frame Relay traffic using the following command:
Europa(conf-if)# ftc-trunk frame-relay-dlci dlci-number
dlci-number is a DLCI with a value ranging from 16 to 1007.
Note Values selected for management, voice, and Frame Relay traffic DLCIs may be the same.
Step 6 Specify the management protocol, as follows:
Europa(conf-if)# ftc-trunk management-protocol [ inverted |legacy | none | normal ]
This example sets up two serial ports as FTC trunks:
interface Serial0/2
no ip address
encapsulation ftc-trunk
no keepalive
media-type v35
no clockrate
ftc-trunk session-trunk connection-id 14
!
interface Serial0/3
no ip address
encapsulation ftc-trunk
no keepalive
media-type v35
no clockrate
ftc-trunk session-trunk connection-id 21
Note You must also specify trunk protocol and management DLCI. See the section "Select FTC Management DLCIs" earlier in this chapter.
Step 7 Specify any session trunks on the FTC trunk using the following command:
ftc-trunk session trunk connection id cid_number
cid can be 1-252.
Step 8 The FTC trunk is initialized in the shutdown state. At initial setup you must specify the FTC trunk to be in the no shutdown state by entering the following command:
Europa(conf-if)# no shutdown
Note The no shutdown state does not display if you enter the write mem or write term commands.
Configure Connection to a Cisco 3800 ERM
See the publication Cisco 3800 Expansion Router Module Installation and Configuration Guide for an explanation of how to connect a Cisco 3800 ERM.
See the Cisco IOS configuration guide and command reference publications for guidelines to configure SNMP. The Cisco IOS Software Command Summary is a good reference.
Configure T1/E1 ports
The Cisco 3800 system supports T1 and E1 in two ways:
- Only a single channel group is allowed and it must be channel-group 0.
- Only 15 timeslots can be assigned to this channel group if the speed is 56 or 48.
If either of these conditions is not met, the following error message is displayed:
%Insufficient resources to create channel group
See the Cisco IOS configuration guide and command reference publications to configure T1/E1 ports. The Cisco IOS Software Command Summary is a good reference.
Saving Configuration Changes
Whenever you make changes to the Cisco 3800 system's configuration, you must save the changes to memory or they will be lost when the system is reset or the power goes down:
Europa> enable
Europa# write memory
Two types of configuration files exist: the running or current operations configuration file and the startup configuration file. The running configuration file is stored in RAM; the startup configuration file is stored in NVRAM. To display the current running configuration, enter the show running-config command. Enter the copy running-config startup-config command to make your startup configuration the running configuration.
To save configuration changes to NVRAM, enter the following commands at the privileged EXEC prompt (#):
Europa# copy running-config startup-config
Verifying the Network's Connectivity
When you have installed and configured a Cisco 3800 system, use the following commands to verify network connectivity from user EXEC mode:
- telnet--Logs into a remote node.
- ping--Sends an ICMP datagram to the destination device, then waits for a reply datagram from that device.
- trace--Discovers the routes packets take when traveling from one device to another.
- LED indications--If you notice a problem with connectivity, refer to chapter "Installing Cisco 3800 Cards" in the publication Cisco 3800 Series Hardware Installation Guide.
Example Configuration
The configuration illustrated in Figure 2-4 connects two Cisco 3800 systems named Europa and Ganymede through an IGX switch named Socks using encapsulated FTC trunks. The IPTV client server sends live or prerecorded digital and audio streams simultaneously to an unlimited number of users over any IP-based LANs or WANs.
Figure 2-4: Europa and Ganymede Connected through an IGX Switch Named Socks
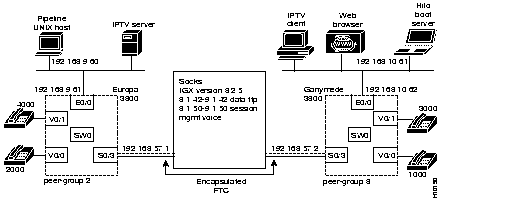
Establish connections in three places:
This configuration is set on the Cisco 3800 system named Europa in Figure 2-4:
Europa# sh config
Using 2693 out of 130458 bytes
!
version 11.2
no service pad
service udp-small-servers
service tcp-small-servers
!
hostname Europa
!
enable secret 5 $1$EwPy$mM3Hlfkh8kWU49iv3h0L0/
enable password dogbert
!
connect Switch0 dlci 300 Serial0/3 connection-id 42
!
ip host Ganymede 192.168.10.62
ip host hilo 192.168.10.61
ip host pipeline 192.168.9.60
ip multicast-routing
ip dvmrp route-limit 7000
frame-relay switching
!
controller E1 0/0
!
voice-port 0/0
 gain output -8
 no echo-cancel
 svc dial-peer voice 2000
 timing digit 70
 timing inter-digit 50
 timing pulse-inter-digit 1000
 timing clear-wait 300
 timing wink-wait 136
 timing delay-duration 136
!
voice-port 0/1
 gain output -8
 no echo-cancel
 svc dial_peer voice 4000
 timing digit 70
 timing inter-digit 50
 timing pulse-inter-digit 1000
 timing clear-wait 300
 timing wink-wait 136
 timing delay-duration 136
!
dial-peer voice 1 pots
 group 1 destination-pattern 2000
 port 0/0
 coder csacelp
!
dial-peer voice 2 pots
 group 2 destination-pattern 4000
 port 0/1
 coder csacelp
!
interface Ethernet0/0
 ip address 192.168.9.61   255.255.255.0
 ip pim dense-mode
 no keepalive
!
interface Serial0/1
 no ip address
 shutdown
!
interface Serial0/2
  no ip address
  shutdown
!
interface Serial0/3
 ip address 192.168.57.1   255.255.255.0
 encapsulation ftc-trunk
 no clock rate
 no keepalive
ftc-trunk session-trunk connection-id 50
 ftc-trunk management-dlci 991
 ftc-trunk voice-dlci 200
 ftc-trunk frame-relay-dlci 300
 ftc-trunk management-protocol normal
 ftc-trunk transmit-timeout 1
!
interface Switch0
 ip address 192.168.12.1 255.255.255.0
 ip pim nbma-mode
 ip pim dense-mode
 ip igmp join-group 239.255.0.1
 no ip mroute-cache
 ip rsvp bandwidth 512 512
 ip rsvp udp-multicasts 224.0.0.33
 encapsulation frame-relay
 no ip route-cache
 custom-queue-list 1
 frame-relay map ip 192.168.12.2 300 broadcast
 frame-relay map ip 192.168.12.3 900 broadcast
 frame-relay ip tcp header-compression passive
!
router rip
 network 192.168.9.0
 network 192.168.10.0
 network 192.168.12.0
network 192.168.57.0
!
no ip classless
!
map-class frame-relay zzz
 frame-relay cir 2000000
queue-list 1 protocol ip 1 udp 1067
queue-list 1 protocol ip 1 udp 1068
!
line con 0
line vty 0 4
 password cisco
 login
!
end
Europa#
This configuration is set on the Cisco 3800 system named Ganymede in Figure 2-4:
Configuration register is 0x1
Ganymede# sh config
Using 2572 out of 130458 bytes
!
version 11.2
no service pad
service udp-small-servers
service tcp-small-servers
!
hostname Ganymede
!
enable secret 5 $1$9.5Q$5L71vDWzgWxMHIyzmmbK11
enable password ratbert
!
connect Switch0 dlci 300 Serial0/3 connection-id 42
!
ip host Europa 192.168.9.61
ip host hilo 192.168.10.61
ip host pipeline 192.168.9.60
ip multicast-routing
ip dvmrp route-limit 7000
frame-relay switching
!
controller E1 0/0
!
voice-port 0/0
 gain output -8
 no echo-cancel
 svc dial-peer voice 1000
 timing digit 70
 timing inter-digit 50
 timing pulse-inter-digit 1000
 timing clear-wait 300
 timing wink-wait 136
 timing delay-duration 136
!
voice-port 0/1
 gain output -8
 no echo-cancel
 svc dial-peer voice 3000
 timing digit 70
 timing inter-digit 50
 timing pulse-inter-digit 1000
 timing clear-wait 300
 timing wink-wait 136
 timing delay-duration 136
!
dial-peer voice 1 pots
 group 1 destination-pattern 1000
 port 0/0
 coder csacelp
!
dial-peer voice 2 pots
 group 2 destination-pattern 3000
 port 0/1
 coder csacelp
!
interface Ethernet0/0
 ip address 204.179.10.108 255.255.255.0
 ip pim dense-mode
!
interface Serial0/1
 no ip address
shutdown
!
interface Serial0/2
 no ip address
 shutdown
!
interface Serial0/3
 ip address 192.168.57.2 255.255.255.0
 encapsulation ftc-trunk
 no clock rate
 no keepalive
 ftc-trunk session-trunk connection-id 50
 ftc-trunk management-dlci 991
 ftc-trunk voice-dlci 200
 ftc-trunk frame-relay-dlci 300
 ftc-trunk management-protocol normal
 ftc-trunk transmit-timeout 1
!
interface Switch0
 ip address 192.168.12.2 255.255.255.0
 ip pim nbma-mode
 ip pim dense-mode
 ip igmp join-group 239.255.0.1
 no ip mroute-cache
 ip rsvp bandwidth 512 512
 ip rsvp udp-multicasts 224.0.0.33
 encapsulation frame-relay
 no ip route-cache
 no fair-queue
 frame-relay map ip 192.168.12.1 300 broadcast
 frame-relay map ip 192.168.12.3 900 broadcast
 frame-relay ip tcp header-compression passive
!
router rip
 network 192.168.9.0
 network 192.168.12.0
network 192.168.10.0
network 192.168.57.0
!
no ip classless
queue-list 1 protocol ip 1 udp 1067
queue-list 1 protocol ip 1 udp 1068
!
line con 0
line vty 0 4
 password cisco
 login
!
end
Ganymede#
Note Now you can check your configuration by entering the show dial-peer and show interface commands.
Ganymede# sh dial-peer voice
C3800 Database Dial Plan Table:
   ATM Address 0800.3e01.02ad-8.64.2, Destination Pattern 3000
   ATM Address 0800.3e01.02ad-8.64.1, Destination Pattern 1000
   ATM Address 0800.3e01.0228-8.64.1, Destination Pattern 2000
   ATM Address 0800.3e01.0228-8.64.2, Destination Pattern 4000
Ganymede# sh int s0/3 ftc
Interface Serial 3
Management Protocol Type: Normal
Status: Protocol UP
  Management Dlci: 991
  Frame Relay Dlci: 300
  Voice Dlci: 200
Management Message Counts:
    ftc: received: 3475  sent: 6779     npc: received: 123  sent: 123
    cid: received: 6  sent: 6   gi received: 2  sent: 2
    ack: received: 8  sent: 8   loop received: 0  sent: 0
    abit: received: 3459  sent: 6763    cm received: 0  sent: 0
Errors:
    ftc: no buffer: 0  out of sequence: 3  repeated: 0
    cid: errored: 0  no buffer: 0        gi: errored: 0
    swsw: errored: 0  no buffer: 0      ack: no buffer: 0
    nack: received: 0  sent: 0  ka: no buffer: 0
    unknown management dlci: 0
Num:  Router          Other End       This end        Type
------------------------------------------------------------------------------
42    Up              Up              Up              frame-relay
       dlci = 300 (Active)  mux byte = 42  (Active)
50    Up              Up              Up              Session Trunk  (PNNI Up)
       dlci = 200 (Active)  mux byte = 50  (Active)
72    Up              Up              Up              frame-relay
       dlci = 300 (Active)  mux byte = 72  (Active)
Ganymede#
Each connection also needs to be defined from the IGX switch. Global Cisco IOS commands for defining Cisco 3800 connections to the IGX switch are listed in the section "Global Cisco IOS Software Overview" in the chapter "About the Cisco 3800 and Cisco IOS Software." The commands and their parameters are described in detail in Cisco StrataCom IGX or IPX documentation.
