The type of upgrade you select is determined by the operating system and version of StrataView Plus you are planning to upgrade. The two approaches are discussed in the following paragraphs.
Perform the procedure for a StrataView Plus Solaris upgrade, by typing the commands as shown in the following example.
- Login as user "root" by typing the following:
	su <RETURN>
	password: <superuser password> <RETURN>
- Type the following command to change to root directory:
cd / <RETURN>
- By default, StrataView Plus is installed in the
/var/tmp directory. If there is adequate space in the /usr/users/svplus/tmp directory, enter the following commands to install StrataView Plus in the /usr/users/svplus/tmp directory:
rm -rf /var/tmp
ln -s /usr/users/svplus/tmp /var/tmp
- Insert the StrataView Plus Release 8.4 tape into the drive.
- Type the following command:
pkgadd -d /dev/rmt/0 CSCOsv <RETURN>
- cd /usr/users/svplus
- Type the following command:
./INSTALL <RETURN>
If you are upgrading from SunOS (8.2, for example) to StrataView Plus 8.4 with Solaris 2.5.1, you need to upgrade the entire file system, just as if you are doing a new installation. Type the following command:
./install_config <RETURN>
Note Before you perform a cross-platform upgrade, it is necessary for you to save the database on some remote NFS file system or onto tape using the dbexport
command. For complete information on the dbexport command, refer to the Informix documentation.
As shown in the example, the installation procedure lets you select New or Upgrade as the type of installation you want.
Installation Type for StrataView Plus Release 8.4
            --------------------------------------------------
            (1) NEW         (Release 8.4 of SV+)
            (2) UPGRADE     (From previous release of SV+)
Enter number corresponding to installation type of x to exit :2
Checking existing partition....................... Successful
				Available partitions (Solaris) :
				================================
				/dev/rdsk/c0t0d0s1
				/dev/rdsk/c0t1d0s1
				/dev/rdsk/c0t1d0s6
				/dev/rdsk/c0t2d0s3
				/dev/rdsk/c0t2d0s7
				/dev/rdsk/c0t3d0s0
				/dev/rdsk/c0t3d0s1
				/dev/rdsk/c0t3d0s4
				/dev/rdsk/c0t3d0s5
				/dev/rdsk/c0t3d0s6
Checking Hard Disk count.......................... Successful
	Disk Configuration Migration to StrataView Plus Release 8.4
  		1) Single Raw Database Disk
  		2) Dual Raw Database Disk
  		x) To Exit
Enter number corresponding to disk configuration or x to exit : 1
Enter Raw Partition Name for rootdb (default :  Not configured): /dev/rdsk/c0t2d0s6
Enter new database name that start with a letter and fewer than
10 characters (default is stratacom):
Informix data will be installed in /dev/rdsk/c0t2d0s6 (409MB ) (Default is Y)
OK to continue (Y/N) :
Initializing the Informix database. This will take a few minutes...
Shutting down Informix (if necessary)............. Successful
Initializing the Informix database root file...... Successful
Initializing the Informix database mode........... Successful
Preparing the database for StrataView Plus........ Successful
Checking for existence of INS....
INS is not installed in /usr/users/svplus
Checking for existence of HP OpenView....
Found HP OpenView installed in /opt/OV
Installing HP OpenView related files. This will take a few minutes...
The BPX/IPX On-Line Help files for StrataView Plus come on a separate tape that is installed after StrataView Plus has been installed. Make sure you have the tape labelled StrataView Plus BPX/IPX Help Files.
Procedure
Proceed as follows to install the IPX On-Line Help files:
- If you are not already logged in as svplus, login as svplus.
- Enter the following command to verify that you are at the /usr/users/svplus/online help directory:
- pwd <RETURN>
- If StrataView Plus is running, enter the following in the SV+ Menu to stop StrataView Plus:
- 2 <RETURN>
- Enter the following command to change to the "onlinehelp" directory:
- cd onlinehelp <RETURN>
- Enter the following command to verify that you are at the /usr/users/svplus/onlinehelp directory:
- pwd <RETURN>
- Load the StrataView Plus Help cartridge and close the door.
- Enter:
- tar xvpf /dev/rmt/0 <RETURN>
For a Sun workstation; the "0" in /dev/rst0 is a zero.
- Enter the following command to change back to the svplus directory:
- cd .. <RETURN>
- Proceed to the next section.
The Statistics Collection Manager (SCM) files for StrataView Plus are installed automatically after StrataView Plus has been installed. If there are multiple NMS workstations used to control the network or if this is a structured network, you must install StrataView Plus and SCM on each NMS workstation. Proceed as follows to configure the network for management by SCM:
- Change directory to /etc.
- If your workstation is not running NIS, edit the /etc/hosts file of the local StrataView Plus workstation. Make a list with a single line with the nodename and IP address for each node in the network to which this SCM is to connect to. For example, to add an IPX node named alpha enter:
- If you have a workstation that is running NIS, do step 2 on the NIS server instead of the local StrataView Plus machine, and remake the NIS maps.
- Enter the following command to change back to the svplus directory:
- Proceed to the next section.
Modifying config.sv after a Cross-Platform Upgrade
If you are performing an upgrade, and your original config.sv file was configured for a LAN connection to a BPX/IPX node, you will need to use the vi command to edit the config.sv to your prior configuration or, if you saved the original file, you can proceed as follows to restore the saved file:
Note The default setting of the
config.sv file is a single line with a serial port selection of gateway and a baud rate of 9600.
- If you are not already logged in as svplus, do so now.
- Enter the following command to verify that you are at the /usr/users/svplus directory:
Note Configure the BPX/IPX node LAN parameters before connecting it to a LAN.
- Obtain IP addresses for your workstation and for the BPX/IPX node you are going to configure.
- Normally, the System Administrator will update the NIS database, as applicable (if an NIS is used), and will add the IP addresses for the workstation and node to the NIS database.
If the System Administrator takes care of the addressing for the workstation, including the /etc/services file, proceed to step 3. If not, and an NIS is not being used, do the following:
- Edit the /etc/hosts file in your workstation, and add the following lines if they do not already appear there. The addresses shown are just examples. Use the addresses obtained from your System Administrator. (This example is for a workstation named "hedgehog" at address 192.187.207.200. It also assumes that the BPX/IPX node LAN port for node sanfran has been assigned an IP address of 192.187.210.30 and a hostname of sanfran. Your own host name and addresses will be different.)
- 192.187.207.200 hedgehog
192.187.210.30 sanfran
- Edit the /etc/services file in your workstation and add the following:
- IPX_PORT 5120/tcp ipx_port
Note If an NIS is being used (for example, a corporate network), you will need to contact the System Administrator.
Note 5120 is used for the LAN ports on all BPX/IPX ports.
- Reboot the workstation so that the changes to the /etc/services file to take effect.
- Modify the config.sv file for the network configuration by changing the third field to the node's LAN port hostname, for example, sanfran as follows:
- 0|Network1|sanfran|19200|0|7|3|0|30|256|8.4|nwip_on|
Leave the other fields as is. For example, the baud rate of 19200 does not apply to a LAN connection.
- Next, configure the LAN port on the BPX/IPX node using a dumb terminal or an RS-232 connection via the workstation (using the vt command, as applicable) to enter the appropriate cnflan parameters.
The cnflan command configures the node's communication parameters so that the node can communicate with a StrataView Plus terminal over an Ethernet LAN using the TCP/IP protocol. The parameters contain address information about the Ethernet TCP/IP network that is used to connect the StrataView Plus station to an IPX or BPX node. The values used must conform to those of the network and should be supplied by the Ethernet network administrator.
The cnflan command has the following parameters:
- IPAddr is the Internet Protocol address of the node used in the TCP/IP protocol.
- IPSubnetMask is a 32-bit mask. The default for a Class C LAN network is 255.255.255.0.
- TCPServicePort is the BPX/IPX LAN port number entered in the /etc/service file on the workstation. It is 5120 for all BPX/IPX nodes.
- GatewayIPAddr is the Internet gateway address. This is the gateway that traffic is routed through if the BPX/IPX node and workstation are on different networks. If they are on the same network, the gateway is not used. The default "none" is displayed in this case. If a gateway IP is entered and later you want to remove it, enter 192.0.0.0 opposite the prompt and "none" will again be displayed.
- A cnflan screen is shown in Figure 3-1. The active IP address for the workstation has been entered as the IP address selected previously for the node, 192.187.207.21. The IP Subnet mask is entered as 255.255.255.0 for a Class C LAN network. The TCP service port is entered as 5120. Since the workstation and node are on different networks in this example, a gateway address of 192.187.207.1, which must be obtained from your System Administrator, has been entered. If the workstation and node are both on the same network, no gateway address is needed. The "Maximum LAN Transmit Unit" and "Ethernet Address" parameters are not configurable by the cnflan command. The "Ethernet Address" is different for every BPX/IPX control port.
- Verify that the IPX node contains an SCC-B backcard and an NPC card (required for LAN connection to IPX). Also, if the node is an IPX 8 or 16 single shelf unit, verify that the utility bus has been upgraded to a UBS-2, model 550058. Refer to the IPX Reference Manual for further information on upgrading these components.
Figure 3-1: Configuring the Parameters on a Node's Control Port
D2.cb1         LAN   StrataCom       IPX 32    8.4. Feb. 27 1997 14:23 PST
Active IP Address:                     192.187.207.21
IP Subnet Mask:                        255.255.255.0
TCP Service Port:                      5120
Default Gateway IP Address:            192.187.207.1
Maximum LAN Transmit Unit:             1500
Ethernet Address:                      00.55.43.00.04.55
Control Socket - Ready
Base Socket Descriptor - 1
Socket Closed
Last Command: cnflan
Next Command:
- Set all eight switches on the switch module on the NPC to "ON". (switches toggled toward the edge of the card). The "OFF" setting is for a serial connection.
- Connect the StrataView Plus workstation and the BPX/IPX node to a LAN network. Examples are shown in Figure 3-2 and Figure 3-3. The LAN port on the BPX/IPX node provides a DB-15 connector for an AUI.
- To test that a LAN connection to the IPX/BPX port is okay, for example, for a hostname of "sanfran" entered in the config.sv file, you could enter the following:
- ping sanfran
- Once the workstation and BPX/IPX node interface has been set up, StrataView Plus can be started. Figure 3-4 shows the dsplan screen after StrataView Plus has been started and the communication sockets are active.
Note "Sockets" is the BSD Unix name for connections between processes, typically used in network communication.
Figure 3-2: StrataView Plus LAN Connection via Router to a BPX Node
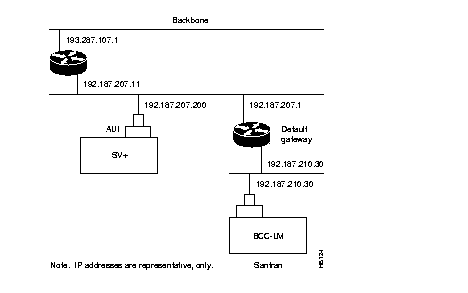
Figure 3-3: StrataView Plus LAN Connection to an IPX Node (no gateway)
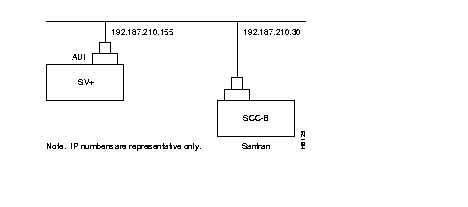
Figure 3-4: dsplan after StrataView Plus Startup
D2.cb1         LAN   StrataCom       IPX 32    8.4. Feb. 27 1997 14:27 PST
Active IP Address:                     192.187.207.21
IP Subnet Mask:                        255.255.255.0
TCP Service Port:                      5120
Default Gateway IP Address:            192.187.207.1
Maximum LAN Transmit Unit:             1500
Ethernet Address:                      00.55.43.00.04.55
Control Socket - Ready
Base Socket Descriptor - 1
Open Socket Descriptor - 2
Last Command: dsplan
Next Command:
When StrataView Plus is started, it obtains the current network topology information and enables default trunk and circuit line statistics that you had set up for your previous version of StrataView Plus software.
Prerequisites
Before starting up StrataView Plus, you need to plan the statistics types that you want to enable automatically and enable these using the SCM program. Refer to Chapter 5 of the StrataView Plus Operations Guide for information on enabling statistics using SCM.
Procedure
Start up StrataView Plus as follows:
- Enter the following command to display the SV+ main menu:
- Select option 1 (Start Core) to start StrataView Plus.
Note Two messages that may appear during the initial part of the startup process are: "IPC: connect failed: Connection refused" and "svmain: L4 send to Application Layer failed." These indicate a temporary condition and may be ignored. If these messages continue, call Customer Advocacy.
