|
|

IPX nodes are available in both AC-powered and DC-powered versions with or without redundant power supplies.
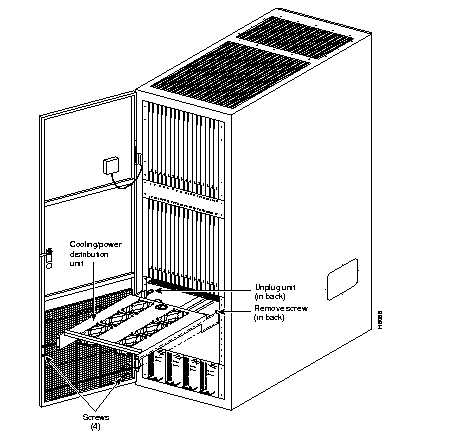
In the IPX 8 node, the Power Distribution Unit is located at the rear of the IPX 8 cabinet immediately behind the two power supply slots. In the IPX 16 and IPX 32, it is located at the bottom of the cabinet and is accessible by opening the rear door of the cabinet.
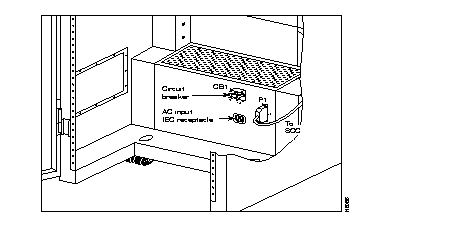
Figure 4-4 shows the location and connections to the AC PDU. Before removing the PDU from the cabinet, remove the AC power cord and the connector on P1. Screws are accessible on each side of the PDU for removal and replacement. Circuit Breaker CB1 is used for turning primary power on and off to the IPX.
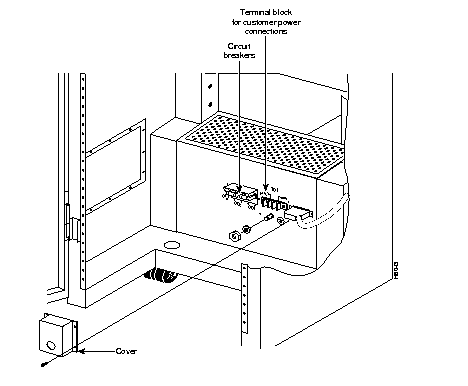
The DC Power Distribution Unit (Figure 4-5) is used on IPXs powered from 48 VDC either from telephone central office batteries or wherever a battery backup is provided to power the IPX during loss of AC. The TB1 terminal block on the DC Power Distribution Unit terminates the input power and ground wiring. Circuit breakers CB1 and CB2 are used for turning primary power on and off to the IPX.
Connector P1 is used to carry power sense leads to the SCC where the voltages are monitored and is not a customer connection. Fans to assist in cooling the power supplies are located behind the Power Distribution Unit.
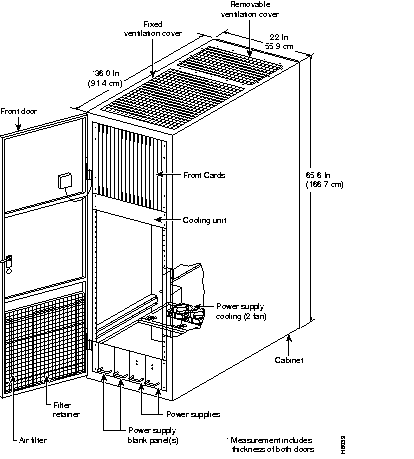
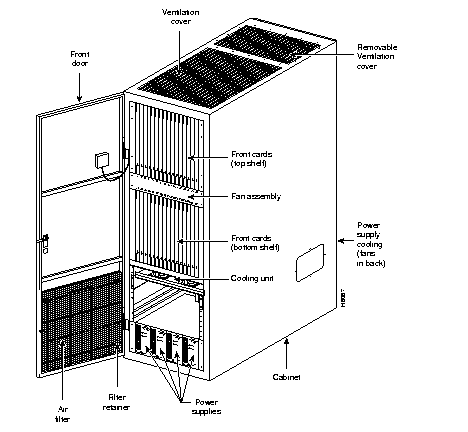
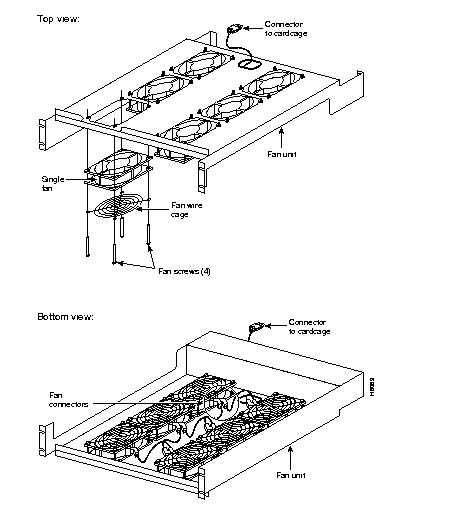
The location of power supplies and cooling fans for the IPX 16 and IPX 32 are shown in Figure 4-6 and Figure 4-7, respectively.
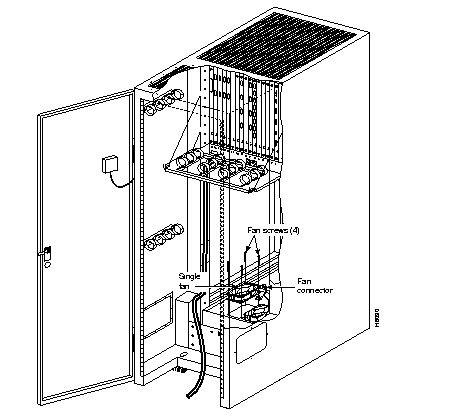
To remove a fan from the lower cooling unit, Figure 4-8 and Figure 4-9, perform the following steps:
Step 1 Reach under the fans to the back of the assembly and unplug the single connector.
Step 2 Remove the two screws and lock washers at the front of the lower cooling unit, and slide the fan assembly out of the cabinet.
Step 3 Unplug the fan that needs replacement.
Step 4 Remove the four corner screws, and remove the fan from the unit.
To install a fan in a cooling unit, perform the following steps:
Step 1 Plug the new fan into the same connector that was used by the replaced fan.
Step 2 Install the new fan in place and secure it with four corner screws.
Step 3 Slide the fan assembly into place in the cooling/expansion unit and secure it with two screws and lock washers.
Step 4 Reach under the fan assembly and plug the connector into the fan power receptacle.
Step 5 Make sure that all fans rotate correctly with the IPX powered up.
In addition to the cooling provided by the lower cooling unit, the IPX 32 contains a four fan booster assembly that is located directly below the upper card cage.
To remove a fan from the four-fan assembly (Figure 4-10), do the following:
Step 1 From the back of the cabinet, unplug the power cord from the ac power source receptacle on the cooling unit.
Step 2 At the front of the cabinet, remove the four screws from the front panel of the four-fan booster assembly.
Step 3 Remove the fan assembly, including its power cable.
 | Warning Be extremely careful when removing the fan assembly. If the IPX is not powered down, areas adjacent to the fan assembly have 5 volts DC present. While these are low voltages, they are high current sources, which could cause bodily injury if shorted to ground. |
Step 4 Unplug the fan to be replaced. (The fan is unplugged in the same way as shown for the cooling unit fans.)
Step 5 Remove the four corner screws and remove the fan from the four-fan assembly. (The fan is removed in the same way as the cooling unit fans.)
To install a fan in a four-fan booster assembly, perform the following steps:
Step 1 Plug the new fan into the same connector that was used by the replaced fan. (The fan is connected in the same way as shown for the cooling unit fans.
Step 2 Install the new fan in place and secure it with four corner screws. The fan is installed in the same way as for the cooling unit fans.
Step 3 At the front of the cabinet, slide the four-fan assembly into place and secure it with four screws and lock washers.
Step 4 Connect the four-fan assembly power cord to the power source receptacle on the cooling unit.
Step 5 Make sure that all fans rotate correctly with the IPX powered up.
In addition to the cooling provided by the lower cooling unit, and the upper card cage, there is a two-fan assembly located directly above the power supplies.
To remove a fan from the PDU assembly (Figure 4-11), perform the following step:
Step 1 From the back of the cabinet, unplug the power cord from the ac power source receptacle on the cooling unit.
Step 2 At the front of the cabinet, remove the four screws from the front panel of the PDU assembly, and remove the front plate.
| Warning Be extremely careful when removing the fan assembly. If the IPX is not powered down, areas adjacent to the fan assembly have 5 volts DC present. While these are low voltages, they are high current sources, which could cause bodily injury if shorted to ground. |
Step 3 Unplug the fan to be replaced.
Step 4 Remove the four corner screws and remove the fan from the four-fan assembly. (The fan is removed in the same way as for the lower cooling unit fans.
To install a fan in the PDU (Figure 4-11), perform the following steps:
Step 1 Plug the new fan into the same connector that was used by the replaced fan. The fan is connected in the same way as shown for the cooling unit fans.
Step 2 Secure the new fan in place with the four corner screws. The fan is installed in the same way as for the cooling/power distribution unit fans.
Step 3 At the front of the cabinet, place the front plate into position and secure it with four screws and lock washers.
Step 4 Connect the PDU power cord to the ac power source receptacle on the cooling distribution unit.
Step 5 Check to insure new fan is rotating correctly when the IPX is powered up.
|
|